在网上看到这篇文章感觉非常好,所以就转载过来,存起来
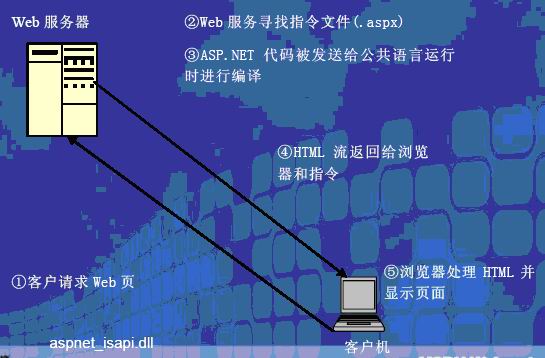
1.1.1 Asp.net 的工作原理
Aspx页面的的一般处理过程如下图所示:
1.1.2 Asp.net 的页面处理过程:
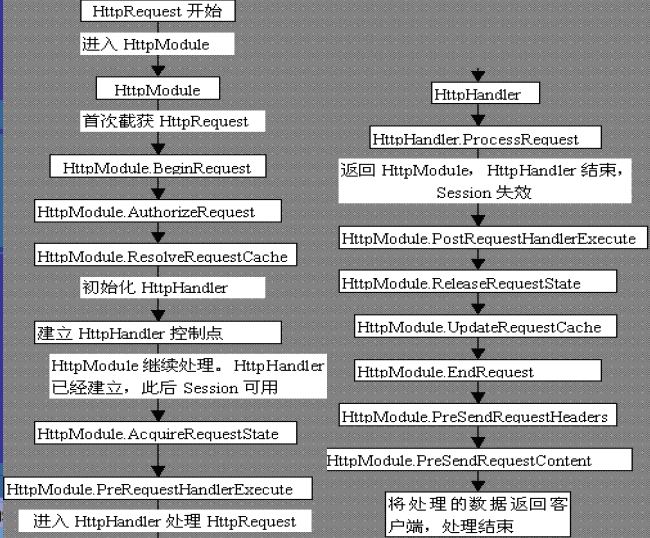
下面通过一个更加详细的图形来描述aspnet_isapi.dll处理页面的一个流程:

请求的处理过程是基于管道模型的。
我们通过下图来理解什么管道模型:
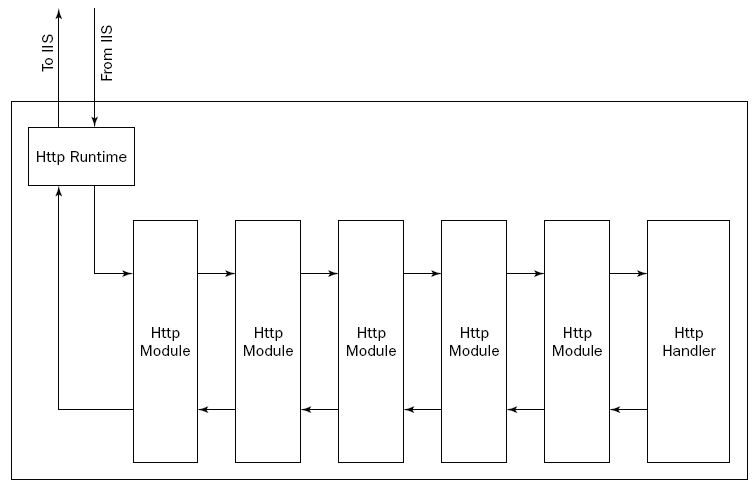
其实就是可以有多个HttpModule,但是只能有一个HttpHandler。
1.1.3 Isapi筛选器
Iis默认不会处理动态页面,只能处理html页面,于是就需要对iis进行扩展,这些扩展要注册到iis中,和特定的后缀名绑定,这样以后每当iis遇到了某个后缀名,就把他发送给响应的扩展来处理,这些筛选器处理完之后,把结果返回给iis,iis就把这个结果返回给客户。比如对于asp,就要用asp_isapi.dll来处理,对于asp.net就要使用aspnet_isapi.dll来处理。扩展的方法有两种:ISAPI Filter和 ISAPI Extension两种。其中HttpModule就是筛选器;HttpHandler就是Http Extension。
1.1.4 HttpModule
Httpmodule实现了过滤器也就是筛选器的功能;HttpModule 实现了System.Web.IHttpModule的接口。
(1) 实现步骤
l 编写一个类,实现IHttpModule接口;
l 实现init方法,注册需要的方法;
l 实现注册的方法;
l 实现dispose方法,这是在为类实现一些清除工作的时候才实现的,通常情况下可以什么都不作,为空;
l 在web.config是注册该HttpModule类。
(2)可以被处理的事件
其实所谓添加HttpModule,就是给HttpApplication的一些列时间添加事件处理函数,在HttpModule类中给需要添加处理函数的事件添加处理函数即可。
HttpApplication主要有以下一些事件:
l BeginRequest
l AuthenticateRequest
l AuthorizeRequest
l ResolveRequestCache
l AcquireRequestState
l PreRequestHandlerExecute
l PostRequestHandlerExecute
l ReleaseRequestState
l UpdateRequestCache
l EndRequest
所有的这些事件都能够被重新定义,但是不是override;你要明白,也就是增加了一层Module,原来的HttpModule仍然存在。这就是HttpModule的基本工作原理。
(3)一个例子
下面给出一个如何自定义HttpModule的例子。
该HttpModule名为:MyHttpModule其中有一个AcquireRequestState事件的处理函数,整个类的定义如下:
using System;
using System.Data;
using System.Configuration;
using System.Web;
using System.Web.Security;
using System.Web.UI;
using System.Web.UI.WebControls;
using System.Web.UI.WebControls.WebParts;
using System.Web.UI.HtmlControls;
/// <summary>
/// Summary description for MyHttpModule
/// </summary>
public class MyHttpModule: System.Web.IHttpModule
{
public MyHttpModule()
{
//
// TODO: Add constructor logic here
//
}
public void Init(HttpApplication httpA)
{
// 向Application 对象注册事件处理程序
httpA.AuthenticateRequest += new EventHandler(this.AuthenticateRequest);
}
public void Dispose()
{
}
private void AuthenticateRequest(object r_objSender,EventArgs r_objEventArgs)
{
HttpApplication httpA = (HttpApplication)r_objSender;
httpA.Context.Response.Write("in MyHttpModule AuthenticateRequest Event Handler");
}
}
把该类放在solution下的叫做App_Code文件夹下,然后在web.config中添加如下代码:
<system.web>
<httpModules>
<add name="Test1" type="MyHttpModule,App_Code"/>
</httpModules>
…
</system.web>
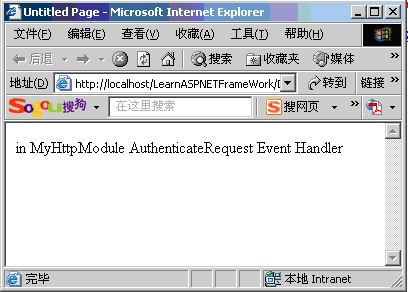
然后给solution添加一个空白页面,运行该页面,得到的结果如下:
(4)这些事件的执行顺序如何?
如果想要弄清HttpApplication的所有这些事件的执行顺序如何,那么通过下面的这个例子就明白了。
我们对上面的例子作一个简单的修改,代码如下:
using System;
using System.Data;
using System.Configuration;
using System.Web;
using System.Web.Security;
using System.Web.UI;
using System.Web.UI.WebControls;
using System.Web.UI.WebControls.WebParts;
using System.Web.UI.HtmlControls;
/// <summary>
/// Summary description for MyHttpModuleMultiEvent
/// </summary>
public class MyHttpModuleMultiEvent : System.Web.IHttpModule
{
public MyHttpModuleMultiEvent()
{
//
// TODO: Add constructor logic here
//
}
public void Init(HttpApplication httpA)
{
// 向Application 对象注册事件处理程序
httpA.BeginRequest += new EventHandler(this.BeginRequest);
httpA.AuthenticateRequest += new EventHandler(this.AuthenticateRequest);
httpA.AuthorizeRequest += new EventHandler(this.AuthorizeRequest);
httpA.ResolveRequestCache += new EventHandler(this.ResolveRequestCache);
httpA.AcquireRequestState += new EventHandler(this.AcquireRequestState);
httpA.PreRequestHandlerExecute += new EventHandler(this.PreRequestHandlerExecute);
httpA.PostRequestHandlerExecute += new EventHandler(this.PostRequestHandlerExecute);
httpA.ReleaseRequestState += new EventHandler(this.ReleaseRequestState);
httpA.UpdateRequestCache += new EventHandler(this.UpdateRequestCache);
httpA.EndRequest += new EventHandler(this.EndRequest);
}
public void Dispose()
{
}
private void AuthenticateRequest(object r_objSender, EventArgs r_objEventArgs)
{
HttpApplication httpA = (HttpApplication)r_objSender;
httpA.Context.Response.Write("in MyHttpModule AuthenticateRequest Event Handler <br/>");
}
private void BeginRequest(object r_objSender, EventArgs r_objEventArgs)
{
HttpApplication httpA = (HttpApplication)r_objSender;
httpA.Context.Response.Write("in MyHttpModule BeginRequest Event Handler <br/>");
}
private void AuthorizeRequest(object r_objSender, EventArgs r_objEventArgs)
{
HttpApplication httpA = (HttpApplication)r_objSender;
httpA.Context.Response.Write("in MyHttpModule AuthorizeRequest Event Handler <br/>");
}
private void ResolveRequestCache(object r_objSender, EventArgs r_objEventArgs)
{
HttpApplication httpA = (HttpApplication)r_objSender;
httpA.Context.Response.Write("in MyHttpModule ResolveRequestCache Event Handler <br/>");
}
private void AcquireRequestState(object r_objSender, EventArgs r_objEventArgs)
{
HttpApplication httpA = (HttpApplication)r_objSender;
httpA.Context.Response.Write("in MyHttpModule AcquireRequestState Event Handler <br/>");
}
private void PreRequestHandlerExecute(object r_objSender, EventArgs r_objEventArgs)
{
HttpApplication httpA = (HttpApplication)r_objSender;
httpA.Context.Response.Write("in MyHttpModule PreRequestHandlerExecute Event Handler <br/>");
}
private void PostRequestHandlerExecute(object r_objSender, EventArgs r_objEventArgs)
{
HttpApplication httpA = (HttpApplication)r_objSender;
httpA.Context.Response.Write("in MyHttpModule PostRequestHandlerExecute Event Handler <br/>");
}
private void ReleaseRequestState(object r_objSender, EventArgs r_objEventArgs)
{
HttpApplication httpA = (HttpApplication)r_objSender;
httpA.Context.Response.Write("in MyHttpModule ReleaseRequestState Event Handler <br/>");
}
private void UpdateRequestCache(object r_objSender, EventArgs r_objEventArgs)
{
HttpApplication httpA = (HttpApplication)r_objSender;
httpA.Context.Response.Write("in MyHttpModule UpdateRequestCache Event Handler <br/>");
}
private void EndRequest(object r_objSender, EventArgs r_objEventArgs)
{
HttpApplication httpA = (HttpApplication)r_objSender;
httpA.Context.Response.Write("in MyHttpModule EndRequest Event Handler <br/>");
}
}
当然了,此时也要在web.config中作相应的修改;
然后运行的结果如下:
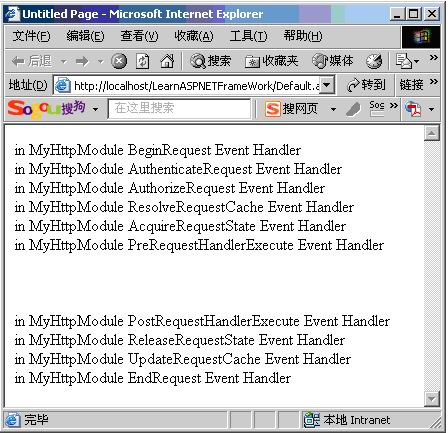
如此一来,这些事件的执行顺序就一目了然了。
(5)配置文件中配置HttpModule的另外一种方法;
另外一种配置方法就是,以上面的这个例子为例。
首先建立一个普通的工程,假设工程名为:MyHttpModuleMultiEventProject,然后把MyHttpModuleMultiEvent.cs添加进去;编译该工程,得到MyHttpModuleMultiEventProject.dll,然后在要使用该httpModule的工程当中添加该dll的引用;然后在该工程的web.config中配置如下代码:
<httpModules>
<add name ="MultiEvent" type="MyHttpModuleMultiEvent,MyHttpModuleEventProject"/>
…
</httpModules>
一切就ok了。
有一点要注意的是,在这样配置方式下,如果想要对那些自己写的HttpModule能够进行单步调试,就要在web.config中添加如下代码:
<system.web>
<authorization>
<deny users="?"/>
</authorization>
…
</system.web>
不然将无法进行调试,至于为什么,俺不明白的啦。
如果想要很好的理解一个http的执行过程,可以参考下面的这个图:
1.1.5 HttpHandler
关键的一个方法是:ProcessRequest()。一般来说,只要实现这个方法就可以了。
如果要在HttpHandler中使用Session,就必须实现IRequireSessionState。该接口指定目标HTTP处理程序接口具有对会话状态值的读写访问权限。这是一个标记接口,没有任何方法。
本节将会在后面做一些补充
2 Master Pages[2006-10-26 ]
2.1 概述
Master page 是vs2005新出来的一种页面设计技术,它对于保持一个网站的统一风格是十分有帮助的,在以往的asp的程序中,要想让网站保持统一的风格就只能采用ctrl+c ,ctrl +v,即使是在vs2003的时代,也仍然是采用这样的方式。此方式最大的坏处就在于一旦风格要有所改变,那么要改动多个地方。也就是有重复代码的bad smell。
Master pages的好处就在于,模板只有一个,可以被任意多次的重复使用,而且以后如果模板需要改动,就只要修改一个地方就可以了。
Vs2005之所以这么做,是因为在vs2002,vs2003的使用过程中,用户反映到了他的许多不合理的地方,microsoft及时的对其进行了调整。
其实master page的出现是因为在vs 2005中加入了partail class技术。这种技术使得在设计期间可以把一个class分割成多个单元,在运行的时候把这多个单元进行合并。
采用master pages 的一个好处就是,你在设计子页的content的时候,通过vs2005的ide可以清除的看到主页的内容,而事实上呢,子页的源文件并不包含master page的内容。
2.2 编辑Master pages
编辑一个master pages其实很简单,和以前编辑任何的aspx的页面是没有区别的,所以在aspx页面中可以使用的控件在这里一样可以使用。
有点稍微不同,也是显而易见的就是:在master page中,你要使用一个叫做:ContentPlaceHolder的控件来标定content的区域,以便在content pages中对该区域进行编辑。
2.3 编辑Content pages
通过查看content page的源码,你会发现他的代码十分的简单,下面就是一个例子:
<%@ Page Language="C#" MasterPageFile="~/MyFirstMasterPage.master" AutoEventWireup="true" CodeFile="MyFirstContentPage.aspx.cs" Inherits="MyFirstContentPage" Title="Untitled Page" %>
<asp:Content ID="Content1" ContentPlaceHolderID="ContentPlaceHolder1" Runat="Server">
</asp:Content>
在content page中,你只要负责编辑好content 中的内容就可以了,其他的什么都不要你操心。
而在content 中编辑东西就和你以前在aspx中编辑东西是一样的,基本感觉不出有什么不同。
2.4 代码存放方式的混合和编程语言的混合
意思就是,在master page中,你可能使用的是嵌入代码的方式,但是这不意味你在content page当中也一定要使用嵌入代码的方式,你完全可以在content page中使用界面与代码分开的方式。
同样的,你可以在master page中使用vb,然后在content page中使用c#;
一切皆有可能。
2.5 指定使用哪个master page 的方式
可以有三种方式:
(1) 在创建content page的时候直接指定;
(2) 在web.config中指定;
下面给出例子:
对于(2)
<configuration>
<system.web>
<pages masterPageFile=”~/Wrox.master” />
</system.web>
</configuration>
这里需要指出的是,采用这种方式制定的master page是整个application中共同使用的,也就是整个程序的界面风格统一,但是这并不意味着不可更改,其实你完全可以在某页中修改master page。
<%@ Page Language=”VB” MasterPageFile=”~/MyOtherCompany.master” %>
此外,你还可以专门为某个目录下的content page指定master page,代码如下:
<configuration>
<location path=”AdministrationArea”>
<system.web>
<pages masterPageFile=”~/WroxAdmin.master” />
</system.web>
</location>
</configuration>
(3) 在程序中通过代码来指定;
这个其实也很简单,代码如下:
protected void Page_PreInit(object sender, EventArgs e)
{
MasterPageFile = "MySecondMasterPage.master";
}
注意,该属性的修改代码不能放在Page_Load()中,只能放在Page_PreInit()或者在这个事件之前。不要问我为什么,编译器这么说的。
2.6 Master page 的嵌套
到目前为止,我们给出的例子中,每个content page都只用到一个master page。而在实际的应用中,很多组织本身就是多层的,这当然就希望master也能够有多层,如此一来组织的每一层都可以打造自身的master page。充分显示其灵活性。
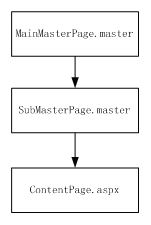
要编辑嵌套的master page有点点麻烦,主要是vs2005不能够通过view design的方式来编辑。下面说说一个二级master page的编辑过程。该例子共有三个页面,这三个页面之间的关系如下图所示:mainMasterPage.master是submasterPage.master的master page, SubMasterPage.master又是ContentPage.aspx的master page。
大概步骤是这样的:
首先建立MainMasterPage.aspx,这步和一般建立masterpage 的过程没有什么区别,这里就不多说了。
代码如下:
<%@ Master Language="C#" AutoEventWireup="true" CodeFile="MainMasterPage.master.cs" Inherits="MainMasterPage" %>
<!DOCTYPE html PUBLIC "-//W
<html xmlns="http://www.w3.org/1999/xhtml" >
<head runat="server">
<title>Untitled Page</title>
</head>
<body>
<form id="form1" runat="server">
<div>
<asp:Label ID="Label1" runat="server" Text="main1"></asp:Label><br />
<asp:contentplaceholder id="ContentPlaceHolder1" runat="server">
</asp:contentplaceholder> <br />
</div>
</form>
</body>
</html>
第二步是建立SubMasterPage.master,这一步最复杂。
(1) 像建立MainMasterpage.master一样建立一个master page,命名为SubMasterPage.master,建立好之后代码如下:
<%@ Master Language="C#" AutoEventWireup="true" CodeFile="SubMasterPage.master.cs" Inherits="SubMasterPage" %>
<!DOCTYPE html PUBLIC "-//W
<html xmlns="http://www.w3.org/1999/xhtml" >
<head runat="server">
<title>Untitled Page</title>
</head>
<body>
<form id="form1" runat="server">
<div>
<asp:contentplaceholder id="ContentPlaceHolder1" runat="server">
</asp:contentplaceholder>
</div>
</form>
</body>
</html>
(2) 因为建立master page的时候不能选择继承自哪个master page,所以SubMasterPage.master的master page要通过手动来添加:
<%@ Master Language="C#" MasterPageFile="~/MainMasterPage.master" AutoEventWireup="true" CodeFile="subMasterPage.master.cs" Inherits="subMasterPage" %>
(3) 然后是修改SubMasterPage.master的内容,因为它是继承自MainMasterPage.master,所以他的内容应该在mainMasterpage的content里头。所以其内容要修改为:
<asp:Content ID="Content1" ContentPlaceHolderID="ContentPlaceHolder1" Runat="Server">
<asp:Label ID="Label2" runat="server" Text="main2"></asp:Label><br />
<asp:contentplaceholder id="ContentPlaceHolder2" runat="server">
</asp:contentplaceholder>
</asp:Content>
第三步是添加Contentpage.aspx,这个步骤和一般的步骤没有区别,
但是这里有一点要注意的是,他只能使用SubMasterPage的ContentPlaceHolder,而不能使用MainMasterPage的placeholder,代码如下:
<asp:Content ID="Content1" ContentPlaceHolderID="ContentPlaceHolder2" Runat="Server">
<asp:Label ID="Label3" runat="server" Text="content"></asp:Label><br />
</asp:Content>
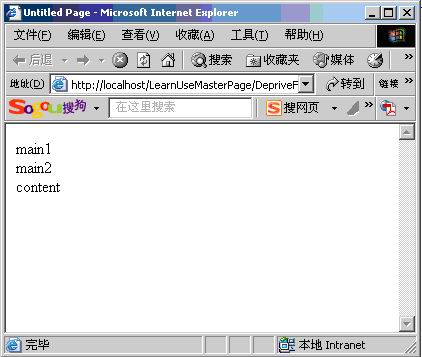
整个程序运行后的结果为:
【转载】 Android App 内存泄露之Thread
【转载】ViewHolder的简洁写法
Android知识整理(5) apk反编译与代码混淆
CAS单点登录客户端配置
一位知乎网友的人生感悟
Android知识整理(4) 关于Android应用的退出
Android知识整理(3) 两种自定义样式的Checkbox
Android知识整理(2)【转】android中三种onClick事件的实现方式与对比
Android知识整理(1) Pull解析器解析XML