版权声明:希望与广大Python爱好者,可以相互交流,欢迎留言!欢迎转载(请注明出处) https://blog.csdn.net/EB_NUM/article/details/78394958
我们首先理解滑动验证的原理
滑动验证难点
1.电脑如何自动点击滑动块
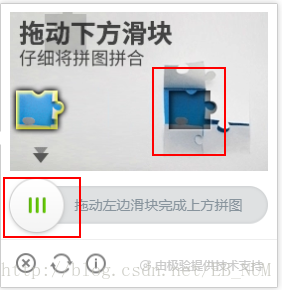
2.电脑如何检测 缺口位置(如图;)
解决这两个问题方法
- 如何自动点击滑动块,也就是图中的左下方圈起来的位置,我们可以使用selenium
- 怎么计算缺口的位置,我们可以通过PIL库的image
既然有了解决方法,我们看一下源码,源码中,我已经添加了注释
# -*- coding:utf-8 -*-
from selenium import webdriver
from selenium.webdriver.support.ui import WebDriverWait
from selenium.webdriver.common.action_chains import ActionChains
import PIL.Image as image
from PIL import Image,ImageEnhance
import time,re, random
import requests
try:
from StringIO import StringIO
except ImportError:
from io import StringIO
#爬虫模拟的浏览器头部信息
agent = "Mozilla/5.0 (Windows NT 5.1; rv:33.0) Gecko/20100101 Firefox/33.0"
headers = {
"User-Agent": agent
}
# 根据位置对图片进行合并还原
# filename:图片
# location_list:图片位置
#内部两个图片处理函数的介绍
#crop函数带的参数为(起始点的横坐标,起始点的纵坐标,宽度,高度)
#paste函数的参数为(需要修改的图片,粘贴的起始点的横坐标,粘贴的起始点的纵坐标)
def get_merge_image(filename,location_list):
#打开图片文件
im = image.open(filename)
#创建新的图片,大小为260*116
new_im = image.new("RGB", (260,116))
im_list_upper=[]
im_list_down=[]
# 拷贝图片
for location in location_list:
#上面的图片
if location["y"]==-58:
im_list_upper.append(im.crop((abs(location["x"]),58,abs(location["x"])+10,166)))
#下面的图片
if location["y"]==0:
im_list_down.append(im.crop((abs(location["x"]),0,abs(location["x"])+10,58)))
new_im = image.new("RGB", (260,116))
x_offset = 0
#黏贴图片
for im in im_list_upper:
new_im.paste(im, (x_offset,0))
x_offset += im.size[0]
x_offset = 0
for im in im_list_down:
new_im.paste(im, (x_offset,58))
x_offset += im.size[0]
return new_im
#对比RGB值
def is_similar(image1,image2,x,y):
pass
#获取指定位置的RGB值
pixel1=image1.getpixel((x,y))
pixel2=image2.getpixel((x,y))
for i in range(0,3):
# 如果相差超过50则就认为找到了缺口的位置
if abs(pixel1[i]-pixel2[i])>=50:
return False
return True
#计算缺口的位置
def get_diff_location(image1,image2):
i=0
# 两张原始图的大小都是相同的260*116
# 那就通过两个for循环依次对比每个像素点的RGB值
# 如果相差超过50则就认为找到了缺口的位置
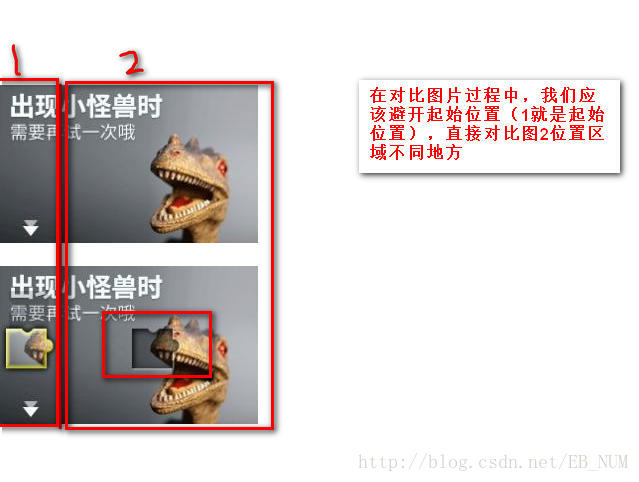
for i in range(62,260):#有人可能看不懂这个位置为什么要从62开始看最后一张图(图:3)
for j in range(0,116):
if is_similar(image1,image2,i,j)==False:
return i
#根据缺口的位置模拟x轴移动的轨迹
def get_track(length):
pass
list=[]
#间隔通过随机范围函数来获得,每次移动一步或者两步
x=random.randint(1,3)
#生成轨迹并保存到list内
while length-x>=5:
list.append(x)
length=length-x
x=random.randint(1,3)
#最后五步都是一步步移动
for i in range(length):
list.append(1)
return list
#滑动验证码破解程序
def main():
#打开火狐浏览器
driver = webdriver.Firefox()
#用火狐浏览器打开网页
driver.get("https://account.geetest.com/register")
time.sleep(2)
driver.find_element_by_xpath('//*[@id="captcha"]/div/div[3]/span[2]').click()
time.sleep(5)
driver.get_screenshot_as_file("D:/test2/滑动验证/img.jpg")#对整个页面截图
imgelement = driver.find_element_by_xpath('/html/body/div[2]/div[2]/div[1]/div/div[2]/div[1]/div/a/div[1]/canvas') # 定位验证码
location = imgelement.location # 获取验证码x,y轴坐标
size = imgelement.size # 获取验证码的长宽
rangle = (int(location['x'] ), int(location['y']), int(location['x'] + size['width']),
int(location['y'] + size['height'])) # 写成我们需要截取的位置坐标
i = Image.open("D:/test2/滑动验证/img.jpg") # 打开截图
i = i.convert('RGB')
frame1 = i.crop(rangle) # 使用Image的crop函数,从截图中再次截取我们需要的区域
frame1.save('D:/test2/滑动验证/new.jpg')
driver.find_element_by_xpath('/html/body/div[2]/div[2]/div[1]/div/div[2]/div[2]/div[2]').click()
time.sleep(4)
driver.get_screenshot_as_file("D:/test2/滑动验证/img.jpg")
imgelement = driver.find_element_by_xpath('/html/body/div[2]/div[2]/div[1]/div/div[2]/div[1]/div/a/div[1]/div/canvas[2]') # 定位验证码
location = imgelement.location # 获取验证码x,y轴坐标
size = imgelement.size # 获取验证码的长宽
rangle = (int(location['x'] ), int(location['y']), int(location['x'] + size['width']),
int(location['y'] + size['height'])) # 写成我们需要截取的位置坐标
i = Image.open("D:/test2/滑动验证/img.jpg") # 打开截图
i = i.convert('RGB')
frame2 = i.crop(rangle) # 使用Image的crop函数,从截图中再次截取我们需要的区域
frame2.save('D:/test2/滑动验证/new2.jpg')
#计算缺口位置
loc=get_diff_location(frame1, frame2)
print('-------------')
print(loc)
#找到滑动的圆球
element=driver.find_element_by_xpath('/html/body/div[2]/div[2]/div[1]/div/div[2]/div[2]/div[2]')
location=element.location
#获得滑动圆球的高度
y=location["y"]
#鼠标点击元素并按住不放
print ("第一步,点击元素")
ActionChains(driver).click_and_hold(on_element=element).perform()
time.sleep(0.15)
print ("第二步,拖动元素")
ActionChains(driver).move_to_element_with_offset(to_element=element, xoffset=loc + 30, yoffset=y - 445).perform()
#释放鼠标
ActionChains(driver).release(on_element=element).perform()
#关闭浏览器,为了演示方便,暂时注释掉.
#driver.quit()
#主函数入口
if __name__ == "__main__":
pass
main()- 1
- 2
- 3
- 4
- 5
- 6
- 7
- 8
- 9
- 10
- 11
- 12
- 13
- 14
- 15
- 16
- 17
- 18
- 19
- 20
- 21
- 22
- 23
- 24
- 25
- 26
- 27
- 28
- 29
- 30
- 31
- 32
- 33
- 34
- 35
- 36
- 37
- 38
- 39
- 40
- 41
- 42
- 43
- 44
- 45
- 46
- 47
- 48
- 49
- 50
- 51
- 52
- 53
- 54
- 55
- 56
- 57
- 58
- 59
- 60
- 61
- 62
- 63
- 64
- 65
- 66
- 67
- 68
- 69
- 70
- 71
- 72
- 73
- 74
- 75
- 76
- 77
- 78
- 79
- 80
- 81
- 82
- 83
- 84
- 85
- 86
- 87
- 88
- 89
- 90
- 91
- 92
- 93
- 94
- 95
- 96
- 97
- 98
- 99
- 100
- 101
- 102
- 103
- 104
- 105
- 106
- 107
- 108
- 109
- 110
- 111
- 112
- 113
- 114
- 115
- 116
- 117
- 118
- 119
- 120
- 121
- 122
- 123
- 124
- 125
- 126
- 127
- 128
- 129
- 130
- 131
- 132
- 133
- 134
- 135
- 136
- 137
- 138
- 139
- 140
- 141
- 142
- 143
- 144
- 145
- 146
- 147
- 148
- 149
- 150
- 151
- 152
- 153