一、概述
作为IO操作的重要部分,文件操作需要经常用到,下面简述下python中操作文件的流程:
1. 打开文件,得到一个文件句柄并赋值给一个变量
f = open("test.txt","r",encoding="utf-8") #open创建句柄并打开文件,由于是对文件进行操作,因此这里的变量习惯性地命名为f,但命名为其他变量显然也OK
2. 通过句柄对文件进行操作
content = f.read()
3. 关闭文件
f.close()
注意:
1. 尽管在这里我们说通过python操作(读写)文件,但实际的过程是python不能直接度读写文件,只能通过向操作系统提供的相应接口发出请求,要求打开一个文件对象,然后由操作系统的接口来完成对文件的具体操作。这里的文件句柄即文件描述符,唯一标识了一个文件对象。
2. 完整的文件操作一定包含了最后一步关闭处理,否则会造成系统资源的严重浪费,每个程序员都应明确践行这点。
3. 对文件进行读写操作时,系统维护了一个指针,指向当前处理完毕后所处文件的位置。
可通过f.seek(n) 将文件指针移动到n处,n为0则表示移动到文件开头位置
可通过f.tell()来获取当前文件指针的位置
二、文件的打开模式
文件的操作需遵循以下规范:
句柄变量 = open(文件路径,打开模式,文件编码)
其中文件路径最好定义绝对路径,除非相对路径非常确定,打开模式默认的是r模式,文件编码默认为utf-8。
普通打开模式
- r模式
只读模式,不可对文件进行写处理。
f = open("test.txt", "r")
print(f.read())
f.write("Hello
")
f.close()
示例程序运行结果:
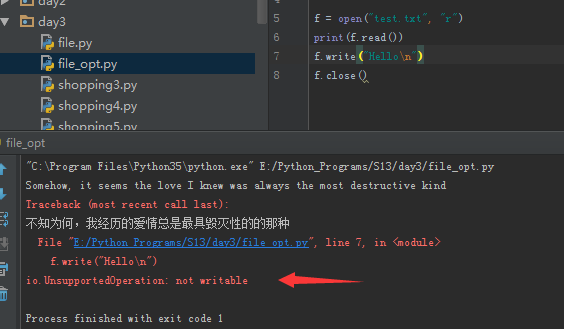
从上图可看出以r模式打开后文件不可写。
- w模式
写模式,如果文件不存在则先创建空文件然后写入指定内容,否则则直接覆盖写原文件。注意该模式下不可对文件进行读处理。
f = open("test.txt", "w")
f.write("Hello
")
print(f.read())
f.close()
与r模式下相同的测试文件进行写处理后的运行输出:
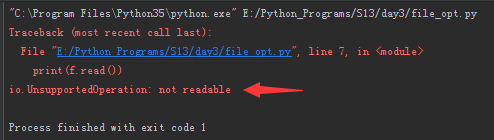
此时测试文件内容仅仅保留了write进去的内容,因此是覆盖写处理:

但是,需要注意的是这里所说的覆盖写处理仅仅适用于打开文件对象后第一次写入,如果打开文件在close之前继续写入,则进行追加写处理(随着新内容的不断写入,文件指针在同步移动)。
验证一下吧:
 f = open("test.txt", "r", encoding="utf-8")
 print("The content of source file---before write:")
 print(f.read())
 print("Begin to write for the first time")
 f = open("test.txt", "w")
 f.write("11
")
 f.tell()
 print("Begin to write for the second time")
 f.write("22
")
 f.close()
 f = open("test.txt", "r", encoding="utf-8")
 print("After write:")
 print(f.read())
 f.close()
输出结果:
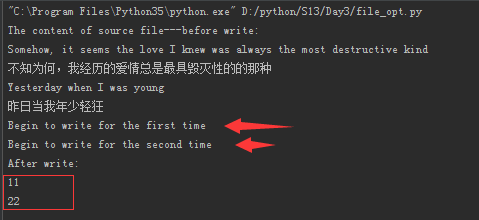
从上图可看出open文件之后第一次写是覆盖写。close前的第二次写却是追加写。
- a模式
追加模式,写入的内容总是在当前文件的末尾追加进去,无论怎么移动指针。注意该模式下仍然不可对文件进行读处理。
续上文,追加写操作之前测试文件内容仅有hello一行。
f = open("test.txt", "a")
f.write("yesterday
")
print(f.tell())
f.seek(0)
print(f.tell())
f.write("write for the second time
")
print(f.read())
f.close()
追加写处理后的输出:
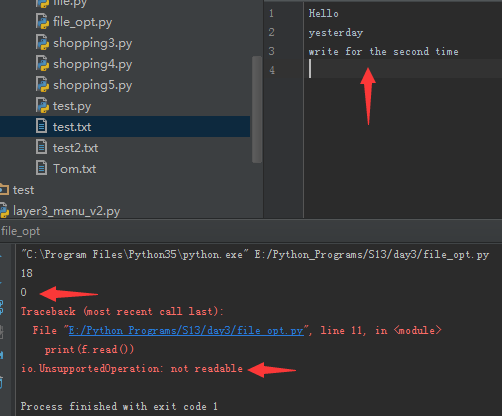
尽管在这里我们通过seek(下文会详述)将指针重置到文件头位置,但是新增的文件内容依然是在文件末尾追加的,并且不可读。
同时读写模式
- r+模式
读写模式,同时具备读和写权限,但写入时默认是把内容写入到文件末尾进行追加写,而不是覆盖写,除非在写入时先把指针移动到文件头。
f = open("test.txt", "r+")
print("Before write:")
print(f.read()) #获取源文件内容
f.write("yesterday
") #执行默认的写处理
print(f.tell())
f.seek(0) #移动文件指针到文件头以便读取文件的全部内容
print("After write for the first time:")
print(f.read())
f.seek(0) #移动文件指针到文件头后再次写入
f.write("yesterday again
") #进行第二次写入测试
print("After write for the second time:")
f.seek(0)
print(f.read()) #读取第二次写操作后的全部文件内容
f.close()
程序运行输出:
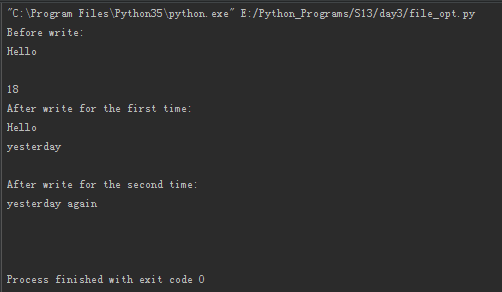
上述运行结果充分论证了r+模式下的写处理过程。
- w+模式
写读模式,同时具备写和读权限,先创建新的空文件,然后写入内容。该模式实际不常用。
- a+模式
追加内容的同时可读,注意新内容一定是在源文件末尾追加,同时在读取文件内容时文件指针默认就在文件末尾,因此不移动文件指针到文件头部是不能读取到文件内容的。
二进制打开模式
二进制文件要以二进制模式进行读取,该模式下打开文件时不能传递编码参数。
常见的二进制格式文件有音频、视频、网络传输的文件(ftp二进制传输模式),因此处理这些文件上时需要用到二进制打开模式。
常见的二进制打开模式下的操作有rb(读二进制),wb(写二进制)和ab(追加二进制)。
需要注意的是:
wb写入时一定要在write后面调用encode()方法将字符串转换为二进制(字节码)写入,同理rb时如果要输出字符串,则需要在read后面调用decode()将二进制字节码转换为字符串输出,原因是python3中对字节码和字符串进行了严格的区分。
三、文件的常用函数及基本操作
文件内容:
 Somehow, it seems the love I knew was always the most destructive kind
 不知为何,我经历的爱情总是最具毁灭性的的那种
 Yesterday when I was young
 昨日当我年少轻狂
-
文件读
python中提供了read(),readline()和readlines()三种读取文件的方法。以下是三者的详细对比:
(1)read()
读取文件内容,并以字符串形式返回。可传递一个int参数进去,表示读取文件的多少个字符。默认不带参数表示读取文件的全部内容,因此仅适合读取文件size明确且较小的文件,否则等待时间将是一个严重的考验。
f = open("test.txt", "r", encoding="utf-8")
print(f.read())
f.seek(0)                  #重置文件指针
print("==========")
print(f.read(20))       #读取20个字符
print(type(f.read()))  #确定返回类型
f.close()

输出:
Somehow, it seems the love I knew was always the most destructive kind
不知为何,我经历的爱情总是最具毁灭性的的那种
Yesterday when I was young
昨日当我年少轻狂
==========
Somehow, it seems th
<class 'str'>  #返回字符串
(2)readline()
一次读取一行文件内容,并以字符串形式返回。相对于一次性读取全部内容效率上有牺牲,但对于大文件和size不确定的文件,可避免系统资源占用过多(内存不够)和耗时较长的问题。实际使用中建议嵌套在循环中对文件进行逐行读取。
f = open("test.txt", "r", encoding="utf-8")
print(f.readline())
print(type(f.readline()))
print("
===1.read in loop=====:
")
while True:
    line = f.readline()
    if line:
        print(line)
    else:
        break

print("
===2.read in loop again=====:
")
f.seek(0)#重置文件指针
while True:
    line = f.readline()
    if line:
        print(line)
    else:
        break
f.close()

输出:
Somehow, it seems the love I knew was always the most destructive kind

<class 'str'>

===1.read in loop=====:  #未重置文件指针时读取下一行

Yesterday when I was young

昨日当我年少轻狂

===2.read in loop again=====:#重置文件指针后从文件头开始读取

Somehow, it seems the love I knew was always the most destructive kind

不知为何,我经历的爱情总是最具毁灭性的的那种

Yesterday when I was young

昨日当我年少轻狂
(3)readlines()
一次性读取全部文件内容,并以列表形式返回。因此也仅仅适用于读取文件size确定且较小的文件。
f = open("test.txt", "r", encoding="utf-8")
print(f.readlines())
print(type(f.readline()))
print(f.tell())    #获取文件指针位置
f.close()

输出:
['Somehow, it seems the love I knew was always the most destructive kind
', '不知为何,我经历的爱情总是最具毁灭性的的那种
', 'Yesterday when I was young
', '昨日当我年少轻狂']
<class 'list'>
192
总结:

扩展:逐行读取文件的方法
(1)for line in f
逐行读取文件,内存每次仅仅加载最新的一行,加载完就销毁
f = open("test.txt", "r", encoding="utf-8")
for line in f:
    print (line)
    print(type(line))
f.close()

输出:
Somehow, it seems the love I knew was always the most destructive kind

<class 'str'>
不知为何,我经历的爱情总是最具毁灭性的的那种

<class 'str'>
Yesterday when I was young

<class 'str'>
昨日当我年少轻狂
<class 'str'>
(2)把f.readline()嵌套到循环中
逐行读取文件,每次仅加载一行,代码相当于for line in f略显冗余f = open("test.txt", "r") while True: line = f.readline() if line: print(line) print(f.tell()) #验证下文件指针位置 else: break f.close() 输出: Somehow, it seems the love I knew was always the most destructive kind 72 不知为何,我经历的爱情总是最具毁灭性的的那种 116 Yesterday when I was young 143 昨日当我年少轻狂 159从文件指针可看出每次移动一行。
(3)把f.readlines()嵌套到循环中
一次性读取文件的全部内容,然后逐行打印,不适合大文件使用。f = open("test.txt", "r") for line in f.readlines(): print(line) print(f.tell()) #还是获取下文件指针位置 f.close() 输出: Somehow, it seems the love I knew was always the most destructive kind 159 #文件指针一下跳到文件末尾 不知为何,我经历的爱情总是最具毁灭性的的那种 159 Yesterday when I was young 159 昨日当我年少轻狂 159 - tell()
f.tell()返回输出当前文件指针所处位置。前文很多地方已经展示了它强大的一面。 - seek()
f.seek()可将文件指针重置到某个特定位置,使用时需要传入int参数,0表示文件头。目前暂时只会使用这点。 - encoding()
返回文件的编码格式。
f = open("test.txt", "r", encoding="utf-8") print(f.encoding) f.close() 输出: utf-8 - fileno()
返回文件描述符,目前还不清楚实际的应用场景。 - seekable
文件指针是否可操作移动,通过print可获取到布尔类型的返回值,可移动则返回true。 - readable
文件是否可读,通过print可获取到布尔类型的返回值。
f = open("test.txt", "w", encoding="utf-8") print(f.readable()) f.close() 输出: False - writable
判断文件是否可写,通过print可获取到布尔类型的返回值。
f = open("test.txt", "w", encoding="utf-8") print(f.writable()) f.close() 输出: True - flush()
将缓存的数据同步刷写到磁盘。
打印类似于Linux下yum安装软件包或python下安装软件包的进度条:
import sys import time for i in range(30): sys.stdout.write("#") #sys.stdout是标准输出文件,调用write方法进行写操作 sys.stdout.flush() #同步刷写到磁盘 time.sleep(0.04) #sleep一下,便于看到动态逐个输出#的效果 输出: 程序每次输出一个#,直到达到30个为止,近似于软件包安装进度条 - truncate()
传入参数int n,将文件从文件头开始截取n个字符。注意截取的起始位置永远都是文件头(即使通过seek跳转指针也不例外),另外打开文件时必须具有写权限(因为截取后直接修改了源文件的内容)。
f = open("test.txt", "r+", encoding="utf-8") print(f.read()) print(f.tell()) print("第一次截取") f.truncate(30) print("第二次截取") f.seek(10) #跳转文件指针以便验证 f.truncate(10) f.seek(0) print(f.read()) f.close() 输出: Seems the love I've ever known 看来,过去我所知道的爱情 Has always been the most destructive kind 似乎总是最具有毁灭性的那种 Guess that's why now 或许,那就是为什么 203 第一次截取 第二次截取 Seems the #最后输出的文件内容表明第二次截取时仍然是从文件头开始的,尽管我们跳转了文件指针 - close()
关闭打开的文件句柄,切记切记! - closed
判断打开的文件句柄是否已关闭,返回布尔值。
f = open("test.txt", "r+", encoding="utf-8")
print(f.closed)
f.close()
print(f.closed)

输出:
False
True
四、关于文件的编辑
如果要对文件的内容进行编辑处理,目前存在以下两种思路:
(1)加载文件到内存后修改保存(类似于vim),适用于小文件
(2)读取源文件内容并修改,然后写入另外的新文件,如果需要则再把新文件重命名后覆盖源文件
示例程序:
f = open("test.txt", "r", encoding="utf-8")   #源文件
f2 = open("test2.txt", "w+", encoding="utf-8") #写入修改内容后保存的新文件
print("=========")
print(f2.read())
print("=========")
for line in f:         #逐行读取源文件内容
    if "昨日当我年少轻狂" in line:
        line = line.replace("昨日当我年少轻狂", "明日当我初露锋芒")
    f2.write(line)   #不管源文件中的内容是否需要修改,统统写入新文件
f2.seek(0)
print(f2.read())
print("======")
f.seek(0)
print(f.read())
f.close()
f2.close()

输出:
=========

=========
Somehow, it seems the love I knew was always the most destructive kind
不知为何,我经历的爱情总是最具毁灭性的的那种
Yesterday when I was young
明日当我初露锋芒
======
Somehow, it seems the love I knew was always the most destructive kind
不知为何,我经历的爱情总是最具毁灭性的的那种
Yesterday when I was young
昨日当我年少轻狂
五、with语句的应用
前面反复强调打开一个文件后要记得及时关闭以释放资源,python很人性化地设计了一个自动关闭已经打开的文件的功能,这就是with语句。具体用法如下:
with open("file", "openMode", encoding="utf-8") as FileOBject: 斜体表示传入的参数
示例:
with open("test.txt", "r", encoding="utf-8") as f:
    print("第一次判断:")
    print(f.closed)
    for line in f:
        print(line)
    print("####")
    f.seek(0)
    print("第二次判断:")
    print(f.closed)
    print(f.read(10))
print("第三次判断:")
print(f.closed)

输出:
第一次判断:
False
Somehow, it seems the love I knew was always the most destructive kind

不知为何,我经历的爱情总是最具毁灭性的的那种

Yesterday when I was young

昨日当我年少轻狂
####
第二次判断:
False
Somehow, i
第三次判断:
True
通过以上程序可看出,只要with代码块没有执行完毕(注意结尾有冒号,类似于循环结构语法),文件就一直保持open状态,一旦跳出with则自动关闭。
小技巧:
实际应用中可能需要操作多个文件,python 2.7以上版本可以在一个with语句中逐个接上多个open as,语法如下:
with open("file1", "r", encoding="utf-8") as f1, open ("file2", "r+", encoding="utf-8") as f2:
为了遵循pep8编码规范,如一行超出了80个字符,则需要换行处理,未超出之前也可以自由换行以提高代码的可读性:
with open("file1", "r", encoding="utf-8") as f1,
open ("file2", "r+", encoding="utf-8") as f2:
示例:
with open("test.txt", "r", encoding="utf-8") as f1,
        open("test2.txt", "r+", encoding="utf-8") as f2:
    print(f1.read())
    print("")
    f2.write("我是第二个文件")
    f2.seek(0)
    print(f2.read())

输出:
Somehow, it seems the love I knew was always the most destructive kind
不知为何,我经历的爱情总是最具毁灭性的的那种
Yesterday when I was young
昨日当我年少轻狂

我是第二个文件