在 Qt Quick 中有两套与布局管理相关的类库,一套叫作 Item Positioner(定位器),一套叫作 Item Layout(布局)。
-
定位器包括 Row(行定位器)、Column(列定位器)、Grid(表格定位器)、Flow(流式定位器)。
-
布局管理器包括行布局(RowLayout)、列布局(ColumnLayout)、表格布局(GridLayout)。
另外还有一种锚布局,这里我们先介绍这个。
一、锚布局
anchors 提供了一种方式,让你可以通过指定一个元素与其他元素的关系来确定元素在界面中的位置。
你可以想象一下,每个 Item 都有 7 条不可见的铺线:左(left)、水平中心(horizontalCenter)、 上(top)、下(bottom)、右(right)、垂直中心(verticalCenter)、基线(baseline)。如下图所示:

上图中,没有标注基线,基线是用于定位文本的,你可以想象一行文字端坐基线的 情景。对于没有文本的图元,baseline 和 top —致。
使用 anchors 布局时,除了对齐锚线,还可以指定上(topMargin)、下(bottomMargin)、 左(leftMargin)、右(rightMargin)四个边的留白。如下图所示。

而如果你想懒省事儿,也可以使用margins属性将四个边的留白置成一样。示例程序如下:
import QtQuick 2.0

Rectangle {
     300
    height: 200

    Rectangle {
        id: rect1
        anchors.left: parent.left
        anchors.leftMargin: 20
        anchors.top: parent.top
        anchors.topMargin: 20
         100
        height: 100
        color: "red"
    }

    Rectangle {
        anchors.left: rect1.right
        anchors.leftMargin: 20
        anchors.top: rect1.top
         100
        height: 100
        color: "blue"
    }
}
程序效果如下所示:
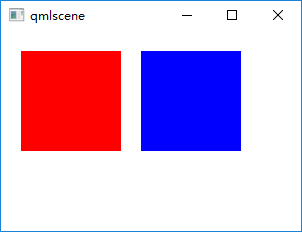
Item 的 anchors 属性,除了上面介绍的,还有一些,如 centerln 表示将一个 Item 居中放置到一个 Item内;fill 表示充满某个 Item……更多的请参考 Item 类的文档。
锚布局是最灵活的一种 Qt Quick 布局方式,使用它你可以随意摆布界面上那些可见元素,不过,如果你的界面元素很多,它也将是代码量最大的一种布局方式。
二、定位器
定位器是一种容器元素,专门用来管理界面中的其他元素,与传统的 Qt Widgets 中的布局管理器类似。使用定位器,你可以很方便地把众多的元素组织在一起,形成非常规则的界面效果。不过有一点需要的是,定位器不会改变它管理的元素的大小,与你使用 Qt Widgets 中的布局管理器的经验不同,不过如果你希望使用 “自动根据界面尺寸变化调整孩子们的尺寸” 这种特性,可以使用 Qt Quick 中的布局管理器。
定位器包括 Row(行定位器)、Column(列定位器)、Grid(表格定位器)、Flow(流式定位器)。
2.1 Row(行定位器)
Row 沿着一行安置它的孩子们,在你需要水平放置一系列的 Item 时,它比锚布局更加方便。一旦你把一个 Item 交给 Row 来管理,那就不要再使用 Item 的 x 、 y 、 anchors 等属性了, Row 会安排得妥妥的。
在一个 Row 内的 item ,可以使用 Positioner 附加属性来获知自己在 Row 中的更多位置信息。 Positioner 有 index 、 isFirstItem 、 isLastItem 三个属性。
看我们的示例 row_layout.qml :
import QtQuick 2.0
import QtQuick.Controls 1.1

Rectangle {
     360;
    height: 240;
    color: "#EEEEEE";
    id: rootItem;

    Text {
        id: centerText;
        text: "A Single Text.";
        anchors.centerIn: parent;
        font.pixelSize: 24;
        font.bold: true;
    }

    function setTextColor(clr){
        centerText.color = clr;
    }

    Row {
        anchors.left: parent.left;
        anchors.leftMargin: 4;
        anchors.bottom: parent.bottom;
        anchors.bottomMargin: 4;
        spacing: 4;

        Rectangle {
             50;
            height: 30;
            color: Qt.rgba(Math.random(), Math.random(), Math.random(), 1.0);
        }

        Rectangle {
             50;
            height: 30;
            color: Qt.rgba(Math.random(), Math.random(), Math.random(), 1.0);
        }

        Rectangle {
             50;
            height: 30;
            color: Qt.rgba(Math.random(), Math.random(), Math.random(), 1.0);
        }
    }
}
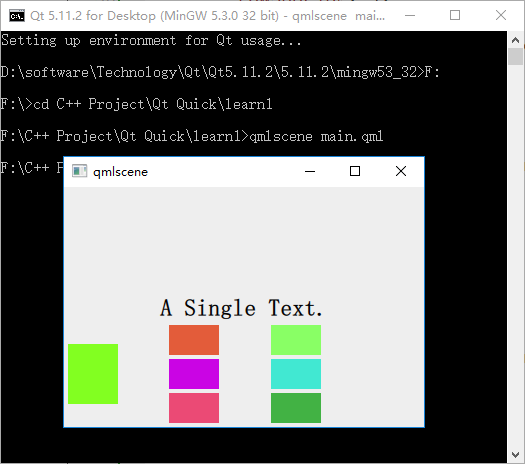
执行命令 qmlscene row_layout.qml,效果如下图所示:
因为 Row 本身是一个 Item ,所以你可以使用锚布局来定位一个 Row ,示例中这么做了,把 Row 放在界面的左下角。
Row 有一个 spacing 属性,用来指定它管理的 Item 之间的间隔。还有一个 layoutDirection 属性,可以指定布局方向,取值为 Qt.LeftToRight 时从左到右放置 Item ,这是默认行为,取值为 Qt.RightToLeft 时从右向左放置 Item 。还有其它的一些属性,请参看 Qt SDK。
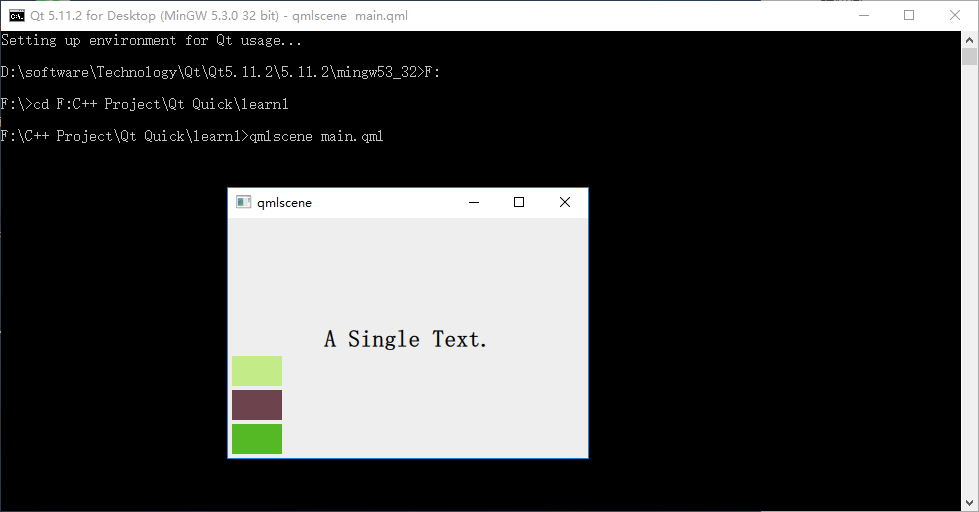
2.2 Column(列定位器)
Column 与 Row 类似,不过是在垂直方向上安排它的子 Items 。Column 本身也是一个 Item ,可以使用 anchors 布局来决定它在父 Item 中的位置。 Column 的 spacing 属性描述子 Item 之间的间隔。
看示例 column_layout.qml :
import QtQuick 2.0
import QtQuick.Controls 1.1

Rectangle {
     360;
    height: 240;
    color: "#EEEEEE";
    id: rootItem;

    Text {
        id: centerText;
        text: "A Single Text.";
        anchors.centerIn: parent;
        font.pixelSize: 24;
        font.bold: true;
    }

    function setTextColor(clr){
        centerText.color = clr;
    }

    Column {
        anchors.left: parent.left;
        anchors.leftMargin: 4;
        anchors.bottom: parent.bottom;
        anchors.bottomMargin: 4;
        spacing: 4;

        Rectangle {
             50;
            height: 30;
            color: Qt.rgba(Math.random(), Math.random(), Math.random(), 1.0);
        }

        Rectangle {
             50;
            height: 30;
            color: Qt.rgba(Math.random(), Math.random(), Math.random(), 1.0);
        }

        Rectangle {
             50;
            height: 30;
            color: Qt.rgba(Math.random(), Math.random(), Math.random(), 1.0);
        }
    }
}
代码与 row_layout.qml 类似, 不用解释了,下图是执行 qmlscene column_layout.qml 后的效果:
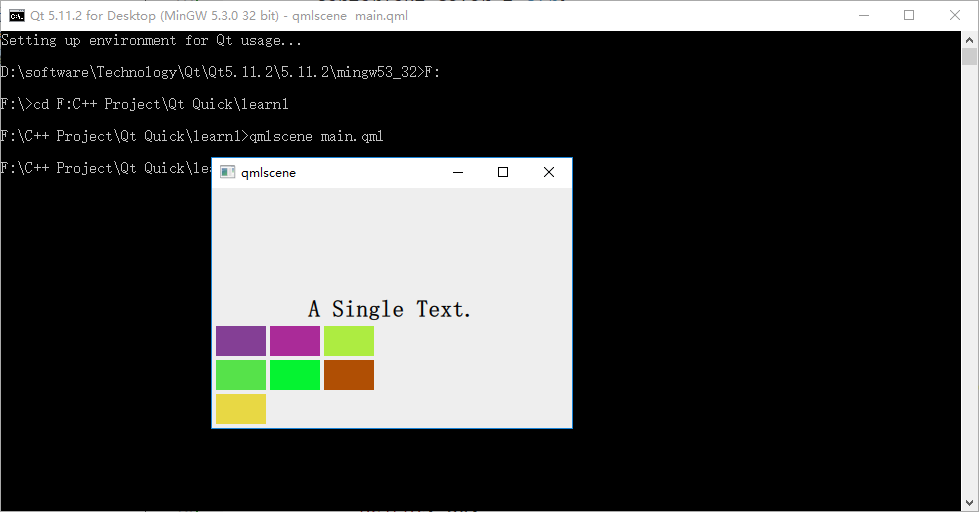
2.3 Grid(表格定位器)
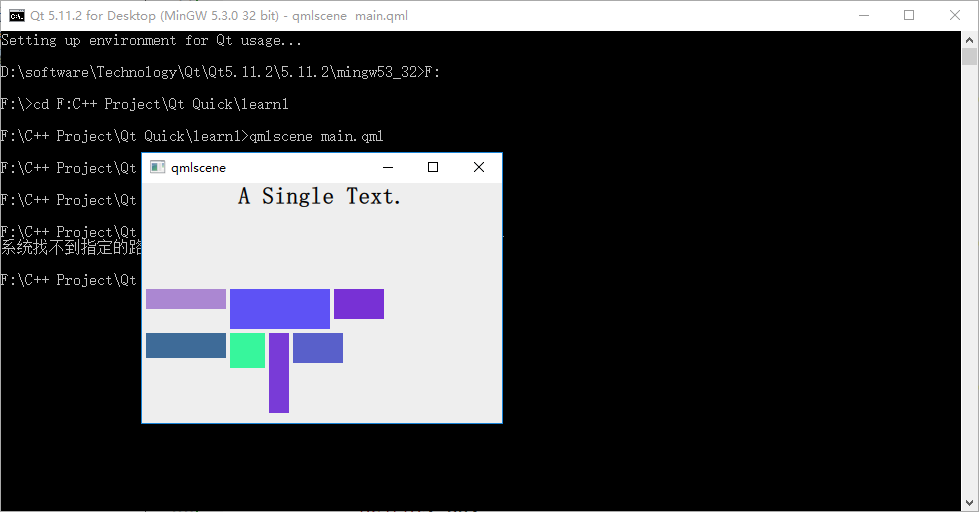
Grid 在一个网格上安置它的子 Items ,它会创建一个拥有很多单元格的网格,足够容纳它所有的子 Items 。Grid 会从左到右、从上到下把它的子 items 一个一个塞到单元格里。 item 默认会被放在一个单元格左上角,(0,0) 位置。
你可以通过 rows 和 columns 属性设定表格的行、列数。如果你不设置,默认只有四列,而行数则会根据实际的 item 数量自动计算。rowSpacing 和 columnSpacing 指定行、列间距,单位是像素。
Grid 的 flow 属性描述表格的流模式,可以取值 Grid.LeftToRight ,这是默认模式,从左到右一个挨一个放置 item ,一行放满再放下一行;取值为 Grid.TopToBottom 时,从上到下一个挨一个放置 item ,一列放满再放下一列。
horizontalItemAlignment 和 verticalItemAlignment 指定单元格对齐方式。默认的单元格对齐方式和 layoutDirection 以及 flow 有关。
先看个简单的例子, grid_layout.qml :
import QtQuick 2.0
import QtQuick.Controls 1.1

Rectangle {
     360;
    height: 240;
    color: "#EEEEEE";
    id: rootItem;

    Text {
        id: centerText;
        text: "A Single Text.";
        anchors.centerIn: parent;
        font.pixelSize: 24;
        font.bold: true;
    }

    function setTextColor(clr){
        centerText.color = clr;
    }

    Grid {
        anchors.left: parent.left;
        anchors.leftMargin: 4;
        anchors.bottom: parent.bottom;
        anchors.bottomMargin: 4;
        rows: 3;
        columns: 3;
        rowSpacing: 4;
        columnSpacing: 4;

        Rectangle {
             50;
            height: 30;
            color: Qt.rgba(Math.random(), Math.random(), Math.random(), 1.0);
        }

        Rectangle {
             50;
            height: 30;
            color: Qt.rgba(Math.random(), Math.random(), Math.random(), 1.0);
        }

        Rectangle {
             50;
            height: 30;
            color: Qt.rgba(Math.random(), Math.random(), Math.random(), 1.0);
        }

        Rectangle {
             50;
            height: 30;
            color: Qt.rgba(Math.random(), Math.random(), Math.random(), 1.0);
        }

        Rectangle {
             50;
            height: 30;
            color: Qt.rgba(Math.random(), Math.random(), Math.random(), 1.0);
        }

        Rectangle {
             50;
            height: 30;
            color: Qt.rgba(Math.random(), Math.random(), Math.random(), 1.0);
        }

        Rectangle {
             50;
            height: 30;
            color: Qt.rgba(Math.random(), Math.random(), Math.random(), 1.0);
        }
    }
}
为了看出 flow 取值不同时的效果,我特意将行列数都设置为 3 ,创建了 7 个 Rectangle 实例。下图是效果:
2.4 Flow(流式定位器)
Flow 其实和 Grid 类似,不同之处是它没有显式的行、列数,它会计算自身尺寸和子 item 尺寸来根据需要折行。它的 flow 属性,默认取值 Flow.LeftToRight ,从左到右安排 item ,直到 Flow 本身的宽度被超出时折行;当 flow 取值 Flow.TopToBottom 时,从上到下安排 item ,直到 Flow 本身的高度被超出时开始在下一列上安排 item 。
spacing 属性描述 item 之间的间隔。
看个示例, flow_layout.qml :
import QtQuick 2.0
import QtQuick.Controls 1.1

Rectangle {
     360;
    height: 240;
    color: "#EEEEEE";
    id: rootItem;

    Text {
        id: centerText;
        text: "A Single Text.";
        anchors.horizontalCenter: parent.horizontalCenter;
        anchors.top: parent.top;
        font.pixelSize: 24;
        font.bold: true;
    }

    function setTextColor(clr){
        centerText.color = clr;
    }

    Flow {
        anchors.left: parent.left;
        anchors.leftMargin: 4;
        anchors.bottom: parent.bottom;
        anchors.bottomMargin: 4;
         280;
        height: 130;
        spacing: 4;

        Rectangle {
             80;
            height: 20;
            color: Qt.rgba(Math.random(), Math.random(), Math.random(), 1.0);
        }

        Rectangle {
             100;
            height: 40;
            color: Qt.rgba(Math.random(), Math.random(), Math.random(), 1.0);
        }

        Rectangle {
             50;
            height: 30;
            color: Qt.rgba(Math.random(), Math.random(), Math.random(), 1.0);
        }

        Rectangle {
             80;
            height: 25;
            color: Qt.rgba(Math.random(), Math.random(), Math.random(), 1.0);
        }

        Rectangle {
             35;
            height: 35;
            color: Qt.rgba(Math.random(), Math.random(), Math.random(), 1.0);
        }

        Rectangle {
             20;
            height: 80;
            color: Qt.rgba(Math.random(), Math.random(), Math.random(), 1.0);
        }

        Rectangle {
             50;
            height: 30;
            color: Qt.rgba(Math.random(), Math.random(), Math.random(), 1.0);
        }
    }
}
我改变了 Rectangle 实例的大小,以便观察 Flow 布局的特点:根据自身宽高是否被 item 超出而自动折行。下图是 flow 为 LeftToRight (代码中未设置 flow 属性,默认值是 LeftToRight)时的效果:
修改下代码,在 Flow 对象生命内添加 "flow: Flow.TopToBottom;" 这行代码,再次执行 qmlscene flow_layout.qml ,效果如下图所示:
如你所见,效果大大不同。其实可以把流布局想象成英文文字排版系统,一个 item 对应一个单词,横版模式时,从左到右,一行一行安排单词的位置,当接近一行的宽度时,如果下一个单词摆上去就会超出行宽,那就把这个单词放到下一行上,继续排排排……;竖版模式也是类似的……也许你看过竖版书,很容易理解这件事情。
2.5 定位器嵌套
Qt Quick 中定位器元素是可以嵌套的,比如 Row 和 Column 可以相互嵌套来实现 Grid 的效果。
看下 nested_layout.qml :
import QtQuick 2.0
import QtQuick.Controls 1.1

Rectangle {
     360;
    height: 240;
    color: "#EEEEEE";
    id: rootItem;

    Text {
        id: centerText;
        text: "A Single Text.";
        anchors.centerIn: parent;
        font.pixelSize: 24;
        font.bold: true;
    }

    function setTextColor(clr){
        centerText.color = clr;
    }

    Row {
        anchors.left: parent.left;
        anchors.leftMargin: 4;
        anchors.bottom: parent.bottom;
        anchors.bottomMargin: 4;
        spacing: 4;

        Column {
            spacing: 4;
            Rectangle {
                 50;
                height: 30;
                color: Qt.rgba(Math.random(), Math.random(), Math.random(), 1.0);
            }

            Rectangle {
                 50;
                height: 30;
                color: Qt.rgba(Math.random(), Math.random(), Math.random(), 1.0);
            }
        }

        //Column {
        //    spacing: 4;
            Rectangle {
                 50;
                height: 30;
                color: Qt.rgba(Math.random(), Math.random(), Math.random(), 1.0);
            }

            Rectangle {
                 50;
                height: 30;
                color: Qt.rgba(Math.random(), Math.random(), Math.random(), 1.0);
            }
       // }
    }
}
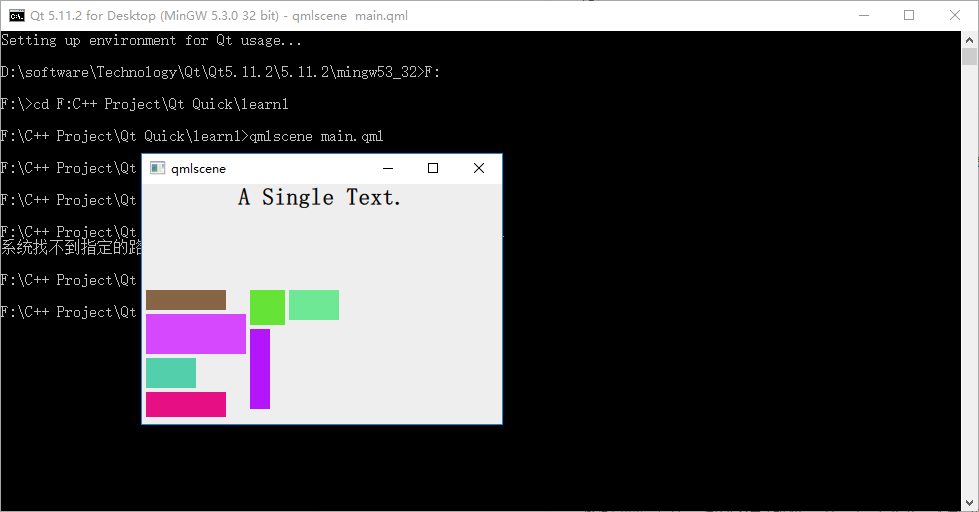
我在一个 Row 内嵌套了 3 个 Column ,实现了 2x3 的表格布局。执行 qmlscene nested_layout.qml ,可以看到下图:
三、布局管理器
Qt Quick 中的布局管理器与 Qt Widgets 中的相似,它与定位器的不同之处在于:布局管理器会自动调整子 Item 的尺寸来适应界面大小的变化。
要适应布局管理器,需要引入 Layouts 模块,这样:
import QtQuick.Layouts 1.1
3.1 GridLayout
由于篇幅原因,我们这里只介绍 Qt Quick 布局管理器中最复杂的 GridLayout 吧,因为 RowLayout 和 ColumnLayout 实际上可以看是 GridLayout 的两个特例,这里不再赘述。
GridLayout 与 Qt C++ 中的 QGridLayout 功能类似,它在一个表格中安排它管理的 Item,如果用户调整界面尺寸,GridLayout 会自动重新调整 Item 的位置。
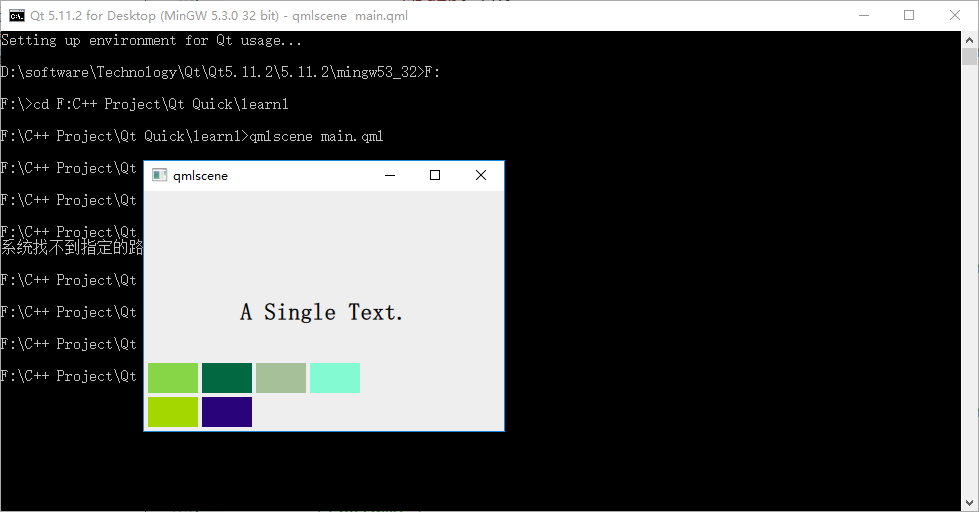
GridLayout 会根据 flow 属性来排列元素,这与 Grid 定位器类似,flow 属性的默认值是 GridLayout.LeftToRight,从左到右安排元素,一行结束再另起一行。而判定行结束的一个条件是 columns 属性,它指定一个 GridLayout 的列数。如果 flow 取值 GridLayout.TopToBottom,GridLayout 则从上到下安排元素,一列结束再另起一列。rows 属性指定 GridLayout 的行数, 它将决定何时新开一列来排布剩余的元素。
下面看一个示例:
import QtQuick 2.2
import QtQuick.Layouts 1.1

Rectangle {
     360;
    height: 240;
    color: "#EEEEEE";
    id: rootItem;

    Text {
        id: centerText;
        text: "A Single Text.";
        anchors.centerIn: parent;
        font.pixelSize: 24;
        font.bold: true;
    }

    function setTextColor(clr){
        centerText.color = clr;
    }

    GridLayout {
        anchors.left: parent.left;
        anchors.leftMargin: 4;
        anchors.bottom: parent.bottom;
        anchors.bottomMargin: 4;
         300;
        rows: 3;
        columns: 3;
        rowSpacing: 4;
        columnSpacing: 4;
        flow: GridLayout.TopToBottom;

        Rectangle {
             50;
            height: 60;
            color: Qt.rgba(Math.random(), Math.random(), Math.random(), 1.0);
            Layout.columnSpan: 3;
            Layout.rowSpan: 3;
        }

        Rectangle {
             50;
            height: 30;
            color: Qt.rgba(Math.random(), Math.random(), Math.random(), 1.0);
        }

        Rectangle {
             50;
            height: 30;
            color: Qt.rgba(Math.random(), Math.random(), Math.random(), 1.0);
        }

        Rectangle {
             50;
            height: 30;
            color: Qt.rgba(Math.random(), Math.random(), Math.random(), 1.0);
        }

        Rectangle {
             50;
            height: 30;
            color: Qt.rgba(Math.random(), Math.random(), Math.random(), 1.0);
        }

        Rectangle {
             50;
            height: 30;
            color: Qt.rgba(Math.random(), Math.random(), Math.random(), 1.0);
        }

        Rectangle {
             50;
            height: 30;
            color: Qt.rgba(Math.random(), Math.random(), Math.random(), 1.0);
        }
    }
}
执行后的效果图如下所示:
参考:
《Qt Quick核心编程》第8章