目录
一、爬虫的步骤
二、使用Jupyter
三、爬虫请求模块之urllib
四、爬虫请求模块之requests
五、爬虫分析之re模块
一、爬虫的步骤
1.发起请求,模拟浏览器发送一个http请求
2.获取响应的内容
3.解析内容(解析出对自己有用的部分)
a.正则表达式
b.BeautifulSoup模块
c.pyquery模块
d.selenium模块
4.保存数据
a.文本文件(txt,csv等)
b.数据库(mysql)
c.redis,mongdb(最长使用)
二、使用Jupyter
2.1.使用理由:Jupyter可以一次执行,讲结果保存到内存里,供后面python语句多次使用,避免每次调试程序,都要重新请求网页,频繁爬取某个网页,容易导致该网站封IP
2.2.windows下使用步骤:
a.安装:pip install jupyter (前提是已经安装了python3)
b.运行:jupyter notebook,浏览器自动弹出使用界面
c.右侧New-->python3,新建一个python程序
2.3.快捷键
shift + enter键 :选定行执行,执行结果保留到内存
2.4 远程连接linux下使用步骤:
a. 安装:pip install jupyter 和 pip install ipython (为了设置远程登录jupyter密码)
b. 生成配置文件 jupyter notebook --generate-config
c. 生成远程登录密码
ipython
In [1]: from notebook.auth import passwd
In [2]: passwd('填写远程密码',algorithm='sha1') #指定使用sha1加密方式
Enter password:
Verify password:
Out[2]: 'sha1:43b95b731276:5d330ee6f6054613b3ab4cc59c5048ff7c70f549' #复制引号内所有内容,包含sha1,密码填在以下配置文件里
e. 编辑配置文件
vi /root/.jupyter/jupyter_notebook_config.py
c.NotebookApp.ip = '*'			#改成*号的话,允许所有任何的ip来连接
c.NotebookApp.open_browser = False    #服务器端启动jupyter时,不自动打开浏览器
c.NotebookApp.port = 8889        #设置远程连接时的端口号
c.NotebookApp.password = 'sha1:43b95b731276:5d330ee6f6054613b3ab4cc59c5048ff7c70f549'   #将上面生成设置好的密码SHA1值填入,包含sha1
c.NotebookApp.allow_root =True		#允许使用root登录
f.服务端启动jupyter
jupyter notebook
g. 客户端打开浏览器输入
http://remoteip:8889

2.5 Jupyter notebook使用virtualenv虚拟环境
1.进入虚拟环境 (此处默认已安装好搭建虚拟环境工具virtualenv和虚拟环境管理工具virtualenvwrapper,并且创建虚拟开发环境test02)

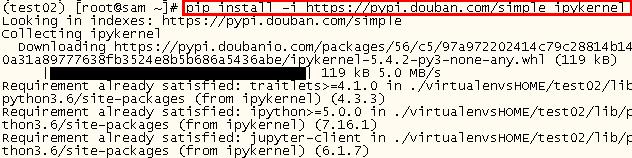
2. 在虚拟环境test02里安装ipykernel
pip install -i https://pypi.douban.com/simple ipykernel
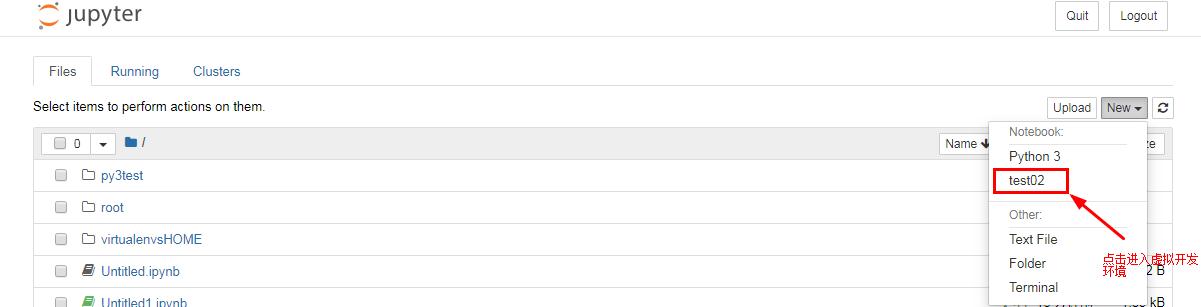
3.将虚拟环境映射到jupyter notebook的浏览器界面
python -m ipykernel install --user --name 虚拟环境名 --display-name Jupyter中要显示的名字

4.在虚拟环境或者真实环境启动 jupyter notebook
jupyter notebook
5.打开浏览器(本地浏览或者远程连接,请参照上面方法)
三、爬虫请求模块之urllib
3.1 urllib介绍
Python标准库中提供了:urllib等模块以供Http请求,但是它的API能力不佳,需要巨量的工作,甚至包括各种方法覆盖,来完成最简单的任务,不推荐使用,此处只是了解一下
3.2 简单使用
#方式一:
import urllib.request

f = urllib.request.urlopen('http://www.baidu.com')
result = f.read().decode('utf-8')
print(result)


#方式二:
import urllib.request
req = urllib.request.Request('http://www.baidu.com')
response = urllib.urlopen(req)
result = response.read().decode('utf-8')
print(result)

ps:硬要使用urllib模块,推荐使用方式二,因为req是一个Request对象,在这个对象里,可以定义请求的头部信息,这样可以把自己包装成像个浏览器发起的请求,如下面的一个例子
3.3自定义请求头信息
import urllib.request
req = urllib.request.Request('http://www.example.com')

#自定义头部,第一个参数为关键字参数key,第二个参数为内容
req.add_header("User-Agent","Mozilla/5.0(X11;Ubuntu;Linux x86_64;rv:39.0) Gecko/20100101 Firefox/39.0")

f = urllib.request.urlopen(req)
result = f.read().decode('utf-8')

#有一个模块fake_useragent可以随机产生User-Agent信息,对于网站的反爬虫机制有一定的欺骗作用
3.4 fake_useragent使用
#1.安装pip install fake_useragent

#2.基本使用
from fake_useragent import UserAgent
ua = UserAgent()
print(ua.chrome)   #产生一个谷歌的内核字段

#常用属性
ua.chrome      #产生一个谷歌的内核字段
ua.ie              #随机产生ie内核字段
ua.firefox       #随机产生火狐内核字段
ua.random    #随机产生不同浏览器的内核字段
3.5 urllib.parse.urljoin使用
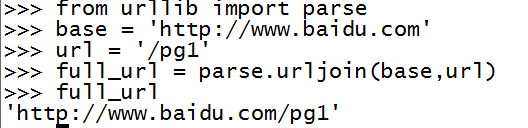
a.使用场景
    遇到url地址需要拼接的时候,可以使用urllib.parse.urljoin (存在在python3)
如base='http://www.baidu.com'   ,  url = '/pg1'

full_url = urllib.parse.urljoin(base,url)  #结果如下
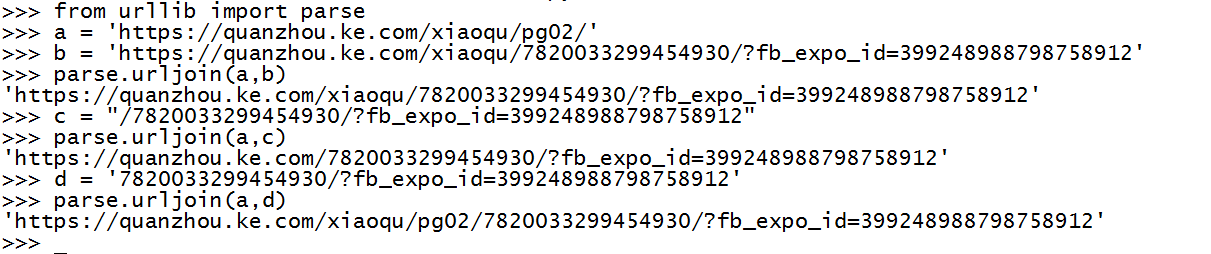
使parse.urljoin()细节问题
四、爬虫请求模块之requests
4.1 requests模块介绍
Requests是使用Apache2 Licensed许可证的,基于Python开发的HTTP库,其在Python内置模块的基础上进行了高度的封装,从而使得进行网络请求时,
变得美好了许多,而且使用Requests可以轻而易举的完成浏览器可以做到的任何操作
4.2 requests安装
pip3 install requests
4.3 简单使用
import requests

r = requests.get('http://www.example.com')
print(type(r))
print (r.status_code)   #服务器返回的状态码
print (r.encoding)       #网站使用的编码
print (r.text)              #返回的内容,字符串类型
4.4 get请求
#1.无参数实例
import requests
res = requests.get('http://www.example.com')

print (res.url)    #打印请求的url
print (res.text)    #打印服务器返回的内容


#2.有参数实例
import requests
payload = {'k1':'v1','k2':'v2'}
res = requests.get('http://httpbin.org/get',params=payload)

print (res.url)
print (res.text)

#3.解析json
import requests
import json

response = rquests.get('http://httpbin.org/get')
print (type(response.text))    #返回结果是字符串类型
pirnt (response.json())          #字符串转成json格式
print (json.loads(response.text))  #字符串转成json格式
print (type(response.json()))    #json类型


#4.添加headers
import requests
from fake_useragent import UserAgent
ua = UserAgent()

#自定义请求头部信息
headers= {
    'User-Agent':ua.chrome
}
response = requests.get('http://www.zhihui.com',headers = headers)
print (response.text)
4.5 post请求
#1.基本POST实例

import requests

#当headers为application/content的时候,请求实例如下:
payload = {'k1':'v1','k2':'v2'}
res = requests.post('http://httpbin.org/post',data = payload)

print (res.text)
print (type(res.headers),res.headers)
print (type(res.cookies),res.cookies)
print (type(res.url),res.url)
print (type(res.history),res.history)


#2.发送请求头和数据实例
import json
import requests

url = 'http://httpbin.org/post'
payload = {'some':'data'}
headers = {'content-type':'application/json'}

#当headers为application/json的时候,请求实例如下:
res = requests.post(url,data=json.dumps(payload), headers = headers)

print (res.text)
4.6关于get与post请求的差别
get请求方法参数只有params,而没有data参数,而post请求中两者都是有的
4.7 http返回代码


 1 100:continue
 2 101 : switching_protocols
 3 102 : processing
 4 103 : checkpoint
 5 122 : uri_too_long , request_uri_too_long
 6
 7 200 : ok , okay, all_ok all_okay , all_good, \o/ , '√'
 8 201 : created
 9 202 : accepted
10 203 : non_authoritative_info , non_authoritative_information
11 204 : no_content
12 205 : rest_content , reset
13 206 : partial_content, partial
14 207 :multi_status , multiple_status multi_stati multiple_stati
15 208 : already_reported
16 226 : im_used
17
18 #Redirection
19 300 :multipel_choices
20 301 : moved_permanently , moved , \o-
21 302 : found
22 303 : see_other , other
23 304 : not_modified
24 305 : use_proxy
25 306 : switch_proxy
26 307 : remporay_redirect , temporary_moved , temporary
27 308 : permanent_redirect , resume_incomplete , resume  #These 2 to be removed in 3.0
28
29 #client Error
30 400 :bad_request , bad
31 401 : unauthorized
32 402 : payment_required payment
33 403 : forbiden
34 404 : not_found , -o-
35 405 : method_not_allowed not_allowed
36 406 : not_acceptable
37 407 : proxy_authentication_required , proxy_auth , proxy_authentication
38 408 : request_timeout  , timeout
39 409 : conflict
40 410 :gone
41 411 :length_required
42 412 : precondition_failed , precondition
43 413 : request_entity_too_large
44 414 : requests_uri_too_large
45 415 : unsupported_media_type, unsupported_media , media_type
46 416: ('requested_range_not_satisfiable', 'requested_range', 'range_not_satisfiable'),
47 417: ('expectation_failed',),
48 418: ('im_a_teapot', 'teapot', 'i_am_a_teapot'),
49 421: ('misdirected_request',),
50 422: ('unprocessable_entity', 'unprocessable'),
51 423: ('locked',),
52 424: ('failed_dependency', 'dependency'),
53 425: ('unordered_collection', 'unordered'),
54 426: ('upgrade_required', 'upgrade'),
55 428: ('precondition_required', 'precondition'),
56 429: ('too_many_requests', 'too_many'),
57 431: ('header_fields_too_large', 'fields_too_large'),
58 444: ('no_response', 'none'),
59 449: ('retry_with', 'retry'),
60 450: ('blocked_by_windows_parental_controls', 'parental_controls'),
61 451: ('unavailable_for_legal_reasons', 'legal_reasons'),
62 499: ('client_closed_request',),
63 # Server Error.
64 500: ('internal_server_error', 'server_error', '/o\', '✗'),
65 501: ('not_implemented',),
66 502: ('bad_gateway',),
67 503: ('service_unavailable', 'unavailable'),
68 504: ('gateway_timeout',),
69 505: ('http_version_not_supported', 'http_version'),
70 506: ('variant_also_negotiates',),
71 507: ('insufficient_storage',),
72 509: ('bandwidth_limit_exceeded', 'bandwidth'),
73 510: ('not_extended',),
74 511: ('network_authentication_required', 'network_auth', 'network_authentication')
4.8 获得cookies
#会话登录
import requests

s = requests.Session()
s.get('http://www.httpbin.org/cookies/set/123456789') #设置cookies
res = s.get('http://www.httpbin.org/cookies')  #获得cookies
print (res.text)   #打印cookies

此httpbin.org是通过以上方式来设置cookies


#获得cookie
import requests
response = requests.get('http://www.baidu.com')
#print ('response.cookies')

for key,value in reponse.cookies.items():
    print (key + '=' + value)         #组合key = value
4.7 SSL设置
#ssl设置
import requests
from requests.packages import urllib3
urllib3.disable_warnings()
res = requests.get('http://www.12306.cn',verify = False)
print (res.status_code)


#证书认证
import requests
res = requests.get('https://www.12306.cn',cert=('/path/server.crt','/path/key'))
print (res.status_code)
4.8 代理设置
import requests
proxies = {
    "http":"http://127.0.0.1:9746",
    "https":"https://127.0.0.1:9924"
}

res = requests.get("http://www.taobao.com",proxies = procies)
print (res.status_code)


#有密码的代理
import requests
proxies = {
    "https":"https://user:password@127.0.0.1:9924"
}

res = requests.get("http://www.taobao.com",proxies = procies)
print (res.status_code)
4.9 超时时间设置与异常处理
import requests
from requests.exceptions import ReadTimeout
try:
    res = requests.get('http://httpbin.org/get',timeout=0.5)
except ReadTimeout:
    print ('Timeout')
4.10 案例:检测QQ是否在线
import urllib
import requests
from xml.etree import ElementTree as ET

#使用内置模块urllib发送http请求
r = urllib.request.urlopen('http://www.webxml.com.cn/webservices/qqOnlineWebService.asmx/qqCheckOnline?qqCode=3455306**')
result = r.read().decode('utf-8')


#使用第三方模块requests发送http请求
r = requetsts.get('http://www.webxml.com.cn/webservices/qqOnlineWebService.asmx/qqCheckOnline?qqCode=3455306**')
result = r.text

#解析XML格式内容
node = ET.XML(result)

#获取内容
if node.text =='Y':
    print ('在线')
else:
    print ('离线')
五、爬虫分析之re模块
5.1 关于re模块的使用方法
http://www.cnblogs.com/lisenlin/articles/8797892.html#1
5.2 爬虫简单案例
import requests
import re
from fake_useragent import UserAgent

def get_page(url):
    ua = UserAgent()
    headers = {
        'User-Agent':ua.chrome,
    }
    response = requests.get(url, headers = headers)
    try:
        if response.status_code == 200:
            res = response.text
            return res
        return None
    except Exception as e:
        print(e)

def get_movie(html):
    partten = '<p.*?><a.*?>(.*?)</a></p>.*?<p.*?>(.*?)</p>.*?<p.*?>(.*?)</p>'
    items = re.findall(partten, html, re.S)
    #print((items))
    return items

def write_file(items):
    fileMovie = open('movie.txt', 'w', encoding='utf8')
    try:
        for movie in items:
            fileMovie.write('电影排名:' + movie[0] + '
')
            fileMovie.write('电影主演:' + movie[1].strip() + '
')
            fileMovie.write('上映时间:' + movie[2] + '

')
        print('文件写入成功...')
    finally:
        fileMovie.close()

def main(url):
    html = get_page(url)
    items = get_movie(html)
    write_file(items)

if __name__ == '__main__':
    url = "http://maoyan.com/board/4"
    main(url)