Volley是Google官方推出的Android异步网络请求框架和图片加载框架,很适合数据量小、通讯频繁的网络操作。它的使用很简单,在开发中使用较多,今天就以请求字符串数据为例,从源码的角度,分析下数据加载整个过程。
首先我们看一下基本使用,注意不要忘了设置网络权限。
package com.example.volleydemo;

import com.android.volley.Request.Method;
import com.android.volley.RequestQueue;
import com.android.volley.Response;
import com.android.volley.VolleyError;
import com.android.volley.toolbox.StringRequest;
import com.android.volley.toolbox.Volley;

import android.app.Activity;
import android.os.Bundle;
import android.view.View;
import android.view.View.OnClickListener;
import android.widget.Button;
import android.widget.TextView;

public class MainActivity extends Activity implements OnClickListener{

    private Button btnExecuteStrRequest;
    private TextView tvContent;

    RequestQueue mQueue;

    @Override
    protected void onCreate(Bundle savedInstanceState) {
        super.onCreate(savedInstanceState);
        setContentView(R.layout.activity_main);

        mQueue = Volley.newRequestQueue(this);

        btnExecuteStrRequest = (Button) findViewById(R.id.btnExecuteStrRequest);
        tvContent = (TextView) findViewById(R.id.tvContent);
        btnExecuteStrRequest.setOnClickListener(this);
    }

    @Override
    public void onClick(View v) {
        switch (v.getId()) {
        case R.id.btnExecuteStrRequest:
            getStringDatas();
            break;

        default:
            break;
        }
    }

    private void getStringDatas() {

        StringRequest strRequest = new StringRequest(Method.GET, "https://www.baidu.com", new Response.Listener<String>() {

            @Override
            public void onResponse(String response) {
                tvContent.setText("" + response);
            }
        }, new Response.ErrorListener() {

            @Override
            public void onErrorResponse(VolleyError error) {
                tvContent.setText("Error: " + error.getMessage());
            }
        });

        mQueue.add(strRequest);
        mQueue.start();
    }
}
使用过程分以下几步:
1.初始化Volley,创建出一个RequestQueue
2.创建一个StringRequest
3.把StringRequest添加到请求队列
4.启动请求队列
点击加载数据按钮,就可以请求到字符串数据了。作为一个有追求的程序猿,我们不能仅仅满足于简单的使用,接下来跟踪下源码,看看里面究竟是咋回事。
mQueue = Volley.newRequestQueue(this),创建出RequestQueue。
/*
 * Copyright (C) 2012 The Android Open Source Project
 *
 * Licensed under the Apache License, Version 2.0 (the "License");
 * you may not use this file except in compliance with the License.
 * You may obtain a copy of the License at
 *
 *      http://www.apache.org/licenses/LICENSE-2.0
 *
 * Unless required by applicable law or agreed to in writing, software
 * distributed under the License is distributed on an "AS IS" BASIS,
 * WITHOUT WARRANTIES OR CONDITIONS OF ANY KIND, either express or implied.
 * See the License for the specific language governing permissions and
 * limitations under the License.
 */

package com.android.volley.toolbox;

import android.content.Context;
import android.content.pm.PackageInfo;
import android.content.pm.PackageManager.NameNotFoundException;
import android.net.http.AndroidHttpClient;
import android.os.Build;

import com.android.volley.Network;
import com.android.volley.RequestQueue;

import java.io.File;

/*
 * 工具类,作用是构建一个可用于添加网络请求的RequestQueue对象
 */
public class Volley {

    /** Default on-disk cache directory. */
    private static final String DEFAULT_CACHE_DIR = "volley";

    /**
     * Creates a default instance of the worker pool and calls {@link RequestQueue#start()} on it.
     *
     * @param context A {@link Context} to use for creating the cache dir.
     * @param stack An {@link HttpStack} to use for the network, or null for default.
     * @return A started {@link RequestQueue} instance.
     */
    public static RequestQueue newRequestQueue(Context context, HttpStack stack) {
        File cacheDir = new File(context.getCacheDir(), DEFAULT_CACHE_DIR);

        String userAgent = "volley/0";
        try {
            String packageName = context.getPackageName();
            PackageInfo info = context.getPackageManager().getPackageInfo(packageName, 0);
            userAgent = packageName + "/" + info.versionCode;
        } catch (NameNotFoundException e) {
        }

        //如果 HttpStatck 参数为 null,则如果系统在 API Level >= 9,采用基于 HttpURLConnection 的 HurlStack
        //如果API Level < 9,采用基于 HttpClient 的 HttpClientStack。
        if (stack == null) {
            if (Build.VERSION.SDK_INT >= 9) {
                stack = new HurlStack();
            } else {
                // Prior to Gingerbread, HttpUrlConnection was unreliable.
                // See: http://android-developers.blogspot.com/2011/09/androids-http-clients.html
                stack = new HttpClientStack(AndroidHttpClient.newInstance(userAgent));
            }
        }

        //得到了HttpStack,然后通过它构造一个代表网络(Network)的具体实现BasicNetwork
        Network network = new BasicNetwork(stack);
        //构造一个代表缓存(Cache)的基于Disk的具体实现DiskBasedCache。最后将网络对象(network)
        //和缓存对象(Cache)对象传入构建一个RequestQueue,启动这个RequestQueue,并返回
        RequestQueue queue = new RequestQueue(new DiskBasedCache(cacheDir), network);
        queue.start();

        return queue;
    }

    /**
     * Creates a default instance of the worker pool and calls {@link RequestQueue#start()} on it.
     *
     * @param context A {@link Context} to use for creating the cache dir.
     * @return A started {@link RequestQueue} instance.
     */
    /*
     * Volley对外暴露的API,通过newRequestQueue()函数新建并启动一个RequestQueue队列
     */
    public static RequestQueue newRequestQueue(Context context) {
        return newRequestQueue(context, null);
    }
}
创建StringRequest,并传入一个Listener,回调响应的数据。
/*
 * Copyright (C) 2011 The Android Open Source Project
 *
 * Licensed under the Apache License, Version 2.0 (the "License");
 * you may not use this file except in compliance with the License.
 * You may obtain a copy of the License at
 *
 *      http://www.apache.org/licenses/LICENSE-2.0
 *
 * Unless required by applicable law or agreed to in writing, software
 * distributed under the License is distributed on an "AS IS" BASIS,
 * WITHOUT WARRANTIES OR CONDITIONS OF ANY KIND, either express or implied.
 * See the License for the specific language governing permissions and
 * limitations under the License.
 */

package com.android.volley.toolbox;

import com.android.volley.NetworkResponse;
import com.android.volley.Request;
import com.android.volley.Response;
import com.android.volley.Response.ErrorListener;
import com.android.volley.Response.Listener;

import java.io.UnsupportedEncodingException;

/**
 * A canned request for retrieving the response body at a given URL as a String.
 */
public class StringRequest extends Request<String> {
    private final Listener<String> mListener;

    /**
     * Creates a new request with the given method.
     *
     * @param method the request {@link Method} to use
     * @param url URL to fetch the string at
     * @param listener Listener to receive the String response
     * @param errorListener Error listener, or null to ignore errors
     */
    public StringRequest(int method, String url, Listener<String> listener,
            ErrorListener errorListener) {
        super(method, url, errorListener);
        mListener = listener;
    }

    /**
     * Creates a new GET request.
     *
     * @param url URL to fetch the string at
     * @param listener Listener to receive the String response
     * @param errorListener Error listener, or null to ignore errors
     */
    public StringRequest(String url, Listener<String> listener, ErrorListener errorListener) {
        this(Method.GET, url, listener, errorListener);
    }

    @Override
    protected void deliverResponse(String response) {
        mListener.onResponse(response);
    }

    @Override
    protected Response<String> parseNetworkResponse(NetworkResponse response) {
        String parsed;
        try {
            parsed = new String(response.data, HttpHeaderParser.parseCharset(response.headers));
        } catch (UnsupportedEncodingException e) {
            parsed = new String(response.data);
        }
        return Response.success(parsed, HttpHeaderParser.parseCacheHeaders(response));
    }
}
把StringRequest添加到请求队列:
    /**
     * Adds a Request to the dispatch queue.
     * @param request The request to service
     * @return The passed-in request
     */
    public <T> Request<T> add(Request<T> request) {
        // Tag the request as belonging to this queue and add it to the set of current requests.
        request.setRequestQueue(this);
        synchronized (mCurrentRequests) {
            mCurrentRequests.add(request);
        }

        // Process requests in the order they are added.
        request.setSequence(getSequenceNumber());
        request.addMarker("add-to-queue");

        // If the request is uncacheable, skip the cache queue and go straight to the network.
        if (!request.shouldCache()) {
            mNetworkQueue.add(request);
            return request;
        }

        // Insert request into stage if there's already a request with the same cache key in flight.
        synchronized (mWaitingRequests) {
            String cacheKey = request.getCacheKey();
            if (mWaitingRequests.containsKey(cacheKey)) {
                // There is already a request in flight. Queue up.
                Queue<Request<?>> stagedRequests = mWaitingRequests.get(cacheKey);
                if (stagedRequests == null) {
                    stagedRequests = new LinkedList<Request<?>>();
                }
                stagedRequests.add(request);
                mWaitingRequests.put(cacheKey, stagedRequests);
                if (VolleyLog.DEBUG) {
                    VolleyLog.v("Request for cacheKey=%s is in flight, putting on hold.", cacheKey);
                }
            } else {
                // Insert 'null' queue for this cacheKey, indicating there is now a request in
                // flight.
                mWaitingRequests.put(cacheKey, null);
                mCacheQueue.add(request);
            }
            return request;
        }
    }
mQueue.start(),启动RequestQueue。
   /**
     * Starts the dispatchers in this queue.
     */
    public void start() {
        stop();  // Make sure any currently running dispatchers are stopped.
        // Create the cache dispatcher and start it.
        mCacheDispatcher = new CacheDispatcher(mCacheQueue, mNetworkQueue, mCache, mDelivery);
        mCacheDispatcher.start();

        // Create network dispatchers (and corresponding threads) up to the pool size.
        for (int i = 0; i < mDispatchers.length; i++) {
            NetworkDispatcher networkDispatcher = new NetworkDispatcher(mNetworkQueue, mNetwork,
                    mCache, mDelivery);
            mDispatchers[i] = networkDispatcher;
            networkDispatcher.start();
        }
    }
NetworkDispatcher是一个线程,主要看一下run()方法。最关键的一行是 NetworkResponse networkResponse = mNetwork.performRequest(request),获取到相应数据,并且使用mDelivery.postResponse(request, response)分发响应数据,postResponse会调用StringRequest中的mRequest.deliverResponse(mResponse.result),最终通过mListener.onResponse(response)回调响应的数据,而这个mListener,是在StringRequest的构造方法中传入的。
    @Override
    public void run() {
        Process.setThreadPriority(Process.THREAD_PRIORITY_BACKGROUND);
        Request<?> request;
        while (true) {
            try {
                // Take a request from the queue.
                request = mQueue.take();
            } catch (InterruptedException e) {
                // We may have been interrupted because it was time to quit.
                if (mQuit) {
                    return;
                }
                continue;
            }

            try {
                request.addMarker("network-queue-take");

                // If the request was cancelled already, do not perform the
                // network request.
                if (request.isCanceled()) {
                    request.finish("network-discard-cancelled");
                    continue;
                }

                addTrafficStatsTag(request);

                // Perform the network request.
                NetworkResponse networkResponse = mNetwork.performRequest(request);
                request.addMarker("network-http-complete");

                // If the server returned 304 AND we delivered a response already,
                // we're done -- don't deliver a second identical response.
                if (networkResponse.notModified && request.hasHadResponseDelivered()) {
                    request.finish("not-modified");
                    continue;
                }

                // Parse the response here on the worker thread.
                Response<?> response = request.parseNetworkResponse(networkResponse);
                request.addMarker("network-parse-complete");

                // Write to cache if applicable.
                // TODO: Only update cache metadata instead of entire record for 304s.
                if (request.shouldCache() && response.cacheEntry != null) {
                    mCache.put(request.getCacheKey(), response.cacheEntry);
                    request.addMarker("network-cache-written");
                }

                // Post the response back.
                request.markDelivered();
                mDelivery.postResponse(request, response);
            } catch (VolleyError volleyError) {
                parseAndDeliverNetworkError(request, volleyError);
            } catch (Exception e) {
                VolleyLog.e(e, "Unhandled exception %s", e.toString());
                mDelivery.postError(request, new VolleyError(e));
            }
        }
    }
mNetwork.performRequest在BasicNetwork这个类中,主要是 httpResponse = mHttpStack.performRequest(request, headers)通过request和header获得相应的Response。
    @Override
    public NetworkResponse performRequest(Request<?> request) throws VolleyError {
        long requestStart = SystemClock.elapsedRealtime();
        while (true) {
            HttpResponse httpResponse = null;
            byte[] responseContents = null;
            Map<String, String> responseHeaders = new HashMap<String, String>();
            try {
                // Gather headers.
                Map<String, String> headers = new HashMap<String, String>();
                addCacheHeaders(headers, request.getCacheEntry());
                httpResponse = mHttpStack.performRequest(request, headers);
                StatusLine statusLine = httpResponse.getStatusLine();
                int statusCode = statusLine.getStatusCode();

                responseHeaders = convertHeaders(httpResponse.getAllHeaders());
                // Handle cache validation.
                if (statusCode == HttpStatus.SC_NOT_MODIFIED) {
                    return new NetworkResponse(HttpStatus.SC_NOT_MODIFIED,
                            request.getCacheEntry() == null ? null : request.getCacheEntry().data,
                            responseHeaders, true);
                }

                // Some responses such as 204s do not have content.  We must check.
                if (httpResponse.getEntity() != null) {
                  responseContents = entityToBytes(httpResponse.getEntity());
                } else {
                  // Add 0 byte response as a way of honestly representing a
                  // no-content request.
                  responseContents = new byte[0];
                }

                // if the request is slow, log it.
                long requestLifetime = SystemClock.elapsedRealtime() - requestStart;
                logSlowRequests(requestLifetime, request, responseContents, statusLine);

                if (statusCode < 200 || statusCode > 299) {
                    throw new IOException();
                }
                return new NetworkResponse(statusCode, responseContents, responseHeaders, false);
            } catch (SocketTimeoutException e) {
                attemptRetryOnException("socket", request, new TimeoutError());
            } catch (ConnectTimeoutException e) {
                attemptRetryOnException("connection", request, new TimeoutError());
            } catch (MalformedURLException e) {
                throw new RuntimeException("Bad URL " + request.getUrl(), e);
            } catch (IOException e) {
                int statusCode = 0;
                NetworkResponse networkResponse = null;
                if (httpResponse != null) {
                    statusCode = httpResponse.getStatusLine().getStatusCode();
                } else {
                    throw new NoConnectionError(e);
                }
                VolleyLog.e("Unexpected response code %d for %s", statusCode, request.getUrl());
                if (responseContents != null) {
                    networkResponse = new NetworkResponse(statusCode, responseContents,
                            responseHeaders, false);
                    if (statusCode == HttpStatus.SC_UNAUTHORIZED ||
                            statusCode == HttpStatus.SC_FORBIDDEN) {
                        attemptRetryOnException("auth",
                                request, new AuthFailureError(networkResponse));
                    } else {
                        // TODO: Only throw ServerError for 5xx status codes.
                        throw new ServerError(networkResponse);
                    }
                } else {
                    throw new NetworkError(networkResponse);
                }
            }
        }
    }
mHttpStack.performRequest(request, headers)有两种实现方式。API Level >= 9,基于HttpURLConnection 的HurlStack 和API Level < 9,基于HttpClient 的 HttpClientStack。
HttpURLConnection 和 AndroidHttpClient(HttpClient 的封装)如何选择及原因:
在 Froyo(2.2) 之前,HttpURLConnection 有个重大 Bug,调用 close() 函数会影响连接池,导致连接复用失效,所以在 Froyo 之前使用 HttpURLConnection 需要关闭 keepAlive。
另外在 Gingerbread(2.3) HttpURLConnection 默认开启了 gzip 压缩,提高了 HTTPS 的性能,Ice Cream Sandwich(4.0) HttpURLConnection 支持了请求结果缓存。
再加上 HttpURLConnection 本身 API 相对简单,所以对 Android 来说,在 2.3 之后建议使用 HttpURLConnection,之前建议使用 AndroidHttpClient。
现在使用的手机系统绝大多数大于9,我们看一下HurlStack中的performRequest(),主要是调用HttpUrlConnection从网络请求数据。
    @Override
    public HttpResponse performRequest(Request<?> request, Map<String, String> additionalHeaders)
            throws IOException, AuthFailureError {
        String url = request.getUrl();
        HashMap<String, String> map = new HashMap<String, String>();
        map.putAll(request.getHeaders());
        map.putAll(additionalHeaders);
        if (mUrlRewriter != null) {
            String rewritten = mUrlRewriter.rewriteUrl(url);
            if (rewritten == null) {
                throw new IOException("URL blocked by rewriter: " + url);
            }
            url = rewritten;
        }
        URL parsedUrl = new URL(url);
        HttpURLConnection connection = openConnection(parsedUrl, request);
        for (String headerName : map.keySet()) {
            connection.addRequestProperty(headerName, map.get(headerName));
        }
        setConnectionParametersForRequest(connection, request);
        // Initialize HttpResponse with data from the HttpURLConnection.
        ProtocolVersion protocolVersion = new ProtocolVersion("HTTP", 1, 1);
        int responseCode = connection.getResponseCode();
        if (responseCode == -1) {
            // -1 is returned by getResponseCode() if the response code could not be retrieved.
            // Signal to the caller that something was wrong with the connection.
            throw new IOException("Could not retrieve response code from HttpUrlConnection.");
        }
        StatusLine responseStatus = new BasicStatusLine(protocolVersion,
                connection.getResponseCode(), connection.getResponseMessage());
        BasicHttpResponse response = new BasicHttpResponse(responseStatus);
        response.setEntity(entityFromConnection(connection));
        for (Entry<String, List<String>> header : connection.getHeaderFields().entrySet()) {
            if (header.getKey() != null) {
                Header h = new BasicHeader(header.getKey(), header.getValue().get(0));
                response.addHeader(h);
            }
        }
        return response;
    }
到这里,主要调用流程就结束了,看源码还是需要耐心的。
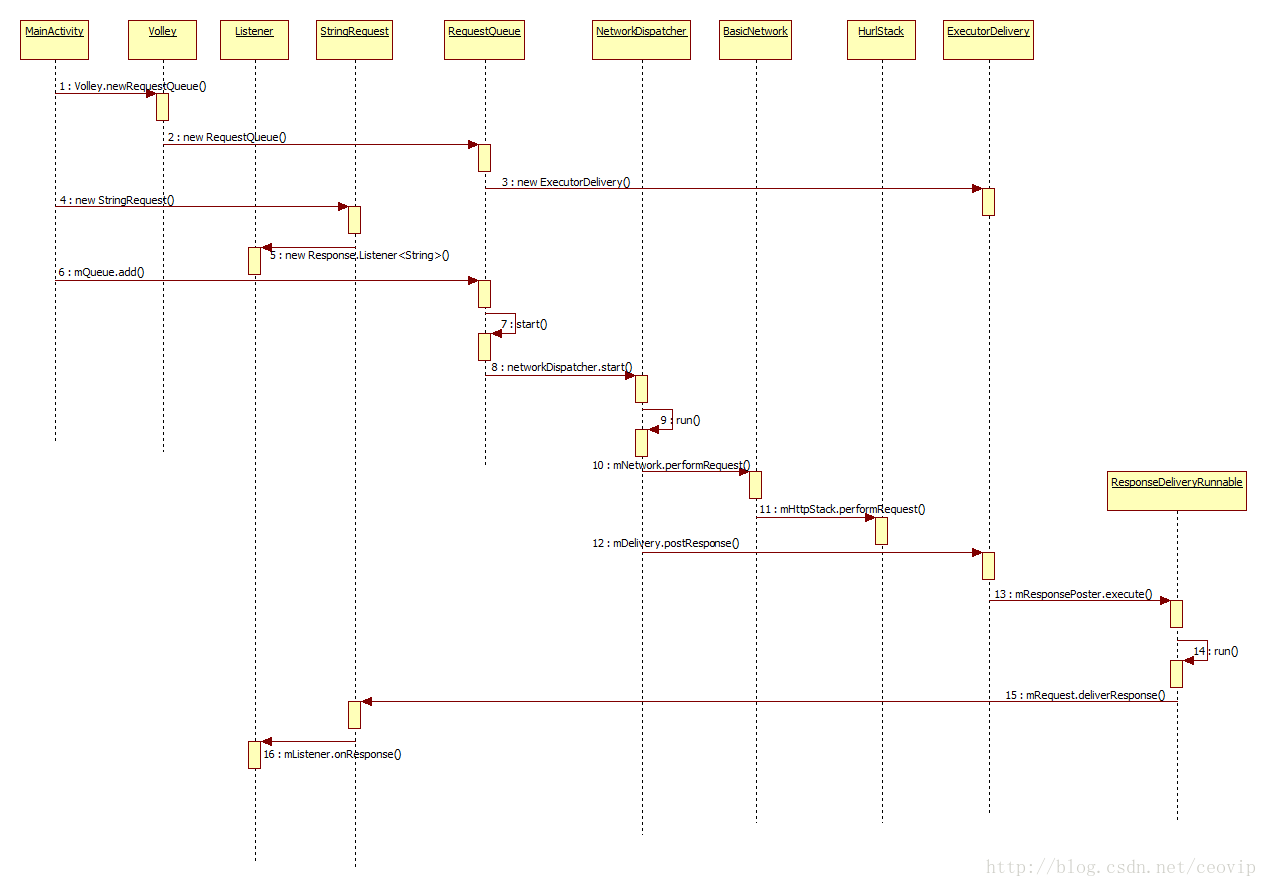
涉及到一些主要类的时序图如下(这里只是以StringRequest加载字符串数据为例,至于加载图片、缓存、超时等,以后再接着写):