一、概况与原理
1)所需要的配置组件有:pacemaker+corosync+HAProxy
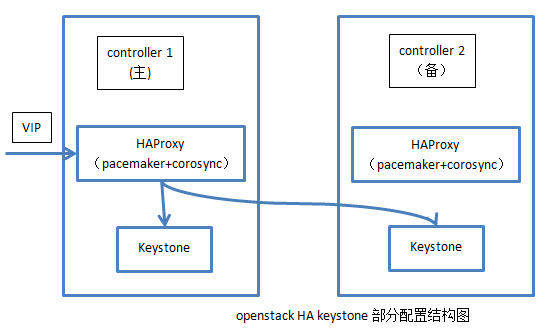
2)主要原理:HAProxy作为负载均衡器,将对openstack api服务的请求分发到两个镜像的控制节点上,由于openstack api服务是无状态的服务,所以不存在数据同步的问题。具体为在pacemaker中配置一个VIP,HAProxy负责监听这个VIP,将对这个VIP的请求分发到两台控制节点上,同时HAProxy本身作为pacemaker的资源实现高可用性。另外,需在openstack中修改API服务的endpoint为VIP,同时对于服务的调用地址改为VIP。
3) 目前只配置了keystone部分,其他部分情况类似。
二、pacemaker+corosync+crmsh安装
一、前提条件
node1:
(1)各节点之间主机名互相解析
uname -n
>node1.test.com
vim /etc/hosts
>127.0.0.1 localhost localhost.localdomain localhost4 localhost4.localdomain4
>::1 localhost localhost.localdomain localhost6 localhost6.localdomain6
>192.168.18.201 node1.test.com node1
>192.168.18.202 node2.test.com node2
ping node1
ping node2
(2).各节点之间时间同步
ntpdate 210.72.145.44
(3).各节点之间ssh互信
ssh-keygen -t rsa -f ~/.ssh/id_rsa -P ''
ssh-copy-id -i .ssh/id_rsa.pub root@node2.test.com
node2:
(1).各节点之间主机名互相解析
uname -n
>node2.test.com
vim /etc/hosts
>127.0.0.1 localhost localhost.localdomain localhost4 localhost4.localdomain4
>::1 localhost localhost.localdomain localhost6 localhost6.localdomain6
>192.168.18.201 node1.test.com node1
>192.168.18.202 node2.test.com node2
ping node1
ping node2
(2).各节点之间时间同步
ntpdate 210.72.145.44
(3).各节点之间ssh互信
ssh-keygen -t rsa -f ~/.ssh/id_rsa -P ''
ssh-copy-id -i .ssh/id_rsa.pub root@node1.test.com
配置yum源(EPEL源)
node1:
wget http://download.fedoraproject.org/pub/epel/5/x86_64/epel-release-5-4.noarch.rpm
rpm -ivh epel-release-5-4.noarch.rpm
rpm --import /etc/pki/rpm-gpg/RPM-GPG-KEY-CentOS-5
yum list
node2:
wget http://download.fedoraproject.org/pub/epel/5/x86_64/epel-release-5-4.noarch.rpm
rpm -ivh epel-release-5-4.noarch.rpm
rpm --import /etc/pki/rpm-gpg/RPM-GPG-KEY-CentOS-5
yum list
关闭防火墙与SELinux
node1:
service iptables stop
vim /etc/selinux/config
># This file controls the state of SELinux on the system.
># SELINUX= can take one of these three values:
># enforcing - SELinux security policy is enforced.
># permissive - SELinux prints warnings instead of enforcing.
># disabled - SELinux is fully disabled.
>SELINUX=disabled
># SELINUXTYPE= type of policy in use. Possible values are:
># targeted - Only targeted network daemons are protected.
># strict - Full SELinux protection.
>SELINUXTYPE=targeted
node2:
service iptables stop
vim /etc/selinux/config
>SELINUX=disabled
>SELINUXTYPE=targeted
二、安装pacemaker+corosync+crmsh
node1+node2:
安装pacemaker+corosync
yum install -y corosync*
yum install -y pacemaker*
安装crmsh
1)crmsh官方网站
https://savannah.nongnu.org/forum/forum.php?forum_id=7672
2)crmsh下载地址
http://download.opensuse.org/repositories/network:/ha-clustering:/Stable/
3)安装crmsh【如果缺少依赖包再安装依赖包】
rpm -ivh crmsh-1.2.6-0.rc2.2.1.x86_64.rpm
4)验证配置:
crm
三、Corosync 详细配置
node1:
修改配置文件
vim /etc/corosync/corosync.conf
>>>
totem {
version: 2
# Time (in ms) to wait for a token 1
token: 10000
# How many token retransmits before forming a new
# configuration
token_retransmits_before_loss_const: 10
# Turn off the virtual synchrony filter
vsftype: none
# Enable encryption 2
secauth: on
# How many threads to use for encryption/decryption
threads: 0
# This specifies the redundant ring protocol, which may be
# none, active, or passive. 3
rrp_mode: active
# The following is a two-ring multicast configuration. 4
interface {
ringnumber: 1
bindnetaddr: 10.0.42.0#心跳线网段
mcastaddr: 239.255.42.2
mcastport: 5405
}
}
amf {
mode: disabled
}
service {
# Load the Pacemaker Cluster Resource Manager 5
ver: 1
name: pacemaker
}
aisexec {
user: root
group: root
}
logging {
fileline: off
to_stderr: yes
to_logfile: yes
to_syslog: yes
logfile: /var/log/cluster/corosync.log #日志位置
syslog_facility: daemon
debug: off
timestamp: on
logger_subsys {
subsys: AMF
debug: off
tags: enter|leave|trace1|trace2|trace3|trace4|trace6
}
}
>>>
生成密钥文件
注:corosync生成key文件会默认调用/dev/random随机数设备,一旦系统中断的IRQS的随机数不够用,将会产生大量的等待时间,因此,为了节约时间,我们在生成key之前讲random替换成urandom,以便节约时间。
mv /dev/{random,random.bak}
ln -s /dev/urandom /dev/random
corosync-keygen
查看生成的key文件
ll
>总用量 24
>-r-------- 1 root root 128 8月 13 14:16 authkey
>-rw-r--r-- 1 root root 521 8月 13 11:11 corosync.conf
>-rw-r--r-- 1 root root 445 5月 15 05:09 corosync.conf.example
>-rw-r--r-- 1 root root 1084 5月 15 05:09 corosync.conf.example.udpu
>drwxr-xr-x 2 root root 4096 5月 15 05:09 service.d
>drwxr-xr-x 2 root root 4096 5月 15 05:09 uidgid.d
将key文件authkey与配置文件corosync.conf复制到node2上
scp -p authkey corosync.conf node2:/etc/corosync/
检查配置
node1+node2:
corosync-cfgtool -s
启动corosync
node1+node2:
service corosync start
四、pacemaker详细配置
启动pacemaker
node1+node2:
service pacemaker start
node1 or node2:
配置集群基本属性
crm configure
>property no-quorum-policy="ignore"
> pe-warn-series-max="1000"
> pe-input-series-max="1000"
> pe-error-series-max="1000"
> cluster-recheck-interval="5min"
【具体资源的配置另当别论】