Spring Security本质上是一连串的Filter, 然后又以一个独立的Filter的形式插入到Filter Chain里,其名为FilterChainProxy。 如图所示。
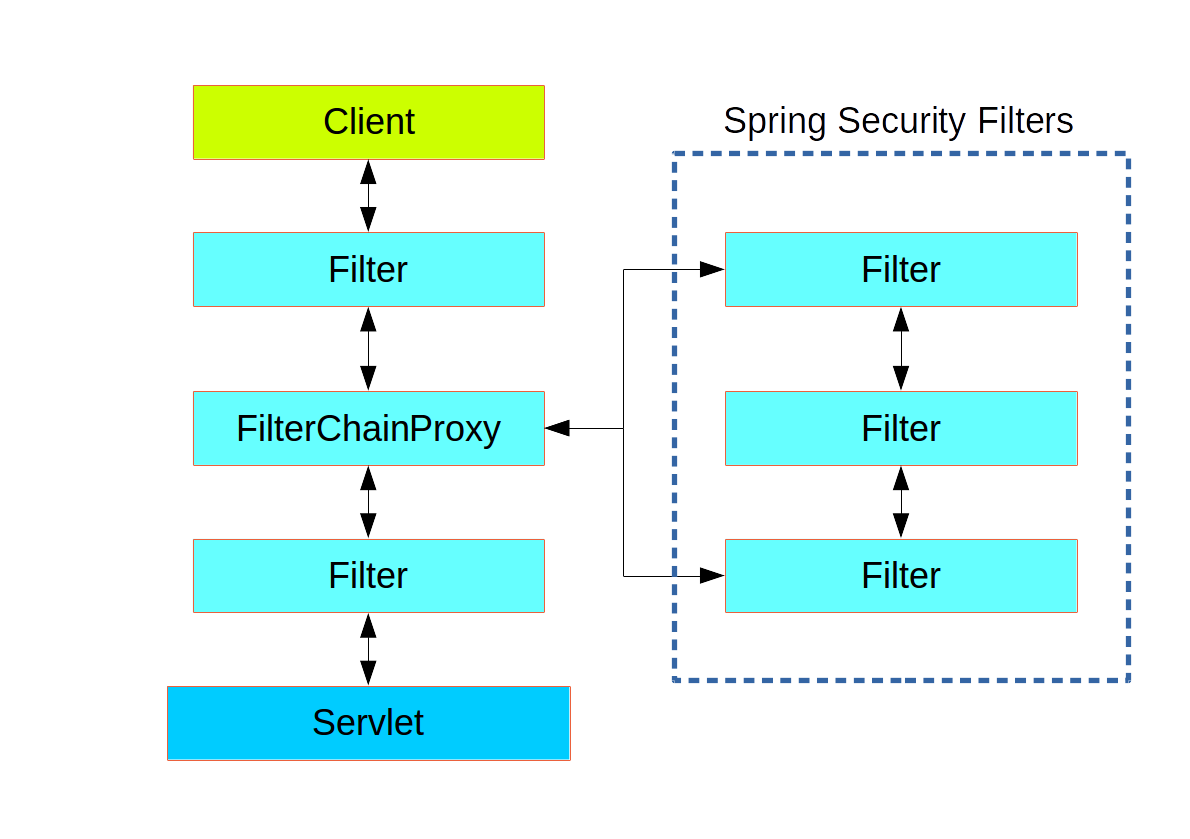
实际上FilterChainProxy下面可以有多条Filter Chain,来针对不同的URL做验证,而Filter Chain中所拥有的Filter则会根据定义的服务自动增减。所以无需要显示再定义这些Filter,除非想要实现自己的逻辑。

关键类
Authentication
Authentication是一个接口,用来表示用户认证信息,在用户登录认证之前相关信息会封装为一个Authentication具体实现类的对象,在登录认证成功之后又会生成一个信息更全面,包含用户权限等信息的Authentication对象,然后把它保存在 SecurityContextHolder所持有的SecurityContext中,供后续的程序进行调用,如访问权限的鉴定等。
AuthenticationManager
用来做验证的最主要的接口为AuthenticationManager,这个接口只有一个方法:
public interface AuthenticationManager {

  Authentication authenticate(Authentication authentication)
    throws AuthenticationException;

}其中authenticate()方法运行后可能会有三种情况:
- 验证成功,返回一个带有用户信息的
Authentication。 - 验证失败,抛出一个
AuthenticationException异常。 - 无法判断,返回
null。
ProviderManager
ProviderManager是上面的AuthenticationManager最常见的实现,它不自己处理验证,而是将验证委托给其所配置的AuthenticationProvider列表,然后会依次调用每一个 AuthenticationProvider进行认证,这个过程中只要有一个AuthenticationProvider验证成功,就不会再继续做更多验证,会直接以该认证结果作为ProviderManager的认证结果。

认证过程
- 用户使用用户名和密码进行登录。
Spring Security将获取到的用户名和密码封装成一个Authentication接口的实现类,比如常用的UsernamePasswordAuthenticationToken。- 将上述产生的
Authentication对象传递给AuthenticationManager的实现类ProviderManager进行认证。 ProviderManager依次调用各个AuthenticationProvider进行认证,认证成功后返回一个封装了用户权限等信息的Authentication对象。- 将
AuthenticationManager返回的Authentication对象赋予给当前的SecurityContext。
自定义验证
有了以上的知识储备后就可以来自定义验证方法了。通过上面可以看出,实际上真正来做验证操作的是一个个的AuthenticationProvider,所以如果要自定义验证方法,只需要实现一个自己的AuthenticationProvider然后再将其添加进ProviderManager里就行了。
自定义AuthenticationProvider
@Component
public class CustomAuthenticationProvider
  implements AuthenticationProvider {

    @Override
    public Authentication authenticate(Authentication authentication)
      throws AuthenticationException {

        String name = authentication.getName();
        String password = authentication.getCredentials().toString();

        if (shouldAuthenticateAgainstThirdPartySystem()) {

            // use the credentials
            // and authenticate against the third-party system
            return new UsernamePasswordAuthenticationToken(
              name, password, new ArrayList<>());
        } else {
            return null;
        }
    }

    @Override
    public boolean supports(Class<?> authentication) {
        return authentication.equals(
          UsernamePasswordAuthenticationToken.class);
    }
}其中的supports()方法接受一个authentication参数,用来判断传进来的authentication是不是该AuthenticationProvider能够处理的类型。
注册AuthenticationProvider
现在再将刚创建的AuthenticationProvider在与ProviderManager里注册,所有操作就完成了。
@Configuration
@EnableWebSecurity
@ComponentScan("org.baeldung.security")
public class SecurityConfig extends WebSecurityConfigurerAdapter {

    @Autowired
    private CustomAuthenticationProvider authProvider;

    @Override
    protected void configure(
      AuthenticationManagerBuilder auth) throws Exception {

        auth.authenticationProvider(authProvider);
    }

    @Override
    protected void configure(HttpSecurity http) throws Exception {
        http.authorizeRequests().anyRequest().authenticated()
            .and()
            .httpBasic();
    }
}