写在前面
之前也一直很少有写SpringBoot项目相关的文章,今天 准备整理一个我自己初始化SpringBoot项目时的一个脚手架,便于自己后面查阅。因为SpringBoot的约定大于配置,在整合各个组件的时候,我们仅仅写很少的代码就能 整合 跑起来。
本文,也仅仅是一个简单的整合,更多个性化配置,更多调优,这个也是自己在工作中慢慢摸索的。如果你有什么更多好的建议或者意见,也可以留言交流。谢谢~
我们开始吧
新建SpringBoot 2.0.3.RELEASE web 项目
标题1:AOP 切面统一打印请求日志
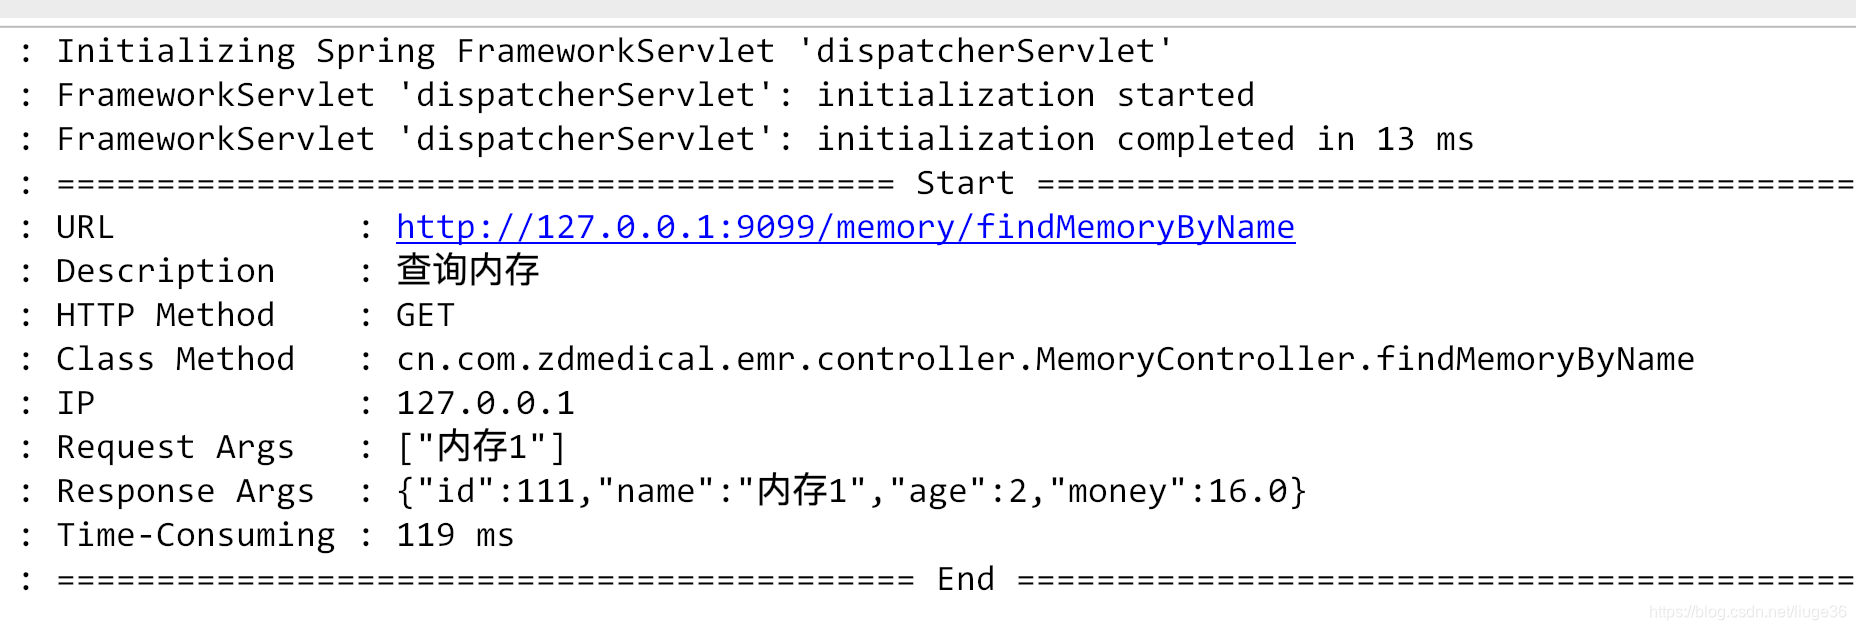
意图:可以看到,每个对于每个请求,开始与结束一目了然,并且打印了以下参数:
URL: 请求接口地址;
HTTP Method: 请求的方法,是 POST, GET, 还是 DELETE 等;
Class Method: 对应 Controller 的全路径以及调用的哪个方法;
IP: 请求 IP 地址;
Request Args: 请求入参,以 JSON 格式输出;
Response Args: 响应出参,以 JSON 格式输出;
Time-Consuming: 请求耗时;
步骤一:添加依赖:
       <dependency>
            <groupId>org.springframework.boot</groupId>
            <artifactId>spring-boot-starter-aop</artifactId>
        </dependency>

        <!-- 用于日志切面中,以 json 格式打印出入参 -->
        <dependency>
            <groupId>com.google.code.gson</groupId>
            <artifactId>gson</artifactId>
            <version>2.8.5</version>
        </dependency>

        <!-- lombok -->
        <dependency>
            <groupId>org.projectlombok</groupId>
            <artifactId>lombok</artifactId>
            <optional>true</optional>
        </dependency>
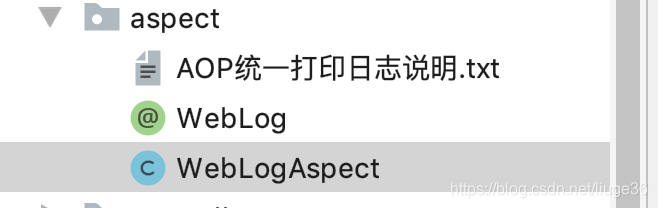
步骤二:新建一个包aspect
自定义一个注解:
import java.lang.annotation.*;

/**
 * Description: TODO
 *
 * @Author: 留歌36
 * @Date: 2019-11-27 15:43
 */
@Retention(RetentionPolicy.RUNTIME)
@Target({ElementType.METHOD})
@Documented
public @interface WebLog {

    /** 日志描述信息 */
    String description() default "";
}
新建注解类:
import com.google.gson.Gson;
import lombok.extern.slf4j.Slf4j;
import org.aspectj.lang.JoinPoint;
import org.aspectj.lang.ProceedingJoinPoint;
import org.aspectj.lang.annotation.*;
import org.springframework.stereotype.Component;
import org.springframework.web.context.request.RequestContextHolder;
import org.springframework.web.context.request.ServletRequestAttributes;

import javax.servlet.http.HttpServletRequest;
import java.lang.reflect.Method;

/**
 * Description: 查看 https://www.cnblogs.com/quanxiaoha/p/10414681.html
 *
 * @Author: 留歌36
 * @Date: 2019-11-08 11:00
 */
@Aspect
@Component
@Slf4j
public class WebLogAspect {

    /** 换行符 */
    private static final String LINE_SEPARATOR = System.lineSeparator();

    /** 以自定义 @WebLog 注解为切点 */
    @Pointcut("@annotation(com.csylh.boot2all.aspect.WebLog)")
    public void webLog() {}

    /**
     * 在切点之前织入
     * @param joinPoint
     * @throws Throwable
     */
    @Before("webLog()")
    public void doBefore(JoinPoint joinPoint) throws Throwable {
        // 开始打印请求日志
        ServletRequestAttributes attributes = (ServletRequestAttributes) RequestContextHolder.getRequestAttributes();
        HttpServletRequest request = attributes.getRequest();

        // 获取 @WebLog 注解的描述信息
        String methodDescription = getAspectLogDescription(joinPoint);

        // 打印请求相关参数
        log.info("========================================== Start ==========================================");
        // 打印请求 url
        log.info("URL            : {}", request.getRequestURL().toString());
        // 打印描述信息
        log.info("Description    : {}", methodDescription);
        // 打印 Http method
        log.info("HTTP Method    : {}", request.getMethod());
        // 打印调用 controller 的全路径以及执行方法
        log.info("Class Method   : {}.{}", joinPoint.getSignature().getDeclaringTypeName(), joinPoint.getSignature().getName());
        // 打印请求的 IP
        log.info("IP             : {}", request.getRemoteAddr());
        // 打印请求入参
        log.info("Request Args   : {}", new Gson().toJson(joinPoint.getArgs()));
    }

    /**
     * 在切点之后织入
     * @throws Throwable
     */
    @After("webLog()")
    public void doAfter() throws Throwable {
        // 接口结束后换行,方便分割查看
        log.info("=========================================== End ===========================================" + LINE_SEPARATOR);
    }

    /**
     * 环绕
     * @param proceedingJoinPoint
     * @return
     * @throws Throwable
     */
    @Around("webLog()")
    public Object doAround(ProceedingJoinPoint proceedingJoinPoint) throws Throwable {
        long startTime = System.currentTimeMillis();
        Object result = proceedingJoinPoint.proceed();
        // 打印出参
        log.info("Response Args  : {}", new Gson().toJson(result));
        // 执行耗时
        log.info("Time-Consuming : {} ms", System.currentTimeMillis() - startTime);
        return result;
    }


    /**
     * 获取切面注解的描述
     *
     * @param joinPoint 切点
     * @return 描述信息
     * @throws Exception
     */
    public String getAspectLogDescription(JoinPoint joinPoint)
            throws Exception {
        String targetName = joinPoint.getTarget().getClass().getName();
        String methodName = joinPoint.getSignature().getName();
        Object[] arguments = joinPoint.getArgs();
        Class targetClass = Class.forName(targetName);
        Method[] methods = targetClass.getMethods();
        StringBuilder description = new StringBuilder("");
        for (Method method : methods) {
            if (method.getName().equals(methodName)) {
                Class[] clazzs = method.getParameterTypes();
                if (clazzs.length == arguments.length) {
                    description.append(method.getAnnotation(WebLog.class).description());
                    break;
                }
            }
        }
        return description.toString();
    }
}
就这样就OK。测试:
标题2:Swagger 整合
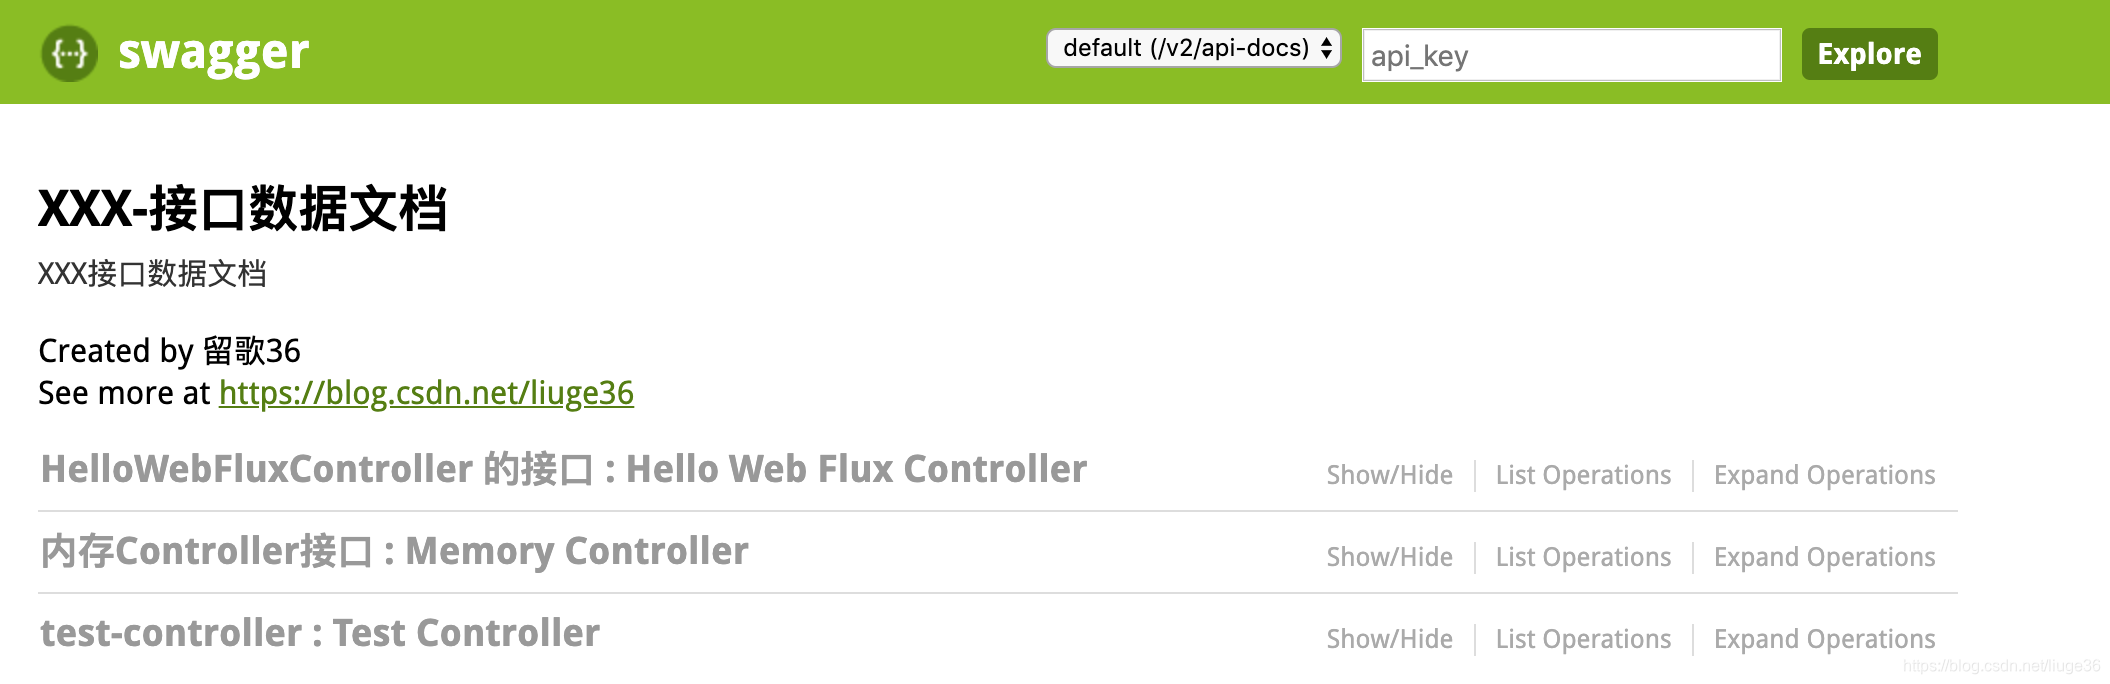
意图:生成文档形式的API并提供给不同的团队使用
便于自己单测
无需过多冗余的word文档,这一点很重要,因为我在工作中就遇到这么一个情况,由于开发使用的文档和最新文档版本导致不一致,导致后期很烦人
步骤一:添加依赖
<dependency>
    <groupId>io.springfox</groupId>
    <artifactId>springfox-swagger2</artifactId>
    <version>2.4.0</version>
</dependency>
<dependency>
    <groupId>io.springfox</groupId>
    <artifactId>springfox-swagger-ui</artifactId>
    <version>2.4.0</version>
</dependency>
步骤2:新建swagger2配置类
import org.springframework.context.annotation.Bean;
import org.springframework.context.annotation.Configuration;
import springfox.documentation.builders.ApiInfoBuilder;
import springfox.documentation.builders.ParameterBuilder;
import springfox.documentation.builders.PathSelectors;
import springfox.documentation.builders.RequestHandlerSelectors;
import springfox.documentation.schema.ModelRef;
import springfox.documentation.service.ApiInfo;
import springfox.documentation.service.Contact;
import springfox.documentation.service.Parameter;
import springfox.documentation.spi.DocumentationType;
import springfox.documentation.spring.web.plugins.Docket;
import springfox.documentation.swagger2.annotations.EnableSwagger2;

import java.util.ArrayList;
import java.util.List;

/**
 * Description:
 *
 * @author: 留歌36
 * Date:2018/9/14 16:29
 */
@Configuration
@EnableSwagger2
public class Swagger2 {

    /**
     * @Description:swagger2的配置文件,这里可以配置swagger2的一些基本的内容,比如扫描的包等等
     */
    @Bean
    public Docket createRestApi() {

        // 为swagger添加header参数可供输入
//        ParameterBuilder userTokenHeader = new ParameterBuilder();
//        ParameterBuilder userIdHeader = new ParameterBuilder();
//        List<Parameter> pars = new ArrayList<Parameter>();
//        userTokenHeader.name("headerUserToken").description("userToken")
//        	.modelRef(new ModelRef("string")).parameterType("header")
//        	.required(false).build();
//        userIdHeader.name("headerUserId").description("userId")
//	    	.modelRef(new ModelRef("string")).parameterType("header")
//	    	.required(false).build();
//        pars.add(userTokenHeader.build());
//        pars.add(userIdHeader.build());

        return new Docket(DocumentationType.SWAGGER_2).apiInfo(apiInfo()).select()

    // 注意修改这里            .apis(RequestHandlerSelectors.basePackage("com.zd.tongnan.controller"))
                .paths(PathSelectors.any()).build()
                .globalOperationParameters(setHeaderToken());
//				.globalOperationParameters(pars);
    }
    private List<Parameter> setHeaderToken() {
        ParameterBuilder tokenPar = new ParameterBuilder();
        List<Parameter> pars = new ArrayList<>();
        tokenPar.name("token").description("token").modelRef(new ModelRef("string")).parameterType("header").required(false).build();
        pars.add(tokenPar.build());
        return pars;
    }


    /**
     * @Description: 构建 api文档的信息
     */
    private ApiInfo apiInfo() {
        return new ApiInfoBuilder()
                // 设置页面标题
                .title("xxx系统-接口数据文档")
                // 描述
                .description("xxx接口数据文档")
                // 设置联系人
                .contact(new Contact("留歌36","https://blog.csdn.net/liuge36",""))

//                .contact(new Contact("留歌36", "http://csylh.cn", "csylh36@163.com"))
                // 定义版本号
                .version("V-1.0.0").build();
    }

}
步骤三:使用注解 ,主要是配置 在 controller类名,controller方法 和 实体类这三个地方
demo:
controller 类名上
@Api(value = “用户注册登录接口”,tags = {“登录注册注销的controller”})
public class UserController{}
controller类 方法名上
@ApiOperation:用在请求的方法上,说明方法的用途、作用
- value=“说明方法的用途、作用”
- notes=“方法的备注说明”

案例:
@ApiOperation(value = “用户注册接口”, notes=“这是用户注册的接口,随便写都可以”)
public ServerResponse register(@RequestBody Users user){
return iUserService.register(user);
}
controller 类方法参数上
重点 两大类:
1.@RequestParam ⇒ @ApiImplicitParams
使用@ApiImplicitParams来定义参数
  @ApiImplicitParams({
            @ApiImplicitParam(name="name",value="内存名",dataType="string", paramType = "query"),
    })
2.@RequestBody ⇒ @ApiModelProperty(value = “用户名”,name = “username”,example = “admin”,required = true) :注:这里是在对应的实体类上的各个属性上添加注解
区别:一个是在实体类上添加注解@ApiModelProperty
一个是在方法 参数上面添加注解@ApiImplicitParams
更多使用,参考 这里
标题3:Mybatis 整合

意图:这个是常用的持久层框架,虽然spring-data-jpa也是很优秀的。但是我自己在工作中这个用的比较多一点。
SpringBoot 整合 Mybatis 有两种常用的方式,一种就是我们常见的 xml 的方式 ,还有一种是全注解的方式。
如何选择:在 SQL 语句不太长的情况下,我觉得全注解的方式一定是比较清晰简洁的。但是,复杂的 SQL 确实不太适合和代码写在一起,那么就使用xml文件的形式。其实这两个方法也没差。
步骤1:添加依赖
     <dependency>
            <groupId>mysql</groupId>
            <artifactId>mysql-connector-java</artifactId>
        </dependency>

        <dependency>
            <groupId>org.mybatis.spring.boot</groupId>
            <artifactId>mybatis-spring-boot-starter</artifactId>
            <version>1.3.1</version>
        </dependency>
步骤2:配置 application.properties
server.port=9099

# 暂时使用SpringBoot2 自带的 HikariCP  连接池,后面结合Druid
spring.datasource.url=jdbc:mysql://192.168.1.200:3306/test2?useUnicode=true&characterEncoding=UTF-8&useSSL=false
spring.datasource.username=db
spring.datasource.password=xxx
spring.datasource.driver-class-name=com.mysql.jdbc.Driver

#Mybatis 配置
mybatis.config-location=classpath:mybatis-config.xml
mybatis.mapper-locations=classpath*:/mappers/**.xml
mybatis.type-aliases-package=com.liuge36.emr.entity
步骤3:resources 下新建mybatis-config.xml ,并建立自己的entity包
<?xml version="1.0" encoding="UTF-8"?>
<!DOCTYPE configuration
        PUBLIC "-//mybatis.org//DTD Config 3.0//EN"
        "http://mybatis.org/dtd/mybatis-3-config.dtd">
<configuration>
    <!-- 配置全局属性 -->
    <settings>
        <!-- 使用jdbc的getGeneratedKeys获取数据库自增主键值 -->
        <setting name="useGeneratedKeys" value="true" />

        <!-- 使用列标签替换列别名 默认:true -->
        <setting name="useColumnLabel" value="true" />

        <!-- 开启驼峰命名转换:Table{create_time} -> Entity{createTime} -->
        <setting name="mapUnderscoreToCamelCase" value="true" />
    </settings>
</configuration>
步骤4:测试
新建dao包,新建MemoryDao接口
import cn.com.zdmedical.emr.entity.Memory;
import org.apache.ibatis.annotations.Mapper;
import org.apache.ibatis.annotations.Param;

/**
 * Description: TODO
 *
 * @Author: 留歌36
 * @Date: 2019-11-28 09:10
 */
@Mapper
public interface MemoryDao {
    /** 根据名字查找内存信息 */
    Memory findMemoryByName(@Param("name") String name);
}
xml 实现:
<?xml version="1.0" encoding="UTF-8"?>
<!DOCTYPE mapper PUBLIC "-//mybatis.org//DTD Mapper 3.0//EN"
        "http://mybatis.org/dtd/mybatis-3-mapper.dtd">

<mapper namespace="com.liuge36.emr.dao.MemoryDao">

    <select id="findMemoryByName" parameterType="String" resultType="com.liuge36.emr.entity.Memory">
        SELECT * FROM memory WHERE name = #{name}
    </select>
</mapper>
其余的就是基本的常规业务操作了。
注解的方式:
@Mapper
public interface UserDao {
    /**
     * 通过名字查询用户信息
     */
    @Select("SELECT * FROM user WHERE name = #{name}")
    User findUserByName(@Param("name") String name);

    /**
     * 查询所有用户信息
     */
    @Select("SELECT * FROM user")
    List<User> findAllUser();

    /**
     * 插入用户信息
     */
    @Insert("INSERT INTO user(name, age,money) VALUES(#{name}, #{age}, #{money})")
    void insertUser(@Param("name") String name, @Param("age") Integer age, @Param("money") Double money);

    /**
     * 根据 id 更新用户信息
     */
    @Update("UPDATE  user SET name = #{name},age = #{age},money= #{money} WHERE id = #{id}")
    void updateUser(@Param("name") String name, @Param("age") Integer age, @Param("money") Double money,
                    @Param("id") int id);

    /**
     * 根据 id 删除用户信息
     */
    @Delete("DELETE from user WHERE id = #{id}")
    void deleteUser(@Param("id") int id);
}
所以,其实SpringBoot整合这些框架的 基本 使用还是很简单的。
标题4:Druid 数据库连接池 整合
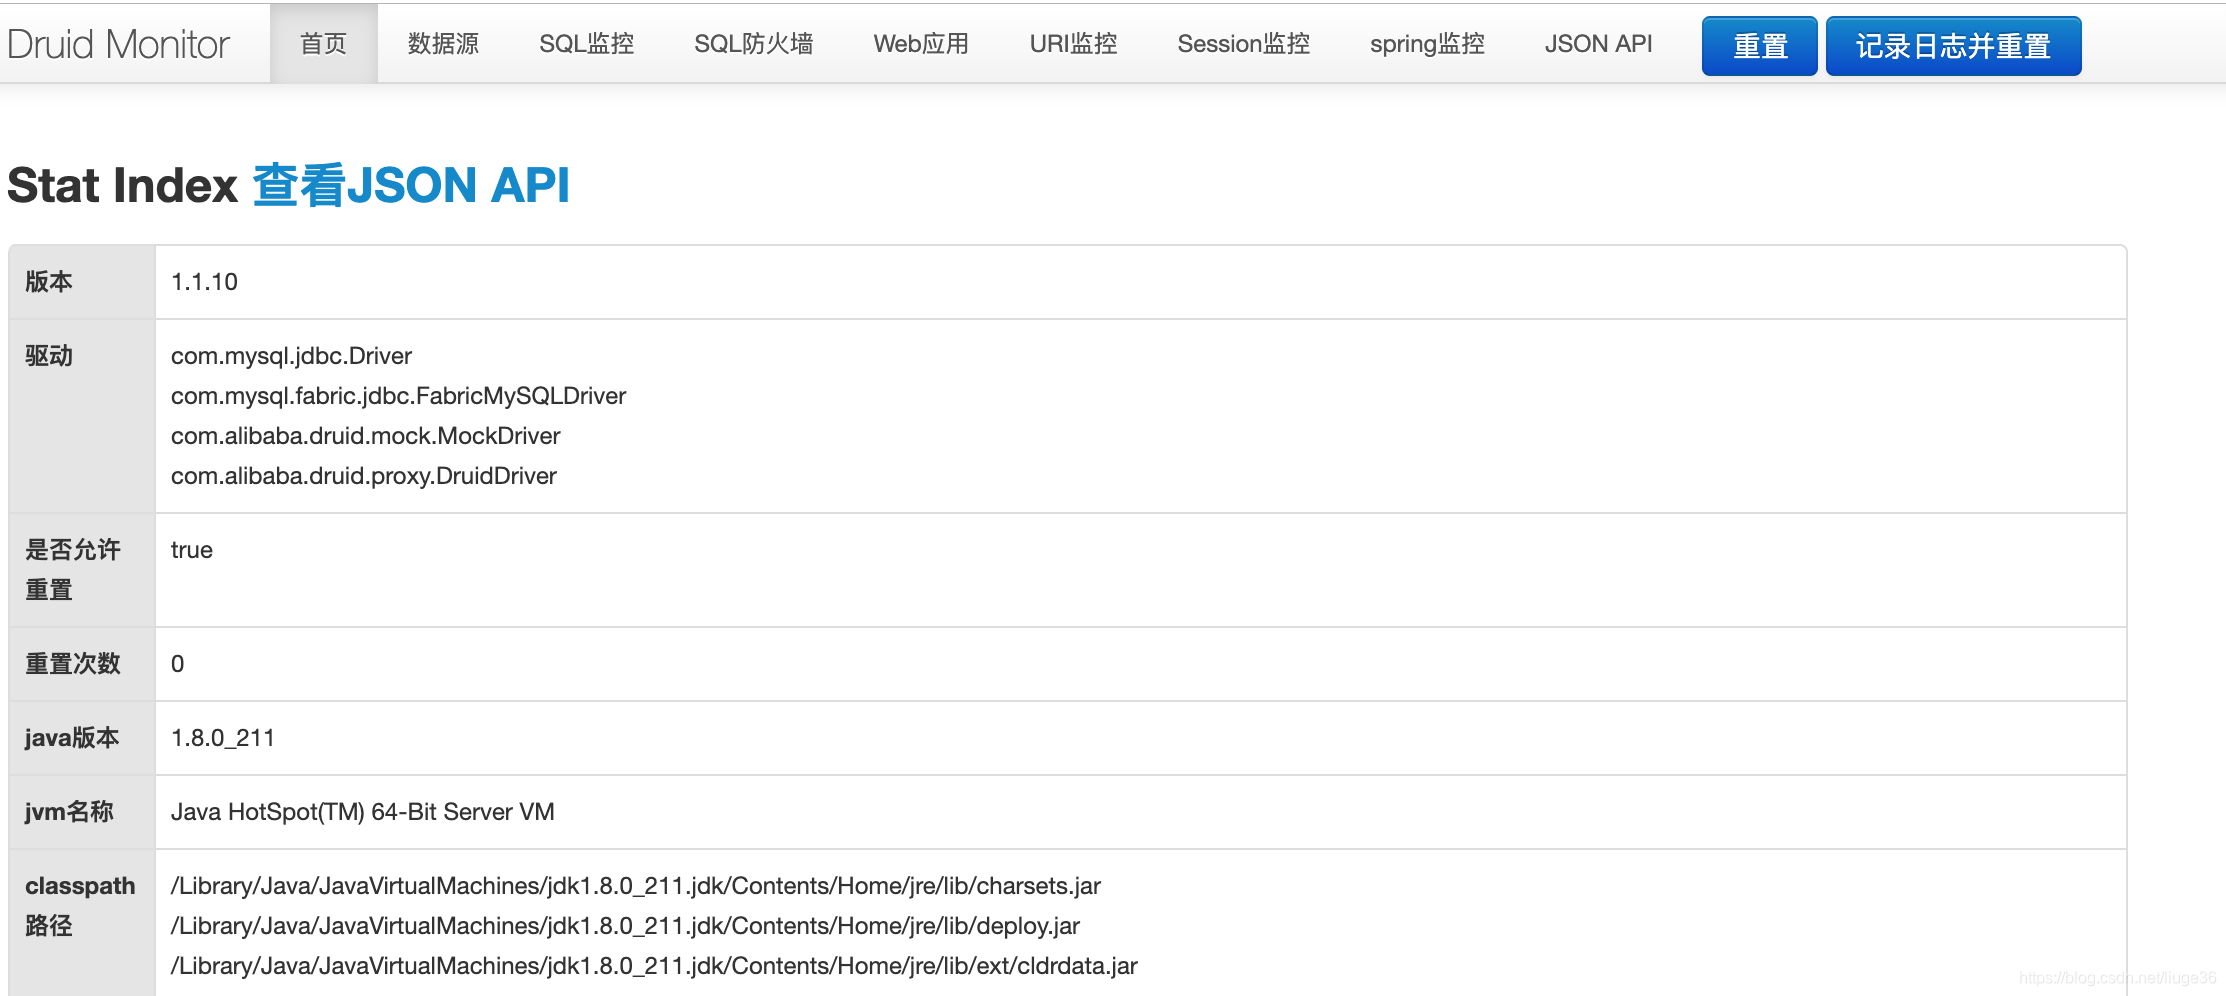
https://github.com/alibaba/druid
阿里巴巴数据库事业部出品,为监控而生的数据库连接池
Druid是Java语言中最好的数据库连接池。Druid能够提供强大的监控和扩展功能。
步骤1:添加依赖
  <dependency>
            <groupId>com.alibaba</groupId>
            <artifactId>druid-spring-boot-starter</artifactId>
            <version>1.1.10</version>
  </dependency>
步骤2:配置 application.properties
#spring.datasource.url=jdbc:mysql://192.168.1.200:3306/test2?useUnicode=true&characterEncoding=UTF-8&useSSL=false
#spring.datasource.username=root
#spring.datasource.password=xx
#spring.datasource.driver-class-name=com.mysql.jdbc.Driver

# 这4个参数key里不带druid也可以,即可以还用上面的这个4个参数
spring.datasource.druid.url=jdbc:mysql://192.168.1.200:3306/test2?useUnicode=true&characterEncoding=UTF-8&useSSL=false
spring.datasource.druid.username=root
spring.datasource.druid.password=xx
spring.datasource.druid.driver-class-name=com.mysql.jdbc.Driver

# 初始化时建立物理连接的个数
spring.datasource.druid.initial-size=5
# 最大连接池数量
spring.datasource.druid.max-active=30
# 最小连接池数量
spring.datasource.druid.min-idle=5
# 获取连接时最大等待时间,单位毫秒
spring.datasource.druid.max-wait=60000
# 配置间隔多久才进行一次检测,检测需要关闭的空闲连接,单位是毫秒
spring.datasource.druid.time-between-eviction-runs-millis=60000
# 连接保持空闲而不被驱逐的最小时间
spring.datasource.druid.min-evictable-idle-time-millis=300000
# 用来检测连接是否有效的sql,要求是一个查询语句
spring.datasource.druid.validation-query=SELECT 1 FROM DUAL
# 建议配置为true,不影响性能,并且保证安全性。申请连接的时候检测,如果空闲时间大于timeBetweenEvictionRunsMillis,执行validationQuery检测连接是否有效。
spring.datasource.druid.test-while-idle=true
# 申请连接时执行validationQuery检测连接是否有效,做了这个配置会降低性能。
spring.datasource.druid.test-on-borrow=false
# 归还连接时执行validationQuery检测连接是否有效,做了这个配置会降低性能。
spring.datasource.druid.test-on-return=false
# 是否缓存preparedStatement,也就是PSCache。PSCache对支持游标的数据库性能提升巨大,比如说oracle。在mysql下建议关闭。
spring.datasource.druid.pool-prepared-statements=true
# 要启用PSCache,必须配置大于0,当大于0时,poolPreparedStatements自动触发修改为true。
spring.datasource.druid.max-pool-prepared-statement-per-connection-size=50
# 配置监控统计拦截的filters,去掉后监控界面sql无法统计
spring.datasource.druid.filters=stat,wall
# 通过connectProperties属性来打开mergeSql功能;慢SQL记录
spring.datasource.druid.connection-properties=druid.stat.mergeSql=true;druid.stat.slowSqlMillis=500
# 合并多个DruidDataSource的监控数据
spring.datasource.druid.use-global-data-source-stat=true
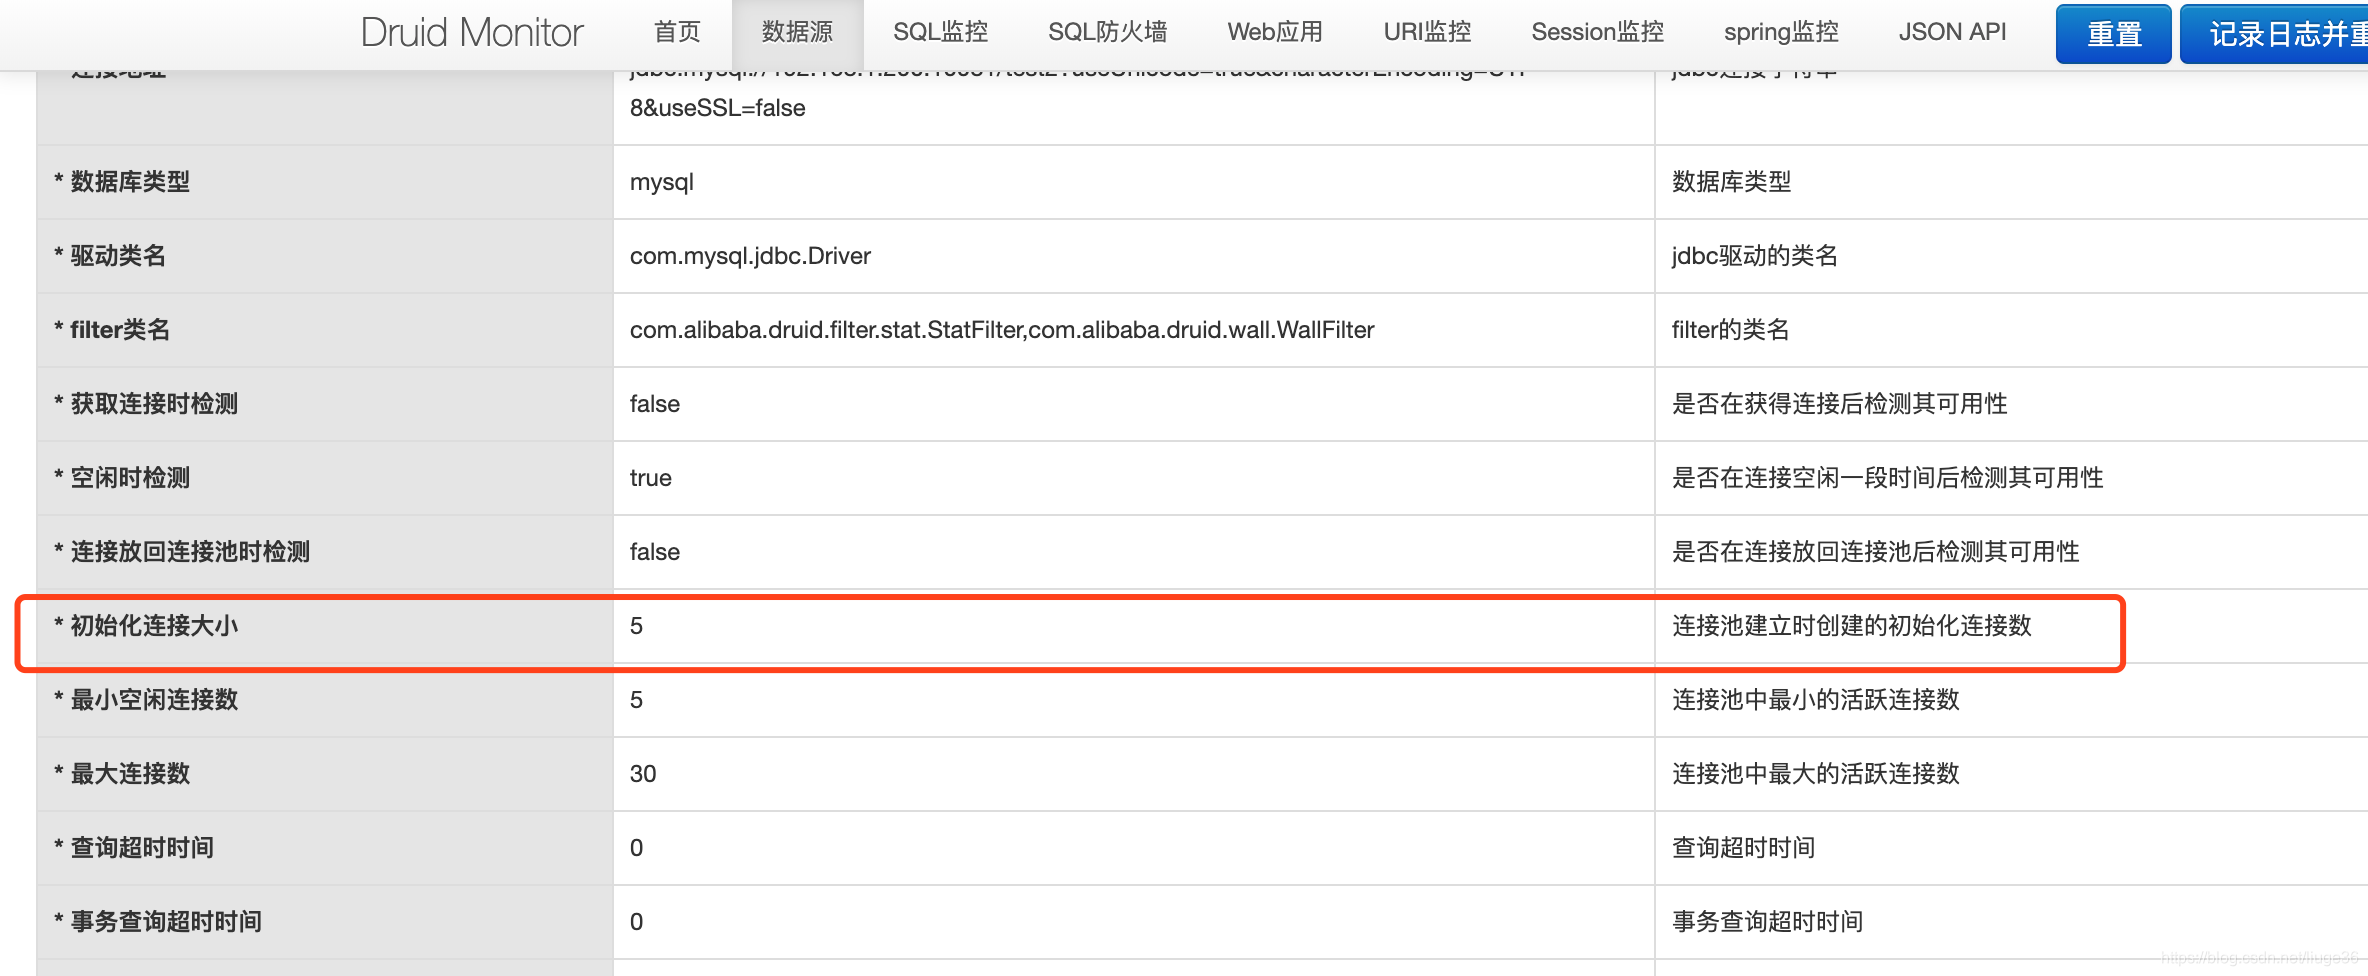
步骤3:访问 http://127.0.0.1:9099/druid/index.html

打开mysql客户端navicat的sql窗口,执行show full processlist,显示如下内容:

可以看到,启动项目后,直接创建5个数据连接,这是由application.properties配置文件中spring.datasource.druid.initial-size=5控制的。
步骤4:druid监控
在步骤3我们可以看到,浏览器输入http://127.0.0.1:9099/druid/index.html直接就能看到druid控制台界面,在这里面可以看到很多项目信息,如果任凭用户随意访问,非常危险。我们可以通过配置,设置只有通过登录认证才可以访问。
在application.properties配置文件中增加:
# druid连接池监控
spring.datasource.druid.stat-view-servlet.login-username=admin
spring.datasource.druid.stat-view-servlet.login-password=admin
# 排除一些静态资源,以提高效率
spring.datasource.druid.web-stat-filter.exclusions=*.js,*.gif,*.jpg,*.png,*.css,*.ico,/druid/*
再次访问:http://127.0.0.1:9099/druid/login.html
输入 admin /admin 进去
标题5:通用工具类+通用返回
4个常用JSON类库分别为:Gson,FastJson,Jackson,Json-lib
步骤1:添加依赖
 <dependency>
            <groupId>org.codehaus.jackson</groupId>
            <artifactId>jackson-mapper-asl</artifactId>
            <version>1.9.13</version>
 </dependency>
步骤2:修改配置文件
# 属性为 空(””) 或者为 NULL 都不序列化
spring.jackson.default-property-inclusion=non_empty
步骤3:新建 common 包
在包下新建:ResponseCode
/**
 * Description:
 *
 * @author: 留歌36
 * Date:2018/11/4 16:04
 */
public enum ResponseCode {
    SUCCESS(200,"成功"),
    ERROR(1,"错误"),
    NEED_REGISTER(10,"需要注册,请授权登录!"),
    NEED_LOGIN(12,"需要登录,请登录!"),


    TOMANYLOGIN(11,"账号被挤出."),
    ILLEGAL_ARGUMENT(2,"ILLEGAL_ARGUMENT");

    private final int code;
    private final String desc;

    ResponseCode(int code, String desc){
        this.code=code;
        this.desc=desc;
    }
    public int getCode(){
        return code;
    }
    public String getDesc(){
        return desc;
    }
}
新建通用返回对象:
import org.codehaus.jackson.annotate.JsonIgnore;
import org.codehaus.jackson.map.annotate.JsonSerialize;

import java.io.Serializable;

/**
 * Description:
 *
 * @author: 留歌36
 * Date:2018/11/4 16:03
 */
@JsonSerialize(include =  JsonSerialize.Inclusion.NON_NULL)
//保证序列化json的时候,如果是null的对象,key也会消失
public class ServerResponse<T> implements Serializable{

    private int status;
    private String msg;
    private T data;//可以指定泛型里面的内容,也可以不指定,而且里面的类型可以是多种,map,list,string

    //编写外部访问的Public方法,之前需要写一个枚举类
    //这样外部的显示的就是这几个值啦
    public int getStatus(){
        return status;
    }
    public String getMsg(){
        return msg;
    }
    public T getData(){
        return data;
    }
    //判断是否登陆成功
    @JsonIgnore
    public boolean isSuccess(){
        return this.status == ResponseCode.SUCCESS.getCode();
    }

    //编写 私有 的构造方法,外部是不能new的
    // 开放供外部使用的Public方法
    private ServerResponse(int status){
        this.status=status;
    }
    private ServerResponse(int status, T data){
        this.status=status;
        this.data=data;
    }
    private ServerResponse(int status, String msg){
        this.status=status;
        this.msg=msg;
    }

    private ServerResponse(int status, String msg, T data){
        this.status=status;
        this.msg=msg;
        this.data=data;
    }
    //编写成功静态的方法供外部的调用
    public static <T> ServerResponse<T> createBySuccess(){
        return new ServerResponse<T>(ResponseCode.SUCCESS.getCode());
    }

    public static  <T> ServerResponse<T> createBySuccess(T data){
        return new ServerResponse<T>(ResponseCode.SUCCESS.getCode(),data);

    }
    public static <T> ServerResponse<T> createBySuccess(String msg,T data){
        return new ServerResponse<T>(ResponseCode.SUCCESS.getCode(),msg,data);
    }

    public static <T> ServerResponse<T> createBySuccessMessage(String msg){
        return new ServerResponse<T>(ResponseCode.SUCCESS.getCode(),msg);

    }
    //编写失败的方法
    public static <T> ServerResponse<T> createByError(){
        return new ServerResponse<T>(ResponseCode.ERROR.getCode(),ResponseCode.ERROR.getDesc());
    }
    public static <T> ServerResponse<T> createByErrorMessage(String errorMessage) {
        return new ServerResponse<T>(ResponseCode.ERROR.getCode(),errorMessage);
    }
    public static <T> ServerResponse<T> createByErrorCodeMessage(int errorcode,String erroeMessage){
        return new ServerResponse<T>(errorcode,erroeMessage);
    }
    public static <T> ServerResponse<T> createByErrorNeeDLogin(String erroeMessage){
        return new ServerResponse<T>(ResponseCode.NEED_REGISTER.getCode(),erroeMessage);
    }
}
允许全局跨域:
import org.springframework.context.annotation.Bean;
import org.springframework.context.annotation.Configuration;
import org.springframework.web.cors.CorsConfiguration;
import org.springframework.web.cors.UrlBasedCorsConfigurationSource;
import org.springframework.web.filter.CorsFilter;

/**
 * Description: 配置全局跨域
 *
 * @Author: 留歌36
 * @Date: 2019-11-28 11:45
 */
@Configuration
public class GlobalCorsConfig {

    private CorsConfiguration buildConfig() {
        CorsConfiguration corsConfiguration = new CorsConfiguration();
        corsConfiguration.addAllowedOrigin("*");
        corsConfiguration.addAllowedHeader("*");
        corsConfiguration.addAllowedMethod("*");
        corsConfiguration.setAllowCredentials(true);
        return corsConfiguration;
    }


    @Bean
    public CorsFilter corsFilter() {
        UrlBasedCorsConfigurationSource source = new UrlBasedCorsConfigurationSource();
        source.registerCorsConfiguration("/**", buildConfig());
        return new CorsFilter(source);
    }
}
SQL样例:
create database imooc_homepage_sc;


-- 用户信息表
create table if not exists `imooc_homepage_sc`.`homepage_user` (
    `id` bigint(20) not null auto_increment comment '自增ID',
    `username` varchar(128) not null default '' comment '用户名',
    `email` varchar(128) not null default '' comment '用户邮箱',
    `create_time` datetime not null default '1970-01-01 08:00:00' comment '创建时间',
    `update_time` datetime not null default '1970-01-01 08:00:00' comment '更新时间',
    primary key(`id`),
    unique key `key_username` (`username`)
)engine=InnoDB auto_increment=1 default charset=utf8 row_format=compact comment='用户信息表';

-- 用户课程表
create table if not exists `imooc_homepage_sc`.`homepage_user_course` (
    `id` bigint(20) not null auto_increment comment '自增ID',
    `user_id` bigint(20) not null default 0 comment '用户 ID',
    `course_id` bigint(20) not null default 0 comment '课程 ID',
    `create_time` datetime not null default '1970-01-01 08:00:00' comment '创建时间',
    `update_time` datetime not null default '1970-01-01 08:00:00' comment '更新时间',
    primary key(`id`),
    unique key `key_user_course` (`user_id`, `course_id`)
)engine=InnoDB auto_increment=1 default charset=utf8 row_format=compact comment='用户课程表';

-- 课程表
create table if not exists `imooc_homepage_sc`.`homepage_course` (
    `id` bigint(20) not null auto_increment comment '自增ID',
    `course_name` varchar(128) not null default '' comment '课程名称',
    `course_type` varchar(128) not null default '' comment '课程类型',
     `course_icon` varchar(128) not null default '' comment '课程图标',
     `course_intro` varchar(128) not null default '' comment '课程介绍',
    `create_time` datetime not null default '1970-01-01 08:00:00' comment '创建时间',
    `update_time` datetime not null default '1970-01-01 08:00:00' comment '更新时间',
    primary key(`id`),
    unique key `key_course_name` (`course_name`)
)engine=InnoDB auto_increment=1 default charset=utf8 row_format=compact comment='课程表';
未完待续~