1.1 问题
使用Hibernate实现对员工表的增、删、改、查。
1.2 方案
Hibernate使用步骤:
- 导入Hibernate包,以及数据库驱动包。
- 引入Hibernate主配置文件hibernate.cfg.xml。
- 创建实体类。
- 创建映射关系文件。
- 使用Hibernate常用API执行增删改查操作。
1.3 步骤
实现此案例需要按照如下步骤进行。
环境为:myeclipse 6.5 ,mysql 5.0 ,Hibernate 3 。
步骤一:准备工作创建员工表EMP,建表语句如下:
CREATE TABLE `emp` (
  `ID` INT(4) NOT NULL AUTO_INCREMENT,
  `NAME` VARCHAR(50) NOT NULL,
  `AGE` INT(11) DEFAULT NULL,
  `SALARY` DOUBLE(7,2) DEFAULT NULL,
  `MARRY` CHAR(1) DEFAULT NULL,
  `BIRTHDAY` DATE DEFAULT NULL,
  `LAST_LOGIN_TIME` DATE DEFAULT NULL,
  PRIMARY KEY (`ID`)
) ENGINE=INNODB DEFAULT CHARSET=utf8
创建一个WEB项目,名为Hibernate。
步骤二:导入Hibernate开发包,以及数据库驱动包,完成后项目的包结构如下图:

网盘下载jar包: http://yunpan.cn/cmRG5gzdMtGMX 访问密码 3747
步骤三:引入Hibernate主配置文件
将Hibernate主配置文件hibernate.cfg.xml复制到项目中,放在src根路径下。并在主配置文件中配置好数据库连接信息,以及Hibernate框架参数,代码如下:
<?xml version="1.0" encoding="UTF-8"?>
<!DOCTYPE hibernate-configuration PUBLIC
            "-//Hibernate/Hibernate Configuration DTD 3.0//EN"
            "http://hibernate.sourceforge.net/hibernate-configuration-3.0.dtd">
<hibernate-configuration>
    <session-factory>
        <!-- 数据库连接信息,根据自己的数据库进行配置-->

        <property name="connection.url">jdbc:mysql://localhost:3306/souvc</property>
        <property name="connection.username">root</property>
        <property name="connection.password">123456</property>
        <property name="connection.driver_class">com.mysql.jdbc.Driver</property>

        <!-- Hibernate配置信息 -->
        <!-- dialect方言,用于配置生成针对哪个数据库的SQL语句 -->
        <property name="dialect">
            <!-- 方言类,Hibernate提供的,用于封装某种特定数据库的方言 -->
            <!-- org.hibernate.dialect.OracleDialect -->
            org.hibernate.dialect.MySQLDialect
        </property>
        <!-- Hibernate生成的SQL是否输出到控制台 -->
        <property name="show_sql">true</property>
        <!-- 将SQL输出时是否格式化 -->
        <property name="format_sql">true</property>


    </session-factory>
</hibernate-configuration>
步骤四:创建实体类
创建包com.souvc.entity,并在该包下创建员工表对应的实体类Emp.java,用于封装员工表的数据,代码如下:
package comsouvc.entity;

import java.sql.Date;
import java.sql.Timestamp;

public class Emp {
    private Integer id;
    private String name;
    private Integer age;
    private Double salary;
    private Boolean marry;
    private Date birthday;
    private Timestamp lastLoginTime;

    public Integer getId() {
        return id;
    }

    public void setId(Integer id) {
        this.id = id;
    }

    public String getName() {
        return name;
    }

    public void setName(String name) {
        this.name = name;
    }

    public Integer getAge() {
        return age;
    }

    public void setAge(Integer age) {
        this.age = age;
    }

    public Double getSalary() {
        return salary;
    }

    public void setSalary(Double salary) {
        this.salary = salary;
    }

    public Boolean getMarry() {
        return marry;
    }

    public void setMarry(Boolean marry) {
        this.marry = marry;
    }

    public Date getBirthday() {
        return birthday;
    }

    public void setBirthday(Date birthday) {
        this.birthday = birthday;
    }

    public Timestamp getLastLoginTime() {
        return lastLoginTime;
    }

    public void setLastLoginTime(Timestamp lastLoginTime) {
        this.lastLoginTime = lastLoginTime;
    }
}
步骤五:创建映射关系文件
在com.souvc.entity包下,创建员工实体类的映射关系文件,名为Emp.hbm.xml,并在该文件中配置实体类和表的关系,以及类中属性和表中字段的关系,代码如下:
<?xml version="1.0" encoding="utf-8"?>
<!DOCTYPE hibernate-mapping PUBLIC
        "-//Hibernate/Hibernate Mapping DTD 3.0//EN"
        "http://hibernate.sourceforge.net/hibernate-mapping-3.0.dtd">
<hibernate-mapping>
    <!-- 配置实体类和表的关系 -->
    <class name="com.souvc.entity.Emp" table="emp">
        <!-- 配置主键属性和字段的关系 -->
        <id name="id" type="java.lang.Integer" column="id">
            <!-- 用来指明主键的生成方式 -->
            <!--
            <generator class="sequence">
                <param name="sequence">emp_seq</param>
            </generator>
            -->
            <generator class="native">
            </generator>
        </id>

        <!-- 配置实体类中属性与表中字段的关系 -->
        <property name="name" type="java.lang.String" column="name" />
        <property name="age" type="java.lang.Integer" column="age" />
        <property name="salary" type="java.lang.Double" column="salary" />
        <property name="birthday" type="java.sql.Date"
            column="birthday" />
        <property name="lastLoginTime" type="java.sql.Timestamp"
            column="last_login_time" />
    </class>
</hibernate-mapping>
步骤六:声明映射关系文件
在主配置文件hibernate.cfg.xml中,声明映射关系文件Emp.hbm.xml,代码如下:
<!-- 声明映射关系文件 -->
        <mapping resource="com/souvc/entity/Emp.hbm.xml" />
完成代码如下:
<?xml version="1.0" encoding="UTF-8"?>
<!DOCTYPE hibernate-configuration PUBLIC
            "-//Hibernate/Hibernate Configuration DTD 3.0//EN"
            "http://hibernate.sourceforge.net/hibernate-configuration-3.0.dtd">
<hibernate-configuration>
    <session-factory>
        <!-- 数据库连接信息,根据自己的数据库进行配置
        <property name="connection.url">
            jdbc:oracle:thin:@localhost:1521:xe
        </property>
        <property name="connection.username">lhh</property>
        <property name="connection.password">123456</property>
        <property name="connection.driver_class">
            oracle.jdbc.OracleDriver
        </property>
        -->

        <property name="connection.url">jdbc:mysql://localhost:3306/souvc</property>
        <property name="connection.username">root</property>
        <property name="connection.password">123456</property>
        <property name="connection.driver_class">com.mysql.jdbc.Driver</property>

        <!-- Hibernate配置信息 -->
        <!-- dialect方言,用于配置生成针对哪个数据库的SQL语句 -->
        <property name="dialect">
            <!-- 方言类,Hibernate提供的,用于封装某种特定数据库的方言 -->
            <!-- org.hibernate.dialect.OracleDialect -->
            org.hibernate.dialect.MySQLDialect
        </property>
        <!-- Hibernate生成的SQL是否输出到控制台 -->
        <property name="show_sql">true</property>
        <!-- 将SQL输出时是否格式化 -->
        <property name="format_sql">true</property>


        <!-- 声明映射关系文件 -->
        <mapping resource="com/souvc/entity/Emp.hbm.xml" />


    </session-factory>
</hibernate-configuration>
步骤七:创建Session工具类
创建HibernateUtil工具类,用于创建Session对象,代码如下:
package com.souvc.util;

import org.hibernate.Session;
import org.hibernate.SessionFactory;
import org.hibernate.cfg.Configuration;

public class HibernateUtil {
    private static SessionFactory sessionFactory;

    static {
        // 加载Hibernate主配置文件
        Configuration conf = new Configuration();
        conf.configure("/hibernate.cfg.xml");
        sessionFactory = conf.buildSessionFactory();
    }

    /**
     * 创建session
     */
    public static Session getSession() {
        return sessionFactory.openSession();
    }

    public static void main(String[] args) {
        System.out.println(getSession());
    }
}
输出效果:
SessionImpl(PersistenceContext[entityKeys=[],collectionKeys=[]];ActionQueue[insertions=[] updates=[] deletions=[] collectionCreations=[] collectionRemovals=[] collectionUpdates=[]])
步骤八:练习使用Hibernate对员工表进行增删改查
创建包com.souvc.test,并在该包下创建一个JUNIT测试类,并在类中使用Hibernate写出对EMP表的增删改查的方法,代码如下:
package com.souvc.test;

import java.sql.Date;
import java.sql.Timestamp;
import java.util.List;

import org.hibernate.HibernateException;
import org.hibernate.Query;
import org.hibernate.Session;
import org.hibernate.Transaction;
import org.junit.Test;

import com.souvc.util.HibernateUtil;
import comsouvc.entity.Emp;

/**
 * 演示Hibernate的基本使用
 */
public class TestEmp {
    /**
     * 新增emp
     */
    @Test
    public void add() {
        // 模拟要新增的emp
        Emp e = new Emp();
        e.setName("ggg");
        e.setAge(29);
        e.setMarry(false);
        e.setSalary(8000.00);
        e.setBirthday(Date.valueOf("1983-10-20"));
        e.setLastLoginTime(new Timestamp(System.currentTimeMillis()));
        // 获取session
        Session session = HibernateUtil.getSession();
        // 开启事务
        Transaction ts = session.beginTransaction();
        try {
            // 执行新增
            session.save(e);
            // 提交事务
            ts.commit();
        } catch (HibernateException e1) {
            e1.printStackTrace();
            // 回滚事务
            ts.rollback();
        } finally {
            session.close();
        }
    }

    /**
     * 根据ID查询emp
     */
    @Test
    public void findById() {
        Session session = HibernateUtil.getSession();
        Emp emp = (Emp) session.get(Emp.class, 1);
        System.out.println(emp.getName());
        System.out.println(emp.getBirthday());
        System.out.println(emp.getLastLoginTime());
        session.close();
    }

    /**
     * 修改emp
     */
    @Test
    public void update() {
        Session session = HibernateUtil.getSession();
        // 查询要修改的数据
        Emp emp = (Emp) session.get(Emp.class, 1);
        // 开启事务
        Transaction ts = session.beginTransaction();
        try {
            // 模拟修改数据
            emp.setName("ee");
            emp.setAge(20);
            // 执行修改
            session.update(emp);
            // 提交事务
            ts.commit();
        } catch (HibernateException e) {
            e.printStackTrace();
            // 回滚事务
            ts.rollback();
        } finally {
            // 关闭连接
            session.close();
        }
    }

    /**
     * 删除emp
     */
    @Test
    public void delete() {
        Session session = HibernateUtil.getSession();
        Emp emp = (Emp) session.get(Emp.class, 1);
        Transaction ts = session.beginTransaction();
        try {
            session.delete(emp);
            ts.commit();
        } catch (HibernateException e) {
            e.printStackTrace();
            ts.rollback();
        } finally {
            session.close();
        }
    }

    /**
     * 查询全部emp
     */
    @Test
    public void findAll() {
        String hql = "from Emp";
        Session session = HibernateUtil.getSession();
        Query query = session.createQuery(hql);
        List<Emp> emps = query.list();
        for (Emp e : emps) {
            System.out.println(e.getName());
        }
        session.close();
    }
}
九、实例的效果图如下:
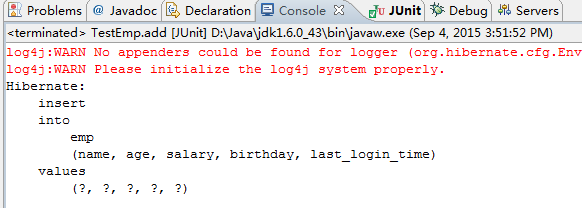
增加:
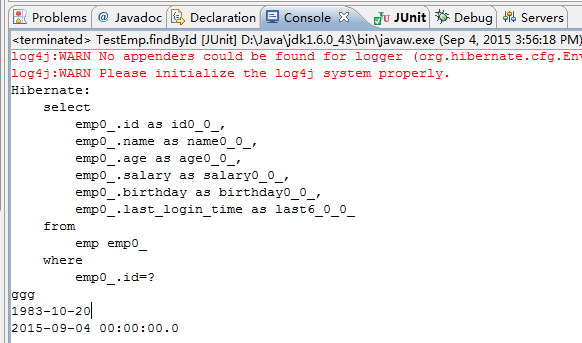
通过id查询:
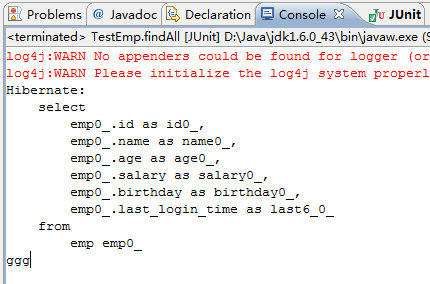
查询全部:
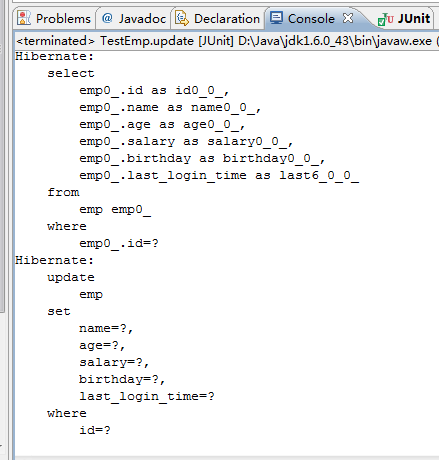
更新:

删除:

温馨提示:注意数据库要存在id为1 的数据,才能进行这些数据的操作。根据自己里面的数据来定id。
源码如下: http://yunpan.cn/cmR97XCh6SvB6 访问密码 afb4