*** 参考 ***
https://kubernetes.io/zh/docs/setup/production-environment/tools/kubeadm/high-availability
https://www.golinuxcloud.com/kubernetes-tutorial
https://kairen-archived.github.io/2019/09/20/ironman2020/day05
https://github.com/kubernetes/kubeadm/blob/main/docs/ha-considerations.md#options-for-software-load-balancing
https://realsysadmin.com/www/2020/12/10/kicking-the-tires-on-kubernetes-part-4
一、服务器规划
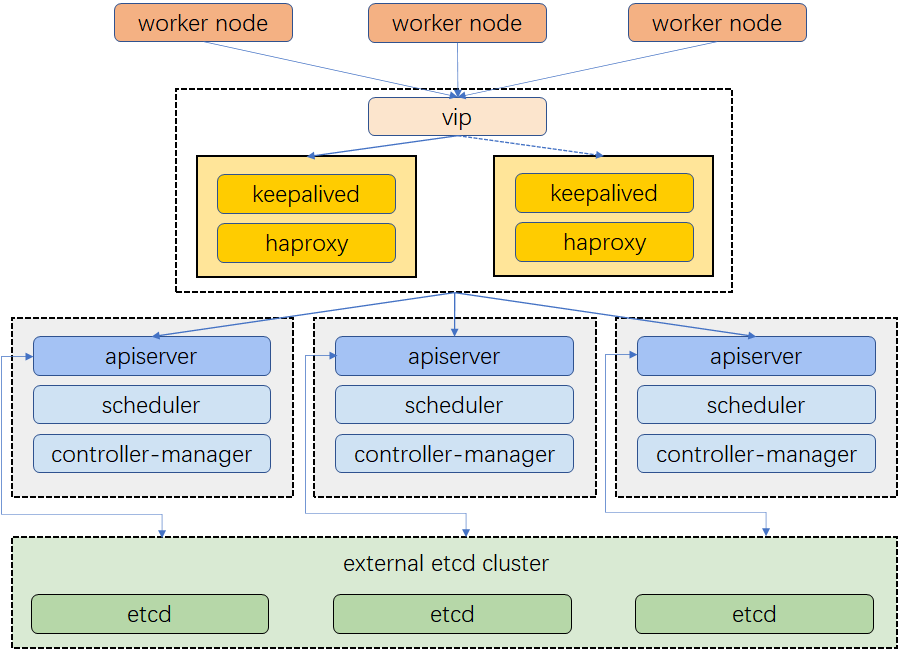
- 使用
堆叠(stacked)控制平面节点,其中etcd节点与控制平面节点共存, 使用外部etcd节点,其中etcd在与控制平面不同节点上运行 - 操作系统
CentOS Linux release 7.9.2009 (Core)
| hostname | category | hardware | eth0 | eth1 |
|---|---|---|---|---|
| vip | 192.168.100.190 | |||
| vm-191 | master | core*4 / 4g / 20GB | 192.168.100.191 | 10.0.100.191 |
| vm-192 | master | core*4 / 4g / 20GB | 192.168.100.192 | 10.0.100.192 |
| vm-193 | master | core*4 / 4g / 20GB | 192.168.100.193 | 10.0.100.193 |
| vm-194 | etcd | core*4 / 4g / 20GB | 192.168.100.194 | 10.0.100.194 |
| vm-195 | etcd | core*4 / 4g / 20GB | 192.168.100.195 | 10.0.100.195 |
| vm-196 | etcd | core*4 / 4g / 20GB | 192.168.100.196 | 10.0.100.196 |
| vm-197 | worker | core*4 / 4g / 20GB | 192.168.100.197 | 10.0.100.197 |
| vm-207 | worker | core*4 / 4g / 20GB | 192.168.100.207 | 10.0.100.207 |
| vm-208 | worker | core*4 / 4g / 20GB | 192.168.100.208 | 10.0.100.208 |
| vm-198 | registry | core*4 / 4g / 20GB | 192.168.100.198 | 10.0.100.198 |
二、预安装
1. 静态指向(master & worker & ectd)
cat > /etc/hosts <<EOF
127.0.0.1   localhost localhost.localdomain localhost4 localhost4.localdomain4
::1         localhost localhost.localdomain localhost6 localhost6.localdomain6

192.168.100.191 vm-191
192.168.100.192 vm-192
192.168.100.193 vm-193
192.168.100.194 vm-194
192.168.100.195 vm-195
192.168.100.196 vm-196
192.168.100.197 vm-197
192.168.100.207 vm-207
192.168.100.208 vm-208
192.168.100.198 vm-198
EOF
2. ssh信任登录
# vm-191
ssh-keygen -b 1024 -t rsa -P '' -f ~/.ssh/id_rsa

for i in {192..197}; do ssh-copy-id -i .ssh/id_rsa.pub vm-$i; done
for i in {192..197}; do scp /etc/hosts vm-$i:/etc; done
3. 修改内核配置
# master & worker & ectd
cat > /etc/modules-load.d/k8s.conf <<EOF
br_netfilter
EOF

cat > /etc/sysctl.d/k8s.conf <<EOF
net.bridge.bridge-nf-call-ip6tables = 1
net.bridge.bridge-nf-call-iptables = 1
EOF

sysctl -p

for i in {192..197}; do scp /etc/modules-load.d/k8s.conf vm-$i:/etc/modules-load.d; done
for i in {192..197}; do scp /etc/sysctl.d/k8s.conf vm-$i:/etc/sysctl.d; done
for i in {192..197}; do ssh vm-$i 'sysctl -p'; done
4. 加载ipvs模块
cat /etc/sysconfig/modules/ipvs.modules << EOF
#!/bin/bash
modprobe -- ip_vs
modprobe -- ip_vs_rr
modprobe -- ip_vs_wrr
modprobe -- ip_vs_sh
modprobe -- nf_conntrack_ipv4
EOF

chmod 755 /etc/sysconfig/modules/ipvs.modules
sh /etc/sysconfig/modules/ipvs.modules

for i in {192..197}; do scp /etc/sysconfig/modules/ipvs.modules vm-$i:/etc/sysconfig/modules; done
for i in {192..197}; do ssh vm-$i 'chmod 755 /etc/sysconfig/modules/ipvs.modules; sh /etc/sysconfig/modules/ipvs.modules'; done
5. 安装docker
# master & worker & ectd
cat > /etc/yum.repos.d/docker-ce.repo << EOF
[docker-ce-stable]
name=Docker CE Stable - $basearch
baseurl=https://mirrors.nju.edu.cn/docker-ce/linux/centos/$releasever/$basearch/stable
enabled=1
gpgcheck=0
gpgkey=https://mirrors.nju.edu.cn/docker-ce/linux/centos/gpg
EOF

yum install -y docker-ce

cat > /etc/docker/daemon.json << EOF
{
  "registry-mirrors": ["https://registry.docker-cn.com", "http://hub-mirror.c.163.com", "https://docker.mirrors.ustc.edu.cn"],
  "insecure-registries": ["https://192.168.100.198:5000"],
  "exec-opts": ["native.cgroupdriver=systemd"]
}
EOF

systemctl restart docker  && systemctl enable docker
docker version && docker info

for i in {192..197}; do ssh vm-$i 'yum install -y docker-ce'; done
for i in {192..197}; do scp /etc/docker/daemon.json vm-$i:/etc/docker; done
for i in {192..197}; do ssh vm-$i 'systemctl enable docker && systemctl restart docker'; done
6. 安装kubernetes
# master & worker & ectd
cat > /etc/yum.repos.d/kubernetes.repo << EOF
[kubernetes]
name=Kubernetes
baseurl=https://mirrors.nju.edu.cn/kubernetes/yum/repos/kubernetes-el7-x86_64
enabled=1
gpgcheck=0
repo_gpgcheck=0
gpgkey=https://packages.cloud.google.com/yum/doc/yum-key.gpg https://packages.cloud.google.com/yum/doc/rpm-package-key.gpg
EOF

yum install -y kubeadm-1.22.2-0 kubectl-1.22.2-0 kubelet-1.22.2-0

for i in {192..197}; do scp /etc/yum.repos.d/kubernetes.repo vm-$i:/etc/yum.repos.d; done
for i in {192..197}; do ssh vm-$i 'yum install -y kubeadm-1.22.2-0 kubectl-1.22.2-0 kubelet-1.22.2-0'; done
三、etcd高可用集群
静态pod方式失败,原因未找到,使用docker单独部署
1. 配置kubelet
mkdir -p /var/lib/kubelet

cat > /var/lib/kubelet/config.yaml << EOF
kind: KubeletConfiguration
apiVersion: kubelet.config.k8s.io/v1beta1
cgroupDriver: "systemd"
address: "127.0.0.1"
staticPodPath: "/etc/kubernetes/manifests"
authentication:
  x509:
    clientCAFile: "/etc/kubernetes/pki/etcd/ca.crt"
    enabled: true
  webhook:
    enabled: false
  anonymous:
    enabled: false
authorization:
  mode: "AlwaysAllow"
EOF

systemctl enable kubelet && systemctl restart kubelet
2. 生成kubeadm文件
# etcd-1
cat > /tmp/etcd-1.yaml << EOF
apiVersion: "kubeadm.k8s.io/v1beta3"
kind: ClusterConfiguration
imageRepository: "192.168.100.198:5000"
etcd:
  local:
    serverCertSANs:
    - "192.168.100.194"
    peerCertSANs:
    - "192.168.100.194"
    extraArgs:
      initial-cluster: etcd1=https://192.168.100.194:2380,etcd2=https://192.168.100.195:2380,etcd3=https://192.168.100.196:2380
      initial-cluster-state: new
      name: etcd1
      listen-peer-urls: https://192.168.100.194:2380
      listen-client-urls: https://192.168.100.194:2379
      advertise-client-urls: https://192.168.100.194:2379
      initial-advertise-peer-urls: https://192.168.100.194:2380
EOF

# etcd-2
cat > /tmp/etcd-2.yaml << EOF
apiVersion: "kubeadm.k8s.io/v1beta3"
kind: ClusterConfiguration
imageRepository: "192.168.100.198:5000"
etcd:
  local:
    serverCertSANs:
    - "192.168.100.195"
    peerCertSANs:
    - "192.168.100.195"
    extraArgs:
      initial-cluster: etcd1=https://192.168.100.194:2380,etcd2=https://192.168.100.195:2380,etcd3=https://192.168.100.196:2380
      initial-cluster-state: new
      name: etcd2
      listen-peer-urls: https://192.168.100.195:2380
      listen-client-urls: https://192.168.100.195:2379
      advertise-client-urls: https://192.168.100.195:2379
      initial-advertise-peer-urls: https://192.168.100.195:2380
EOF

# etcd-3
cat > /tmp/etcd-3.yaml << EOF
apiVersion: "kubeadm.k8s.io/v1beta3"
kind: ClusterConfiguration
imageRepository: "192.168.100.198:5000"
etcd:
  local:
    serverCertSANs:
    - "192.168.100.196"
    peerCertSANs:
    - "192.168.100.196"
    extraArgs:
      initial-cluster: etcd1=https://192.168.100.194:2380,etcd2=https://192.168.100.195:2380,etcd3=https://192.168.100.196:2380
      initial-cluster-state: new
      name: etcd3
      listen-peer-urls: https://192.168.100.196:2380
      listen-client-urls: https://192.168.100.196:2379
      advertise-client-urls: https://192.168.100.196:2379
      initial-advertise-peer-urls: https://192.168.100.196:2380
EOF
拷贝
scp /tmp/etcd-2.yaml vm-195:/tmp
scp /tmp/etcd-3.yaml vm-196:/tmp
3. 生成证书
# ca.crt & ca.key
kubeadm init phase certs etcd-ca

# etcd-3
kubeadm init phase certs etcd-server --config=/tmp/etcd-3.yaml
kubeadm init phase certs etcd-peer --config=/tmp/etcd-3.yaml
kubeadm init phase certs etcd-healthcheck-client --config=/tmp/etcd-3.yaml
kubeadm init phase certs apiserver-etcd-client --config=/tmp/etcd-3.yaml
scp -r /etc/kubernetes/pki vm-196:/etc/kubernetes

# etcd-2
find /etc/kubernetes/pki -not -name ca.crt -not -name ca.key -type f -delete

kubeadm init phase certs etcd-server --config=/tmp/etcd-2.yaml
kubeadm init phase certs etcd-peer --config=/tmp/etcd-2.yaml
kubeadm init phase certs etcd-healthcheck-client --config=/tmp/etcd-2.yaml
kubeadm init phase certs apiserver-etcd-client --config=/tmp/etcd-2.yaml
scp -r /etc/kubernetes/pki vm-195:/etc/kubernetes

# etcd-1
find /etc/kubernetes/pki -not -name ca.crt -not -name ca.key -type f -delete

kubeadm init phase certs etcd-server --config=/tmp/etcd-1.yaml
kubeadm init phase certs etcd-peer --config=/tmp/etcd-1.yaml
kubeadm init phase certs etcd-healthcheck-client --config=/tmp/etcd-1.yaml
kubeadm init phase certs apiserver-etcd-client --config=/tmp/etcd-1.yaml

# 查看证书
openssl x509 -in /etc/kubernetes/pki/apiserver-etcd-client.crt -noout -text
openssl x509 -in /etc/kubernetes/pki/etcd/server.crt -noout -text
openssl x509 -in /etc/kubernetes/pki/etcd/healthcheck-client.crt -noout -text
openssl x509 -in /etc/kubernetes/pki/etcd/peer.crt -noout -text

需要有以下信息
Subject: O=system:masters, CN=....

X509v3 Subject Alternative Name:
  DNS:localhost, DNS:vm-194, IP Address:192.168.100.1914 IP Address:127.0.0.1, IP Address:0:0:0:0:0:0:0:1, IP Address:192.168.100.195
4. 生成etcd静态pod配置文件
# 194
kubeadm init phase etcd local --config=/tmp/etcd-1.yaml

# 195
kubeadm init phase etcd local --config=/tmp/etcd-2.yaml

# 196
kubeadm init phase etcd local --config=/tmp/etcd-3.yaml

cat /etc/kubernetes/manifests/etcd.yaml
4. 运行etcd集群
# 194
docker run -d -p 2379:2379 -p 2380:2380 -v /var/lib/etcd:/etcd-data -v /etc/kubernetes/pki/etcd:/etc/kubernetes/pki/etcd
--name etcd 192.168.100.198:5000/etcd:3.5.0-0
/usr/local/bin/etcd
    --advertise-client-urls=https://192.168.100.194:2379
    --cert-file=/etc/kubernetes/pki/etcd/server.crt
    --client-cert-auth=true
    --data-dir=/var/lib/etcd
    --initial-advertise-peer-urls=https://192.168.100.194:2380
    --initial-cluster=etcd1=https://192.168.100.194:2380,etcd2=https://192.168.100.195:2380,etcd3=https://192.168.100.196:2380
    --initial-cluster-state=new
    --key-file=/etc/kubernetes/pki/etcd/server.key
    --listen-client-urls=https://0.0.0.0:2379
    --listen-metrics-urls=http://127.0.0.1:2381
    --listen-peer-urls=https://0.0.0.0:2380
    --name=etcd1
    --peer-cert-file=/etc/kubernetes/pki/etcd/peer.crt
    --peer-client-cert-auth=true
    --peer-key-file=/etc/kubernetes/pki/etcd/peer.key
    --peer-trusted-ca-file=/etc/kubernetes/pki/etcd/ca.crt
    --snapshot-count=10000
    --trusted-ca-file=/etc/kubernetes/pki/etcd/ca.crt

# 195
docker run -d -p 2379:2379 -p 2380:2380 -v /var/lib/etcd:/etcd-data -v /etc/kubernetes/pki/etcd:/etc/kubernetes/pki/etcd
--name etcd 192.168.100.198:5000/etcd:3.5.0-0
/usr/local/bin/etcd
    --advertise-client-urls=https://192.168.100.195:2379
    --cert-file=/etc/kubernetes/pki/etcd/server.crt
    --client-cert-auth=true
    --data-dir=/var/lib/etcd
    --initial-advertise-peer-urls=https://192.168.100.195:2380
    --initial-cluster=etcd1=https://192.168.100.194:2380,etcd2=https://192.168.100.195:2380,etcd3=https://192.168.100.196:2380
    --initial-cluster-state=new
    --key-file=/etc/kubernetes/pki/etcd/server.key
    --listen-client-urls=https://0.0.0.0:2379
    --listen-metrics-urls=http://127.0.0.1:2381
    --listen-peer-urls=https://0.0.0.0:2380
    --name=etcd2
    --peer-cert-file=/etc/kubernetes/pki/etcd/peer.crt
    --peer-client-cert-auth=true
    --peer-key-file=/etc/kubernetes/pki/etcd/peer.key
    --peer-trusted-ca-file=/etc/kubernetes/pki/etcd/ca.crt
    --snapshot-count=10000
    --trusted-ca-file=/etc/kubernetes/pki/etcd/ca.crt

# 196
docker run -d -p 2379:2379 -p 2380:2380 -v /var/lib/etcd:/etcd-data -v /etc/kubernetes/pki/etcd:/etc/kubernetes/pki/etcd
--name etcd 192.168.100.198:5000/etcd:3.5.0-0
/usr/local/bin/etcd
    --advertise-client-urls=https://192.168.100.196:2379
    --cert-file=/etc/kubernetes/pki/etcd/server.crt
    --client-cert-auth=true
    --data-dir=/var/lib/etcd
    --initial-advertise-peer-urls=https://192.168.100.196:2380
    --initial-cluster=etcd1=https://192.168.100.194:2380,etcd2=https://192.168.100.195:2380,etcd3=https://192.168.100.196:2380
    --initial-cluster-state=new
    --key-file=/etc/kubernetes/pki/etcd/server.key
    --listen-client-urls=https://0.0.0.0:2379
    --listen-metrics-urls=http://127.0.0.1:2381
    --listen-peer-urls=https://0.0.0.0:2380
    --name=etcd3
    --peer-cert-file=/etc/kubernetes/pki/etcd/peer.crt
    --peer-client-cert-auth=true
    --peer-key-file=/etc/kubernetes/pki/etcd/peer.key
    --peer-trusted-ca-file=/etc/kubernetes/pki/etcd/ca.crt
    --snapshot-count=10000
    --trusted-ca-file=/etc/kubernetes/pki/etcd/ca.crt

# test
docker run --rm -it
  --net host
  -v /etc/kubernetes:/etc/kubernetes 192.168.100.198:5000/etcd:3.5.0-0 etcdctl
  --cert /etc/kubernetes/pki/etcd/peer.crt
  --key /etc/kubernetes/pki/etcd/peer.key
  --cacert /etc/kubernetes/pki/etcd/ca.crt
  --endpoints https://192.168.100.194:2379 endpoint health --cluster
四、haproxy & keepalive高可用
1. haproxy配置文件
mkdir -p /etc/haproxy

# haproxy 与 kube-api部署同一台物理机,vip端口由6443变为8443

cat > /etc/haproxy/haproxy.cfg << EOF
global
    log        127.0.0.1 local0 info
    maxconn    4000
    daemon
    stats socket /var/lib/haproxy/stats

defaults
    mode                    http
    log                     global
    option                  httplog
    option                  dontlognull
    option http-server-close
    option                  redispatch
    retries                 3
    timeout http-request    10s
    timeout queue           1m
    timeout connect         10s
    timeout client          1m
    timeout server          1m
    timeout http-keep-alive 10s
    timeout check           10s
    maxconn                 4000

frontend stats
    bind *:9000
    mode http
    stats enable
    stats uri /stats
    stats hide-version
    stats auth haproxy:@haproxy

frontend apiservers
    bind *:8443
    mode tcp
    option tcplog
    default_backend k8s_apiservers

backend k8s_apiservers
    mode tcp
    option ssl-hello-chk
    option log-health-checks
    balance roundrobin
    default-server inter 10s downinter 5s rise 2 fall 2 slowstart 60s maxconn 250 maxqueue 256 weight 100
    server kube-apiserver-1 192.168.100.191:6443 check
    server kube-apiserver-2 192.168.100.192:6443 check
    server kube-apiserver-3 192.168.100.193:6443 check
EOF
- keepalived配置文
# 191
mkdir -p /etc/keepalived
cat > /etc/keepalived/keepalived.conf << EOF
global_defs {
  router_id vm-191
}

vrrp_script check_haproxy {
  script "/usr/sbin/pidof haproxy"
  interval 2
  weight 2
}

vrrp_instance VI_1 {
  interface eth0
  state MASTER
  advert_int 1
  virtual_router_id 51
  priority 300
  unicast_src_ip 192.168.100.191
  unicast_peer {
    192.168.100.192
    192.168.100.193
  }

  authentication {
    auth_type PASS
    auth_pass Password
  }

  virtual_ipaddress {
    192.168.100.190 dev eth0 label eth0:0
  }

  track_script {
    check_haproxy
  }
}
EOF

# 192
mkdir -p /etc/keepalived
cat > /etc/keepalived/keepalived.conf << EOF
global_defs {
  router_id vm-192
}

vrrp_script check_haproxy {
  script "/usr/sbin/pidof haproxy"
  interval 2
  weight 2
}

vrrp_instance VI_1 {
  interface eth0
  state BACKUP
  advert_int 1
  virtual_router_id 51
  priority 200
  unicast_src_ip 192.168.100.192
  unicast_peer {
    192.168.100.191
    192.168.100.193
  }

  authentication {
    auth_type PASS
    auth_pass Password
  }

  virtual_ipaddress {
    192.168.100.190 dev eth0 label eth0:0
  }

  track_script {
    check_haproxy
  }
}
EOF

# 193
mkdir -p /etc/keepalived
cat > /etc/keepalived/keepalived.conf << EOF
global_defs {
  router_id vm-193
}

vrrp_script check_haproxy {
  script "/usr/sbin/pidof haproxy"
  interval 2
  weight 2
}

vrrp_instance VI_1 {
  interface eth0
  state BACKUP
  advert_int 1
  virtual_router_id 51
  priority 100
  unicast_src_ip 192.168.100.193
  unicast_peer {
    192.168.100.191
    192.168.100.192
  }

  authentication {
    auth_type PASS
    auth_pass Password
  }

  virtual_ipaddress {
    192.168.100.190 dev eth0 label eth0:0
  }

  track_script {
    check_haproxy
  }
}
EOF
4. haproxy静态pod配置文件
cat > /etc/kubernetes/manifests/haproxy.yaml << EOF
apiVersion: v1
kind: Pod
metadata:
  name: haproxy
  namespace: kube-system
spec:
  containers:
  - image: 192.168.100.198:5000/haproxy:2.4.7
    name: haproxy
    livenessProbe:
      failureThreshold: 8
      httpGet:
        host: localhost
        path: /healthz
        port: 6443
        scheme: HTTPS
    volumeMounts:
    - mountPath: /usr/local/etc/haproxy/haproxy.cfg
      name: haproxyconf
      readOnly: true
  hostNetwork: true
  volumes:
  - hostPath:
      path: /etc/haproxy/haproxy.cfg
      type: FileOrCreate
    name: haproxyconf
status: {}
EOF

for i in {192..193}; do scp /etc/kubernetes/manifests/haproxy.yaml vm-$i:/etc/kubernetes/manifests; done
5. keepalived静态pod配置文件
cat > /etc/kubernetes/manifests/keepalived.yaml << EOF
apiVersion: v1
kind: Pod
metadata:
  creationTimestamp: null
  name: keepalived
  namespace: kube-system
spec:
  containers:
  - image: 192.168.100.198:5000/keepalived:2.0.20
    name: keepalived
    resources: {}
    securityContext:
      capabilities:
        add:
        - NET_ADMIN
        - NET_BROADCAST
        - NET_RAW
    volumeMounts:
    - mountPath: /usr/local/etc/keepalived/keepalived.conf
      name: config
  hostNetwork: true
  volumes:
  - hostPath:
      path: /etc/keepalived/keepalived.conf
    name: config
status: {}
EOF

for i in {192..193}; do scp /etc/kubernetes/manifests/keepalived.yaml vm-$i:/etc/kubernetes/manifests; done
6. 测试
docker run --rm -it
 -p 6443:6443 -p 9000:9000
 -v /etc/haproxy:/usr/local/etc/haproxy:ro
 --name haproxy 192.168.100.198:5000/haproxy:2.4.7
 haproxy -f /usr/local/etc/haproxy/haproxy.cfg

docker run --rm -it
 --privileged --cap-add=NET_ADMIN --net=host
 -v /etc/keepalived/keepalived.conf:/usr/local/etc/keepalived/keepalived.conf
 --name keepalived 192.168.100.198:5000/keepalived:2.0.20
 /bin/bash
五、kubernetes集群
1. 生成配置文件模板
# kubeadm config print init-defaults > /tmp/kubeadm-config.yaml

apiVersion: kubeadm.k8s.io/v1beta3
bootstrapTokens:
- groups:
  - system:bootstrappers:kubeadm:default-node-token
  token: abcdef.0123456789abcdef
  ttl: 24h0m0s
  usages:
  - signing
  - authentication
kind: InitConfiguration
localAPIEndpoint:
  advertiseAddress: 1.2.3.4
  bindPort: 6443
nodeRegistration:
  criSocket: /var/run/dockershim.sock
  imagePullPolicy: IfNotPresent
  name: node
  taints: null
---
apiServer:
  timeoutForControlPlane: 4m0s
apiVersion: kubeadm.k8s.io/v1beta3
certificatesDir: /etc/kubernetes/pki
clusterName: kubernetes
controllerManager: {}
dns: {}
etcd:
  local:
    dataDir: /var/lib/etcd
imageRepository: k8s.gcr.io
kind: ClusterConfiguration
kubernetesVersion: 1.22.0
networking:
  dnsDomain: cluster.local
  serviceSubnet: 10.96.0.0/12
scheduler: {}
2. 下载镜像
kubeadm config images pull --image-repository 192.168.100.198:5000
3. 生成配置文件
# haproxy 与 kube-api部署同一台物理机,vip端口由6443变为8443
cat > /tmp/kubeadm-config.yaml << EOF
apiVersion: kubeadm.k8s.io/v1beta3
kind: ClusterConfiguration
kubernetesVersion: 1.22.2
controlPlaneEndpoint: "192.168.100.190:8443"
networking:
  podSubnet: "10.240.0.0/16"
imageRepository: "192.168.100.198:5000"
etcd:
  external:
    endpoints:
    - https://192.168.100.194:2379
    - https://192.168.100.195:2379
    - https://192.168.100.196:2379
    caFile: /etc/kubernetes/pki/etcd/ca.crt
    certFile: /etc/kubernetes/pki/apiserver-etcd-client.crt
    keyFile: /etc/kubernetes/pki/apiserver-etcd-client.key
EOF
4. 部署
# 191
scp -r vm-194:/etc/kubernetes/pki /etc/kubernetes

kubeadm init --config /tmp/kubeadm-config.yaml --upload-certs --ignore-preflight-errors=all

成功提示
Your Kubernetes control-plane has initialized successfully!

To start using your cluster, you need to run the following as a regular user:

  mkdir -p $HOME/.kube
  sudo cp -i /etc/kubernetes/admin.conf $HOME/.kube/config
  sudo chown $(id -u):$(id -g) $HOME/.kube/config

Alternatively, if you are the root user, you can run:

  export KUBECONFIG=/etc/kubernetes/admin.conf

You should now deploy a pod network to the cluster.
Run "kubectl apply -f [podnetwork].yaml" with one of the options listed at:
  https://kubernetes.io/docs/concepts/cluster-administration/addons/

You can now join any number of the control-plane node running the following command on each as root:

  kubeadm join 192.168.100.190:8443 --token aw1vxe.533rm508wmavcj1s
	--discovery-token-ca-cert-hash sha256:f50e85f09578b4fffbc8425df50950b21eefe8d2b10bbee234f5947485a588e0
	--control-plane --certificate-key 1bd7fb3bab9d601e80c4a13c52f4e1329b10ecfce3a5a3ec4f2dc3afad291bc3

Please note that the certificate-key gives access to cluster sensitive data, keep it secret!
As a safeguard, uploaded-certs will be deleted in two hours; If necessary, you can use
"kubeadm init phase upload-certs --upload-certs" to reload certs afterward.

Then you can join any number of worker nodes by running the following on each as root:

kubeadm join 192.168.100.190:8443 --token aw1vxe.533rm508wmavcj1s
	--discovery-token-ca-cert-hash sha256:f50e85f09578b4fffbc8425df50950b21eefe8d2b10bbee234f5947485a588e0
5. 配置用户环境
# 191
mkdir -p $HOME/.kube
cp -i /etc/kubernetes/admin.conf $HOME/.kube/config
chown $(id -u):$(id -g) $HOME/.kube/config

# 查看pod
kubectl get pods --all-namespaces -o wide
6. 添加控制和工作节点
# 192 & 193
  kubeadm join 192.168.100.190:8443 --token aw1vxe.533rm508wmavcj1s
	--discovery-token-ca-cert-hash sha256:f50e85f09578b4fffbc8425df50950b21eefe8d2b10bbee234f5947485a588e0
	--control-plane --certificate-key 1bd7fb3bab9d601e80c4a13c52f4e1329b10ecfce3a5a3ec4f2dc3afad291bc3
  --ignore-preflight-errors=all

# 197
kubeadm join 192.168.100.190:8443 --token aw1vxe.533rm508wmavcj1s
	--discovery-token-ca-cert-hash sha256:f50e85f09578b4fffbc8425df50950b21eefe8d2b10bbee234f5947485a588e0
  --ignore-preflight-errors=all

# 查看node
kubectl get nodes -o wide
7. 安装flannel网络插件(master)
curl -k https://raw.fastgit.org/flannel-io/flannel/master/Documentation/kube-flannel.yml -o /tmp/kube-flannel.yml

sed -e 's|image: quay.io|image: 192.168.100.198:5000|g'
    -e 's|image: rancher|image: 192.168.100.198:5000/rancher|g'
    -i /tmp/kube-flannel.yml

kubectl apply -f /tmp/kube-flannel.yml
8. 更换Calico网络插件(master)
kubectl delete -f /tmp/kube-flannel.yml

curl -k https://docs.projectcalico.org/manifests/calico.yaml -o /tmp/calico.yaml

# pod network cidr = 10.240.0.0/16
sed -e 's|# - name: CALICO_IPV4POOL_CIDR|- name: CALICO_IPV4POOL_CIDR|g'
    -e 's|#   value: "192.168.0.0/16"|  value: "10.240.0.0/16"|g'
    -e 's|image: docker.io|image: 192.168.100.198:5000|g'
    -e 's|:v3.21.0|:v3.20.2|g'
    -i /tmp/calico.yaml

kubectl apply -f /tmp/calico.yaml

curl  -k https://docs.projectcalico.org/manifests/calicoctl.yaml -o /tmp/calicoctl.yaml

sed -e 's|image: calico|image: 192.168.100.198:5000/calico|g' -e 's|:v3.21.0|:v3.20.2|g'
    -i /tmp/calicoctl.yaml

kubectl apply -f /tmp/calicoctl.yaml
8. 检查集群状态
# kubectl get pod -A -o wide
NAMESPACE     NAME                                       READY   STATUS    RESTARTS   AGE     IP                NODE     NOMINATED NODE   READINESS GATES
kube-system   calico-kube-controllers-6c6cd485bd-mm77l   1/1     Running   0          29s     10.240.234.1      vm-193   <none>           <none>
kube-system   calico-node-q76bf                          0/1     Running   0          29s     192.168.100.191   vm-191   <none>           <none>
kube-system   calico-node-qdt62                          0/1     Running   0          30s     192.168.100.192   vm-192   <none>           <none>
kube-system   calico-node-r2cjd                          0/1     Running   0          29s     192.168.100.193   vm-193   <none>           <none>
kube-system   calico-node-ssdxc                          0/1     Running   0          30s     192.168.100.197   vm-197   <none>           <none>
kube-system   calico-node-vw8nv                          0/1     Running   0          29s     192.168.100.207   vm-207   <none>           <none>
kube-system   coredns-c86fdc858-b6gpk                    1/1     Running   0          6m8s    10.240.2.129      vm-197   <none>           <none>
kube-system   coredns-c86fdc858-xxl86                    1/1     Running   0          6m8s    10.240.2.130      vm-197   <none>           <none>
kube-system   haproxy-vm-191                             1/1     Running   0          6m10s   192.168.100.191   vm-191   <none>           <none>
kube-system   haproxy-vm-192                             1/1     Running   0          4m33s   192.168.100.192   vm-192   <none>           <none>
kube-system   haproxy-vm-193                             1/1     Running   0          4m26s   192.168.100.193   vm-193   <none>           <none>
kube-system   keepalived-vm-191                          1/1     Running   0          6m10s   192.168.100.191   vm-191   <none>           <none>
kube-system   keepalived-vm-192                          1/1     Running   0          4m33s   192.168.100.192   vm-192   <none>           <none>
kube-system   keepalived-vm-193                          1/1     Running   0          4m25s   192.168.100.193   vm-193   <none>           <none>
kube-system   kube-apiserver-vm-191                      1/1     Running   0          6m10s   192.168.100.191   vm-191   <none>           <none>
kube-system   kube-apiserver-vm-192                      1/1     Running   0          4m34s   192.168.100.192   vm-192   <none>           <none>
kube-system   kube-apiserver-vm-193                      1/1     Running   0          4m25s   192.168.100.193   vm-193   <none>           <none>
kube-system   kube-controller-manager-vm-191             1/1     Running   0          6m10s   192.168.100.191   vm-191   <none>           <none>
kube-system   kube-controller-manager-vm-192             1/1     Running   0          4m33s   192.168.100.192   vm-192   <none>           <none>
kube-system   kube-controller-manager-vm-193             1/1     Running   0          4m25s   192.168.100.193   vm-193   <none>           <none>
kube-system   kube-proxy-7tlwx                           1/1     Running   0          4m4s    192.168.100.197   vm-197   <none>           <none>
kube-system   kube-proxy-88hf7                           1/1     Running   0          4m26s   192.168.100.193   vm-193   <none>           <none>
kube-system   kube-proxy-gpsb9                           1/1     Running   0          6m8s    192.168.100.191   vm-191   <none>           <none>
kube-system   kube-proxy-w5qdh                           1/1     Running   0          4m34s   192.168.100.192   vm-192   <none>           <none>
kube-system   kube-proxy-zhqn5                           1/1     Running   0          3m1s    192.168.100.207   vm-207   <none>           <none>
kube-system   kube-scheduler-vm-191                      1/1     Running   0          6m10s   192.168.100.191   vm-191   <none>           <none>
kube-system   kube-scheduler-vm-192                      1/1     Running   0          4m33s   192.168.100.192   vm-192   <none>           <none>
kube-system   kube-scheduler-vm-193                      1/1     Running   0          4m25s   192.168.100.193   vm-193   <none>           <none>

# kubectl get node -A -o wide
NAME     STATUS   ROLES                  AGE     VERSION   INTERNAL-IP       EXTERNAL-IP   OS-IMAGE                KERNEL-VERSION           CONTAINER-RUNTIME
vm-191   Ready    control-plane,master   6m24s   v1.22.2   192.168.100.191   <none>        CentOS Linux 7 (Core)   3.10.0-1160.el7.x86_64   docker://20.10.9
vm-192   Ready    control-plane,master   4m42s   v1.22.2   192.168.100.192   <none>        CentOS Linux 7 (Core)   3.10.0-1160.el7.x86_64   docker://20.10.9
vm-193   Ready    control-plane,master   4m34s   v1.22.2   192.168.100.193   <none>        CentOS Linux 7 (Core)   3.10.0-1160.el7.x86_64   docker://20.10.9
vm-197   Ready    <none>                 4m11s   v1.22.2   192.168.100.197   <none>        CentOS Linux 7 (Core)   3.10.0-1160.el7.x86_64   docker://20.10.9
vm-207   Ready    <none>                 3m9s    v1.22.2   192.168.100.207   <none>        CentOS Linux 7 (Core)   3.10.0-1160.el7.x86_64   docker://20.10.9

# kubectl get service -A -o wide
NAMESPACE     NAME         TYPE        CLUSTER-IP   EXTERNAL-IP   PORT(S)                  AGE     SELECTOR
default       kubernetes   ClusterIP   10.96.0.1    <none>        443/TCP                  9m38s   <none>
kube-system   kube-dns     ClusterIP   10.96.0.10   <none>        53/UDP,53/TCP,9153/TCP   9m27s   k8s-app=kube-dns

# kubectl get deployment -A -o wide
NAMESPACE     NAME                      READY   UP-TO-DATE   AVAILABLE   AGE     CONTAINERS                IMAGES                                                 SELECTOR
kube-system   calico-kube-controllers   1/1     1            1           3m50s   calico-kube-controllers   192.168.100.198:5000/calico/kube-controllers:v3.20.2   k8s-app=calico-kube-controllers
kube-system   coredns                   2/2     2            2           9m34s   coredns                   192.168.100.198:5000/coredns:v1.8.4                    k8s-app=kube-dns

# kubectl cluster-info
Kubernetes control plane is running at https://192.168.100.190:8443
CoreDNS is running at https://192.168.100.190:8443/api/v1/namespaces/kube-system/services/kube-dns:dns/proxy
9. 测试dns
# kubectl run busybox --image=192.168.100.198:5000/busybox:1.28 --rm=true --restart=Never -it -- nslookup kubernetes
Server:    10.96.0.10
Address 1: 10.96.0.10 kube-dns.kube-system.svc.cluster.local

Name:      kubernetes
Address 1: 10.96.0.1 kubernetes.default.svc.cluster.local
pod "busybox" deleted

# kubectl run busybox --image=192.168.100.198:5000/busybox:1.28 --rm=true --restart=Never -it -- nslookup kube-dns.kube-system
Server:    10.96.0.10
Address 1: 10.96.0.10 kube-dns.kube-system.svc.cluster.local

Name:      kube-dns.kube-system
Address 1: 10.96.0.10 kube-dns.kube-system.svc.cluster.local
pod "busybox" deleted