SpringBoot简介
1.简介
Spring Boot是由Pivotal团队提供的全新框架,其设计目的是用来简化新Spring应用的初始搭建以及开发过程。该框架使用了特定的方式来进行配置,从而使开发人员不再需要定义样板化的配置。通过这种方式,Boot致力于在蓬勃发展的快速应用开发领域(rapid application development)成为领导者。
2.SpringBoot特点
1. 创建独立的Spring应用程序
2. 嵌入的Tomcat,无需部署WAR文件
3. 简化Maven配置
4. 自动配置Spring
5. 提供生产就绪型功能,如指标,健康检查和外部配置
6. 绝对没有代码生成和对XML没有要求配置
初识SpringBoot
maven构建SpringBoot项目
可访问以下网址生成SpringBoot基础架构
1.SpringBoot案例 HelloWorld版
SpringBoot搭建步骤
- 创建一个maven工程
- 引入SpringBoot依赖jar包
- 创建Application类(启动类)
- 编写代码
- 运行程序
1.案例结构:

2.导入SpringBoot依赖jar包 POM.xml
<project xmlns="http://maven.apache.org/POM/4.0.0" xmlns:xsi="http://www.w3.org/2001/XMLSchema-instance"

															xsi:schemaLocation="http://maven.apache.org/POM/4.0.0 http://maven.apache.org/maven-v4_0_0.xsd">
    <parent>
        <artifactId>01Code</artifactId>
        <groupId>cn.happy</groupId>
        <version>1.0-SNAPSHOT</version>
    </parent>
    <modelVersion>4.0.0</modelVersion>
    <artifactId>03SpringBoot</artifactId>
    <packaging>war</packaging>
    <name>03SpringBoot Maven Webapp</name>
    <url>http://maven.apache.org</url>

																																														<!--在Maven中dependencyManagement的作用其实相当于一个对所依赖jar包进行版本管理的管理器。-->

																																															<dependencyManagement>
        <dependencies>
            <dependency>
                <groupId>org.springframework.boot</groupId>
                <artifactId>spring-boot-dependencies</artifactId>
                <version>1.5.1.RELEASE</version>
                <type>pom</type>
                <scope>import</scope>
            </dependency>
        </dependencies>
    </dependencyManagement>

																																																																																<!--项目编码-->

																																																																																	<properties>
        <project.build.sourceEncoding>UTF-8</project.build.sourceEncoding>
        <java.version>1.8</java.version>
    </properties>
    <dependencies>

																																																																																																<!-- web项目-->

																																																																																																	<dependency>
            <groupId>org.springframework.boot</groupId>
            <artifactId>spring-boot-starter-web</artifactId>
            <version>1.5.1.RELEASE</version>
        </dependency>

																																																																																																																		<!--spring boot单测-->

																																																																																																																			<dependency>
            <groupId>org.springframework.boot</groupId>
            <artifactId>spring-boot-starter-test</artifactId>
            <version>1.5.1.RELEASE</version>
            <scope>test</scope>
        </dependency>
    </dependencies>

																																																																																																																																										<!--能够将Spring Boot应用打包为可执行的jar或war文件-->

																																																																																																																																											<build>
        <plugins>
            <plugin>
                <groupId>org.springframework.boot</groupId>
                <artifactId>spring-boot-maven-plugin</artifactId>
                <version>1.5.1.RELEASE</version>
            </plugin>
        </plugins>
    </build>
</project> - 创建Application类(启动类)
@SpringBootApplication
public class Application {

									public static void main(String[] args) {
        SpringApplication.run(Application.class, args);
    }
}@SpringBootApplication的作用就是@Configuration, @EnableAutoConfiguration与@ComponentScan的集合
@Configuration:表示将该类作用springboot配置文件类。
@EnableAutoConfiguration:表示程序启动时,自动加载springboot默认的配置。
@ComponentScan:表示程序启动是,自动扫描当前包及子包下所有类。
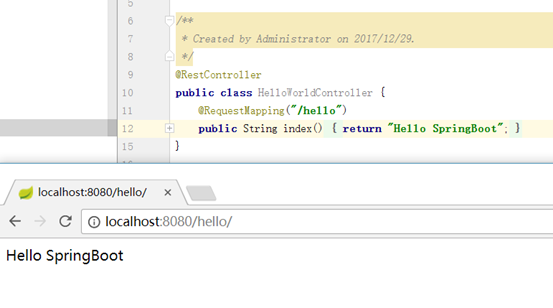
- 编写代码
@RestController
public class HelloWorldController {

									@RequestMapping("/hello")

													public String index() {

															return "Hello World";
    }
} - 运行程序
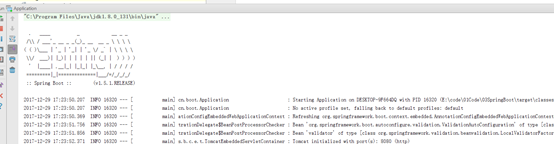
运行方式有多种,可以main方法运行

运行成功
在浏览器访问
SpringBoot 定时任务
1.Application类(启动类)启动定时
@SpringBootApplication
@EnableScheduling
public class Application {

									public static void main(String[] args) {
        SpringApplication.run(Application.class, args);
    }
}
@EnableScheduling 为我们提供了快速的基于多种规则的任务调度功能。
2.定时任务的实现类
定时任务一:
@Component
public class SchedulerTask {

									private int count=0;
     //每6秒执行一次

													@Scheduled(cron="*/6 * * * * ?")

																	private void process(){
        System.out.println("this is scheduler task runing  "+(count++));
    }
}@Scheduled(cron="*/6 * * * * ?") 定时任务注解
定时任务2:
@Component
public class Scheduler2Task {

									private static final SimpleDateFormat dateFormat = new SimpleDateFormat("yyyy-MM-dd HH:mm:ss");


																	@Scheduled(fixedRate = 6000)

																					public void reportCurrentTime() {
        System.out.println("现在时间:" + dateFormat.format(new Date()));
    }
}
@Scheduled使用方式

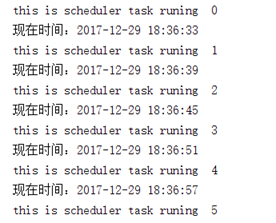
执行结果:
@Scheduled使用方式