Person.java
public class Person {
    private Long pid;
    private String pname;
    private Student student;
    private List list;
    private Set set;
    private Map map;
    private Properties properties;
//get和set方法
}
applicationContext.xml
 1 <?xml version="1.0" encoding="UTF-8"?>
 2 <beans xmlns="http://www.springframework.org/schema/beans"
 3        xmlns:xsi="http://www.w3.org/2001/XMLSchema-instance"
 4        xsi:schemaLocation="http://www.springframework.org/schema/beans
 5            http://www.springframework.org/schema/beans/spring-beans-2.5.xsd">
 6
 7 <bean name="person" class="cn.test.di.Person">
 8 <!--
 9             property就是代表属性
10               在spring中基本类型(包装类型和String)都可以用value来赋值
11                                      引用类型用ref赋值
12 -->
13     <property name="pid" value="5"></property>
14     <property name="pname" value="张三"></property><!-- 基本数据类型 -->
15     <property name="student" ref="student"></property><!-- 引用类型 -->
16     <property name="list">
17         <list>
18             <value>list1</value>
19             <value>list2</value>
20             <ref bean="student"/>
21         </list>
22     </property>
23
24     <property name="set">
25         <set>
26             <value>set1</value>
27             <value>set2</value>
28             <ref bean="student"/>
29         </set>
30     </property>
31     <property name="map">
32         <map>
33             <entry key="map1">
34                 <value>map1</value>
35             </entry>
36             <entry key="map2">
37                 <value>map2</value>
38             </entry>
39             <entry key="map3">
40                 <ref bean="student"/>
41             </entry>
42         </map>
43     </property>
44     <property name="properties">
45         <props>
46             <prop key="pro1">
47                 pro1
48             </prop>
49         </props>
50     </property>
51 </bean>
52 <bean name="student" class="cn.test.di.Student"></bean>
53 </beans>
测试
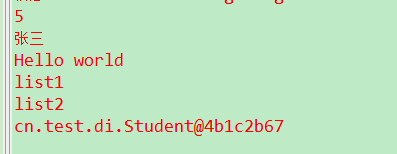
 1 @Test
 2     public void doSome(){
 3         ApplicationContext applicationContext=new ClassPathXmlApplicationContext("cn/test/di/applicationContext.xml");
 4         Person person= (Person) applicationContext.getBean("person");
 5         System.err.println(person.getPid());
 6         System.err.println(person.getPname());
 7         person.getStudent().say();
 8         List list=person.getList();
 9         for(int i=0;i<list.size();i++){
10             System.err.println(list.get(i).toString());
11         }
处理使用上面的get方法进行赋值外,还可以通过构造函数来赋值,首先在类中添加构造函数,然后进行配置
public Person(String pname, Student student) {
        this.pname = pname;
        this.student = student;
    }
 1 <!--
 2             构造函数的参数
 3               index  第几个参数,下标从0开始
 4               type   参数的类型
 5               ref    如果类型是引用类型,赋值
 6               value  如果类型是基本类型,赋值
 7              说明:
 8                 只能指定一个构造函数
 9 -->
10 <constructor-arg index="0" type="java.lang.String" value="李四"></constructor-arg>
11 <constructor-arg index="1" type="cn.test.di2.Student" ref="student"></constructor-arg>
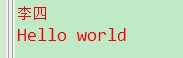
1 @Test
2     public void doSome(){
3         ApplicationContext applicationContext=new ClassPathXmlApplicationContext("cn/test/di2/applicationContext.xml");
4         Person person= (Person) applicationContext.getBean("person");
5         System.err.println(person.getPname());
6         person.getStudent().say();
7     }