1.Spring 简介
Spring的基础架构起源于2000年早期,它是Rod Johnson在一些成功的商业项目中构建的基础设施
2002后期,Rod Johnson发布了《Expert One-on-One J2EE Design and Development》一书
2003年2月Spring框架正式成为一个开源项目,并发布于SourceForge中
1.2 Spring工作原理
Spring是一种用JavaBean配置应用程序的方法
运用SpringIOC,通过setter方法来暴露一个类的任何依赖关系(如一个数据库连接),只要在Spring中进行配置来解决依赖性,不用编写一个数据库连接
运用Spring AOP 可以解决公共代码重复问题
1.3 Spring框架简介
Spring框架
轻量级
容器
开源框架
用于解决企业应用程序开发复杂性
一个轻量级的IOC和AOP容器框架
一个解决了许多J2EE开发中常见的问题的强大框架
1.4 Spring框架简介
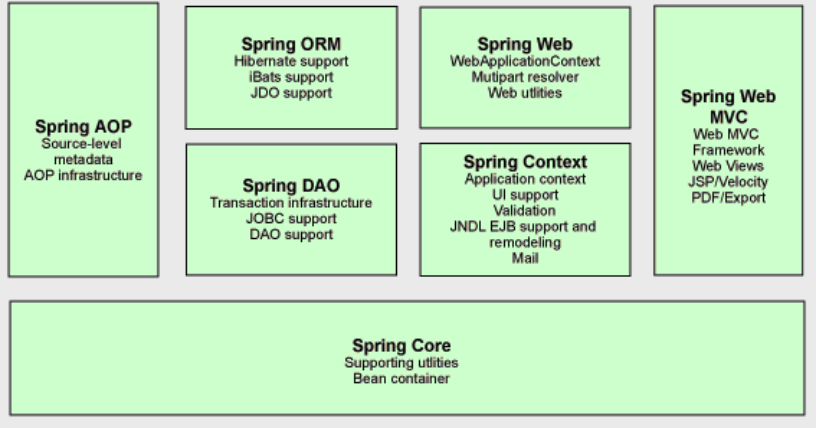
Spring框架有7个模块, 每个模块都可以单独存在,或者与其他一个或多个模块联合实现
2.1 Spring Bean 封装机制
Spring以Bean的方式管理所有的组件,J2EE的全部组件都被视为Bean管理
Spring负责创建Bean的实例,并管理其生命周期
Bean在Spring的容器中运行,无须知道Spring容器的存在也可以使用Spring的一些特性


1 <?xml version="1.0" encoding="UTF-8"?>
2 <beans xmlns="http://www.springframework.org/schema/beans"
3     xmlns:xsi="http://www.w3.org/2001/XMLSchema-instance"
4     xsi:schemaLocation="http://www.springframework.org/schema/beans         http://www.springframework.org/schema/beans/spring-beans-3.0.xsd">
5     <bean id=“user" class="com.hr.g3.persist.UserVo"
6         abstract="false" lazy-init="default" autowire="default"
7         dependency-check="default">
8     </bean>
9 </beans>
 1 <bean
 2 id="beanId"
 3 name ="beanName"
 4 class="beanClass"
 5 parent="parentBean"
 6 abstract="true | false"
 7 scope="prototype|singleton"
 8 lazy-init="true | false | default"
 9 autowire="no | byName | by Type | constructor | auto detect |default">
10 </ bean>

BeanFactory
BeanFactory由org.springframework.beans.factory.BeanFactory接口定义
BeanFactory是工厂模式(Factory pattern)的实现,负责创建和管理bean
BeanFactory接口包含以下基本方法
containsBean(String name)
getBean(String name)
getBean(String name,Class class)
getType(String name)
ApplicationContext
ApplicationContext是基于BeanFactory之上的,提供了应用程序框架服务,扩展的新功能如下
提供国际化的支持
资源访问,如URL和文件
事件传递
载入多个配置文件等
搜索classpath路径,以classpath路径下的applicationContext.xml和bean.xml创建ApplicationContext
1 ApplicationContext applicationContext = new ClassPathXmlApplicationContext(“applicationContext.xml”);//单个文件
2
3
4 BeanFactory beanFactory = new ClassPathXmlApplicationContext(new String[]{“applicationContext.xml”,“bean.xml”}); //多个文件
按照指定路径下的applicationContext.xml和bean.xml创建ApplicationContext
BeanFactory beanFactory =
new FileSystemXmlApplicationContext(
new String[]{
"/WebRoot/WEB-INF/classes/applicationContext.xml",
"/WebRoot/WEB-INF/classes/bean.xml"});
ApplicationContext接口的重要方法
 1 (1)containsBean(String name)方法。
 2 //判断Spring容器是否包含ID为 user的Bean
 3 boolean flag=applicationContext.containsBean("user");
 4
 5 (2)getBean(String name)方法。
 6 //返回ID为 user的Bean
 7 UserVo userBean= (UserVo)applicationContext.getBean("user");
 8
 9
10 (3)getType(String name)方法
11 //返回:ID为 user 的类型
12 Class beanType= applicationContext.getType("user");
3.Spring依赖注入 (非注解)
设值注入的优点
如果依赖关系(或继承关系)较为复杂 ,设值注入模式往往更为简洁 有些地方有其局限性
直观,更加自然
构造注入的优点
构造期即创建一个完整、合法的对象
避免了繁琐的setter方法的编写
无需担心在调用过程中执行setter方法对组件依赖关系产生破坏
在构造函数中决定依赖关系的注入顺序
自动注入
简化配置文件
3.1接口与实体类
1 package cn.yunhe.entity;
2
3 /**
4  * Created by Administrator on 2017/7/11.
5  */
6 public interface Display {
7     void printDisplayInfo();
8
9 }
 1 package cn.yunhe.entity;
 2
 3 /**
 4  * Created by Administrator on 2017/7/11.
 5  */
 6 public class Computer {
 7     private MainFrame mainFrame;//主机
 8     private Display display;//显示器接口
 9
10     public Computer() {
11     }
12
13     public Computer(MainFrame mainFrame, Display display) {
14         this.mainFrame = mainFrame;
15         this.display = display;
16     }
17
18     //输出计算机配置信息
19     public void printComputerInfo(){
20         System.out.println("计算机配置如下:");
21         mainFrame.printMainFrameInfo();//输出主机信息
22         display.printDisplayInfo();//输出显示器信息
23
24     }
25
26     public MainFrame getMainFrame() {
27         return mainFrame;
28     }
29
30     public void setMainFrame(MainFrame mainFrame) {
31         this.mainFrame = mainFrame;
32     }
33
34     public Display getDisplay() {
35         return display;
36     }
37
38     public void setDisplay(Display display) {
39         this.display = display;
40     }
41 }
 1 package cn.yunhe.entity;
 2
 3 /**
 4  * Created by Administrator on 2017/7/11.
 5  */
 6 public class LgDisplay  implements Display{
 7
 8     //LG显示器
 9     public void printDisplayInfo() {
10         System.out.println("显示器:LG显示器");
11     }
12 }
 1 package cn.yunhe.entity;
 2
 3 /**
 4  * Created by Administrator on 2017/7/11.
 5  */
 6 public class MainFrame {
 7     private String modelType; //型号
 8     //输出主机信息
 9     public void printMainFrameInfo(){
10         System.out.println("主机型号:"+modelType);
11     }
12
13     public String getModelType() {
14         return modelType;
15     }
16
17     public void setModelType(String modelType) {
18         this.modelType = modelType;
19     }
20 }
 1 package cn.yunhe.entity;
 2
 3 /**
 4  * Created by Administrator on 2017/7/11.
 5  */
 6 public class SamSungDisplay implements Display{
 7
 8     //三星显示器
 9     public void printDisplayInfo() {
10         System.out.println("显示器:三星显示器");
11     }
12 }
 1 package cn.yunhe.entity;
 2
 3 import java.util.*;
 4
 5 /**
 6  * Created by Administrator on 2017/7/11.
 7  */
 8 public class TestBean {
 9     private List list;
10     private Map map;
11     private Properties prop;
12     private Set set;
13
14     public List getList() {
15         return list;
16     }
17
18     public void setList(List list) {
19         this.list = list;
20     }
21
22     public Map getMap() {
23         return map;
24     }
25
26     public void setMap(Map map) {
27         this.map = map;
28     }
29
30     public Properties getProp() {
31         return prop;
32     }
33
34     public void setProp(Properties prop) {
35         this.prop = prop;
36     }
37
38     public Set getSet() {
39         return set;
40     }
41
42     public void setSet(Set set) {
43         this.set = set;
44     }
45 }
 1 package cn.yunhe.entity;
 2
 3 /**
 4  * Created by Administrator on 2017/7/11.
 5  */
 6 public class UserVo {
 7     private int id;
 8     private String name;
 9     private int age;
10
11     public void printInfo(){
12         System.out.println("姓名:"+name+",年龄:"+age);
13     }
14
15     public int getId() {
16         return id;
17     }
18
19     public void setId(int id) {
20         this.id = id;
21     }
22
23     public String getName() {
24         return name;
25     }
26
27     public void setName(String name) {
28         this.name = name;
29     }
30
31     public int getAge() {
32         return age;
33     }
34
35     public void setAge(int age) {
36         this.age = age;
37     }
38 }
3.2配置文件
 1 <?xml version="1.0" encoding="UTF-8"?>
 2 <beans xmlns="http://www.springframework.org/schema/beans"
 3        xmlns:xsi="http://www.w3.org/2001/XMLSchema-instance"
 4        xmlns:p="http://www.springframework.org/schema/p"
 5        xmlns:context="http://www.springframework.org/schema/context"
 6        xmlns:aop="http://www.springframework.org/schema/aop"
 7        xsi:schemaLocation="http://www.springframework.org/schema/beans
 8     http://www.springframework.org/schema/beans/spring-beans-3.0.xsd
 9     http://www.springframework.org/schema/context
10     http://www.springframework.org/schema/context/spring-context-3.0.xsd
11     http://www.springframework.org/schema/aop
12     http://www.springframework.org/schema/aop/spring-aop-3.0.xsd">
13
14     <context:component-scan base-package="cn.yunhe.entity"/>
15     <bean id="user" class="cn.yunhe.entity.UserVo"/>
16     <bean id="mainFrame" class="cn.yunhe.entity.MainFrame">
17         <property name="modelType" value="三星高配主机"/>
18     </bean>
19     <bean id="lg" class="cn.yunhe.entity.LgDisplay"/>
20     <bean id="samsung" class="cn.yunhe.entity.SamSungDisplay"/>
21
22     <!--设值注入是指通过setter方法传入被调用者的实例-->
23     <!--<bean id="computer" class="cn.yunhe.entity.Computer">
24         <property name="mainFrame" ref="mainFrame"/>
25         <property name="display" ref="lg"/>
26     </bean>-->
27     <!--构造注入是指通过构造方法完成依赖关系的注入-->
28     <bean id="computer2" class="cn.yunhe.entity.Computer">
29         <constructor-arg index="0" ref="mainFrame"/>
30         <constructor-arg index="1" ref="samsung"/>
31     </bean>
32
33     <!--Spring容器可以自动注入(autowire)相互协作bean之间的关联关系-->
34     <!--no : 不适用自动的装配,必须通过ref元素指定依赖。这是默认设置。
35             由于显式指定协作者可以使配置更灵活、更清晰,因此对于较大的
36             部署配置,推荐采用该设置。-->
37     <!--byName :根据属性名自动装配。此选项将检查容器并根据名字查找与属
38                 性完全一致的bean,并将其与属性自动装配-->
39     <!--byType :如果容器中存在一个与指定属性类型相同的bean,那么将与该
40                 属性自动装配。如果存在多个该类型的bean,那么将会抛出异
41                 常,并指出不能使用byType方式进行自动装配。若没有找到相
42                 匹配的bean,则属性不会被设置。-->
43     <bean id="computer" class="cn.yunhe.entity.Computer" autowire="byName">
44         <property name="display" ref="lg"/>
45     </bean>
46
47     <!--集合属性-->
48     <bean id="testBean" class="cn.yunhe.entity.TestBean">
49         <property name="list">
50             <list>
51                 <value>aaa</value>
52                 <value>bbb</value>
53                 <value>ccc</value>
54             </list>
55         </property>
56         <property name="map">
57             <map>
58                 <entry key="k1" value="v1"/>
59             </map>
60         </property>
61         <property name="prop">
62             <props>
63                 <prop key="k1" >str1</prop>
64             </props>
65         </property>
66         <property name="set">
67             <set>
68                 <value>ddd</value>
69                 <value>eee</value>
70             </set>
71         </property>
72     </bean>
73 </beans>
3.3 测试类
 1 package cn.yunhe.demo;
 2
 3 import cn.yunhe.entity.Computer;
 4 import cn.yunhe.entity.TestBean;
 5 import cn.yunhe.entity.UserVo;
 6 import org.junit.Before;
 7 import org.junit.Test;
 8 import org.springframework.context.ApplicationContext;
 9 import org.springframework.context.support.ClassPathXmlApplicationContext;
10
11 import java.util.List;
12
13 /**
14  * Created by Administrator on 2017/7/11.
15  */
16 public class Demo {
17
18     ApplicationContext applicationContext =null;
19     @Before
20     public void init(){
21         //以classpath路径下的applicationContex.xml创建Spring容器
22         applicationContext =new ClassPathXmlApplicationContext("applicationContext.xml");
23     }
24
25     @Test
26     public void test1(){
27         //从Spring容器中获取ID 为user的Bean
28         UserVo user=applicationContext.getBean("user",UserVo.class);
29         //封装姓名和年龄
30         user.setName("张三丰");
31         user.setAge(100);
32         //输出该bean的信息
33         user.printInfo();
34     }
35
36     @Test//Spring的设值注入方式    //自动注入也有用这个例子
37     //设值注入是指通过setter方法传入被调用者的实例
38     public void test2(){
39       Computer computer=  applicationContext.getBean("computer", Computer.class);
40         computer.printComputerInfo();
41     }
42
43     @Test//Spring的构造注入方式
44     //构造注入是指通过构造方法完成依赖关系的注入
45     public void test3(){
46         Computer computer=applicationContext.getBean("computer2",Computer.class);
47         computer.printComputerInfo();
48     }
49
50     @Test//集合属性
51     public void test4(){
52         TestBean testBean=applicationContext.getBean("testBean",TestBean.class);
53         List<String>list = testBean.getList();
54         for (String str:list){
55             System.out.println(str);
56         }
57     }
58
59 }
4.注解实现Spring注入
@Component 注解配置bean @Component注解唯一的一个可选参数是value,用于指定bean的名称(即id值,所以必须是唯一的)
1 @Component(”computer”)
2 public class Computer { }
3 @Component
4 public class MainFrame {}
5 @Component
6 public class SamSungDisplay implements Display {}
7 @Component
8 public class LgDisplay implements Display {}
只需在配置文件中配置以下代码 扫描@Component标注的类
1 <context:component-scan
2 base-package="s3spring.ch1.annotation.computer"/>
ApplicationContext ac = new ClassPathXmlApplicationContext("applicationContext.xml");

//从容器获取bean
Computer c = ac.getBean(Computer.class);
使用 @Scope注解配置bean 的作用域
@Scope定义bean的作用域,singleton表示在Spring loC容器中一个bean的定义对应一个对象实例,Spring使用单例模式获取实例
prototype 表示一个bean定义对应多个对象实例,即非单例模式,常称作多例
1 @Component
2 @Scope(value="prototype")
3 public class Computer { …… }
使用@Autowired注解
可以对类成员变量、方法及构造函数进行标注,以完成自动装配依赖的工作
@Autowired 默认按 byType 自动注入
1 @Component
2 @Scope("prototype")
3 public class Computer {
4 @Autowired
5 private MainFrame mainFrame;// 主机
6 @Autowired
7 private Display display;// 显示器接口
8 ……
多个bean导致的创建bean失败的问题
把属性名称做为依赖bean名称
@Qualifier 注解明确指定依赖bean的名称(就是显示器接口被多个类实现,导致使用该接口时不知道调那个类,就需要在这里声明一下)
 1 @Component
 2 @Scope("prototype")
 3 public class Computer {
 4 @Autowired
 5 private MainFrame mainFrame;// 主机
 6 @Autowired
 7 @Qualifier("samSungDisplay")//表明是用的三星的
 8 private Display display;// 显示器接口
 9     ……
10 }
注解的运行流程
1.首先根据属性的类型在Spring 应用容器中查找类型匹配的bean
2.如果没有类型匹配的bean,抛出BeanCreationException;如果只有一个,则注入依赖,完成自动装配;如果不只一个,则继续执行步骤3;
3.如果通过 @Qualifier指定了bean 名称,则从所有符合类型的bean中返回指定的bean,完成自动装配;如果没有通过 @Qualifier制定bean 名称,则通过反射技术获取当前属性的名称作为bean 名称返回指定的bean,完成自动装配;
使用@Resource注解注入依赖
@Resource 默认按 byName 自动注入 用法与上边使用@Autowire相同
 1 @Component
 2 @Scope("prototype")
 3 public class Computer {
 4     @Resource
 5     private MainFrame mainFrame;//采用属性名称作为依赖bean的名称
 6
 7     @Resource(name="samSungDisplay")
 8     private Display display;// 采用@name参数值作为依赖bean的名称
 9      ……
10 }
使用JSR-250规范定义的注解
@PostConstruct 和 @PreDestroy
@PostConstruct 注解的方法将在类实例化后调用,
@PreDestroy注解的方法将在类销毁之前调用 ConfigurableApplicationContext close方法
1 @PostConstruct
2 public void postConstruct1(){
3          System.out.println("执行postConstruct1");
4 }
5
6 @PreDestroy
7 public void preDestroy1(){
8          System.out.println("执行preDestroy1");
9 }