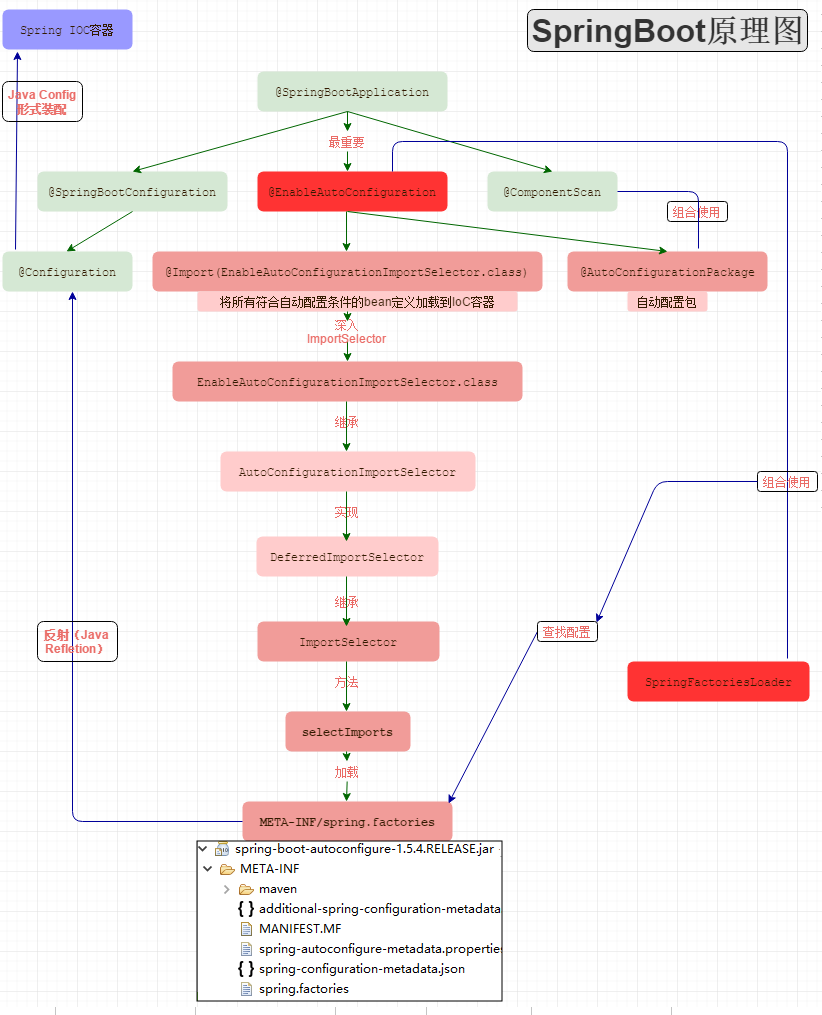
0. 原理
SpringBootApplication背后的秘密
@Target(ElementType.TYPE)            // 注解的适用范围,其中TYPE用于描述类、接口(包括包注解类型)或enum声明
@Retention(RetentionPolicy.RUNTIME)  // 注解的生命周期,保留到class文件中(三个生命周期)
@Documented                          // 表明这个注解应该被javadoc记录
@Inherited                           // 子类可以继承该注解
@SpringBootConfiguration             // 继承了Configuration,表示当前是注解类
@EnableAutoConfiguration             // 开启springboot的注解功能,springboot的四大神器之一,其借助@import的帮助
@ComponentScan(excludeFilters = {    // 扫描路径设置(具体使用待确认)
       @Filter(type = FilterType.CUSTOM, classes = TypeExcludeFilter.class),
       @Filter(type = FilterType.CUSTOM, classes = AutoConfigurationExcludeFilter.class) })
public @interface SpringBootApplication {
   // ...
}
虽然定义使用了多个Annotation进行了原信息标注,但实际上重要的只有三个Annotation:
- @Configuration(@SpringBootConfiguration点开查看发现里面还是应用了@Configuration)
- @EnableAutoConfiguration
- @ComponentScan
所以,如果我们使用如下的SpringBoot启动类,整个SpringBoot应用依然可以与之前的启动类功能对等:
@Configuration
这里的@Configuration对我们来说不陌生,它就是JavaConfig形式的Spring Ioc容器的配置类使用的那个@Configuration,SpringBoot社区推荐使用基于JavaConfig的配置形式,所以,这里的启动类标注了@Configuration之后,本身其实也是一个IoC容器的配置类。
基于JavaConfig的配置形式是这样的:
@Configuration
public class MockConfiguration{
    @Bean
    public MockService mockService(){
        return new MockServiceImpl();
    }
}
任何一个标注了@Configuration的Java类定义都是一个JavaConfig配置类。
@ComponentScan
@ComponentScan这个注解在Spring中很重要,它对应XML配置中的元素,@ComponentScan的功能其实就是自动扫描并加载符合条件的组件(比如@Component和@Repository等)或者bean定义,最终将这些bean定义加载到IoC容器中。
我们可以通过basePackages等属性来细粒度的定制@ComponentScan自动扫描的范围,如果不指定,则默认Spring框架实现会从声明@ComponentScan所在类的package进行扫描。
@EnableAutoConfiguration
个人感觉@EnableAutoConfiguration这个Annotation最为重要,所以放在最后来解读,大家是否还记得Spring框架提供的各种名字为@Enable开头的Annotation定义?比如@EnableScheduling、@EnableCaching、@EnableMBeanExport等,@EnableAutoConfiguration的理念和做事方式其实一脉相承,简单概括一下就是,借助@Import的支持,收集和注册特定场景相关的bean定义。
@EnableScheduling是通过@Import将Spring调度框架相关的bean定义都加载到IoC容器。
@EnableMBeanExport是通过@Import将JMX相关的bean定义加载到IoC容器。
而@EnableAutoConfiguration也是借助@Import的帮助,将所有符合自动配置条件的bean定义加载到IoC容器,仅此而已!
原理图

1. 引入依赖
<dependency>
   <groupId>org.springframework.boot</groupId>
   <artifactId>spring-boot-autoconfigure</artifactId>
   <version>2.5.4</version>
</dependency>
2. 编写属性类
@Component
@ConfigurationProperties(prefix = "liuyishi.start.config")
public class MyStartProperties {
    private String username;
    private String password;
    private String port;
}
之后我们就可以在properties 中 使用 liuyishi.start.config.port=这样子来指定参数了
3. 编写配置类
@Configuration
@ConditionalOnClass(MyStartProperties.class) // 只有当 MyStartProperties 存在的时候才执行,就是说一定要引入了Jedis的依赖才会执行这个配置
@EnableConfigurationProperties(MyStartProperties.class) // 引入属性类
public class AutoConfig {
    @Bean
    @ConditionalOnMissingBean // 当这个bean不存在的时候才执行,防止重复加载bean
    public MyServer info(MyStartProperties myStartProperties) {
        String username = myStartProperties.getUsername();
        String password = myStartProperties.getPassword();
        String port = myStartProperties.getPort();
        return new MyServer(username, password, port);
    }
}
4. 编写 spring.factories
spring.factories 默认配置在 resources 目录的 META-INF 下
org.springframework.boot.autoconfigure.EnableAutoConfiguration = com.cnblogs.liuyishi.springlearn.autoconfiguration.AutoConfig
5. 测试
@SpringBootTest
class SpringLearnApplicationTests {
    @Autowired
    private MyServer myServer;
    @Test
    void testAutoConfig() {
        System.out.println("myServer = " + myServer);
    }
}
```_