场景说明
项目整体是使用的是spring cloud架构,配置中心为spring cloud config组件。
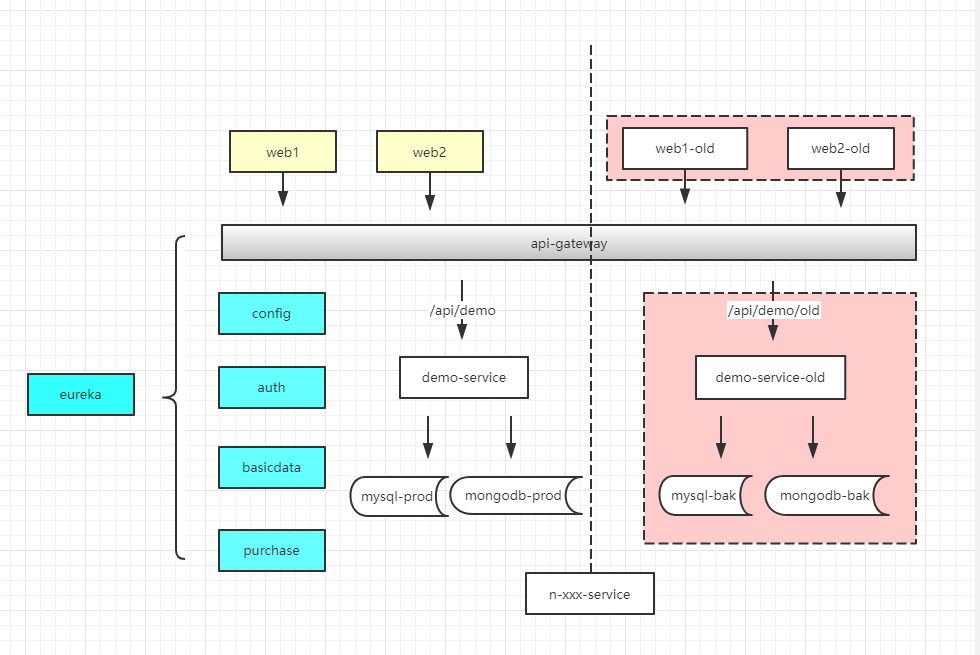
最近项目中有个需求是上线的时候需要新旧服务同时运行, 但数据库表结构在本期变更中发生了很大的变化,所以这里考虑的使用自定义数据源来实现新旧服务访问不同的数据源。
新服务访问线上的正式数据库,旧的服务访问当前线上数据库的备份库。新的部署规划如下:
备注:这里熟悉spring boot的同学会说,这很好办,可以通过spring boot配置文件的优先级顺序,直接在当前服务根路径下定义config/application.yml文件,然后直接配置spring.datasource
来覆盖全局的配置即可。大家都知道spring boot 工程目录下config/application.yml配置优先级是最高的,这在单体项目下,确实是成立的,但是如果使用的spring cloud config配置中心,则配置
中心的配置优先级才是最高的。
实现方案 —— mysql
项目环境: spring boot 1.5.9 + spring cloud 1.3.6 + durid连接池
1. 在当前项目配置文件添加新数据源配置,这里增加数据源为dbBak, 使用的是druid连接池
spring:
  #数据源
  datasource:
    dbBak:
      driver-class-name: com.mysql.jdbc.Driver
      url: jdbc:mysql://localhost:3306/test?useSSL=false&characterEncoding=utf8&allowMultiQueries=true
      username: root
      password: 123456
      type: com.alibaba.druid.pool.DruidDataSource
    # update at 2021-07-06 by author ,这里的配置durid配置项与password平级
      #druid:
      # 初始化连接池个数
      initial-size: 5
      # 最大连接池个数
      max-active: 20
      # 最小连接池个数
      min-idle: 5
      # 配置获取连接等待超时的时间,单位毫秒,缺省启用公平锁,并发效率会有所下降
      max-wait: 60000
      # 配置间隔多久才进行一次检测,检测需要关闭的空闲连接,单位是毫秒
      time-between-eviction-runs-millis: 60000
      # 配置一个连接在池中最小生存的时间,单位是毫秒
      min-evictable-idle-time-millis: 300000
      # 如果validationQuery为null,testOnBorrow、testOnReturn、testWhileIdle都不会起作用
      validation-query: SELECT 1 FROM DUAL
      # 建议配置为true,不影响性能,并且保证安全性。
      # 申请连接的时候检测,如果空闲时间大于timeBetweenEvictionRunsMillis,执行validationQuery检测连接是否有效。
      test-while-idle: true
      # 申请连接时执行validationQuery检测连接是否有效,做了这个配置会降低性能
      test-on-borrow: false
      # 归还连接时执行validationQuery检测连接是否有效,做了这个配置会降低性能
      test-on-return: false
      # 打开PSCache,并且指定每个连接上PSCache的大小
      pool-prepared-statements: true
      # 配置过滤器, 打开sql监控,如果这里不配置,sql监控上没数据
      filters: stat,wall
# 配置由于疏忽或者使用不当产生数据库连接泄露的配置
      #开启超时自动释放连接
      remove-abandoned: true
      #检测时间
      remove-abandoned-timeout: 300
      #是否显示连接未释放的堆栈位置
      log-abandoned: true
2. 增加config配置文件,新建配置文件DuridDataSourceConfig配置类
@Configuration
public class DruidDatasourceConfig {

    /**
     * 添加 DruidDataSource 组件到容器中,并绑定属性:
     * 将自定义的 Druid 数据源添加到容器中,不再让 Spring Boot 自动创建
     * 这样做的目的是:绑定全局配置文件中的 druid 数据源属性到 com.alibaba.druid.pool.DruidDataSource
     * 从而让它们生效
     *
     * @ConfigurationProperties(prefix = "spring.datasource"):作用就是将 全局配置文件中 前缀为 spring.datasource
     * 的属性值注入到 com.alibaba.druid.pool.DruidDataSource 的同名参数中
     */
    @ConfigurationProperties(prefix = "spring.datasource.dbBak")
    @Bean
    public DataSource druidDataSource() {
        return new DruidDataSource();
    }

    /**
     * 注册 Druid 监控之管理后台的 Servlet
     */
    @Bean
    public ServletRegistrationBean servletRegistrationBean() {
        ServletRegistrationBean bean = new ServletRegistrationBean(
                new StatViewServlet(), "/druid/*");

        /**
         * 这些参数可以在 com.alibaba.druid.support.http.StatViewServlet 的父类 com.alibaba.druid.support.http.ResourceServlet 中找到
         * loginUsername:Druid 后台管理界面的登录账号
         * loginPassword:Druid 后台管理界面的登录密码
         * allow:Druid 白名单,后台允许谁可以访问,多个用逗号分割, 如果allow没有配置或者为空,则允许所有访问
         *      initParams.put("allow", "localhost"):表示只有本机可以访问
         *      initParams.put("allow", ""):为空或者为null时,表示允许所有访问
         * deny:Druid 黑名单,后台拒绝谁访问,多个用逗号分割 (共同存在时,deny优先于allow)
         *      initParams.put("deny", "192.168.1.20");表示禁止此ip访问
         */
        Map<String, String> initParams = new HashMap<>();
        initParams.put("loginUsername", "admin");
        initParams.put("loginPassword", "88888");
        initParams.put("allow", "");
        initParams.put("allow", "localhost");

        /** 设置初始化参数*/
        bean.setInitParameters(initParams);
        return bean;
    }

    /**
     * 配置 Druid 监控之 web 监控的 filter
     * 这个过滤器的作用就是统计 web 应用请求中所有的数据库信息,
     * 比如 发出的 sql 语句,sql 执行的时间、请求次数、请求的 url 地址、以及seesion 监控、数据库表的访问次数 等等。
     */
    @Bean
    public FilterRegistrationBean filterRegistrationBean() {
        FilterRegistrationBean bean = new FilterRegistrationBean();
        bean.setFilter(new WebStatFilter());

        /** exclusions:设置哪些请求进行过滤排除掉,从而不进行统计*/
        Map<String, String> initParams = new HashMap<>();
        initParams.put("exclusions", "*.js,*.gif,*.jpg,*,png,*.css,/druid/*");
        bean.setInitParameters(initParams);

        /** "/*" 表示过滤所有请求*/
        bean.setUrlPatterns(Arrays.asList("/*"));
        return bean;
    }

}
3. 正常启动项目后,访问 http://localhost:8080/druid/ ,会打开durid控制台页面,切换到【数据源】页面,就会看到连接已经更新
4. 控制台打印DataSource调试信息
@Order(1)
@Component
public class DemoCommandLineRunner implements CommandLineRunner {

    private final static Logger logger = LoggerFactory.getLogger(DemoCommandLineRunner.class);

    @Autowired
    private JdbcTemplate jdbcTemplate;

    @Override
    public void run(String... strings) throws Exception {
        // 这里可打印 启动参数
        logger.info("当前项目启动参数为:{}", strings);

        logger.debug("打印连接池信息..");
        //这行为测试信息,DataSource在第一次sql查询后初始化
        jdbcTemplate.queryForList("select 1 from dual", Integer.class);
        logger.debug("DataSource:{}", DruidStatManagerFacade.getInstance().getDataSourceStatDataList());
    }
}
5. 优化JdbcTemplate显示调用产生数据库连接泄露的方法
#反例写法
Connection conn = jdbcTemplate.getDataSource().getConnection();

#正确写法
Connection conn = DataSourceUtils.getConnection(jdbcTemplate.getDataSource())
实现方案 —— mongodb
项目环境: spring boot 1.5.9 + spring cloud 1.3.6 + spring data mongodb
1. 在当前项目配置文件添加新数据源配置,这里增加数据源为mongodb2, 使用的是spring data mongodb连接方式
spring:
#mongodb 配置
data:
  mongodb2:
    host: localhost
    port: 27017
    database: demo_bak
    username: admin
    password: 123456
2. 增加config配置文件,新建配置文件MongodbConfig 配置类
@Configuration
@ConfigurationProperties(
        prefix = "spring.data.mongodb2", ignoreInvalidFields = true
)
@Setter
public class MongodbConfig {

    private String host;

    private Integer port = null;

    private String username;

    private char[] password;

    private String database;

    @Bean
    public MongoClient mongoClient(){
        //配置连接mongo客户端,一共三个参数
        List<MongoCredential> credentialList = new ArrayList<MongoCredential>();
        credentialList.add(MongoCredential.createCredential(username,database,password));
        //主机端口,账号密码,超时时间等的配置
        return new MongoClient(new ServerAddress(host,port),
                credentialList,
                MongoClientOptions.builder()
                        .socketTimeout(3000)
                        .minHeartbeatFrequency(25)
                        .heartbeatSocketTimeout(3000)
                        .build());
    }

    @Bean
    public MongoDbFactory mongoDbFactory(){
        //注册一个MongoDbFactory,连接到指定数据库
        return new SimpleMongoDbFactory(mongoClient(),database);
    }

    @Bean
    public MongoTemplate mongoTemplate(){
        //将MongoDbFactory作为参数,注册MongoTemplate
        return new MongoTemplate(mongoDbFactory());
    }


}
3. 正常启动项目后,查看控制太日志,会看到大致如下内容,证明自定义数据源生效了
2021-06-26 22:55:32.522  INFO xx --- [           main] o.m.d.cluster                            : Cluster created with settings {hosts=[localhost:27017], mode=SINGLE, requiredClusterType=UNKNOWN, serverSelectionTimeout='30000 ms', maxWaitQueueSize=500}
2021-06-26 22:55:32.729  INFO xx --- [0.201.105:27018] o.m.d.connection                         : Opened connection [connectionId{localValue:1, serverValue:1558}] to localhost:27017

2021-06-26 22:55:32.733 INFO xx --- [0.201.105:27018] o.m.d.cluster : Monitor thread successfully connected to server with description ServerDescription{address=localhost:27017, type=STANDALONE, state=CONNECT