一、xinetd简介
1、什么是xinetd
xinetd:eXtended InterNET Daemon 扩展的互联网守护程序
xinetd是新一代的网络守护进程服务程序,又叫超级守护进程,常用来管理多种轻量级Internet服务。xinetd提供类似于inetd + tcp_wrapper的功能,但是更加强大和安全。
2、Xinetd的缺点
当前最大的缺点是对RPC支持的不稳定,但是可以启动protmap,使它与xinetd共存来解决这个问题。
3、使用xinetd启动守护进程
原则上任何系统服务都可以使用xinetd,然而最适合的应该是那些常用的网络服务,同时,这个服务的请求数目和频繁程度不会太高。像DNS和Apache就不适合采用这种方式,而像FTP、Telnet、SSH等就适合使用xinetd模式。
二、xinetd的使用
llinux上有两类服务:
standalone : 独立守护进程
transient :非独立守护进程 依赖于超级进程 xinetd
xinetd为接收用户请求较少的服务专门提供监听功能,有请求时,xinetd临时地启动相应服务并响应请求,结束后又关掉相应的服务。
这种被xinetd管理的服务叫非独立守护进程又被称为瞬时守护进程:他们无需定义在运行级别下,只需要一次性地定义xinetd的运行级别
能自我管理,无需xinetd提供监听服务的进程叫独立(standalone)守护进程
1、那如何启动基于xinetd的服务?
例如,我想启动rsync服务
在/etc/inetd.d/目录下每个被xinetd管理的服务都有一个配置文件:
配置文件主要有两部分 :
1、全局配置(服务的默认配置)
2、服务配置
service <service_name>
{
<attribute> <assign_op> <value> <value> ...
...
}
xinetd --> (n个非独立进程)
/etc/xinetd.conf
/etc/xinetd.d/*

[root@Node4 ~]# cd /etc/xinetd.d
[root@Node4 xinetd.d]# ls
chargen-dgram   daytime-stream  echo-dgram   tcpmux-server  time-stream
chargen-stream  discard-dgram   echo-stream  telnet
daytime-dgram   discard-stream  rsync        time-dgram

[root@Node4 xinetd.d]# cat rsync
# default: off
# description: The rsync server is a good addition to an ftp server, as it
#    allows crc checksumming etc.
service rsync
{
    disable    = yes               #是否禁用,改成no就启用了,无需重启xinetd
    flags        = IPv6
    socket_type     = stream
    wait            = no
    user            = root
    server          = /usr/bin/rsync
    server_args     = --daemon
    log_on_failure  += USERID
}

#也可以直接使用chkconfig设置
[root@Node4 xinetd.d]# chkconfig --list|grep rsync
    rsync:             on
[root@Node4 xinetd.d]# chkconfig rsync off
[root@Node4 xinetd.d]# chkconfig --list|grep rsync
    rsync:             off
[root@Node4 xinetd.d]# cat rsync
# default: off
# description: The rsync server is a good addition to an ftp server, as it
#    allows crc checksumming etc.
service rsync
{
    disable    = yes                    #chkconfig命令也是修改这个值
    flags        = IPv6
    socket_type     = stream
    wait            = no
    user            = root
    server          = /usr/bin/rsync
    server_args     = --daemon
    log_on_failure  += USERID
}
SYSLOG :专门用于记录日志的服务(rsyslogd系统日志,klogd内核日志)
SOCKET服务三种: tcp/udp/rpc(远程过程调用)
portmap 提供rpc服务
nfs 利用rpc服务
man xinetd.conf 可查看:
* 基本访问控制
only_from 仅允许 例:only_from = 172.16.22.1 only_from = 172.16.22.1/16
IP
NETWORK
HOSTNAME : FQDN
DOMAIN : 域 名
no_access 不允许 例:no_access = 172.16.22.1 no_access = 172.16.22.1/16
备注:两者同时使用,一般谁的匹配范围小谁生效,但不建议同时使用。
* 基于时间段的访问控制
access_times = hh:mm-hh:mm
access_times 例:access_times = 10:00-16:00
* 基于资源的访问控制
cps 能限制每秒钟客户端能启动服务的个数(带两个参数:每秒连接数的最大值;超出最大连接数后临时禁用的时长) 例:cps = 50 5
per_source 能限制每个客户端能启动的最大服务器数目 例:per_source = 20
instances 能限制客户端能启动的最大服务器数目总数 例:instances = 200
* 功能完备的log功能,即可以记录连接成功也可以记录连接失败的行为
type_log type_log=FILE /var/log/ftp.log
* 将某个服务绑定在特定的系统接口上,从而能实现只允许私有网络访问某项服务
bind 例:bind = 172.16.22.1
向启动的server传递参数 :
server_args =
欢迎语 :
banner =
我们可以总结出:
非独立守护进程和独立守护进程不一样,非独立守护进程使用chkconfig既然设置开机是否运行,也设置服务当前开启和关闭,而独立守护进程chkconfig是仅设置开机在哪些运行级别下是否运行
瞬时守护进程依赖于xinetd监听端口,当xinetd服务没启动时,非独立守护进程启动着也没用
[root@Node4 ~]# service xinetd status
xinetd (pid  1637) is running...
[root@Node4 ~]# ss -tunlp|grep :23
[root@Node4 ~]# chkconfig telnet on
[root@Node4 ~]# ss -tunlp|grep :23
tcp    LISTEN     0      64                    :::23                   :::*      users:(("xinetd",1637,5))
[root@Node4 ~]# service xinetd stop
Stopping xinetd:                                           [  OK  ]
[root@Node4 ~]# service xinetd status
xinetd is stopped
[root@Node4 ~]# chkconfig --list|grep telnet
    telnet:            on
[root@Node4 ~]# ss -tunlp|grep :23
[root@Node4 ~]#
Telnet服务:
telnet服务之后,默认是不开启服务,修改文件/etc/xinetd.d/telnet来开启服务:

注:如有则修改,第一次修改,此文件若不存在,可自己vim创建修改:
        修改 disable = yes 为 disable = no

修改后的telnet文件为:

# default: yes

# description: The telnet server servestelnet sessions; it uses

#      unencrypted username/password pairs for authentication.
service telnet

{
  flags           = REUSE
  socket_type     = stream
  wait            = no
  user            = root
  server          =/usr/sbin/in.telnetd
 # log_type        = FILE /var/log/telnet.log   自定义
  log_on_failure  += USERID  ( +=:在默认基础值上再增加一个选项)       #失败是记录日志格式
  disable         = no
}
测试telent,输入ip+用户名+密码登陆(正常情况下):
我的出错了(linux root用户无法telnet登录),使用root登录一直提示Login incorrect,解决办法:
键入命令 tail /var/log/secure 查看日志如下:
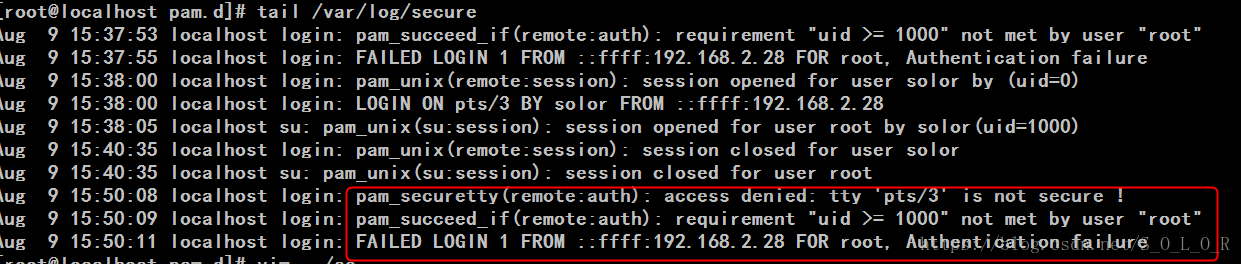
日志中倒数的三行就是我上次登录失败的信息。看倒数第三行pam_securetty提示 access denied(拒绝访问):tty pts/3 is not secure(终端 pts/3 不安全)。
这时我们需要知道pam_securetty是啥,首先你要知道pam是啥,百度一下好多博主给了很详细的解释。登录系统也是要调用pam模块,而登录验证就在/etc/pam.d/login文件中配置。打开这个文件不出意外你会看到有一行中包含这个pam_securetty.so标记。然后使用man工具查看 man pam_securetty结果如下:
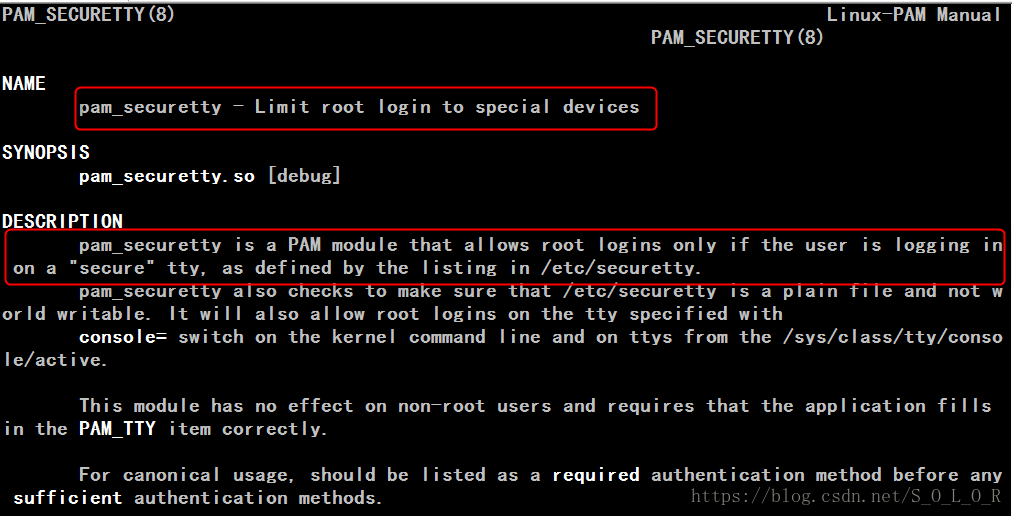
作用是对root用户的登录进行限制。
description第一行解释说:pam_securetty是一个pam模块,他要对root用户的登录进行校验,保证root登录的tty(终端)是安全的。那么什么样的终端才是安全的呢– –as defined by the listing in /etc/securetty(在这个文件里面列出来的才是安全的)。
所以结合上面的错误日志以及这段解释应该大概明白了,root登录失败的原因是那个终端“pts/3”没有在/etc/securetty这个文件里列出。所以我们打开/etc/securetty新建一行按照原来的格式加入“pts/3”。
然后重启telnet服务。此时root用户就可以再远程使用telnet登录了。
service xinetd restart
systemctl restart xinetd.service
11===》设置服务开机启动:
chkconfig --level 35 xinetd on
systemctl enable xinetd.service
12===》怎么退出telnet:
(1)比较多的协议支持quit命令,以telent界面上键入该命令后,系统会自动断开与远程的连接
(2)如果不嫌多一步可以考虑用CTRL+]键,这时会强制退到telnet命令界面下,再用quit退出就行了,百试百灵。
(3)其它就是用CTRL +C或CTRL+D两种方式来强行断开与远程的连接,但能支持这种命令的比较少(反正我的电脑是不支持这种方式)。最后的方法就是关掉telnet的窗口。
CentOS安装telnet服务和xinetd服务和iptables和linux运行级别
三、tcp_wrapper
1、tcp_wrapper简介
tcp_wrapper tcp包装器,
是一种访问控制工具,类似于iptables,可以作访问控制。
tcp_wrapper只能对基于tcp协议的服务作访问控制,但并不是所有基于tcp协议的服务都能实现用tcp wraper作访问控制。
2、tcp_wrapper工作机制
守护进程:tcpd,也可以说tcp_wrapper是一个库,程序依赖于tcp_wrapper就表明接受tcp_wrapper控制
配置文件:/etc/hosts.allow,/etc/hosts.deny
注意:
并非所有服务均能由tcp_wrapper控制
判断某服务程序是否能由tcp_wrap控制
动态编译:
ldd命令检测其是否链接至libwrap库上即可
libwarp.so.0 =>/lib64/libwarp.so.0
静态编译:
string /path/to/program
strings `which porgram` | grep host
如果出现以下某项说明也接受tcp_wrapper控制
hosts.allow
hosts.deny
tcp_wrapper实现访问控制主要依靠两个文件,一个是/etc.hosts.allow文件,另一个是/etc/hosts.deny文件从文件的名字上可以理解:一个是定义允许的,一个是定义拒绝的。那这两个文件生效的次序是怎样的呢?
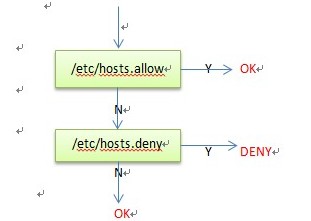
说明:如图所示,N表示没有匹配的规则,Y表示有匹配的规则,OK表示允许访问,DENY表示拒绝访问。
匹配机制:
1.先检查/etc/hosts.allow,如果被允许,则直接放心
2.如果/etc/hosts.allow没有匹配项,则检查/etc/hosts.deny,如果被拒绝,则禁止访问;
3.如果二者均无匹配,则放行
3、tcp_wrapper配置
配置文件语法格式:
daemon_list:client_list [:options]
进程列表:客户端列表
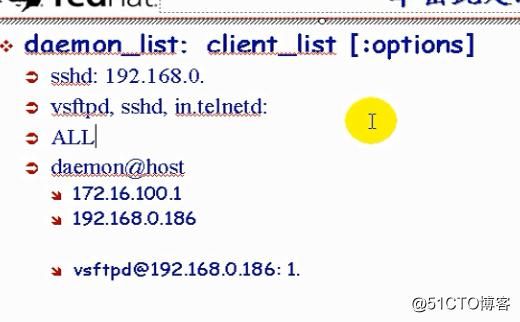
daemon_list的格式:
Daemon_list 要写的可执行程序的二进制文件名。例ssh的二进制文件名sshd,http的二进制文件名为httpd
应用程序名称(不是进程名),如果有多个,用逗号分隔即可
ALL:匹配所有的列表
client_list:
ip地址:172.16.100.100
etwork address 不能使用长度格式,只能使用完整长度格式。例:172.16. 172.16.0.1/255.255.0.0 但不能使用172.16.0.1/16
主机名:www.magedu.com
网络地址/子网掩码:掩码仅允许使用长格式,不允许使用CIDR格式
172.16. 表示172.16.0.0/255.255.0.0
[:options]
在hosts.allow文件中使用deny选项:表示在hosts.allow文件中定义拒绝规则
在hosts.deny文件中使用allow选项:表示在hosts.deny文件中定义放行规则
tcp_wrapper有几个内置的宏:
用于client_list的有:ALL,KNOWN(主机名能正常解析的),UNKNOWN(主机名不能正常解析),PARANOID(主机名正反项解析不匹配的)
用于daemon_list的有:ALL
EXCEPT:除了不包含的意思。可以用户client和daemon之中,起到排除功能
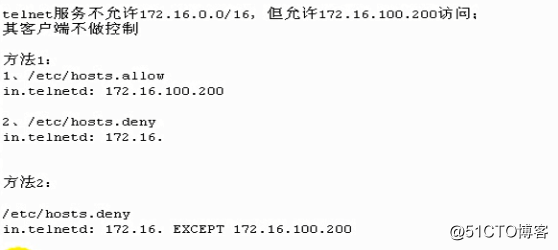
例子:

in.telnetd:  172.16.  EXCEPT  172.16.251.105

in.telnetd: 172.16. :deny       # 表示在deny这个172.16.0.0网段中的主机
spawn :启动
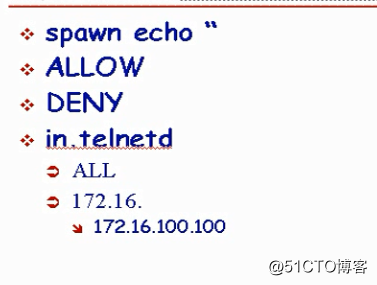
发起执行一条命令的意思,可以用来记录日志
%c:客户端信息 user@host
%s:服务端信息 server@host
%h:客户端主机名
%p:服务器上的进程PID
例:ssh允许172.16.0.0/16网段访问,记录日志。
sshd:172.16. :spawn echo ”someone login attempt from%c to %s” >> /var/log/tcpwrapper.log
man 5 hosts_access:获取其完整帮助信息
注意:
spaw要定义在客户端被哪个文件拒绝的那个文件里才生效
echo的信息无需加引号,否则,命令替换可能不会进行
练习:
使用tcp_wrapper控制vsftp服务仅允许172.16.0.0网络中的主机访问,但要拒绝172.16.200.中的所有主机,对所有的拒绝访问尝试使用记录日志