1.配置caffe环境
[请参考此篇博客:http://blog.csdn.net/ws_20100/article/details/48850449]
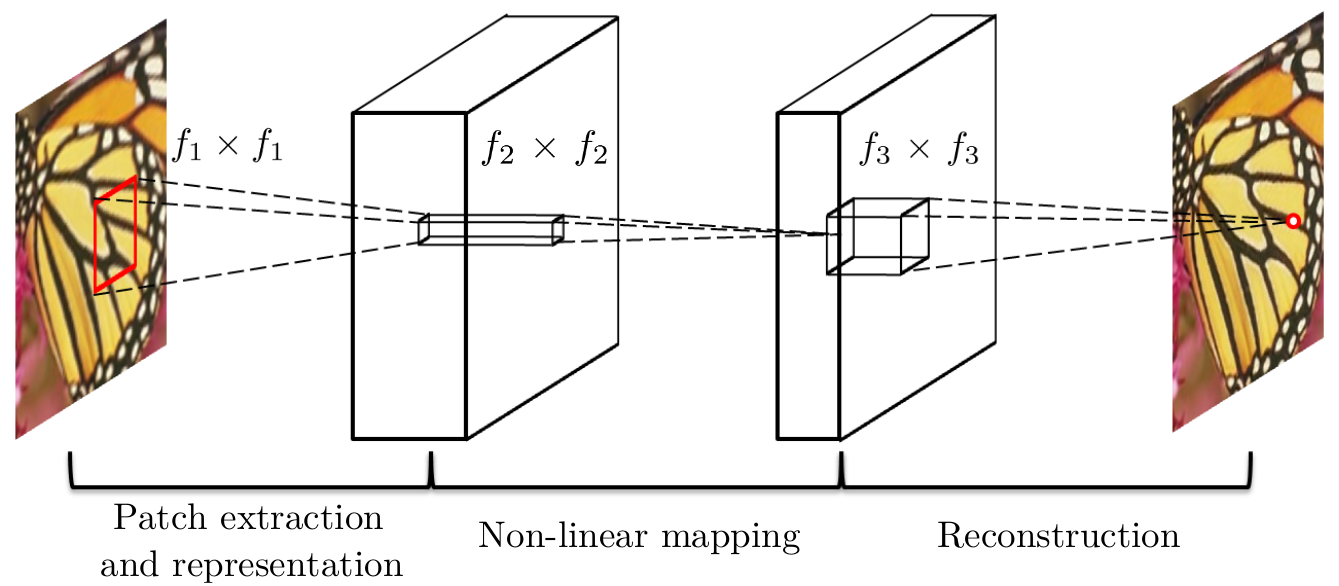
本篇介绍如何在caffe环境下,实现"图像对图像"的卷积神经网络的训练。
2.文件结构
在配置好的caffe文件夹中,进入examples目录,创建CNN文件夹,并进入文件夹
$ cd caffe-master/examples/
$ mkdir CNN
$ cd CNN/
在CNN文件夹下面创建子文件夹
$ mkdir model snapshot TestPhotos TestLabels TrainPhotos TrainLabels
其中,
model用于以后存储卷积核矩阵和偏置向量;
snapshot用于存储训练中备份的caffe模型,每一段时间存储一次,防止断电等一些情况;
TrainPhotos、TrainLabels分别存储训练集输入和监督样本;
TestPhotos、TestLabels分别存储测试集输入和监督样本,不直接参与到训练中。
然后,将训练所用的输入样本和监督样本分别放入到TrainPhotos和TrainLabels中去。注意,样本文件名无所谓,但是排列次序必须一一对应。同样,将测试所用的输入样本和监督样本分别放入到TestPhotos和TestLabels中去。
3.产生训练和测试数据
1.)产生路径文件
在CNN文件夹下面(以下均是在此文件夹下)创建两个路径文件。
$ vim train.txt
输入内容:
examples/CNN/train.h5
:wq保存文档。
$ vim test.txt
输入内容:
examples/CNN/test.h5
:wq保存文档。
2.)产生训练数据
$ vim generate_train.m
输入内容:(把输入图像切成11*11的像素块,监督图像为3*3的像素块(由网络结构和卷积核大小决定),步长为1个像素)
clear;close all;

%% settings
folder_input = 'TrainPhotos';
folder_label = 'TrainLabels';
savepath = 'train.h5';
size_input = 11;
size_label = 3; % size_input - 12
stride = 1;

%% initialization
data = zeros(size_input, size_input, 1, 1);
label = zeros(size_label, size_label, 1, 1);
padding = abs(size_input - size_label) / 2;
count = 0;

%% read data
filepaths_input = dir(fullfile(folder_input,'*.jpg'));
filepaths_label = dir(fullfile(folder_label,'*.jpg'));

if (length(filepaths_input)==length(filepaths_label))
    length = length(filepaths_input);
else
    error('The Number of Input is NOT equal to the Number of Label.');
end

%% generate data
for i = 1 : length

    im_input = imread(fullfile(folder_input,filepaths_input(i).name));
    im_input = rgb2ycbcr(im_input);
    im_input = im2double(im_input(:, :, 1));

    im_label = imread(fullfile(folder_label,filepaths_label(i).name));
    im_label = im2double(im_label(:, :, 1));

    if size(im_input) == size(im_label)
        [hei,wid] = size(im_input);
    else
        error('The size of input and label are not equal.');
    end

    for x = 1 : stride : hei-size_input+1
        for y = 1 :stride : wid-size_input+1

            subim_input = im_input(x : x+size_input-1, y : y+size_input-1);
            subim_label = im_label(x+padding : x+padding+size_label-1, y+padding : y+padding+size_label-1);

            count = count + 1;
            data(:, :, 1, count) = subim_input;
            label(:, :, 1, count) = subim_label;
        end
    end

end

%% randomized the data and label
order = randperm(count);
data = data(:, :, 1, order);
label = label(:, :, 1, order);

%% writing to HDF5
chunksz = 128;
created_flag = false;
totalct = 0;

for batchno = 1:floor(count/chunksz)
    last_read=(batchno-1)*chunksz;
    batchdata = data(:,:,1,last_read+1:last_read+chunksz);
    batchlabs = label(:,:,1,last_read+1:last_read+chunksz);

    startloc = struct('dat',[1,1,1,totalct+1], 'lab', [1,1,1,totalct+1]);
    curr_dat_sz = store2hdf5(savepath, batchdata, batchlabs, ~created_flag, startloc, chunksz);
    created_flag = true;
    totalct = curr_dat_sz(end);
end
h5disp(savepath);
终端下输入:
$ matlab -nodesktop -nosplash -logfile generate_train.log
-r generate_train
产生训练数据train.h5。
3.)产生测试数据
$ vim generate_test.m
generate_test.m只需要将generate_test.m文件开头改为:
clear;close all;

%% settings
folder_input = 'TestPhotos';
folder_label = 'TestLabels';
savepath = 'test.h5';
size_input = 11;
size_label = 3;
stride = 30;
将最后一段改成:
%% writing to HDF5
chunksz = 2;
created_flag = false;
totalct = 0;

for batchno = 1:floor(count/chunksz)
    last_read=(batchno-1)*chunksz;
    batchdata = data(:,:,1,last_read+1:last_read+chunksz);
    batchlabs = label(:,:,1,last_read+1:last_read+chunksz);

    startloc = struct('dat',[1,1,1,totalct+1], 'lab', [1,1,1,totalct+1]);
    curr_dat_sz = store2hdf5(savepath, batchdata, batchlabs, ~created_flag, startloc, chunksz);
    created_flag = true;
    totalct = curr_dat_sz(end);
end
h5disp(savepath);
终端下输入:
$ matlab -nodesktop -nosplash -logfile generate_test.log -r generate_test
产生测试数据test.h5。仅仅用于判断训练到达什么地步。
4.建立训练文件
1.)建立solver文件
$ vim CNN_solver.prototxt
此为运行的配置文件,输入以下内容:
# The train/test net protocol buffer definition
net: "examples/CNN/CNN_net.prototxt"
test_iter: 556
# Carry out testing every 500 training iterations.
test_interval: 500
# The base learning rate, momentum and the weight decay of the network.
base_lr: 0.0001
momentum: 0.9
weight_decay: 0
# The learning rate policy
lr_policy: "fixed"
# Display every 100 iterations
display: 100
# The maximum number of iterations
max_iter: 15000000
# snapshot intermediate results
snapshot: 500
snapshot_prefix: "examples/CNN/snapshot/CNN"
# solver mode: CPU or GPU
solver_mode: GPU:wq保存退出。
2.)建立net文件
$ vim CNN_net.prototxt
此为网络结构配置文件,可以配置网络层数,节点数,卷积核等参数。输入以下内容:
name: "CNN"
layer {
  name: "data"
  type: "HDF5Data"
  top: "data"
  top: "label"
  hdf5_data_param {
    source: "examples/CNN/train.txt"
    batch_size: 128
  }
  include: { phase: TRAIN }
}
layer {
  name: "data"
  type: "HDF5Data"
  top: "data"
  top: "label"
  hdf5_data_param {
    source: "examples/CNN/test.txt"
    batch_size: 2
  }
  include: { phase: TEST }
}

layer {
  name: "conv1"
  type: "Convolution"
  bottom: "data"
  top: "conv1"
  param {
    lr_mult: 1
  }
  param {
    lr_mult: 0.1
  }
  convolution_param {
    num_output: 128
    kernel_size: 5
    stride: 1
    pad: 0
    weight_filler {
      type: "gaussian"
      std: 0.001
    }
    bias_filler {
      type: "constant"
      value: 0
    }
  }
}

layer {
  name: "relu1"
  type: "ReLU"
  bottom: "conv1"
  top: "conv1"
}

layer {
  name: "conv2"
  type: "Convolution"
  bottom: "conv1"
  top: "conv2"
  param {
    lr_mult: 1
  }
  param {
    lr_mult: 0.1
  }
  convolution_param {
    num_output: 64
    kernel_size: 3
    stride: 1
    pad: 0
    weight_filler {
      type: "gaussian"
      std: 0.001
    }
    bias_filler {
      type: "constant"
      value: 0
    }
  }
}

layer {
  name: "relu2"
  type: "ReLU"
  bottom: "conv2"
  top: "conv2"
}

layer {
  name: "conv3"
  type: "Convolution"
  bottom: "conv2"
  top: "conv3"
  param {
    lr_mult: 0.1
  }
  param {
    lr_mult: 0.1
  }
  convolution_param {
    num_output: 1
    kernel_size: 3
    stride: 1
    pad: 0
    weight_filler {
      type: "gaussian"
      std: 0.001
    }
    bias_filler {
      type: "constant"
      value: 0
    }
  }
}

layer {
  name: "loss"
  type: "EuclideanLoss"
  bottom: "conv3"
  bottom: "label"
  top: "loss"
}:wq保存退出。
5.CNN训练
$ vim train.sh
输入以下shell:
#!/bin/bash
cd ../../
./build/tools/caffe train --solver examples/CNN/CNN_solver.prototxt 2>&1 | tee examples/CNN/CNN.log
增加运行权限:
$ chmod +x train.sh
运行脚本文件:
$ ./train.sh
时间可能会运行几天,也可以提前退出(Ctrl+C),因为在snapshot中有中间备份存储。

6.保存滤波器
1.)创建mat文件
$ cp CNN_net.prototxt CNN_mat.prototxt
将CNN_mat.prototxt文件开头两个layer段改为:
name: "CNN"
input: "data"
input_dim: 1
input_dim: 1
input_dim: 11
input_dim: 11

input: "label"
input_dim: 1
input_dim: 1
input_dim: 3
input_dim: 3:wq保存即可。
2.)创建M文件
$ vim saveFilters.m
输入以下内容:(第7行可以更改需要转换的caffemodel文件名)
caffe.reset_all();
clear; close all;
%% settings
%folder = 'examples/CNN/';
folder = './';
model = [folder 'CNN_mat.prototxt'];
weights = [folder 'snapshot/CNN_iter_550000.caffemodel'];
savepath = [folder 'model/x.mat'];
layers = 3;

%% load model using mat_caffe
net = caffe.Net(model,weights,'test');

%% reshap parameters
weights_conv = cell(layers,1);

for idx = 1 : layers
    conv_filters = net.layers(['conv' num2str(idx)]).params(1).get_data();
    [~,fsize,channel,fnum] = size(conv_filters);

    if channel == 1
        weights = double(ones(fsize^2, fnum));
    else
        weights = double(ones(channel, fsize^2, fnum));
    end

    for i = 1 : channel
        for j = 1 : fnum
             temp = conv_filters(:,:,i,j);
             if channel == 1
                weights(:,j) = temp(:);
             else
                weights(i,:,j) = temp(:);
             end
        end
    end

    weights_conv{idx} = weights;
end

%% save parameters
weights_conv1 = weights_conv{1};
weights_conv2 = weights_conv{2};
weights_conv3 = weights_conv{3};
biases_conv1 = double(net.layers('conv1').params(2).get_data());
biases_conv2 = double(net.layers('conv2').params(2).get_data());
biases_conv3 = double(net.layers('conv3').params(2).get_data());

save(savepath,'weights_conv1','biases_conv1','weights_conv2','biases_conv2','weights_conv3','biases_conv3');:wq保存。
3.)运行M文件
$
matlab -nodesktop -nosplash -logfile saveFilters.log -r
saveFilters
此时,在model中会生成x.mat文件。
7.CNN重构
已经知道了x.mat文件中,有三层卷积层的卷积核矩阵weights_conv*和偏置向量biases_conv*。
编写一个demo_net.m文件,使用这些参数构建卷积网络结构,对输入图像(矩阵)进行处理,即可得到结果。
不同应用有不同的源码,这里省略该文件源码。
本文可能叙述不全面,如有错误,欢迎指正!
Enjoy~~