前言
有很多网站不登录的话,是无法访问到里面的页面的,这就需要先登录了
实现场景:先登录(只登录一次),然后访问页面->我的地盘页->产品页->项目页
官方案例
下面是一个简单的locustfile.py的简单示例:
from locust import HttpLocust, TaskSet

def login(l):
    l.client.post("/login", {"username":"ellen_key", "password":"education"})

def logout(l):
    l.client.post("/logout", {"username":"ellen_key", "password":"education"})

def index(l):
    l.client.get("/")

def profile(l):
    l.client.get("/profile")

class UserBehavior(TaskSet):
    tasks = {index: 2, profile: 1}

    def on_start(self):
        login(self)

    def on_stop(self):
        logout(self)

class WebsiteUser(HttpLocust):
    task_set = UserBehavior
    min_wait = 5000
    max_wait = 9000
这里我们定义了许多Locust任务,它们是带有一个参数(Locust类实例)的普通Python callables 。这些任务收集在tasks属性的TaskSet类下 。然后我们有一个代表用户的 类,我们在其中定义模拟用户在执行任务之间应该等待多长时间,以及哪个 类应该定义用户的“行为”。 类可以继承HttpLocust、TaskSet、TaskSet
HttpLocust类从继承 Locust的类,并把它添加一个客户端属性,它是的一个实例 HttpSession,可用于使HTTP请求。
另一种我们可以声明任务的方法,通常是更方便,就是使用 @task装饰器。以下代码与上述代码相同:
from locust import HttpLocust, TaskSet, task

class UserBehavior(TaskSet):
    def on_start(self):
        """ on_start is called when a Locust start before any task is scheduled """
        self.login()

    def on_stop(self):
        """ on_stop is called when the TaskSet is stopping """
        self.logout()

    def login(self):
        self.client.post("/login", {"username":"ellen_key", "password":"education"})

    def logout(self):
        self.client.post("/logout", {"username":"ellen_key", "password":"education"})

    @task(2)
    def index(self):
        self.client.get("/")

    @task(1)
    def profile(self):
        self.client.get("/profile")

class WebsiteUser(HttpLocust):
    task_set = UserBehavior
    min_wait = 5000
    max_wait = 9000
在Locust类(以及HttpLocust 因为它是一个子类),也可以让一个在指定最小和最大等待时间毫秒,每个模拟用户之间的任务执行(min_wait和MAX_WAIT)以及其他用户的行为。默认情况下,时间是在min_wait和max_wait之间统一随机选择的,但是可以通过将wait_function设置为任意函数来使用任何用户定义的时间分布。例如,对于指数分布的等待时间平均为1秒:
import random

class WebsiteUser(HttpLocust):
    task_set = UserBehaviour
    wait_function = lambda self: random.expovariate(1)*1000
项目实战:
上面的官方案例只是一些伪代码,不能在真实的环境中跑起来,接下来把上面的理论执行用到真实的项目环境中
http协议是无状态的,所以登录请求和登录后的请求它是独立的,但是登录后的请求需要依赖先登录拿到cookies,才能保持登录状态,可以用session来解决
s = requests.session()
HttpLocust类从继承 Locust的类,并把它添加一个客户端属性,它是的一个实例 HttpSession,可用于使HTTP请求,这就相当于它自动使用了session机制,类似于client = requests.session()
所以后面的请求,直接拿client.get()、client.post()请求就可以了
# -*- coding: utf_8 -*-
# locust性能测试

from locust import HttpLocust, TaskSet, task
import subprocess
import json

# 性能测试任务类 TaskSet.
class UserBehavior(TaskSet):
    # 账户登陆
    def _loginname(self):
        url = "/global/do-login.action"
        body = {
            "loginName": "%s" % self.locust.loginName,
            "password": "%s" % self.locust.password,
            "pcCodeForFocusMedia": 0
        }
        h = {
            "User-Agent": "Mozilla/5.0 (Windows NT 10.0; WOW64) AppleWebKit/537.36 (KHTML, like Gecko) Chrome/63.0.3239.132 Safari/537.36",
            "Content-Type": "application/x-www-form-urlencoded",
            }
        a = self.client.post(url=url, data=body, headers=h, verify=False)
        data = a.json()
        assert data['status'] == 202

    # 选择租户
    def _tenant(self):
        url = "/global/login-entry.action"
        body = {
            "tenantId": "%s" % self.locust.tenantId,
            "passport.id": self.locust.passport_id,
            "encryptionKey": "%s" % self.locust.encryptionKey,
            "loginName": "%s" % self.locust.loginName
        }
        h = {
            "User-Agent": "Mozilla/5.0 (Windows NT 10.0; WOW64) AppleWebKit/537.36 (KHTML, like Gecko) Chrome/63.0.3239.132 Safari/537.36",
            "Content-Type": "application/x-www-form-urlencoded",
            }
        b = self.client.post(url=url, data=body, headers=h, verify=False)
        data = b.json()
        assert data['status'] == 0

    def on_start(self):
        '''任务开始准备工作:只登录一次'''
        self._loginname()   # 账户登陆
        self._tenant()   # 选择租户

    # 任务
    @task(10)
    def getTagVals(self):
        u"""
        request_url:请求路径
        request_params:请求头参数
        request_json:请求json参数
        """
        request_url = "/json/crm_dimension/dim-tree.action" # (待测试的路径)
        body = {
            "belongId":35,
            "dimType":1
        }

        response = self.client.post(url=request_url, data=body, verify=False)
        if response.status_code != 200:
            print(u"返回异常")
            print(u"请求返回状态码:", response.status_code)
        elif response.status_code == 200:
            print(u"返回正常")

# 性能测试配置
class MobileUserLocust(HttpLocust):
    u"""
    min_wait :用户执行任务之间等待时间的下界,单位:毫秒。
    max_wait :用户执行任务之间等待时间的上界,单位:毫秒。
    """
    # weight = 3
    task_set = UserBehavior
    host = "自己公司的url"  # (待测试的ip或者域名)
    min_wait = 3000
    max_wait = 6000

    loginName = "账号"
    password = 密码
    tenantId = 公司租户Id # 租户ID
    encryptionKey = "keyId"  # 保持登陆的key
    passport_id = 默认


if __name__ == "__main__":
    subprocess.Popen("locust -f locustlearn.py", shell=True)
如何运行:首先打开到文件路径下、然后直接运行脚本  python locustlearn.py
设置1个虚拟用户,每秒启动1个服务,点start后运行结果
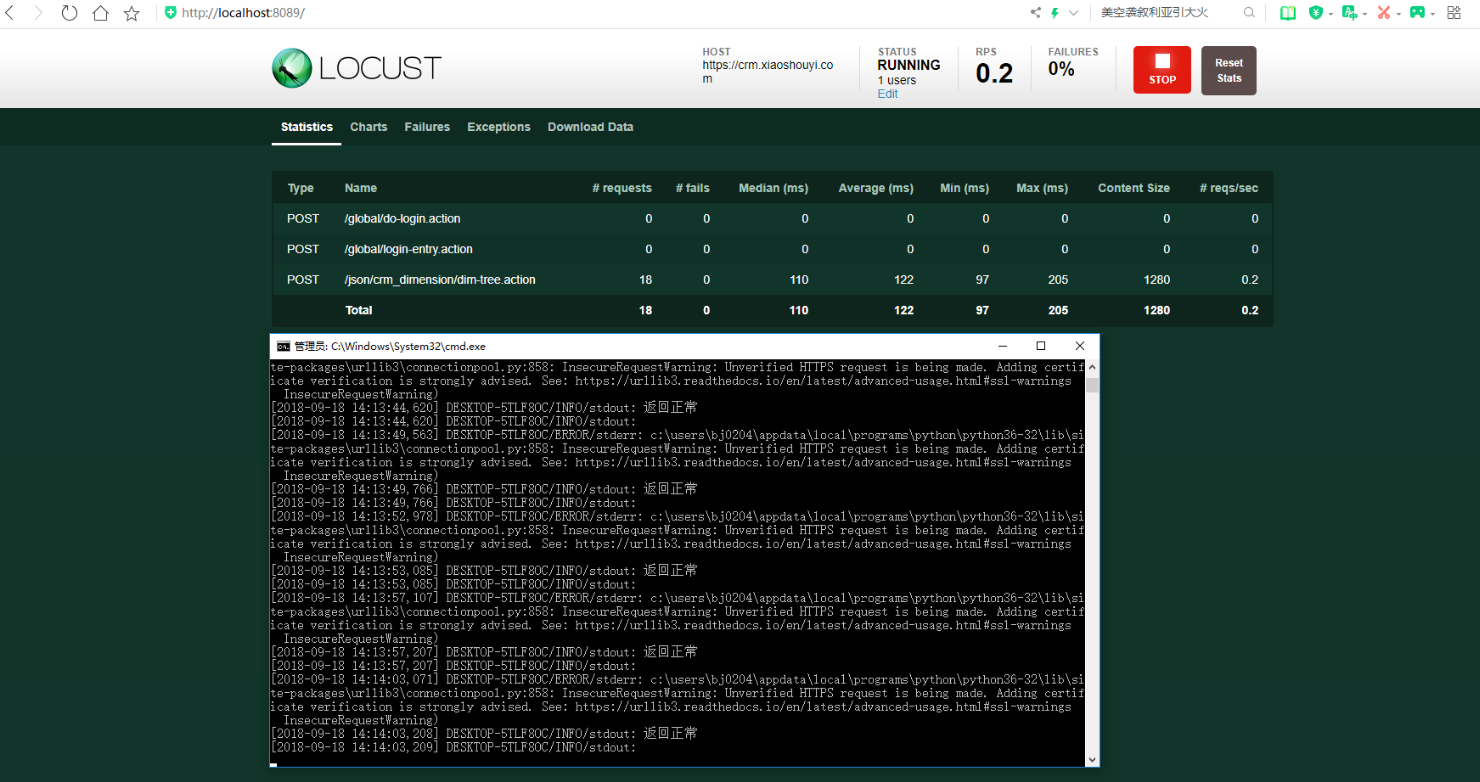
从结果可以看到登录的请求只访问了一次,定义on_start()相当于用例的准备操作,当然还有on_stop()用于数据清理操作
作者:含笑半步颠√
博客链接:https://www.cnblogs.com/lixy-88428977
声明:本文为博主学习感悟总结,水平有限,如果不当,欢迎指正。如果您认为还不错,欢迎转载。转载与引用请注明作者及出处。