项目布局中使用:SurfaceView:宽,高都填充窗体
1.相机预览的实现
2.相机自动聚焦实现
(1)http://jingyan.baidu.com/article/d7130635299a4513fdf47504.html
这个楼主是在SurfaceView的触摸事件中添加了自动对焦事件。
-
首先创建回调方法,代码如下:

-
按钮调用:就是在点击某一按钮后实现自动对焦。只需要在按钮的触发事件中使用camera回调(mCamera.autoFocusCallback(myAutoFocusCallback ))即可。

-
随时调用回调方式2:
触屏调用:设置surfaceView的触屏事件,在该事件中实现camera回调。

一:先写好获取相机对象的方法,释放相机资源的方法
 1     /**
 2      * 获取Camera的对象
 3      *
 4      * @return
 5      */
 6     public Camera getCamera() {
 7         Camera camera;
 8         try {
 9             camera = Camera.open();
10         } catch (Exception e) {
11             camera = null;
12             e.printStackTrace();
13         }
14
15         return camera;
16     }
17
18     /**
19      * 开始预览相机内容
20      */
21     private void setStartPreview(Camera camera, SurfaceHolder holder) {
22         try {
23             Camera.Parameters parameters = mCamera.getParameters();
24             parameters.setPictureFormat(ImageFormat.JPEG);
25 //            parameters.setPictureSize(800, 480);
26             parameters.setFocusMode(Camera.Parameters.FOCUS_MODE_CONTINUOUS_VIDEO);
27
28             camera.setPreviewDisplay(holder);
29             camera.setParameters(parameters);
30             camera.setPreviewCallback(this);
31 //            camera.setOneShotPreviewCallback(this);
32             camera.setDisplayOrientation(90);
33             camera.startPreview();
34             /***TODO  聚焦***/
35             camera.autoFocus(myAutoFocus);
36
37         } catch (IOException e) {
38             e.printStackTrace();
39         }
40     }
41
42     /**
43      * 释放相机资源
44      */
45     private void releaseCamera() {
46         if (mCamera != null) {
47             mCamera.setPreviewCallback(null);
48             mCamera.stopPreview();
49             mCamera.release();
50             mCamera = null;
51         }
52         if (mHolder != null) {
53 //            mHolder
54         }
55     }
二:SurfaceHolder.Callback需要重写的方法。
 1  /**
 2      * A client may implement this interface to receive information about
 3      * changes to the surface.  When used with a {@link SurfaceView}, the
 4      * Surface being held is only available between calls to
 5      * {@link #surfaceCreated(SurfaceHolder)} and
 6      * {@link #surfaceDestroyed(SurfaceHolder)}.  The Callback is set with
 7      * {@link SurfaceHolder#addCallback SurfaceHolder.addCallback} method.
 8      */
 9     public interface Callback {
10         /**
11          * This is called immediately after the surface is first created.
12          * Implementations of this should start up whatever rendering code
13          * they desire.  Note that only one thread can ever draw into
14          * a {@link Surface}, so you should not draw into the Surface here
15          * if your normal rendering will be in another thread.
16          *
17          * @param holder The SurfaceHolder whose surface is being created.
18          */
19         public void surfaceCreated(SurfaceHolder holder);
20
21         /**
22          * This is called immediately after any structural changes (format or
23          * size) have been made to the surface.  You should at this point update
24          * the imagery in the surface.  This method is always called at least
25          * once, after {@link #surfaceCreated}.
26          *
27          * @param holder The SurfaceHolder whose surface has changed.
28          * @param format The new PixelFormat of the surface.
29          * @param width The new width of the surface.
30          * @param height The new height of the surface.
31          */
32         public void surfaceChanged(SurfaceHolder holder, int format, int width,
33                 int height);
34
35         /**
36          * This is called immediately before a surface is being destroyed. After
37          * returning from this call, you should no longer try to access this
38          * surface.  If you have a rendering thread that directly accesses
39          * the surface, you must ensure that thread is no longer touching the
40          * Surface before returning from this function.
41          *
42          * @param holder The SurfaceHolder whose surface is being destroyed.
43          */
44         public void surfaceDestroyed(SurfaceHolder holder);
45     }
三:让Activity页面实现SurfaceHolder.Callback,里面的方法
 1
 2   @Override
 3     public void surfaceCreated(SurfaceHolder holder) {
 4         setStartPreview(mCamera, mHolder);
 5     }
 6
 7     @Override
 8     public void surfaceChanged(SurfaceHolder holder, int format, int width, int height) {
 9         mCamera.stopPreview();
10         setStartPreview(mCamera, mHolder);
11     }
12
13 @Override
14     public void surfaceDestroyed(SurfaceHolder holder) {
15        releaseCamera();
16     }
四:自定义CameraView继承SurfaceView来封装好对应的SurfaceHolder.Callback回调
import java.io.IOException;
import android.content.Context;
import android.hardware.Camera;
import android.hardware.Camera.AutoFocusCallback;
import android.hardware.Camera.PreviewCallback;
import android.util.Log;
import android.view.SurfaceHolder;
import android.view.SurfaceView;

/** A basic Camera preview class */
public class CameraPreview extends SurfaceView implements
        SurfaceHolder.Callback {
    private SurfaceHolder mHolder;
    private Camera mCamera;
    private PreviewCallback previewCallback;
    private AutoFocusCallback autoFocusCallback;

    @SuppressWarnings("deprecation")
    public CameraPreview(Context context, Camera camera,
            PreviewCallback previewCb, AutoFocusCallback autoFocusCb) {
        super(context);
        mCamera = camera;
        previewCallback = previewCb;
        autoFocusCallback = autoFocusCb;

        /*
         * Set camera to continuous focus if supported, otherwise use software
         * auto-focus. Only works for API level >=9.
         */
        /*
         * Camera.Parameters parameters = camera.getParameters(); for (String f
         * : parameters.getSupportedFocusModes()) { if (f ==
         * Parameters.FOCUS_MODE_CONTINUOUS_PICTURE) {
         * mCamera.setFocusMode(Parameters.FOCUS_MODE_CONTINUOUS_PICTURE);
         * autoFocusCallback = null; break; } }
         */

        // Install a SurfaceHolder.Callback so we get notified when the
        // underlying surface is created and destroyed.
        mHolder = getHolder();
        mHolder.addCallback(this);

        // deprecated setting, but required on Android versions prior to 3.0
        mHolder.setType(SurfaceHolder.SURFACE_TYPE_PUSH_BUFFERS);
    }

    public void surfaceCreated(SurfaceHolder holder) {
        // The Surface has been created, now tell the camera where to draw the
        // preview.
        try {
            mCamera.setPreviewDisplay(holder);
        } catch (IOException e) {
            Log.d("DBG", "Error setting camera preview: " + e.getMessage());
        }
    }

    public void surfaceDestroyed(SurfaceHolder holder) {
        // Camera preview released in activity
    }

    public void surfaceChanged(SurfaceHolder holder, int format, int width,
            int height) {
        /*
         * If your preview can change or rotate, take care of those events here.
         * Make sure to stop the preview before resizing or reformatting it.
         */
        if (mHolder.getSurface() == null) {
            // preview surface does not exist
            return;
        }

        // stop preview before making changes
        try {
            mCamera.stopPreview();
        } catch (Exception e) {
            // ignore: tried to stop a non-existent preview
        }

        try {
            // Hard code camera surface rotation 90 degs to match Activity view
            // in portrait
            mCamera.setDisplayOrientation(90);

            mCamera.setPreviewDisplay(mHolder);
            mCamera.setPreviewCallback(previewCallback);
            mCamera.startPreview();
            mCamera.autoFocus(autoFocusCallback);
        } catch (Exception e) {
            Log.d("DBG", "Error starting camera preview: " + e.getMessage());
        }
    }
}
五:获取相机预览时的照片;要实现PreviewCallback的回调
(一)http://blog.csdn.net/ocean20/article/details/8772196 原楼主分享
Camera.PreviewCallback:定义了onPreviewFrame(byte[] data, Camera camera) 方法,当存在预览帧(preview frame)时调用该方法。可以传入保存当前图像像素的字节数组。在Camera对象上,有3种不同的方式使用这个回调:
· setPreviewCallback(Camera.PreviewCallback):使用此方法注册一个Camera. PreviewCallback,这将确保在屏幕上显示一个新的预览帧时调用onPreviewFrame方法。传递到onPreviewFrame方法中的数据字节数组最有可能采用YUV格式。但是,Android 2.2是第一个包含了YUV格式解码器(YuvImage)的版本;在以前的版本中,必须手动完成解码。
· setOneShotPreviewCallback(Camera.PreviewCallback):利用Camera对象上的这个方法注册Camera.PreviewCallback,从而当下一幅预览图像可用时调用一次onPreviewFrame。同样,传递到onPreviewFrame方法的预览图像数据最有可能采用YUV格式。可以通过使用ImageFormat中的常量检查Camera. getParameters(). getPreviewFormat()返回的结果来确定这一点。
· setPreviewCallbackWithBuffer(Camera.PreviewCallback):在Android 2.2中引入了该方法,其与setPreviewCallback的工作方式相同,但要求指定一个字节数组作为缓冲区,用于预览图像数据。这是为了能够更好地管理处理预览图像时使用的内存。
● Camera.AutoFocusCallback:定义了onAutoFocus方法,当完成一个自动聚焦活动时调用它。通过传入此回调接口的一个实例,在调用Camera对象上的autoFocus方法时会触发自动聚焦。
● Camera.ErrorCallback:定义了onError方法,当发生一个Camera错误时调用它。有两个常量可用于与传入的错误代码进行比较:CAMERA_ERROR_UNKNOWN和CAMERA_ERROR_SERVER_DIED。
● Camera.OnZoomChangeListener:定义了onZoomChange方法,当正在进行或完成“平滑缩放”(慢慢缩小或放大)时调用它。在Android 2.2 (API Level 8)中引入了这个类和方法。
Camera.ShutterCallback:定义了onShutter方法,当捕获图像时立刻调用它
(二)源码:需要实现onPreviewFrame方法;在这个方法中,可以获取预览时的图片btye字节数组。
 1 /**
 2      * Callback interface used to deliver copies of preview frames as
 3      * they are displayed.
 4      *
 5      * @see #setPreviewCallback(Camera.PreviewCallback)
 6      * @see #setOneShotPreviewCallback(Camera.PreviewCallback)
 7      * @see #setPreviewCallbackWithBuffer(Camera.PreviewCallback)
 8      * @see #startPreview()
 9      *
10      * @deprecated We recommend using the new {@link android.hardware.camera2} API for new
11      *             applications.
12      */
13     @Deprecated
14     public interface PreviewCallback
15     {
16         /**
17          * Called as preview frames are displayed.  This callback is invoked
18          * on the event thread {@link #open(int)} was called from.
19          *
20          * <p>If using the {@link android.graphics.ImageFormat#YV12} format,
21          * refer to the equations in {@link Camera.Parameters#setPreviewFormat}
22          * for the arrangement of the pixel data in the preview callback
23          * buffers.
24          *
25          * @param data the contents of the preview frame in the format defined
26          *  by {@link android.graphics.ImageFormat}, which can be queried
27          *  with {@link android.hardware.Camera.Parameters#getPreviewFormat()}.
28          *  If {@link android.hardware.Camera.Parameters#setPreviewFormat(int)}
29          *             is never called, the default will be the YCbCr_420_SP
30          *             (NV21) format.
31          * @param camera the Camera service object.
32          */
33         void onPreviewFrame(byte[] data, Camera camera);
34     };
(三)原项目中处理
@Override
    public void onPreviewFrame(byte[] data, Camera camera) {
        Camera.Parameters parameters = camera.getParameters();
        int width = parameters.getPreviewSize().width;
        int height = parameters.getPreviewSize().height;
        ByteArrayOutputStream outstr = new ByteArrayOutputStream();
        Rect rect = new Rect(0, 0, width, height);
        YuvImage yuvimage = new YuvImage(data, ImageFormat.NV21, width, height, null);
        yuvimage.compressToJpeg(rect, 100, outstr);
        Bitmap bmp = BitmapFactory.decodeByteArray(outstr.toByteArray(), 0, outstr.size());
        Matrix matrix = new Matrix();
        matrix.setRotate(90);
        bmp = Bitmap.createBitmap(bmp, 0, 0, bmp.getWidth(), bmp.getHeight(), matrix, true);
      /*  bmp = Bitmap.createBitmap(bmp, capture_crop_rl.getLeft(), capture_crop_rl.getTop(),
                capture_crop_rl.getRight(), capture_crop_rl.getBottom(), matrix, true);*/


        /*bit_result = Bitmap.createBitmap(bmp,capture_crop_rl.getLeft(),capture_crop_rl.getTop()
                , capture_crop_rl.getRight(),capture_crop_rl.getBottom());//截取*/
        if(null != mBitmapFaceTask){
            switch(mBitmapFaceTask.getStatus()){
                case RUNNING:
                    return;
                case PENDING:
                    mBitmapFaceTask.cancel(false);
                    break;
            }
        }

        mBitmapFaceTask = new BitmapFaceTask(data);
        mBitmapFaceTask.execute((Void)null);
    }
  1    /*自定义的FaceTask类,开启一个线程分析数据*/
  2     private class BitmapFaceTask extends AsyncTask<Void, Void, Void> {
  3
  4         private byte[] mData;
  5         //构造函数
  6         BitmapFaceTask(byte[] data){
  7             this.mData = data;
  8         }
  9
 10         @Override
 11         protected Void doInBackground(Void... params) {
 12             // TODO Auto-generated method stub
 13             Camera.Size size = mCamera.getParameters().getPreviewSize(); //获取预览大小
 14             final int w = size.width;  //宽度
 15             final int h = size.height;
 16             final YuvImage image = new YuvImage(mData, ImageFormat.NV21, w, h, null);
 17             ByteArrayOutputStream os = new ByteArrayOutputStream(mData.length);
 18             if(!image.compressToJpeg(new Rect(0, 0, w, h), 100, os)){
 19                 return null;
 20             }
 21             byte[] tmp = os.toByteArray();
 22             getBitmap = BitmapFactory.decodeByteArray(tmp, 0,tmp.length);
 23             //设置FOCUS_MODE_CONTINUOUS_VIDEO)之后,myParam.set("rotation", 90)失效。图片竟然不能旋转了,故这里要旋转下
 24             Matrix matrix = new Matrix();
 25             matrix.postRotate((float)90.0);
 26             Bitmap rotaBitmap = Bitmap.createBitmap(getBitmap, 0, 0, getBitmap.getWidth(), getBitmap.getHeight(), matrix, false);
 27             //将960×1280缩放到540×800
 28             getBitmap = Bitmap.createScaledBitmap(rotaBitmap, 540, 800, true);
 29 //            getBitmap = rotaBitmap;
 30             runOnUiThread(new Runnable() {
 31                 @Override
 32                 public void run() {
 33                     left= StringUtil.px2dip(CropPhoneNumberActivity.this,capture_crop_rl.getLeft());
 34                     top=StringUtil.px2dip(CropPhoneNumberActivity.this,capture_crop_rl.getTop());
 35                     right=StringUtil.px2dip(CropPhoneNumberActivity.this,capture_crop_rl.getRight());
 36                     buttom=StringUtil.px2dip(CropPhoneNumberActivity.this,capture_crop_rl.getBottom()+TitleBar.getStatusBarHeight());
 37                     /****top=top-px2dip(CropPhoneNumberActivity.this,TitleBar.getStatusBarHeight());
 38                      * 经常取到的top为0
 39                      * **/
 40                         bit_result = Bitmap.createBitmap(getBitmap, left, top,
 41                                 right, buttom);
 42                     Matrix matrix = new Matrix();
 43                     matrix.postScale(2f,2f); //长和宽放大缩小的比例
 44                     bit_result = Bitmap.createBitmap(bit_result,0,0,bit_result.getWidth(),bit_result.getHeight(),matrix,true);
 45                     createPhoneText();
 46                 }
 47             });
 48             return null;
 49         }
 50
 51     }
 52
 53
 54     /**** 该handler用于处理修改结果的任务******/
 55     private void createPhoneText() {
 56         photouri= ImageUtils.createFilename();
 57         ImageUtils.saveImage(CropPhoneNumberActivity.this,bit_result,photouri);
 58         iv_image.setImageBitmap(bit_result);
 59
 60         // 新线程来处理识别
 61         new Thread(new Runnable() {
 62             @Override
 63             public void run() {
 64                 /*对图像进行预处理*/
 65                 /*bitmap_end_result = ImgPretreatment
 66                         .doPretreatment(bit_result);*/
 67                 /*将图片化成灰度图*/
 68                     /*bitmapTreated = ImgPretreatment
 69                             .converyToGrayImg(bitmapSelected);*/
 70
 71                 if(null!=bit_result)
 72                 textResult = doOcr(bit_result,LANGUAGE);
 73                 runOnUiThread(new Runnable() {
 74                     @Override
 75                     public void run() {
 76                         GetToast.showToast(mContext,textResult);
 77                     }
 78                 });
 79                 Message msg = new Message();
 80                 msg.what = SHOWRESULT;
 81                 myHandler.sendMessage(msg);
 82             }
 83
 84         }).start();
 85     }
 86
 87     public static Handler myHandler = new Handler() {
 88
 89         @Override
 90         public void handleMessage(Message msg) {
 91             switch (msg.what) {
 92                 case SHOWRESULT:
 93                     if (TextUtils.isEmpty(textResult)) {
 94                         //Toast.makeText(mContext, "识别失败", Toast.LENGTH_SHORT).show();
 95                     }else if(textResult.length()>=11){
 96                         //这里只截取了:成功情况下的手机号在末尾的11位中。
 97                         textResult=textResult.substring(textResult.length()-11,textResult.length());
 98                         if(StringUtil.isMobilePhone(textResult)) {
 99                             setText(textResult);
100                         }else{
101                             //Toast.makeText(mContext,"号码格式不正确",Toast.LENGTH_SHORT).show();
102                         }
103                     }else{
104                         //Toast.makeText(mContext, "号码长度不够", Toast.LENGTH_SHORT).show();
105                     }
106                     break;
107             }
108             super.handleMessage(msg);
109         }
110
111     };
使用了开源的特征库(需要存放到手机sd卡根目录下);在摄像机预览状态下获取扫描手机号框框区域内的图片bitmap对象,交给开源代码识别数字,识别出来的数字进入手机号的正则表达式匹配
在识别手机号的过程中,为了增加识别率:可以参照的文章有:http://www.oschina.net/code/snippet_1422728_34167 楼主使用c语言写的

原理和算法在代码中做了详细说明,功能存在很大的局限性,但我的想法是把这个思路和实现的办法共享出来。
源码下载地址:
http://git.oschina.net/bobo2cj/iamge2text
2. [代码]提取出该图片内的字符
 1
22 /// <summary>
23 /// 提取出该图片内的字符(将进过灰度处理的图片转化为0、1的二位数组)
24 /// </summary>
25 /// <param name="singlepic">图片来源</param>
26 public void generateLicense(Bitmap singlepic)
27 {
28     try
29     {
30         char[,] charArray = new char[singlepic.Height, singlepic.Width];    //定义个chai型的二维数组记录每个像素上0/1的值,形成一个矩形
31         int imageWidth = 0;    //记录图片的像素宽度
32         int imageHeight = 0;    //记录图片的像素高度
33         int dgGrayValue = 128;    //灰度值
34         Color piexl;
35         //string code = "";    //存储每个像素的0/1
36         for (int posy = 0; posy < singlepic.Height; posy++)
37         {//从上到下
38             string codeCache = "";    //存储每行的像素的0/1
39             for (int posx = 0; posx < singlepic.Width; posx++)
40             {//从左到右
41                 piexl = singlepic.GetPixel(posx, posy);
42                 if (piexl.R < dgGrayValue)
43                 {// 如果该像素的颜色为黑色,值就为“1”
44                     codeCache = codeCache + "1";
45                 }
46                 else
47                 {// 否则该像素的颜色为白色,值就为“0”
48                     codeCache = codeCache + "0";
49                 }
50             }
51             char[] array = codeCache.ToCharArray();    //每行的0/1的值用数字保存,以便于进行循环处理
52             //code += codeCache + "
";
53             for (imageWidth = 0; imageWidth < array.Length; imageWidth++)
54                 charArray[imageHeight, imageWidth] = array[imageWidth];    //通过循环将每行值转存到二维数组中
55             imageHeight++;
56         }       //*********************以上代码可用来获取一个字的图片二进制数组,即字库*****************************
57
58         //开始和字库进行匹配(我的工具中只需要下面的几个字符)
59         findWord(charArray, char0, imageHeight, imageWidth, BinaryWidth0, BinaryHeight0, '0');
60         findWord(charArray, char1, imageHeight, imageWidth, BinaryWidth1, BinaryHeight1, '1');
61         findWord(charArray, char2, imageHeight, imageWidth, BinaryWidth2, BinaryHeight2, '2');
62         findWord(charArray, char3, imageHeight, imageWidth, BinaryWidth3, BinaryHeight3, '3');
63         findWord(charArray, char4, imageHeight, imageWidth, BinaryWidth4, BinaryHeight4, '4');
64         findWord(charArray, char5, imageHeight, imageWidth, BinaryWidth5, BinaryHeight5, '5');
65         findWord(charArray, char6, imageHeight, imageWidth, BinaryWidth6, BinaryHeight6, '6');
66         findWord(charArray, char7, imageHeight, imageWidth, BinaryWidth7, BinaryHeight7, '7');
67         findWord(charArray, char8, imageHeight, imageWidth, BinaryWidth8, BinaryHeight8, '8');
68         findWord(charArray, char9, imageHeight, imageWidth, BinaryWidth9, BinaryHeight9, '9');
69         findWord(charArray, charA, imageHeight, imageWidth, BinaryWidthA, BinaryHeightA, 'a');
70         findWord(charArray, charB, imageHeight, imageWidth, BinaryWidthB, BinaryHeightB, 'b');
71         findWord(charArray, charC, imageHeight, imageWidth, BinaryWidthC, BinaryHeightC, 'c');
72         findWord(charArray, charD, imageHeight, imageWidth, BinaryWidthD, BinaryHeightD, 'd');
73         findWord(charArray, charE, imageHeight, imageWidth, BinaryWidthE, BinaryHeightE, 'e');
74         findWord(charArray, charF, imageHeight, imageWidth, BinaryWidthF, BinaryHeightF, 'f');
75         findWord(charArray, charP, imageHeight, imageWidth, BinaryWidthP, BinaryHeightP, 'p');
76         findWord(charArray, charY, imageHeight, imageWidth, BinaryWidthY, BinaryHeightY, 'y');
77         //------------------------------------END---------------------------------------------
78         richTextBoxLicense.Text += identifySort();    //执行identifySort方法,将我需要的格式在richTextBoxLicense文本框中显示
79         richTextBoxLicense.SelectionStart = richTextBoxLicense.TextLength;    //将光标移到最后面
80     }
81     catch { }
82 }
3. [图片] 单个字图片对应的二维矩阵0、1码.png
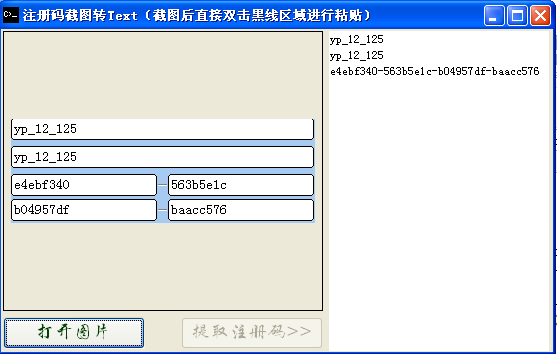
/*
 2  * 开发思路:图片灰度处理,二进制,然后和图片中的字二进制库精确对比
 3  *
 4  * 获取字库:通过下面代码中generateLicense(Bitmap singlepic)方法获得,具体操作:
 5  *      从图片中截图出(抠出)一个字符,然后处理得到二维的二进制矩阵,比如下面的字符1对应的二维矩阵
 6  *      00000
 7  *      00100
 8  *      11100
 9  *      00100
10  *      00100
11  *      00100
12  *      00100
13  *      00100
14  *      00100
15  *      11111
16  *      00000
17  *      00000
18  *
19  * 注意:【相同字符,比如1,不同字体,字号,不同缩放大小的图片,获得到的二位矩阵中0、1排列和数量都是不同的!
20  *          故按照此方法来写出匹配所有字的话,那字库就大了。。。】
21 */static String stringByte0 = "000000001100010010100001100001100001100001100001010010001100000000000000";
  2     static char[] char0 = stringByte0.toCharArray();
  3     static int BinaryWidth0 = 5, BinaryHeight0 = 11;    //0的平面像素长宽(从0开始数起)
  4
  5     static String stringByte1 = "000000010011100001000010000100001000010000100111110000000000";
  6     static char[] char1 = stringByte1.toCharArray();
  7     static int BinaryWidth1 = 4, BinaryHeight1 = 11;    //1的平面像素长宽(从0开始数起)
  8
  9     static String stringByte2 = "000000111010001100010000100010001000100010001111110000000000";
 10     static char[] char2 = stringByte2.toCharArray();
 11     static int BinaryWidth2 = 4, BinaryHeight2 = 11;    //2的平面像素长宽(从0开始数起)
 12
 13     static String stringByte3 = "000000111010001100010011000001000011000110001011100000000000";
 14     static char[] char3 = stringByte3.toCharArray();
 15     static int BinaryWidth3 = 4, BinaryHeight3 = 11;    //3的平面像素长宽(从0开始数起)
 16
 17     static String stringByte4 = "000010000010000110001010010010010010100010011111000010000111000000000000";
 18     static char[] char4 = stringByte4.toCharArray();
 19     static int BinaryWidth4 = 5, BinaryHeight4 = 11;    //4的平面像素长宽(从0开始数起)
 20
 21     static String stringByte5 = "000001111110000100001111010001000011000110001011100000000000";
 22     static char[] char5 = stringByte5.toCharArray();
 23     static int BinaryWidth5 = 4, BinaryHeight5 = 11;    //5的平面像素长宽(从0开始数起)
 24
 25     static String stringByte6 = "000000001111010001100000101110110001100001100001100001011110000000000000";
 26     static char[] char6 = stringByte6.toCharArray();
 27     static int BinaryWidth6 = 5, BinaryHeight6 = 11;    //6的平面像素长宽(从0开始数起)
 28
 29     static String stringByte7 = "000001111110001100100001000100001000010000100001000000000000";
 30     static char[] char7 = stringByte7.toCharArray();
 31     static int BinaryWidth7 = 4, BinaryHeight7 = 11;    //7的平面像素长宽(从0开始数起)
 32
 33     static String stringByte8 = "000000011110100001100001010010011110100001100001100001011110000000000000";
 34     static char[] char8 = stringByte8.toCharArray();
 35     static int BinaryWidth8 = 5, BinaryHeight8 = 11;    //8的平面像素长宽(从0开始数起)
 36
 37     static String stringByte9 = "000000011110100001100001100001100011011101000001100010111100000000000000";
 38     static char[] char9 = stringByte9.toCharArray();
 39     static int BinaryWidth9 = 5, BinaryHeight9 = 11;    //9的平面像素长宽(从0开始数起)
 40
 41     static int[][] intStartXY = new int[128][3];    //记录匹配上时的“X坐标”和“Y坐标”对应的“值”以及该“字符像素的宽度”
 42     static int numIdentfied = 0;    //负责记录总共有多少匹配的字符
 43
 44     /*****Android SDK中提供了Bitmap图片每个像素颜色读取的方法:*/
 45     /*public void getPixColor(){
 46         Bitmap src =  BitmapFactory.decodeResource(getResources(),R.drawable.imgbg);
 47         int A, R, G, B;
 48         int pixelColor;
 49         int height = src.getHeight();
 50         int width = src.getWidth();
 51
 52         for (int y = 0; y < height; y++) {
 53             for (int x = 0; x < width; x++) {
 54                 pixelColor = src.getPixel(x, y);
 55                 A = Color.alpha(pixelColor);
 56                 R = Color.red(pixelColor);
 57                 G = Color.green(pixelColor);
 58                 B = Color.blue(pixelColor);
 59                 Log.e("A:", A+"");
 60                 Log.e("R:", R+"");
 61                 Log.e("G:", G+"");
 62                 Log.e("B:", B+"");
 63             }
 64         }
 65     }*/
 69     //提取数字码
 70     private void GenerateText(Bitmap mBitmap)
 71     {
 72         try{
 73 //          Bitmap Sourcebm = (Bitmap)mBitmap.Image;    //为了保险起见将pictureBox的图片类型进行格式转换(Bitmap)
 74             int iw = mBitmap.getWidth();    //图片宽度
 75             int ih = mBitmap.getHeight();    //图片高度
 76            /* //下面双循环是图片灰度处理
 77             for (int i = 0; i < iw; i++)
 78             {//从左到右
 79                 for (int j = 0; j < ih; j++)
 80                 {//从上到下
 81                     //Color c = mBitmap.GetPixel(i, j);    //获取该点的颜色
 82                     //int luma = (int)(c.R * 0.3 + c.G * 0.59 + c.B * 0.11);    //将颜色转换为数值体现
 83                     int colorPix=mBitmap.getPixel(i,j);
 84                     int alpha=Color.alpha(colorPix);
 85                     //将颜色转换为数值体现
 86                     int luma = (int)(Color.red(colorPix) * 0.3 + Color.green(colorPix) * 0.59 + Color.blue(colorPix)* 0.11);
 87                     //将这一点进行灰度处理,非白色的部分变黑
 88                     //mBitmap.setPixel(i, j, Color.FromArgb(luma, luma, luma));
 89                     mBitmap.setPixel(i, j, Color.argb(alpha,luma, luma, luma));
 90                 }
 91             }*/
 92             generateLicense(mBitmap);    //通过该方法进行提取字符
 93         }catch(Exception e){
 94             GetToast.showToast(mContext,"提取图片出错了");
 95         }
 96     }
 97
 98     /// 提取出该图片内的字符(将进过灰度处理的图片转化为0、1的二位数组)
 99     /// <param name="singlepic">图片来源</param>
100     public void generateLicense(Bitmap singlepic)
101     {
102         photouri= ImageUtils.createFilename();
103         ImageUtils.saveImage(CropPhoneNumberActivity.this,singlepic,photouri);
104         iv_image.setImageBitmap(singlepic);
105
106         String richTextBox="";
107         try{
108             //定义个chai型的二维数组记录每个像素上0/1的值,形成一个矩形
109             char[][] charArray = new char[singlepic.getHeight()][singlepic.getWidth()];
110             int imageWidth = 0;    //记录图片的像素宽度
111             int imageHeight = 0;    //记录图片的像素高度
112             int dgGrayValue = 128;    //灰度值
113             int piexl;
114             //string code = "";    //存储每个像素的0/1
115             for (int posy = 0; posy < singlepic.getHeight(); posy++)
116             {//从上到下
117                 String codeCache = "";    //存储每行的像素的0/1
118                 for (int posx = 0; posx < singlepic.getWidth(); posx++)
119                 {//从左到右
120                     piexl = singlepic.getPixel(posx, posy);
121                     if (Color.red(piexl)< dgGrayValue)
122                     {// 如果该像素的颜色为黑色,值就为“1”
123                         codeCache = codeCache + "1";
124                     }else
125                     {// 否则该像素的颜色为白色,值就为“0”
126                         codeCache = codeCache + "0";
127                     }
128                 }
129                 char[] array = codeCache.toCharArray();    //每行的0/1的值用数字保存,以便于进行循环处理
130                 //code += codeCache + "
";
131                 for (imageWidth = 0; imageWidth < array.length; imageWidth++)
132                     charArray[imageHeight][imageWidth] = array[imageWidth];    //通过循环将每行值转存到二维数组中
133                 imageHeight++;
134             }
135             //*********************以上代码可用来获取一个字的图片二进制数组,即字库*****************************
136             //开始和字库进行匹配(我的工具中只需要下面的几个字符)
137             findWord(charArray, char0, imageHeight, imageWidth, BinaryWidth0, BinaryHeight0, '0');
138             findWord(charArray, char1, imageHeight, imageWidth, BinaryWidth1, BinaryHeight1, '1');
139             findWord(charArray, char2, imageHeight, imageWidth, BinaryWidth2, BinaryHeight2, '2');
140             findWord(charArray, char3, imageHeight, imageWidth, BinaryWidth3, BinaryHeight3, '3');
141             findWord(charArray, char4, imageHeight, imageWidth, BinaryWidth4, BinaryHeight4, '4');
142             findWord(charArray, char5, imageHeight, imageWidth, BinaryWidth5, BinaryHeight5, '5');
143             findWord(charArray, char6, imageHeight, imageWidth, BinaryWidth6, BinaryHeight6, '6');
144             findWord(charArray, char7, imageHeight, imageWidth, BinaryWidth7, BinaryHeight7, '7');
145             findWord(charArray, char8, imageHeight, imageWidth, BinaryWidth8, BinaryHeight8, '8');
146             findWord(charArray, char9, imageHeight, imageWidth, BinaryWidth9, BinaryHeight9, '9');
147             //------------------------------------END---------------------------------------------
148             richTextBox += identifySort();    //执行identifySort方法,将我需要的格式在richTextBoxLicense文本框中显示
149             GetToast.showToast(mContext,"::richTextBox::"+richTextBox);
150         }catch(Exception e) { }
151     }
152
153     /// 和字库进行匹配
154     /// <param name="charArray">记录图片中每个像素的二维数组</param>
155     /// <param name="charNum">字库中0/1值一维数组形式的字符</param>
156     /// <param name="imageHeight">图片的像素高度</param>
157     /// <param name="imageWidth">图片的像素宽度</param>
158     /// <param name="binaryWidth">字库中该字符的像素宽度</param>
159     /// <param name="binaryHeight">字库中该字符的像素高度</param>
160     /// <param name="stringChar">字库中该字符</param>
161     public void findWord(char[][] charArray, char[] charNum, int imageHeight, int imageWidth, int binaryWidth, int binaryHeight, char stringChar)
162     {
163         try{
164             int upLeftX, upLeftY, x, y;
165             for (y = 0; y < imageHeight - binaryHeight; y++)//从图片的每行开始
166             {
167                 for (x = 0; x < imageWidth - binaryWidth; x++)//从当前行的第一格开始
168                 {
169                     boolean isIdentified = false;    //负责辨别是否匹配
170                     int count = 0;    //负责计数
171                     for (upLeftY = 0; upLeftY <= binaryHeight; upLeftY++)//从图片中取出一块进行对比,从的每行开始
172                     {
173                         for (upLeftX = 0; upLeftX <= binaryWidth; upLeftX++)//从这一块当前行的第一格开始
174                         {
175                             //下面进行每格的对比,大数字去除的“块”是二维数组,小数组是一维数组
176                             if (charArray[y + upLeftY][x + upLeftX] == charNum[upLeftY * (binaryWidth + 1) + upLeftX])
177                             {
178                                 isIdentified = true;    //记录像素点是否比对成功
179                                 count++;
180                                 if (count == (binaryWidth + 1) * (binaryHeight + 1))//判断是否对比到了最后一个像素点
181                                 {
182                                     intStartXY[numIdentfied][0] = y;    //记录字库中该字符在图片中出现的Y值
183                                     intStartXY[numIdentfied][1] = x;    //记录字库中该字符在图片中出现的X值
184                                     //intStartXY[numIdentfied][2] = Convert.ToInt32(stringChar);    //将该字符转换为数字型
185                                     intStartXY[numIdentfied][2] = Integer.parseInt(stringChar+"");   //将该字符转换为数字型
186                                     numIdentfied++;    //记录图片中总共多少个字库中的数字
187                                     break;    //一旦匹配即将结束比对
188                                 }
189                             }else{
190                                 isIdentified = false;    //此像素点比对不成功
191                                 break;    //如果该像素点值比对不成功即将结束比对
192                             }
193                         }
194                         if (!isIdentified)//如果一个不符就向后退一格,同时小数组的比对又需要从第一格开始
195                             break;    //并且结束这次的比对
196                     }
197                 }
198             }
199         }catch(Exception e) { }
200     }
201
202     /// <summary>
203     /// 对比对后的结果通过坐标进行排序
204     /// </summary>
205     /// <returns>提取出的图片中的字符串</returns>
206     public String identifySort()
207     {
208         String stringLicense = "";    //存储该结果
209         try
210         {
211             int intTemp = 0;
212             for (int a = 0; a < numIdentfied; a++)
213             {//从第一列开始
214                 for (int b = 0; b < numIdentfied; b++)
215                 {//然后从该列中第一行开始对比
216                     if (intStartXY[a][0] < intStartXY[b][0])
217                     {//通过Y坐标(离顶端距离)判断那个字符在上面,并进行对调
218                         for (int c = 0; c < 3; c++)
219                         {
220                             intTemp = intStartXY[a][c];
221                             intStartXY[a][c] = intStartXY[b][c];
222                             intStartXY[b][c] = intTemp;
223                         }
224                     }
225                     if (intStartXY[a][0] == intStartXY[b][0] && intStartXY[a][1] < intStartXY[b][1])
226                     {//当Y坐标(离顶端距离)相同时,通过X坐标(离左端距离)判断那个字符在左面,并进行对调
227                         for (int c = 0; c < 3; c++)
228                         {
229                             intTemp = intStartXY[a][c];
230                             intStartXY[a][c] = intStartXY[b][c];
231                             intStartXY[b][c] = intTemp;
232                         }
233                     }
234                 }
235             }
236             //------------------------下面是我需要的格式-------------------------------------------------------------
237                 /*
238                     yp_12_125
239                     yp_12_125
240                     e4ebf340-563b5e1c-b04957df-baacc576
241                  */
242             for (int h = 0; h < numIdentfied; h++)
243             {
244                 stringLicense += intStartXY[h][2];
245                 if ((intStartXY[h + 1][0] == intStartXY[h][0] && intStartXY[h + 1][1] - intStartXY[h][ 1] >= 12
246                         && h < numIdentfied - 32))
247                 stringLicense += "_";    //当同一行时,相差一个下划线距离就显示下划线_
248                 if (intStartXY[h + 1][0] - intStartXY[h][0] >= 11 && h < numIdentfied - 17)
249                 stringLicense += "
";    //当不上一行时就输出

250                 if (h == numIdentfied - 25 || h == numIdentfied - 17 || h == numIdentfied - 9)
251                     stringLicense += "-";    //每8个显示一个中划线-
252             }
253             //---------------------------------------END---------------------------------------------------------------------------------
254         }catch(Exception ex){ }
255         return stringLicense + "
";    //对返回的结果进行换行,保证在richTextBox文本框显示的时候光标始终在下行
256     }