在Linux系统下开发一个较大的项目,完全手动建立Makefile是一件费力而又容易出错的工作。autotools系列工具只需用户输入简单的目标文件、依赖文件、文件目录等就可以比较轻松地生成Makefile了。
这极大地简化了Makefile的编写和维护,作者也是刚体验到其威力,所以将其过程记录下来。
本文以一个简单的hello.c文件进行验证。
准备工作
首先需要安装autotools系列工具,包括aclocal、autoscan、automake、autoheader、autoconf等。
如果在centos或redhat系统下可以通过rpm –qa | grep auto来查看各个应用程序,如果没有,直接yum install automake即可安装。
大致流程
- 1. 编写源代码以及手动书写Makefile.am文件(稍后介绍);
- 2. 依次使用各种autotools系列工具配置编译属性;
    autoscan                               #扫面当前目录、源文件,生成configure.scan文件
    aclocal                                #根据configure.in生成aclocal.m4文件以及autom4te.cache文件夹
    autoconf                               #根据configure.in和aclocal.m4来产生configure文件
    autoheader                             #生成配置头文件的模板config.h.in
    touch README NEWS AUTHORS ChangeLog    #生成一些声明性文件
    automake --add-missing                 #生成Makefiel.in和所需要的脚本
- 3. 编译、生成、部署:
make
make install
make clean
make dist       #制作发布的软件包
make distcheck  #检验完整性并制作软件包
详细步骤
1. autoscan
将生成configure.scan和autoscan.log文件,它会在给定目录及其子目录树中检查源文件,若没有给定目录,就在当前目录及其子目录树中进行检查。它会搜索源文件以寻找一般的移植性问题并且创建一个文件configure.scan,通过这个文件我们可以创建autoconf需要的模版文件。
[root@lzv6 hello]# ls
hello.c
[root@lzv6 hello]# autoscan
[root@lzv6 hello]# ls
autoscan.log  configure.scan  hello.c
2. 重命名configure.scan,并修改configure.in
mv configure.scan configure.in #将上步生成的configure.scan更改为autoconf需要的文件模版configure.in
在configure.in中增加以下内容:
AC_INIT([hello], [0.1], [lizhenghn@gmail.com])
AM_INIT_AUTOMAKE(hello,1.0)
AC_PROG_CXX
AC_PROG_LIBTOOL
AC_CONFIG_FILES(Makefile)
修改后的configure.in内容如下:
 1 #                                               -*- Autoconf -*-
 2 # Process this file with autoconf to produce a configure script.
 3
 4 AC_PREREQ([2.63])
 5 AC_INIT([hello], [0.1], [lizhenghn@gmail.com])   #用来定义软件的名字、版本,以及邮箱地址信息
 6 #AC_INIT([hello], [0.1])
 7 AM_INIT_AUTOMAKE(hello,0.1)      #必须添加此行,描述了要生成的软件包的名字及其版本号
 8 AC_CONFIG_SRCDIR([hello.c])      #用来侦测所指定的源码文件是否存在
 9 AC_CONFIG_HEADERS([config.h])
10
11 # Checks for programs.
12 AC_PROG_CC         #检测系统所用的C编译器
13 AC_PROG_CXX
14
15 # Checks for libraries.
16 #AC_PROG_RANLIB    #需要需要静态库
17 AC_PROG_LIBTOOL    #如果需要动态库
18
19 # Checks for header files.
20
21 # Checks for typedefs, structures, and compiler characteristics.
22
23 # Checks for library functions.
24 AC_CONFIG_FILES(Makefile)
25 AC_OUTPUT
3. aclocal :复制所有的宏命令
configure.in 里面包含了一系列的宏命令,运行aclocal的目的是把工程需要的宏命令展开。aclocal.m4 就是configure.in中用到的宏定义。本步会生成aclocal.m4文件和autom4te.cache文件夹。
[root@lzv6 hello]# aclocal
[root@lzv6 hello]# ls
aclocal.m4  autom4te.cache  autoscan.log  configure.in  hello.c
4. autoheader :生成config.h.in文件
生成配置头文件的模板config.h.in文件。
[root@lzv6 hello]# autoheader
[root@lzv6 hello]# ls
aclocal.m4  autom4te.cache  autoscan.log  config.h.in  configure.in  hello.c
5. 创建一些声明性文件
此处创建一些声明性,但非必须的文件,文件内容可以暂时都为空。
[root@lzv6 hello]# touch README NEWS AUTHORS ChangeLog
6. autoconf :生成configure脚本
[root@lzv6 hello]# autoconf
[root@lzv6 hello]# ls
aclocal.m4  AUTHORS  autom4te.cache  autoscan.log  ChangeLog  config.h.in  configure  configure.in  hello.c  NEWS  README
7. 编写Makefile.am
如下是一个简单的Makefile.am
AUTOMAKE_OPTIONS=foreign
bin_PROGRAMS=hello
hello_SOURCES=hello.c
说明:AUTOMAKE_OPTIONS为设置automake的选项。automake提供了3种软件等级:foreign、gnu、gnits,默认等级是gnu。此处使用的foreign表示只是检测必要的文件。
bin_PROGRAMS定义了要产生的执行文件名。如果产生多个可执行文件,每个文件名用空格隔开。
file_SOURCES定义file这个执行程序的依赖文件。同样的,对于多个执行文件,那就要定义相应的file_SOURCES。
8. automake --add-missing
生成Makefiel.in和所需要的脚本,其中add-missing选项会让automake自动添加一些必须的脚本文件。
[root@lzv6 hello]# automake --add-missing
configure.in:16: installing `./config.guess'
configure.in:16: installing `./config.sub'
configure.in:7: installing `./install-sh'
configure.in:16: required file `./ltmain.sh' not found
configure.in:7: installing `./missing'
Makefile.am: installing `./depcomp'
[root@lzv6 hello]# libtoolize --automake --copy --debug --force              #注意此处步骤!!!
[root@lzv6 hello]# automake --add-missing
[root@lzv6 hello]# ls
aclocal.m4  autom4te.cache  ChangeLog     config.h.in  configure     depcomp  install-sh  Makefile.am  missing  README
AUTHORS     autoscan.log    config.guess  config.sub   configure.in  hello.c  ltmain.sh   Makefile.in  NEWS
说明:第一次运行时报错,此时运行命令libtoolize --automake --copy --debug --force即可解决。
至此该工程的Makefile就配置完成了。
在以后的使用中进行编译时可以直接运行命令:
[root@lzv6 hello]# ./configure
[root@lzv6 hello]# make
[root@lzv6 hello]# make install             #默认安装在/usr/local/bin/
[root@lzv6 hello]# make dist                #打包,会在当前目前下生成hello-0.1.tar.gz
当你增加代码文件时,其实主需要修改Makefile.am即可,这里就不再详述了。
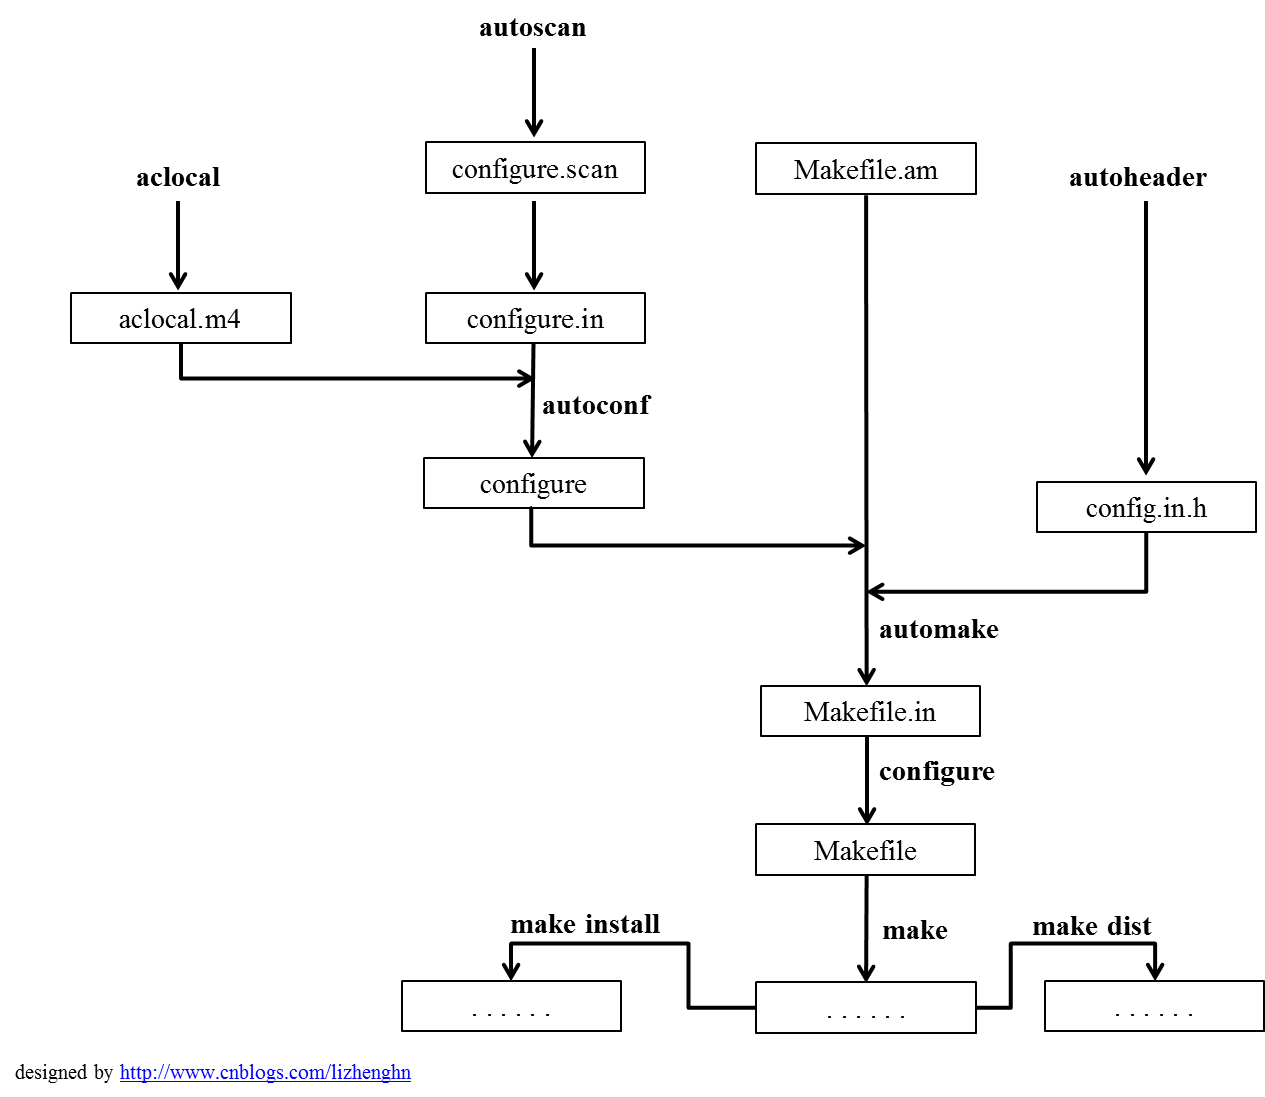
这里附上一张整个步骤的流程图:
参考:
http://www.ibm.com/developerworks/cn/linux/l-makefile/