在开始写本次的日记之前,首先需要给大家道个歉。因为最近一直忙于新的项目,所以有一个多月都没有继续更新了。
本篇日记我们将详细探讨如何将表现领域的类映射到现有的数据库。现在的经济形势不是太好,很多公司都取消了开发新系统的预算。在这种情况下,通常的做法是把原有的几个系统修改一下做个集成,先凑合用着得了。如果要对原有的系统做功能提升的话,肯定要重用原来的数据库结构并做一些小的改进,在这种情况下我们怎样使用Code First呢?我们可以按照原有系统的业务逻辑和CR(Change Request)中的新业务逻辑建立domain中的类,然后使用Fluent API把这些类映射到原有数据库的表中,或修改原有系统的数据结构。我相信通过前几篇的日记,大家已经知道了怎样去自定义各个方面的数据库映射了。这种方法虽然给我们机会重新审视我们的业务逻辑,但是原有系统中许多没有变化的部分也需要按照Code First的方法重头创建类并映射到原有的数据表,给我们的开发带来了很多不必要的工作量。为了提高我们的开发效率,减少在使用Code First升级系统时不必要的工作量,微软发明了Entity Framework Power Tools. 这个工具可以使用反向工程,在原有数据库的基础上生成Code First中使用的纯粹代表domain的类和数据库映射配置。博客园上有很多关于这个工具的介绍,大家可以上博客园搜索。这个工具虽然很好,但是他只能帮你减少你的工作量,不可能完全替代你的工作。比如说原来的数据库中有一个表,你经过对业务逻辑的分析,发现表中的字段应该属于两个类,但是你还不能改变现有的数据库结构,这种情况需要你自己配置数据库映射来搞定。或者原来数据库中的两个表,在你的新的业务逻辑中属于同一个类,也给根据特定的业务逻辑进行数据库映射的配置。所以我今天主要介绍如何解决以上的两个问题。
1.在不修改数据库结构的前提下,如何将两个类映射到同一个数据库表。
2.在不修改数据库结构的前提下,如何将一个类映射到两个数据库表。
1.在不修改数据库结构的前提下,如何将两个类映射到同一个数据库表。
我们已经介绍过一种将两个类映射成一个表的方法:ComplexType,今天我们将介绍另外一种方法。
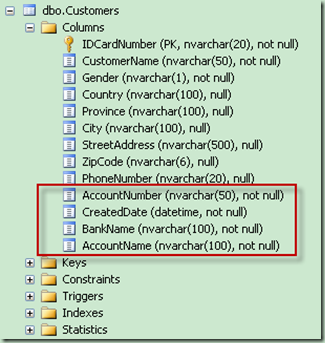
假设我们的原有数据库中有一个Customer表,结构如下:
我们在对现有系统进行升级改造的时候,使用了Code First。请大家注意,这个表中我用红色方框标识出来列,从业务逻辑上来说,并不是客户信息的一部分,而是客户的银行账号信息。按照业务逻辑中的实际情况,我们建立了两个类:Customer和BankAccount。
Customer类:
public class Customer
{
      public string IDCardNumber { get; set; }
      public string CustomerName { get; set; }
      public string Gender { get; set; }
      public Address Address { get; set; }
      public string PhoneNumber { get; set; }
      public BankAccount Account { get; set; }
}
BankAccount类:
public class BankAccount
    {
        public string AccountNumber { get; set; }
        public DateTime CreatedDate { get; set; }
        public string BankName { get; set; }
        public string AccountName { get; set; }
    }
如果我们需要让Code First把这两个类映射到同一个表,这两个还必须满足两个条件:
1.两个类必须共享同一个主键。
2.两个类之间的关系必须被映射为表之间的一对一关系。
为了满足这两个条件,我们首先需要修改BankAccount类,让BankAccount类使用与Customer类同样的主键。
public class BankAccount
    {
        public string IDCardNumber { get; set; }
        public string AccountNumber { get; set; }
        public DateTime CreatedDate { get; set; }
        public string BankName { get; set; }
        public string AccountName { get; set; }
    }
我们还必须在Customer的数据库配置类中手动地映射这两个类之间的一对一关系。
HasRequired(c => c.Account).WithRequiredDependent();
满足了以上的两个条件之后我们还必须使用ToTable方法手动地把这两个映射到同一个表。
public class CustomerEntityConfiguration:EntityTypeConfiguration<Customer>
    {
        public CustomerEntityConfiguration()
        {
            ToTable("Customers");
            HasKey(c => c.IDCardNumber).Property(c => c.IDCardNumber).HasDatabaseGeneratedOption(DatabaseGeneratedOption.None).HasMaxLength(50);
            Property(c => c.IDCardNumber).HasMaxLength(20);
            Property(c => c.CustomerName).IsRequired().HasMaxLength(50);
            Property(c => c.Gender).IsRequired().HasMaxLength(1);
            Property(c => c.PhoneNumber).HasMaxLength(20);
            HasRequired(c => c.Account).WithRequiredDependent();
        }
    }
public class BankAccountValueObjectConfiguration: EntityTypeConfiguration<BankAccount>
    {
        public BankAccountValueObjectConfiguration()
        {
            ToTable("Customers");
            HasKey(ba => ba.IDCardNumber).Property(ba => ba.IDCardNumber).HasDatabaseGeneratedOption(DatabaseGeneratedOption.None).HasMaxLength(20);
            Property(ba => ba.AccountNumber).IsRequired().HasMaxLength(50);
            Property(ba => ba.AccountName).IsRequired().HasMaxLength(100);
            Property(ba => ba.BankName).IsRequired().HasMaxLength(100);
        }
    }
我们修改一下以前使用的单元测试方法来测试Code First是否把这两个类映射到同一个表:
 [TestMethod]
        public void CanAddCustomerWithBankAccount()
        {
            OrderSystemContext unitOfWork = new OrderSystemContext();
            CustomerRepository repository = new CustomerRepository(unitOfWork);
            Customer newCustomer = new Customer() { IDCardNumber = "120104198106072518", CustomerName = "Alex", Gender = "M", PhoneNumber = "test" };
            Address customerAddress = new Address { Country = "China", Province = "Tianjin", City = "Tianjin", StreetAddress = "Crown Plaza", ZipCode = "300308" };
            BankAccount account = new BankAccount { IDCardNumber = "120104198106072518", AccountNumber = "2012001001", BankName = "ICBC", AccountName = "Alex", CreatedDate = DateTime.Parse("2012-1-21") };
            newCustomer.Address = customerAddress;
            newCustomer.Account = account;
            repository.AddNewCustomer(newCustomer);
            unitOfWork.CommitChanges();
        }
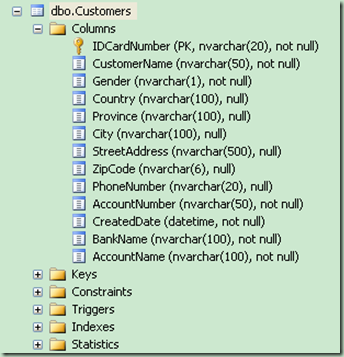
执行完测试方法之后,我们打开数据库看一下Code First映射出的数据库结构是否与我们原来的数据库结构一样。
通过手动地将这两个类映射成同一个表,使我们的代码可以再不修改原有数据库结构的基础上根据业务逻辑重构我们的代码。
2.在不修改数据库结构的前提下,如何将一个类映射到两个数据库表
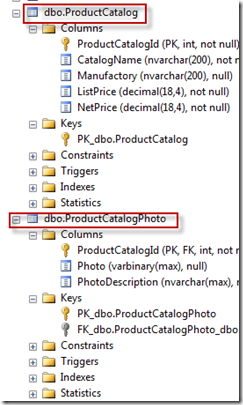
假设我们原有的数据库中有两个表,一个是ProductCatalog,另一个是ProductCatalogPhoto。ProductCatalog表存储某类产品的信息,但是后来加新需求的时候,需要显示该类产品的照片和对照片的描述。不知道是哪位仁兄不敢动ProductCatalog表,直接加了一个ProductCatalogPhoto表。现在轮到我们升级系统的时候,就会面临下面这样的数据库结构:
但是傻子都能看出来,从ProductCatalog和ProductCatalogPhoto两个表创建出两个类肯定是不符合业务逻辑的。我们就需要创建ProductCatalog类,它应该既包括某类产品的信息,也应该包括该类产品的照片和对照片的描述。
public class ProductCatalog
    {
        public int ProductCatalogId { get; set; }
        public string CatalogName { get; set; }
        public string Manufactory { get; set; }
        public decimal ListPrice { get; set; }
        public decimal NetPrice { get; set; }
        public List<Product> ProductInStock { get; set; }
        public List<SalesPromotion> SalesPromotionHistory { get; set; }
        public byte[] Photo { get; set; }
        public string PhotoDescription { get; set; }

       .............
    }
在不改变原来数据库结构的情况下,我们就需要通过手动配置将ProductCatalog类映射到ProductCatalog和ProductCatalogPhoto两个表。
public class ProductCatalogEntityConfiguration:EntityTypeConfiguration<ProductCatalog>
    {
        public ProductCatalogEntityConfiguration()
        {
            this.Property(c => c.CatalogName).HasMaxLength(200).IsRequired();
            this.Property(c => c.Manufactory).HasMaxLength(200);
            this.Property(c => c.ListPrice).HasPrecision(18, 4);
            this.Property(c => c.NetPrice).HasPrecision(18, 4);
            this.HasKey(c => c.ProductCatalogId);
            Map(c =>
            {
                c.Properties(p => new {p.CatalogName,p.Manufactory,p.ListPrice,p.NetPrice});
                c.ToTable("ProductCatalog");
            });
            Map(c =>
            {
                c.Properties(p => new {p.Photo,p.PhotoDescription});
                c.ToTable("ProductCatalogPhoto");
            });

        }
    }
我们通过Map方法,首先选择类的属性,然后将选择的属性列表映射到某个数据库表。
我们在我们的测试程序里新加一个单元测试,测试一下,Entity Framework Code First是不是将这个类实例持久化到两个表中。
        [TestMethod]
        public void CanAddNewProductCatalogWithPhoto()
        {
            OrderSystemContext unitOfWork = new OrderSystemContext();
            ProductRepository repository = new ProductRepository(unitOfWork);
            ProductCatalog catalog = new ProductCatalog() { CatalogName = "DELL Laptop E6400", Manufactory = "DELL", ListPrice = 6000, NetPrice = 5000, Photo = new byte[] { 0 }, PhotoDescription = "E6400" };
            repository.AddNewProductCatalog(catalog);
            unitOfWork.CommitChanges();
        }
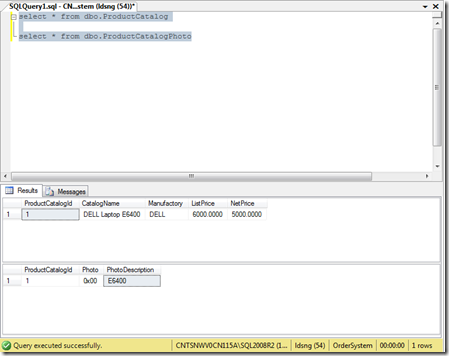
执行完这个单元测试程序之后,我们可以到数据库中查询一下,看看是不是我们想要的结果:
大家可以看到,Entity Framework Code First已经将ProductCatalog 类的实例持久化到ProductCatalog和ProductCatalogPhoto两个表中。
通过这次的笔记我想大家都知道了怎么使遗留的数据库与Code First兼容。我们下面的笔记将介绍一下如何在Entity Framework Code First中使用视图和存储过程。


