通道
channel用于字节缓冲区和位于通道另一侧的实体(通常是一个文件或套接字)之间有效的传输数据。 通道时一种途径,通过这种途径,可以用最小的总开销来访问操作系统本身的IO服务,缓冲区则是通道内部用于发送和接受数据的断点。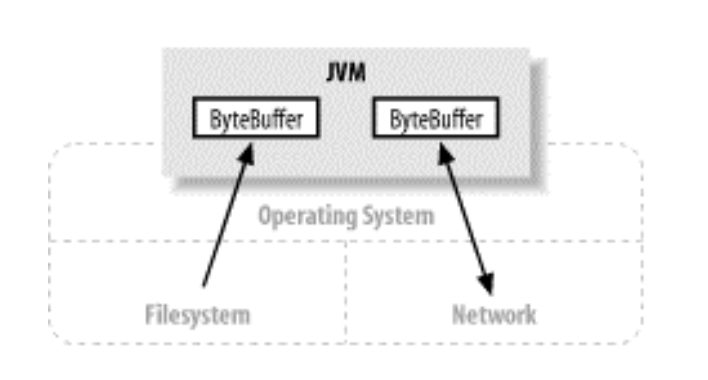
通道基础
顶层接口Channel,次级接口WritableByteChannel、ReadableByteChannel、InterruptibleChannel等。描述通道行为的接口在java.nio.channels包中定义,具体的通道实现都是从java.nio.channels.spi中的类引申来的。通道打开
IO可以分为广义的两大类:File IO和Stream IO,对应File通道和Socket通道。体现在FileChannel类和三个socket通道类:SocketChannel、ServerSocketChannel和DatagramChannel。 代码如下: //打开SocketChannel
SocketChannel sc = SocketChannel.open( );
sc.connect (new InetSocketAddress("somehost", port));
//打开ServerSocketChannel
ServerSocketChannel ssc = ServerSocketChannel.open( );
ssc.socket( ).bind (new InetSocketAddress (port));
DatagramChannel dc = DatagramChannel.open( );
//FileChannel只能通过 RandomAccessFile、FileInputStream 或 FileOutputStream 对象上调用 getChannel( )方法来获取
RandomAccessFile raf = new RandomAccessFile ("somefile", "r");
FileChannel fc = raf.getChannel( );
通道使用
利用通道,从控制台接收输入,并在控制台打印出接收的输入。代码如下: ```java public static void main(String[] args) throws IOException { //一个读通道,一个写通道
ReadableByteChannel source = Channels.newChannel(System.in);
WritableByteChannel dest = Channels.newChannel(System.out);
channelCopy(source,dest);
source.close();
dest.close();
}
private static void channelCopy(ReadableByteChannel source, WritableByteChannel dest) throws IOException{
ByteBuffer byteBuffer = ByteBuffer.allocate(16 * 1024);
ByteBuffer flag = ByteBuffer.allocate(4);
while (source.read(byteBuffer) != -1) {
byteBuffer.flip();
//输出标记
flag.put((byte)'-').put((byte)'-').put((byte)'-').put((byte) '>');
flag.flip();
dest.write(flag);
dest.write(byteBuffer);
flag.clear();
byteBuffer.compact();
}
byteBuffer.flip();
//确保缓冲区排干净
while (byteBuffer.hasRemaining()) {
flag.putChar('-').putChar('-').putChar('-');
flag.flip();
dest.write(byteBuffer);
flag.clear();
}
}
测试输入输出如下:

<h4 id=4><font color=red size=3 face="微软雅黑"> 通道关闭</font></h4>
与缓冲区不同,通道不能重复利用,打开通道即代表与一个特定的IO服务的特定链接并封装该链接的状态,通道关闭时,连接丢失,通道不在连接任何东西。
调用close方法时,可能导致线程暂时阻塞,关闭的通道上调用close方法不会产生任何操作,只会立即返回。可以通过isOpen方法判断通道状态。
如果一个线程被中断,那么这个线程访问的通道将立即关闭,这也是为程序健壮性而采用的一种权衡。
<h4 id=5><font color=red size=3 face="微软雅黑"> Scatter/Gather</font></h4>
在多个缓冲区实现一个简单的IO操作:
对于write,数据是从几个缓冲区按顺序抽取(gather)并沿着通道发送。该gather过程,好比全部缓冲区内容被连接起来,并在发送前存放到一个大的缓冲区。
对于read,从通道读取的数据会被按顺序散布(scatter)到多个缓冲区,将每个缓冲区填满直至通道中的数据或缓冲区的空间被消耗完。
接口定义如下, 其中read和write入参时Buffer数组:
```java
public interface ScatteringByteChannel
extends ReadableByteChannel
{
public long read (ByteBuffer [] dsts)
throws IOException;
public long read (ByteBuffer [] dsts, int offset, int length)
throws IOException;
}
public interface GatheringByteChannel
extends WritableByteChannel
{
public long write(ByteBuffer[] srcs)
throws IOException;
public long write(ByteBuffer[] srcs, int offset, int length)
throws IOException;
}
文件通道
具体来讲FileChannel,接口如下: ```java public abstract class FileChannel extends AbstractInterruptibleChannel implements SeekableByteChannel, GatheringByteChannel, ScatteringByteChannel ``` FileChannel 对象是线程安全(thread-safe)的. 对于文件IO,最强大之处在于异步IO,它允许一个进程可以从操作系统请求一个或多个IO操作而不必等待这些操作完成。文件通道代码示例
- 将缓冲区数据,通过文件channel写入文件 public static void write(String filePath) throws Exception {
/*写文件,使用FileOutputStream,RandomAccessFile都可以。*/
/* RandomAccessFile file = new RandomAccessFile(filePath,"rw");*/
FileOutputStream file = new FileOutputStream(new File(filePath));
ByteBuffer byteBuffer = ByteBuffer.allocate(500);
String str = "hello LK";
/*数据写入缓冲区*/
byteBuffer.put(str.getBytes());
byteBuffer.flip();
FileChannel fileChannel = file.getChannel();
//将缓冲区数据写入文件通道
fileChannel.write(byteBuffer);
byteBuffer.clear();
fileChannel.close();
}
- 通过文件channel,将文件中的数据读入缓冲区
	public static void read(String filePath) throws Exception {
		FileInputStream fileInputStream = new FileInputStream(new File(filePath));
		/*一个FileChannel对象却只能通过
		在一个打开的RandomAccessFile、FileInputStream或FileOutputStream对象上调用getChannel()方法来获取,
		开发者不能直接创建一个FileChannel*/
		FileChannel fileChannel = fileInputStream.getChannel();

		ByteBuffer byteBuffer = ByteBuffer.allocate(500);
		//将文件channel读入缓冲区
		fileChannel.read(byteBuffer);

		byteBuffer.flip();

		while (byteBuffer.hasRemaining()){
			System.out.print((char)byteBuffer.get());
		}

		byteBuffer.clear();
		fileChannel.close();
	}
Socket通道
新的Socket通道类可以`运行非阻塞模式,并且是可选择的`。借助新的NIO类,一个或几个线程可以管理成百上千的活动socket连接,并且只有很少的性能顺势。 全部 socket 通道类(DatagramChannel、SocketChannel 和 ServerSocketChannel)都是由位于java.nio.channels.spi 包中的` AbstractSelectableChannel `引申而来。 DatagramChannel 和 SocketChannel 实现定义读和写功能的接口而 ServerSocketChannel 不实现。ServerSocketChannel 负责监听传入的连接和创建新的SocketChannel 对象,它本身从不传 输数据。Socket通道代码示例
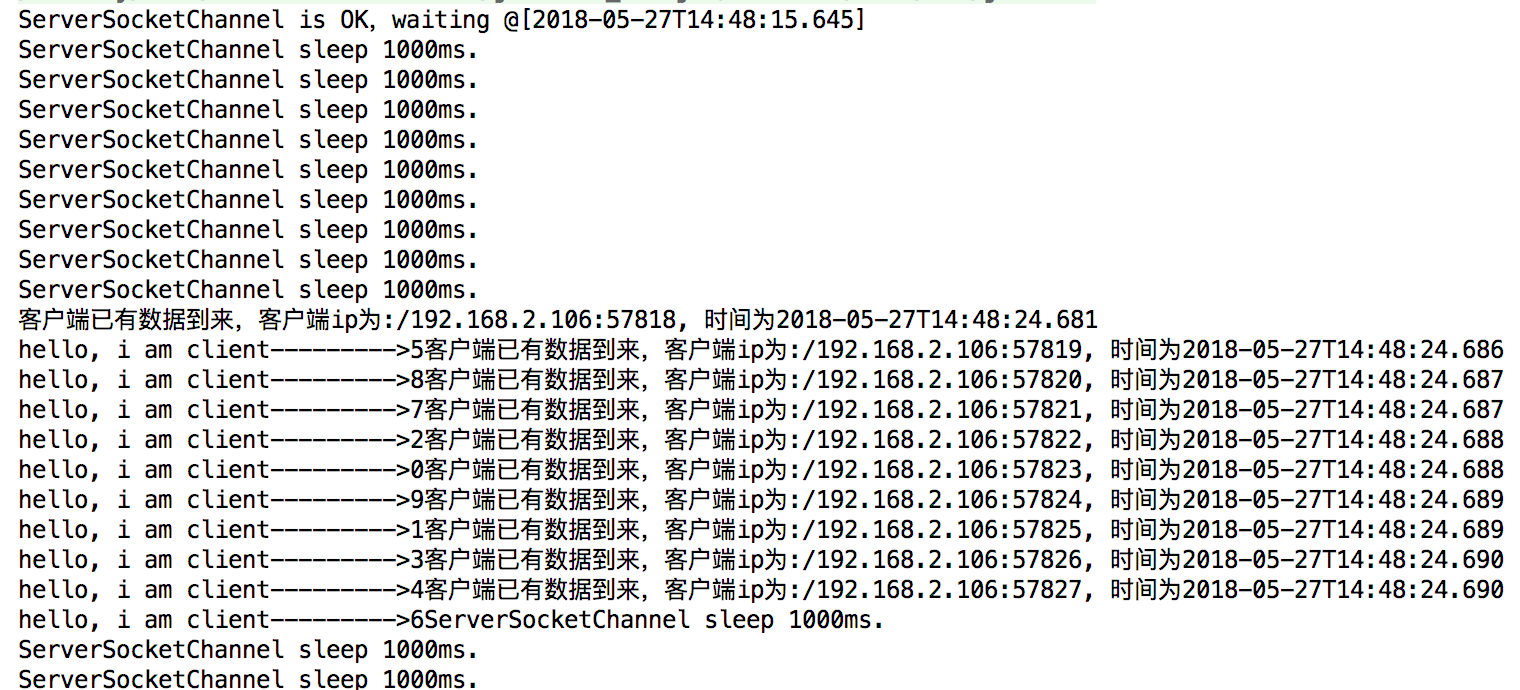
启动一个ServerSocketChannel,监听8001端口,非阻塞模式。启动10个SocketChannel线程向ServerSocketChannel写数据。 ServerSocketChannel代码如下:ServerSocketChannel serverSocketChannel = ServerSocketChannel.open();
/*非阻塞*/
serverSocketChannel.configureBlocking(false);
serverSocketChannel.bind(new InetSocketAddress(port));
System.out.println("ServerSocketChannel is OK,waiting @[" + LocalDateTime.now() + "]");
for (; ; ) {
SocketChannel socketChannel = serverSocketChannel.accept();
if (socketChannel == null) {
Thread.sleep(1000);
System.out.println("ServerSocketChannel sleep 1000ms.");
continue;
}
String connectIP = socketChannel.socket().getRemoteSocketAddress().toString();
System.out.println("客户端已有数据到来,客户端ip为:" + connectIP + ", 时间为" + LocalDateTime.now());
ByteBuffer byteBuffer = ByteBuffer.allocate(1024);
socketChannel.read(byteBuffer);
byteBuffer.flip();
while (byteBuffer.hasRemaining()) {
System.out.print((char) byteBuffer.get());
}
socketChannel.close();
}
}
启动10个SocketCHannel代码如下:
private static final int port = 8001;
	public static void main(String[] args) {
		for (int i=0;i<10;i++) {
			new SocketChannelImpl(port,i).start();
		}
	}
	private static class SocketChannelImpl extends Thread {
		private  int count = 0;
		private int port;
		public SocketChannelImpl(int port,int count){
			this.port = port;
			this.count = count;
		}
		@Override
		public void run() {

			try {
				SocketChannel socketChannel = SocketChannel.open();
				/*非阻塞*/
				socketChannel.configureBlocking(false);
				socketChannel.connect(new InetSocketAddress(port));

				for (;!socketChannel.finishConnect();) {
					System.out.println("connectting....");
					Thread.sleep(50);
				}
				ByteBuffer byteBuffer = ByteBuffer.allocate(1024);
				String content = "hello, i am client--------->" + count;
				byteBuffer.put(content.getBytes());
				byteBuffer.flip();
				socketChannel.write(byteBuffer);

				byteBuffer.clear();
				socketChannel.close();
			} catch (Exception e) {
				e.printStackTrace();
			}
		}
	}
运行结果如下:
补充下:
ServerSocketChannel监听的是8001端口,你可以在浏览器,输入:http://localhost:8001/helloworld,你会发现你的ServerSocketChannel也是可以收到数据了,这也web服务器处理的基础了。

总结
以上,了解了基本的通道操作,文件通道和socket通道的使用示例,我觉得点个赞,不过分=。= 以上所有代码示例,可以fork这里:[github](https://github.com/lknny/springboot/tree/master/src/main/java/springboot/nio)谢谢