
本篇关于Linux的一些安全知识,主要就是与账号相关的安全。
账户文件锁定
当服务器中的用户账号已经固定,不在进行更改,可锁定账户文件。锁定后,无法添加、删除账号,也无法更改密码等。
- 锁定账户文件
chattr +i /etc/passwd /etc/shadow
- 解锁账户文件
chattr -i /etc/passwd /etc/shadow
- 查看账户文件是否锁定
lsattr /etc/passwd /etc/shadow
Demo:
1.查看允许登录的账户。
[root@localhost ~]# grep "/bin/bash$" /etc/passwd
root:x:0:0:root:/root:/bin/bash
2.添加一个名为zhangsan用户。
[root@localhost ~]# useradd zhangsan && echo "000000" | passwd --stdin zhangsan
Changing password for user zhangsan.
passwd: all authentication tokens updated successfully.
[root@localhost ~]# grep "/bin/bash$" /etc/passwd
root:x:0:0:root:/root:/bin/bash
zhangsan:x:1000:1000::/home/zhangsan:/bin/bash
3.锁定账号文件。
[root@localhost ~]# lsattr /etc/passwd /etc/shadow
---------------- /etc/passwd
---------------- /etc/shadow
[root@localhost ~]# chattr +i /etc/passwd /etc/shadow
[root@localhost ~]# lsattr /etc/passwd /etc/shadow
----i----------- /etc/passwd
----i----------- /etc/shadow
4.尝试添加名为lisi的用户,添加失败。
[root@localhost ~]# useradd lisi && echo "000000" | passwd --stdin lisi
useradd: cannot open /etc/passwd
[root@localhost ~]# grep "/bin/bash$" /etc/passwd
root:x:0:0:root:/root:/bin/bash
zhangsan:x:1000:1000::/home/zhangsan:/bin/bash
5.解锁账号文件。
[root@localhost ~]# lsattr /etc/passwd /etc/shadow
----i----------- /etc/passwd
----i----------- /etc/shadow
[root@localhost ~]# chattr -i /etc/passwd /etc/shadow
[root@localhost ~]# lsattr /etc/passwd /etc/shadow
---------------- /etc/passwd
---------------- /etc/shadow
6.尝试添加名为lisi的用户,添加成功。
[root@localhost ~]# useradd lisi && echo "000000" | passwd --stdin lisi
Changing password for user lisi.
passwd: all authentication tokens updated successfully.
[root@localhost ~]# grep "/bin/bash$" /etc/passwd
root:x:0:0:root:/root:/bin/bash
zhangsan:x:1000:1000::/home/zhangsan:/bin/bash
lisi:x:1001:1001::/home/lisi:/bin/bash
密码有效期
为了避免用户长时间使用同一个密码,管理员可以设置密码有效期。密码过期后,只有重新设置密码,否则无法登录。
- 对于新建的用户,修改配置文件
# vi /etc/login.defs
PASS_MAX_DAYS   99999
- 对于已有的用户,使用
chage命令修改密码时限
chage -M 30 lisi
- 强制用户下次登陆必须更改密码
chage -d 0 zhangsan
Demo:
1.查看/etc/shadow发现用户密码有效期为99999天。
[root@localhost ~]# cat /etc/shadow
root:$6$4/ne8o5V38hiA2jr$6SclA1hllj8FPXqyMtfof5T4NMH1gJeDQ31AfoR4wapYPBQWlbZQKKPkuUBWoqgwA1GsuHW.1lTg59tyfrwvC/::0:99999:7:::
bin:*:17110:0:99999:7:::
daemon:*:17110:0:99999:7:::
adm:*:17110:0:99999:7:::
lp:*:17110:0:99999:7:::
sync:*:17110:0:99999:7:::
shutdown:*:17110:0:99999:7:::
halt:*:17110:0:99999:7:::
mail:*:17110:0:99999:7:::
operator:*:17110:0:99999:7:::
games:*:17110:0:99999:7:::
ftp:*:17110:0:99999:7:::
nobody:*:17110:0:99999:7:::
systemd-network:!!:18124::::::
dbus:!!:18124::::::
polkitd:!!:18124::::::
postfix:!!:18124::::::
sshd:!!:18124::::::
chrony:!!:18124::::::
zhangsan:$6$MWTXL8Jt$rEFwO.UoAmoKmxczVgiJtOWCHtdYwRbW1G.drbEFrWuKYCAvfEByRN7eohVxonsVZCtqJ.oV3c1sLaVGUVIk9.:18136:0:99999:7:::
lisi:$6$VLsvfMkO$aNnVeB1wWspXnD.4QErik1iLRw80jI7qqosbn9RgtGA9di5QFYh5ZWe3sUtLyshADukCH9vdZ55DZghDu4c.K.:18136:0:99999:7:::
2.修改/etc/login.defs配置文件,更改最大有效期为30天。
[root@localhost ~]# vim /etc/login.defs
# PASS_MAX_DAYS   99999
PASS_MAX_DAYS   30
3.新创建wangwu用户,并查看密码有效期为30天。
[root@localhost ~]# useradd wangwu && echo "000000" | passwd --stdin wangwu
Changing password for user wangwu.
passwd: all authentication tokens updated successfully.
[root@localhost ~]# cat /etc/shadow | grep wangwu
wangwu:$6$qTt8ruAd$PbgMJlgjO6.Bp4YpQwN60oTyZyPloMxTjOUBJ0aYEBAjzg/opw4Ci6LZG5/RtBJW/YJ7QbJaMUEFbkLl9XTG8/:18136:0:30:7:::
4.更改已存在的用户lisi密码有效期为30天。
[root@localhost ~]# chage -M 30 lisi
[root@localhost ~]# cat /etc/shadow | grep lisi
lisi:$6$VLsvfMkO$aNnVeB1wWspXnD.4QErik1iLRw80jI7qqosbn9RgtGA9di5QFYh5ZWe3sUtLyshADukCH9vdZ55DZghDu4c.K.:18136:0:30:7:::
5.强制zhangsan用户下次登录必须修改密码。
[root@localhost ~]# chage -d 0 zhangsan
[root@localhost ~]# cat /etc/shadow | grep zhangsan
zhangsan:$6$MWTXL8Jt$rEFwO.UoAmoKmxczVgiJtOWCHtdYwRbW1G.drbEFrWuKYCAvfEByRN7eohVxonsVZCtqJ.oV3c1sLaVGUVIk9.:0:0:99999:7:::
6.使用zhangsan用户登录发现必须要修改密码,注意密码复杂性要求,示例密码:asdf1928。
login as: zhangsan
zhangsan@192.168.128.133's password:
You are required to change your password immediately (root enforced)
WARNING: Your password has expired.
You must change your password now and login again!
Changing password for user zhangsan.
Changing password for zhangsan.
(current) UNIX password:
New password:
Retype new password:
passwd: all authentication tokens updated successfully.
history 命令历史
命令历史记录在带来便利的同时,也存在着潜在的风险,比如曾经输入的明文密码等。
- 对所有用户生效,修改系统环境变量,可修改能查看最近历史记录的条数。
# vi /etc/profile
HISTSIZE=1000
~/.bash_logout在用户注销时会自动执行,可实现自动清除命令记录,下次登录将无法查看以前的命令记录。
# vi ~/.bash_logout
history -c
clear
Demo:
1.查看命令历史记录。
[root@localhost ~]# history
    1  grep "/bin/bash$" /etc/passwd
    2  useradd zhangsan && echo "000000" | passwd --stdin zhangsan
    3  grep "/bin/bash$" /etc/passwd
    4  lsattr /etc/passwd /etc/shadow
    5  chattr +i /etc/passwd /etc/shadow
    6  lsattr /etc/passwd /etc/shadow
    7  useradd lisi && echo "000000" | passwd --stdin lisi
    8  grep "/bin/bash$" /etc/passwd
    9  lsattr /etc/passwd /etc/shadow
   10  chattr -i /etc/passwd /etc/shadow
   11  lsattr /etc/passwd /etc/shadow
   12  useradd lisi && echo "000000" | passwd --stdin lisi
   13  grep "/bin/bash$" /etc/passwd
   14  cat /etc/shadow
   15  yum install vim -y
   16  vim /etc/login.defs
   17  useradd wangwu && echo "000000" | passwd --stdin wangwu
   18  cat /etc/shadow | grep wangwu
   19  chage -M 30 lisi
   20  cat /etc/shadow | grep lisi
   21  chage -d 0 zhangsan
   22  cat /etc/shadow | grep zhangsan
   23  history
2.修改配置文件记录的历史为20条,并立即生效。
[root@localhost ~]# vim /etc/profile
#HISTSIZE=1000
HISTSIZE=20
[root@localhost ~]# source /etc/profile
3.再次查看命令历史记录。
[root@localhost ~]# history
    6  useradd lisi && echo "000000" | passwd --stdin lisi
    7  grep "/bin/bash$" /etc/passwd
    8  lsattr /etc/passwd /etc/shadow
    9  chattr -i /etc/passwd /etc/shadow
   10  lsattr /etc/passwd /etc/shadow
   11  useradd lisi && echo "000000" | passwd --stdin lisi
   12  grep "/bin/bash$" /etc/passwd
   13  cat /etc/shadow
   14  yum install vim -y
   15  vim /etc/login.defs
   16  useradd wangwu && echo "000000" | passwd --stdin wangwu
   17  cat /etc/shadow | grep wangwu
   18  chage -M 30 lisi
   19  cat /etc/shadow | grep lisi
   20  chage -d 0 zhangsan
   21  cat /etc/shadow | grep zhangsan
   22  history
   23  vim /etc/profile
   24  source /etc/profile
   25  history
4.配置注销时自动清除历史记录,并注销登录。
[root@localhost ~]# vim ~/.bash_logout
# ~/.bash_logout
history -c
clear
[root@localhost ~]# logout
5.再次登录,无法查看以前的命令历史记录。
[root@localhost ~]# history
    1  history
TMOUT 自动注销
BASH终端环境中,可以设置一个闲置超时时间,当超过指定时间没有执行任何命令时,将自动注销终端。
- 添加系统环境变量
TMOUT,对所有用户生效
# vi /etc/profile
export TMOUT=600
Demo:
1.添加TMOUT系统环境变量。
[root@localhost ~]# vim /etc/profile
export TMOUT=600
2.设置生效,并查看是否生效。
[root@localhost ~]# echo $TMOUT

[root@localhost ~]# source /etc/profile
[root@localhost ~]# echo $TMOUT
600
3.执行一些长时间的操作时,应使用unset取消超时。
[root@localhost ~]# unset TMOUT
[root@localhost ~]# echo $TMOUT
su 用户安全切换
一般Linux系统不建议直接使用root用户直接登录,但在必要时可以使用su命令用来切换用户。默认情况下,所有用户都可以使用su命令,这样必然会带来安全风险。所以需要对su的使用做控制。
su - root
-:等同于--login或-l,表示切换用户后进入目标用户的登录shell环境。
- 开启
pam_wheel认证,配置文件/etc/pam.d/su,去掉pam_wheel条目开头注释。
auth required pam_wheel.so use_uid
Demo:
1.正常情况下zhangsan用户可以切换root用户。
[zhangsan@localhost ~]$ su - root
Password:
Last login: Wed Aug 28 13:33:12 CST 2019 from 192.168.128.1 on pts/0
[root@localhost ~]#
2.修改/etc/pam.d/su认证配置,去掉开头#注释,以启用pam_wheel认证。
[root@localhost ~]# vim /etc/pam.d/su
auth            required        pam_wheel.so use_uid
3.查看wheel组,其中没有已添加的用户。(只有在wheel组中的用户可以正常切换root用户)
[root@localhost ~]# grep "^wheel" /etc/group
wheel:x:10:
4.再次尝试切换root用户,权限拒绝。
[zhangsan@localhost ~]$ su - root
Password:
su: Permission denied
5.将zhangsan加入wheel组。
[root@localhost ~]# gpasswd -a zhangsan wheel
Adding user zhangsan to group wheel
[root@localhost ~]# grep "^wheel" /etc/group
wheel:x:10:zhangsan
6.再次尝试切换root用户,成功切换。
[zhangsan@localhost ~]$ su - root
Password:
Last login: Wed Aug 28 13:52:17 CST 2019 on pts/1
Last failed login: Wed Aug 28 14:01:26 CST 2019 on pts/1
There was 1 failed login attempt since the last successful login.
sudo 用户提权
通过su可以切换root用户,但是必须要知道密码。若是给普通用户一部分管理权限,就可以不切换用户,必要时使用sudo提升执行权限。
- 配置文件
/etc/sudoers,可使用专门的工具visudo编辑,也可使用vi编辑器,但需要强制保存。基本配置格式如下。
user MACHINE=COMMANDS
user:授权的用户名,或%组名,表示组内所有用户。
MACHINE:使用此配置文件的主机名称,一般设为localhost或者实际主机名。
COMMANDS:允许授权用户通过sudo执行的特权命令,需要命令的完整路径,多个以,分隔。
- 集中定义别名:
User_Alias、Host_Alias、Cmnd_Alias,别名必须大写。
例子:允许用户jerry、tom、kcce在主机smtp、pop中执行rpm、yum命令。
User_Alias OPERATORS=jerry,tom,kcce
Host_Alias MAILSVRS=smtp,pop
Cmnd_Alias PKGTOOLS=/bin/rpm,/usr/bin/yum
OPERATORS MAILSVRS=PKGTOOLS
- 通配符
*、取反符号!,一般授权某个目录下所有命令,但取消其中个别命令时使用。
zhangsan localhost=/sbin/*,!/sbin/ifconfig,!/sbin/route
- 启用日志,配置文件添加以下参数。
Defaults logfile="/var/log/sudo"
Demo:
1.已有普通用户lisi、现有网卡配置。
[root@localhost ~]# id lisi
uid=1001(lisi) gid=1001(lisi) groups=1001(lisi)
[root@localhost ~]# ifconfig ens33
ens33: flags=4163<UP,BROADCAST,RUNNING,MULTICAST>  mtu 1500
        inet 192.168.128.133  netmask 255.255.255.0  broadcast 192.168.128.255
        inet6 fe80::7d96:e043:e371:4943  prefixlen 64  scopeid 0x20<link>
        ether 00:0c:29:5b:e0:09  txqueuelen 1000  (Ethernet)
        RX packets 32045  bytes 36669743 (34.9 MiB)
        RX errors 0  dropped 0  overruns 0  frame 0
        TX packets 13480  bytes 1129005 (1.0 MiB)
        TX errors 0  dropped 0 overruns 0  carrier 0  collisions 0
2.使用lisi尝试修改网卡地址,无法修改。
[lisi@localhost ~]$ ifconfig ens33 192.168.128.188
SIOCSIFADDR: Operation not permitted
SIOCSIFFLAGS: Operation not permitted
[lisi@localhost ~]$ sudo ifconfig ens33 192.168.128.188

We trust you have received the usual lecture from the local System
Administrator. It usually boils down to these three things:

    #1) Respect the privacy of others.
    #2) Think before you type.
    #3) With great power comes great responsibility.

[sudo] password for lisi:
lisi is not in the sudoers file.  This incident will be reported.
[lisi@localhost ~]$ ifconfig ens33
ens33: flags=4163<UP,BROADCAST,RUNNING,MULTICAST>  mtu 1500
        inet 192.168.128.133  netmask 255.255.255.0  broadcast 192.168.128.255
        inet6 fe80::7d96:e043:e371:4943  prefixlen 64  scopeid 0x20<link>
        ether 00:0c:29:5b:e0:09  txqueuelen 1000  (Ethernet)
        RX packets 32410  bytes 36735375 (35.0 MiB)
        RX errors 0  dropped 0  overruns 0  frame 0
        TX packets 13598  bytes 1141821 (1.0 MiB)
        TX errors 0  dropped 0 overruns 0  carrier 0  collisions 0
3.使用root用户编辑/etc/sudoers,给lisi添加授权。
[root@localhost ~]# visudo
lisi localhost=/sbin/ifconfig
4.使用lisi用户再次尝试修改地址,成功修改。
[lisi@localhost ~]$ sudo ifconfig ens33 192.168.128.188
[sudo] password for lisi:
[lisi@localhost ~]$ ifconfig ens33
ens33: flags=4163<UP,BROADCAST,RUNNING,MULTICAST>  mtu 1500
        inet 192.168.128.188  netmask 255.255.255.0  broadcast 192.168.128.255
        inet6 fe80::7d96:e043:e371:4943  prefixlen 64  scopeid 0x20<link>
        ether 00:0c:29:5b:e0:09  txqueuelen 1000  (Ethernet)
        RX packets 33575  bytes 36955964 (35.2 MiB)
        RX errors 0  dropped 0  overruns 0  frame 0
        TX packets 13975  bytes 1187393 (1.1 MiB)
        TX errors 0  dropped 0 overruns 0  carrier 0  collisions 0
5.使用sudo -l可以查看自己的sudo配置。
[lisi@localhost ~]$ sudo -l
[sudo] password for lisi:
Matching Defaults entries for lisi on localhost:
    !visiblepw, always_set_home, match_group_by_gid, env_reset, env_keep="COLORS DISPLAY HOSTNAME HISTSIZE KDEDIR LS_COLORS", env_keep+="MAIL PS1 PS2 QTDIR USERNAME
    LANG LC_ADDRESS LC_CTYPE", env_keep+="LC_COLLATE LC_IDENTIFICATION LC_MEASUREMENT LC_MESSAGES", env_keep+="LC_MONETARY LC_NAME LC_NUMERIC LC_PAPER LC_TELEPHONE",
    env_keep+="LC_TIME LC_ALL LANGUAGE LINGUAS _XKB_CHARSET XAUTHORITY", secure_path=/sbin:/bin:/usr/sbin:/usr/bin

User lisi may run the following commands on localhost:
    (root) /sbin/ifconfig
GRUB 密码
默认情况下,CentOS 7启动时,是可以随意进入GRUB菜单修改引导参数的,为了安全,可以对其设置密码,只有拥有相应的用户与密码才可以进入。
Demo:
1.备份需要修改的GRUB配置文件。
[root@localhost ~]# cp -p /boot/grub2/grub.cfg /boot/grub2/grub.cfg.bak
[root@localhost ~]# cp -p /etc/grub.d/00_header /etc/grub.d/00_header.bak
2.创建一个GRUB密码备用。
[root@localhost ~]# grub2-mkpasswd-pbkdf2
Enter password:
Reenter password:
PBKDF2 hash of your password is grub.pbkdf2.sha512.10000.017517DF1145EF0A839EDB3E53A8D3E598D8E8477AFDC778DE66A97966F486B7C6017910C5BF1FAC9882F84E1F8697B56AB5E833480D616A7B28D4BA9F6C5B38.6C0516B81FDFF2382B3AA0FB700FA7FD716DF8B83EBA727349C36BEB9498201B795714429AA09641005C6A176324D16EB7FE63088D393FE1695269E34D20A3F3
3.修改/etc/grub.d/00_header,加入用户与对应的密码。
[root@localhost ~]# vim /etc/grub.d/00_header
cat << EOF
set superusers="root"
password_pbkdf2 root grub.pbkdf2.sha512.10000.017517DF1145EF0A839EDB3E53A8D3E598D8E8477AFDC778DE66A97966F486B7C6017910C5BF1FAC9882F84E1F8697B56AB5E833480D616A7B28D4BA9F6C5B38.6C0516B81FDFF2382B3AA0FB700FA7FD716DF8B83EBA727349C36BEB9498201B795714429AA09641005C6A176324D16EB7FE63088D393FE1695269E34D20A3F3
EOF
4.重新创建GRUB配置文件。
[root@localhost ~]# grub2-mkconfig -o /boot/grub2/grub.cfg
Generating grub configuration file ...
Found linux image: /boot/vmlinuz-3.10.0-693.el7.x86_64
Found initrd image: /boot/initramfs-3.10.0-693.el7.x86_64.img
Found linux image: /boot/vmlinuz-0-rescue-ba010ae4b2944c52b216ec6259f230c0
Found initrd image: /boot/initramfs-0-rescue-ba010ae4b2944c52b216ec6259f230c0.img
done
5.重启验证。
[root@localhost ~]# reboot
6.验证结果。
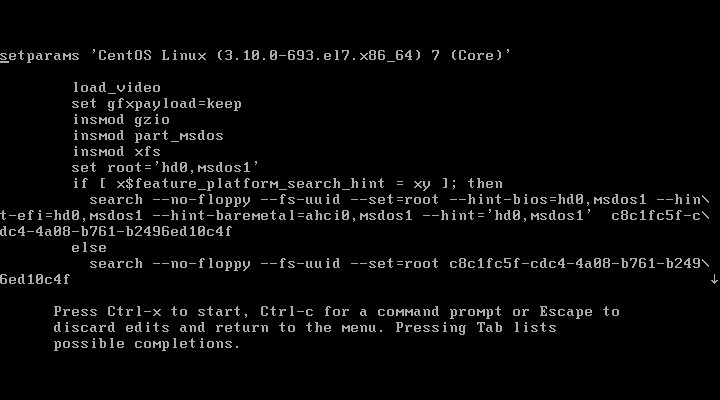
(1)使用上下取消读秒,按下e默认进入3,可以随意修改引导参数,不需要密码。
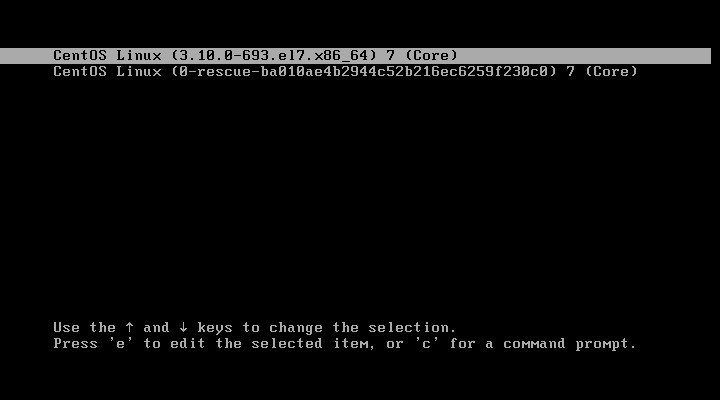
(2)加入密码后,需要输入用户名、密码才可以进入3。

(3)引导参数相关。
弱口令检测
使用弱密码会增加安全风险,而管理员可以使用john the Ripper这款开源工具,可以分析弱密码,以便采取相应的安全措施。
Demo:
1.安装编译器环境。
[root@localhost ~]# yum install gcc gcc-c++ -y
2.源代码编译安装。
[root@localhost ~]# tar zxvf john-1.8.0.tar.gz -C ~
[root@localhost ~]# ll
total 5328
-rw-------. 1 root root    1241 Aug 16 17:16 anaconda-ks.cfg
drwxr-xr-x. 5 root root      53 Aug 28 15:33 john-1.8.0
-rw-r--r--. 1 root root 5450412 Aug 28 15:31 john-1.8.0.tar.gz
[root@localhost ~]# cd ~/john-1.8.0/src/
[root@localhost src]# ls
AFS_fmt.c  BF_fmt.c    compiler.c  DES_bs.c    formats.c  john.asm  logger.c      memory.c   os.h        ppc64.h     signals.c  times.h     wordlist.h
alpha.h    BF_std.c    compiler.h  DES_bs.h    formats.h  john.c    logger.h      memory.h   params.c    recovery.c  signals.h  trip_fmt.c  x86-64.h
alpha.S    BF_std.h    config.c    DES_fmt.c   getopt.c   john.com  Makefile      mips32.h   params.h    recovery.h  single.c   tty.c       x86-64.S
batch.c    BSDI_fmt.c  config.h    DES_std.c   getopt.h   john.h    Makefile.dep  mips64.h   pa-risc.h   rpp.c       single.h   tty.h       x86-any.h
batch.h    c3_fmt.c    cracker.c   DES_std.h   ia64.h     list.c    math.c        misc.c     path.c      rpp.h       sparc32.h  unafs.c     x86-mmx.h
bench.c    charset.c   cracker.h   detect.c    idle.c     list.h    math.h        misc.h     path.h      rules.c     sparc64.h  unique.c    x86-mmx.S
bench.h    charset.h   crc32.c     dummy.c     idle.h     LM_fmt.c  MD5_fmt.c     nonstd.c   ppc32alt.h  rules.h     status.c   unshadow.c  x86.S
best.c     common.c    crc32.h     external.c  inc.c      loader.c  MD5_std.c     options.c  ppc32.h     sboxes.c    status.h   vax.h       x86-sse.h
best.sh    common.h    DES_bs_b.c  external.h  inc.h      loader.h  MD5_std.h     options.h  ppc64alt.h  sboxes-s.c  symlink.c  wordlist.c  x86-sse.S
[root@localhost src]# make linux-x86-64
ln -sf x86-64.h arch.h
make ../run/john ../run/unshadow ../run/unafs ../run/unique
        JOHN_OBJS="DES_fmt.o DES_std.o DES_bs.o DES_bs_b.o BSDI_fmt.o MD5_fmt.o MD5_std.o BF_fmt.o BF_std.o AFS_fmt.o LM_fmt.o trip_fmt.o dummy.o batch.o bench.o charset.o common.o compiler.o config.o cracker.o crc32.o external.o formats.o getopt.o idle.o inc.o john.o list.o loader.o logger.o math.o memory.o misc.o options.o params.o path.o recovery.o rpp.o rules.o signals.o single.o status.o tty.o wordlist.o unshadow.o unafs.o unique.o c3_fmt.o x86-64.o"
        CFLAGS="-c -Wall -Wdeclaration-after-statement -O2 -fomit-frame-pointer  -DHAVE_CRYPT"
        LDFLAGS="-s  -lcrypt"
make[1]: Entering directory `/root/john-1.8.0/src'
gcc -c -Wall -Wdeclaration-after-statement -O2 -fomit-frame-pointer  -DHAVE_CRYPT -funroll-loops DES_fmt.c
gcc -c -Wall -Wdeclaration-after-statement -O2 -fomit-frame-pointer  -DHAVE_CRYPT -funroll-loops DES_std.c
gcc -c -Wall -Wdeclaration-after-statement -O2 -fomit-frame-pointer  -DHAVE_CRYPT -funroll-loops DES_bs.c
gcc -c -Wall -Wdeclaration-after-statement -O2 -fomit-frame-pointer  -DHAVE_CRYPT -Os -funroll-loops -finline-functions DES_bs_b.c
gcc -c -Wall -Wdeclaration-after-statement -O2 -fomit-frame-pointer  -DHAVE_CRYPT -funroll-loops BSDI_fmt.c
gcc -c -Wall -Wdeclaration-after-statement -O2 -fomit-frame-pointer  -DHAVE_CRYPT -funroll-loops MD5_fmt.c
gcc -c -Wall -Wdeclaration-after-statement -O2 -fomit-frame-pointer  -DHAVE_CRYPT -funroll-loops MD5_std.c
gcc -c -Wall -Wdeclaration-after-statement -O2 -fomit-frame-pointer  -DHAVE_CRYPT -funroll-loops BF_fmt.c
gcc -c -Wall -Wdeclaration-after-statement -O2 -fomit-frame-pointer  -DHAVE_CRYPT -funroll-loops BF_std.c
gcc -c -Wall -Wdeclaration-after-statement -O2 -fomit-frame-pointer  -DHAVE_CRYPT -funroll-loops AFS_fmt.c
gcc -c -Wall -Wdeclaration-after-statement -O2 -fomit-frame-pointer  -DHAVE_CRYPT -funroll-loops LM_fmt.c
gcc -c -Wall -Wdeclaration-after-statement -O2 -fomit-frame-pointer  -DHAVE_CRYPT -funroll-loops trip_fmt.c
gcc -c -Wall -Wdeclaration-after-statement -O2 -fomit-frame-pointer  -DHAVE_CRYPT -funroll-loops dummy.c
gcc -c -Wall -Wdeclaration-after-statement -O2 -fomit-frame-pointer  -DHAVE_CRYPT -funroll-loops batch.c
gcc -c -Wall -Wdeclaration-after-statement -O2 -fomit-frame-pointer  -DHAVE_CRYPT -funroll-loops bench.c
gcc -c -Wall -Wdeclaration-after-statement -O2 -fomit-frame-pointer  -DHAVE_CRYPT -funroll-loops charset.c
gcc -c -Wall -Wdeclaration-after-statement -O2 -fomit-frame-pointer  -DHAVE_CRYPT -funroll-loops common.c
gcc -c -Wall -Wdeclaration-after-statement -O2 -fomit-frame-pointer  -DHAVE_CRYPT -funroll-loops compiler.c
gcc -c -Wall -Wdeclaration-after-statement -O2 -fomit-frame-pointer  -DHAVE_CRYPT -funroll-loops config.c
gcc -c -Wall -Wdeclaration-after-statement -O2 -fomit-frame-pointer  -DHAVE_CRYPT -funroll-loops cracker.c
gcc -c -Wall -Wdeclaration-after-statement -O2 -fomit-frame-pointer  -DHAVE_CRYPT -funroll-loops crc32.c
gcc -c -Wall -Wdeclaration-after-statement -O2 -fomit-frame-pointer  -DHAVE_CRYPT -funroll-loops external.c
gcc -c -Wall -Wdeclaration-after-statement -O2 -fomit-frame-pointer  -DHAVE_CRYPT -funroll-loops formats.c
gcc -c -Wall -Wdeclaration-after-statement -O2 -fomit-frame-pointer  -DHAVE_CRYPT -funroll-loops getopt.c
gcc -c -Wall -Wdeclaration-after-statement -O2 -fomit-frame-pointer  -DHAVE_CRYPT -funroll-loops idle.c
gcc -c -Wall -Wdeclaration-after-statement -O2 -fomit-frame-pointer  -DHAVE_CRYPT -funroll-loops inc.c
gcc -c -Wall -Wdeclaration-after-statement -O2 -fomit-frame-pointer  -DHAVE_CRYPT -funroll-loops john.c
gcc -c -Wall -Wdeclaration-after-statement -O2 -fomit-frame-pointer  -DHAVE_CRYPT -funroll-loops list.c
gcc -c -Wall -Wdeclaration-after-statement -O2 -fomit-frame-pointer  -DHAVE_CRYPT -funroll-loops loader.c
gcc -c -Wall -Wdeclaration-after-statement -O2 -fomit-frame-pointer  -DHAVE_CRYPT -funroll-loops logger.c
gcc -c -Wall -Wdeclaration-after-statement -O2 -fomit-frame-pointer  -DHAVE_CRYPT -funroll-loops math.c
gcc -c -Wall -Wdeclaration-after-statement -O2 -fomit-frame-pointer  -DHAVE_CRYPT -funroll-loops memory.c
gcc -c -Wall -Wdeclaration-after-statement -O2 -fomit-frame-pointer  -DHAVE_CRYPT -funroll-loops misc.c
gcc -c -Wall -Wdeclaration-after-statement -O2 -fomit-frame-pointer  -DHAVE_CRYPT -funroll-loops options.c
gcc -c -Wall -Wdeclaration-after-statement -O2 -fomit-frame-pointer  -DHAVE_CRYPT -funroll-loops params.c
gcc -c -Wall -Wdeclaration-after-statement -O2 -fomit-frame-pointer  -DHAVE_CRYPT -funroll-loops path.c
gcc -c -Wall -Wdeclaration-after-statement -O2 -fomit-frame-pointer  -DHAVE_CRYPT -funroll-loops recovery.c
gcc -c -Wall -Wdeclaration-after-statement -O2 -fomit-frame-pointer  -DHAVE_CRYPT -funroll-loops rpp.c
gcc -c -Wall -Wdeclaration-after-statement -O2 -fomit-frame-pointer  -DHAVE_CRYPT -funroll-loops rules.c
gcc -c -Wall -Wdeclaration-after-statement -O2 -fomit-frame-pointer  -DHAVE_CRYPT -funroll-loops signals.c
gcc -c -Wall -Wdeclaration-after-statement -O2 -fomit-frame-pointer  -DHAVE_CRYPT -funroll-loops single.c
gcc -c -Wall -Wdeclaration-after-statement -O2 -fomit-frame-pointer  -DHAVE_CRYPT -funroll-loops status.c
gcc -c -Wall -Wdeclaration-after-statement -O2 -fomit-frame-pointer  -DHAVE_CRYPT -funroll-loops tty.c
gcc -c -Wall -Wdeclaration-after-statement -O2 -fomit-frame-pointer  -DHAVE_CRYPT -funroll-loops wordlist.c
gcc -c -Wall -Wdeclaration-after-statement -O2 -fomit-frame-pointer  -DHAVE_CRYPT -funroll-loops unshadow.c
gcc -c -Wall -Wdeclaration-after-statement -O2 -fomit-frame-pointer  -DHAVE_CRYPT -funroll-loops unafs.c
gcc -c -Wall -Wdeclaration-after-statement -O2 -fomit-frame-pointer  -DHAVE_CRYPT -funroll-loops unique.c
gcc -c -Wall -Wdeclaration-after-statement -O2 -fomit-frame-pointer  -DHAVE_CRYPT -funroll-loops c3_fmt.c
gcc -c  x86-64.S
gcc DES_fmt.o DES_std.o DES_bs.o DES_bs_b.o BSDI_fmt.o MD5_fmt.o MD5_std.o BF_fmt.o BF_std.o AFS_fmt.o LM_fmt.o trip_fmt.o dummy.o batch.o bench.o charset.o common.o compiler.o config.o cracker.o crc32.o external.o formats.o getopt.o idle.o inc.o john.o list.o loader.o logger.o math.o memory.o misc.o options.o params.o path.o recovery.o rpp.o rules.o signals.o single.o status.o tty.o wordlist.o unshadow.o unafs.o unique.o c3_fmt.o x86-64.o -s  -lcrypt -o ../run/john
rm -f ../run/unshadow
ln -s john ../run/unshadow
rm -f ../run/unafs
ln -s john ../run/unafs
rm -f ../run/unique
ln -s john ../run/unique
make[1]: Leaving directory `/root/john-1.8.0/src'
3.运行脚本,分析账户、密码文件,只有zhangsan用户的密码强度足够,没有分析出来。
[root@localhost src]# cd ~/john-1.8.0/run/
[root@localhost run]# ls
ascii.chr  digits.chr  john  john.conf  lm_ascii.chr  mailer  makechr  password.lst  relbench  unafs  unique  unshadow
[root@localhost run]# ./john /etc/passwd /etc/shadow
Loaded 4 password hashes with 4 different salts (crypt, generic crypt(3) [?/64])
Press 'q' or Ctrl-C to abort, almost any other key for status
000000           (root)
000000           (lisi)
000000           (wangwu)
3g 0:00:09:38 90% 2/3 0.005184g/s 272.3p/s 278.2c/s 278.2C/s christmased..freemaned
Use the "--show" option to display all of the cracked passwords reliably
Session aborted
nmap 端口扫描
定期的端口扫描,可以找出网络中不可控的应用服务,及时关闭不安全的服务,减小安全风险。
- nmap [扫描类型] [选项] <扫描目标>
常用的扫描类型:
-sS:TCP SYN扫描(半开扫描):只向目标发出SYN数据包,如果收到SYN/ACK响应包就认为目标端口正在监听,并立即断开连接;否则认为目标端口并未开放。
-sT:TCP连接扫描:这是完整的TCP扫描方式,用来建立一个TCP连接,如果成功则认为目标端口正在监听服务,否则认为目标端口并未开放。
-sF:TCP FIN扫描:开放的端口会忽略这种数据包,关闭的端口会回应RST数据包。许多防火墙只对SYN数据包进行简单过滤,而忽略了其他形式的TCP攻击包。这种类型的扫描可间接检测防火墙的健壮性。
-sU:UDP扫描:探测目标主机提供哪些UDP服务,UDP扫描的速度会比较慢。
-sP:ICMP扫描:类似于ping检测,快速判断目标主机是否存活,不做其他扫描。
-P0:跳过ping检测:这种方式认为所有目标主机时存活的,当对方不响应ICMP请求时,使用这种方式可以避免无法ping通而放弃扫描。
常用的选项:
-p:指定扫描的端口
-n:禁用反向DNS解析,加快扫描速度
Demo:
1.扫描本机开放了哪些TCP端口。
[root@localhost ~]# nmap -sT 127.0.0.1

Starting Nmap 6.40 ( http://nmap.org ) at 2019-08-28 15:58 CST
Nmap scan report for localhost (127.0.0.1)
Host is up (0.0011s latency).
Not shown: 998 closed ports
PORT   STATE SERVICE
22/tcp open  ssh
25/tcp open  smtp

Nmap done: 1 IP address (1 host up) scanned in 0.09 seconds
2.扫描本机开放了哪些UDP端口。
[root@localhost ~]# nmap -sU 127.0.0.1

Starting Nmap 6.40 ( http://nmap.org ) at 2019-08-28 16:01 CST
Nmap scan report for localhost (127.0.0.1)
Host is up (0.00011s latency).
Not shown: 999 closed ports
PORT   STATE         SERVICE
68/udp open|filtered dhcpc

Nmap done: 1 IP address (1 host up) scanned in 48.02 seconds
3.扫描网段中的哪些主机在线。
[root@localhost ~]# nmap -sP 192.168.128.0/24

Starting Nmap 6.40 ( http://nmap.org ) at 2019-08-28 16:03 CST
Nmap scan report for 192.168.128.1
Host is up (0.000074s latency).
MAC Address: 00:50:56:C0:00:08 (VMware)
Nmap scan report for 192.168.128.2
Host is up (0.00017s latency).
MAC Address: 00:50:56:E0:8F:D1 (VMware)
Nmap scan report for 192.168.128.132
Host is up (0.00024s latency).
MAC Address: 00:0C:29:BC:AB:96 (VMware)
Nmap scan report for 192.168.128.254
Host is up (0.00029s latency).
MAC Address: 00:50:56:E7:AC:DE (VMware)
Nmap scan report for 192.168.128.133
Host is up.
Nmap done: 256 IP addresses (5 hosts up) scanned in 4.16 seconds
4.扫描某主机开启了哪些TCP端口。
[root@localhost ~]# nmap -sT 192.168.128.132

Starting Nmap 6.40 ( http://nmap.org ) at 2019-08-28 16:07 CST
Nmap scan report for 192.168.128.132
Host is up (0.68s latency).
Not shown: 999 filtered ports
PORT   STATE SERVICE
22/tcp open  ssh
MAC Address: 00:0C:29:BC:AB:96 (VMware)

Nmap done: 1 IP address (1 host up) scanned in 58.14 seconds