Spring 第二天:
1. 代理模式
2. Aop编程
3.Spring对Jdbc的支持
JdbcTemplate工具类
思考:
程序的“事务控制”, 可以用aop实现! 即只需要写一次,运行时候动态织入到业务方法上。
Spring提供了对事务的管理,开发者只需要按照Spring的方式去做就行。
目标:
1. Spring声明式事务管理
* XML配置
*注解方式
2. Spring与Hibernate整合
3. SSH整合
1. 程序中事务控制
1.1 环境准备
用户访问—》Action --》 Service---》Dao
一个业务的成功: 调用的service是执行成功的,意味着service中调用的所有的dao是执行成功的。 事务应该在Service层统一控制。
1)没有应用事务的代码:
2)模拟:
在service中调用2次dao, 希望其中一个dao执行失败,整个操作要回滚。
开发步骤:
1. 后台环境准备
数据库、表/entity/dao/service
2. dao 的实现用JdbcTemplate
3. 对象创建都有Spring容器完成
1.2 事务控制概述
编程式事务控制
自己手动控制事务,就叫做编程式事务控制。
Jdbc代码:
Conn.setAutoCommite(false); // 设置手动控制事务
Hibernate代码:
Session.beginTransaction(); // 开启一个事务
【细粒度的事务控制: 可以对指定的方法、指定的方法的某几行添加事务控制】
(比较灵活,但开发起来比较繁琐: 每次都要开启、提交、回滚.)
声明式事务控制
Spring提供了对事务的管理, 这个就叫声明式事务管理。
Spring提供了对事务控制的实现。用户如果想用Spring的声明式事务管理,只需要在配置文件中配置即可; 不想使用时直接移除配置。这个实现了对事务控制的最大程度的解耦。
Spring声明式事务管理,核心实现就是基于Aop。
【粗粒度的事务控制: 只能给整个方法应用事务,不可以对方法的某几行应用事务。】
(因为aop拦截的是方法。)
Spring声明式事务管理器类:
Jdbc技术:DataSourceTransactionManager
Hibernate技术:HibernateTransactionManager
2. 声明式事务管理
步骤:
1) 引入spring-aop相关的4个jar文件
2) 引入aop名称空间 【XML配置方式需要引入】
3) 引入tx名称空间 【事务方式必须引入】
XML方式实现
|
1. DeptDao.java |
|
public class DeptDao { // 容器注入JdbcTemplate对象 private JdbcTemplate jdbcTemplate; public void setJdbcTemplate(JdbcTemplate jdbcTemplate) { this.jdbcTemplate = jdbcTemplate; } public void save(Dept dept){ String sql = "insert into t_dept (deptName) values(?)"; jdbcTemplate.update(sql,dept.getDeptName()); } } |
|
2. DeptService |
|
public class DeptService { // 容器注入dao对象 private DeptDao deptDao; public void setDeptDao(DeptDao deptDao) { this.deptDao = deptDao; } /* * 事务控制? */ public void save(Dept dept){ // 第一次调用 deptDao.save(dept); int i = 1/0; // 异常: 整个Service.save()执行成功的要回滚 // 第二次调用 deptDao.save(dept); } } |
|
3. App 测试类 |
|
@Test public void testApp() throws Exception { //容器对象 ApplicationContext ac = new ClassPathXmlApplicationContext("cn/itcast/a_tx/bean.xml"); // 模拟数据 Dept dept = new Dept(); dept.setDeptName("测试: 开发部"); DeptService deptService = (DeptService) ac.getBean("deptService"); deptService.save(dept); } |
|
4. bean.xml (Spring声明式事务管理配置) |
|
<?xml version="1.0" encoding="UTF-8"?> <beans xmlns="http://www.springframework.org/schema/beans" xmlns:xsi="http://www.w3.org/2001/XMLSchema-instance" xmlns:p="http://www.springframework.org/schema/p" xmlns:context="http://www.springframework.org/schema/context" xmlns:aop="http://www.springframework.org/schema/aop" xmlns:tx="http://www.springframework.org/schema/tx" xsi:schemaLocation="http://www.springframework.org/schema/beans http://www.springframework.org/schema/beans/spring-beans.xsd http://www.springframework.org/schema/context http://www.springframework.org/schema/context/spring-context.xsd http://www.springframework.org/schema/aop http://www.springframework.org/schema/aop/spring-aop.xsd http://www.springframework.org/schema/tx http://www.springframework.org/schema/tx/spring-tx.xsd"> <!-- 1. 数据源对象: C3P0连接池 --> <bean id="dataSource" class="com.mchange.v2.c3p0.ComboPooledDataSource"> <property name="driverClass" value="com.mysql.jdbc.Driver"></property> <property name="jdbcUrl" value="jdbc:mysql:///hib_demo"></property> <property name="user" value="root"></property> <property name="password" value="root"></property> <property name="initialPoolSize" value="3"></property> <property name="maxPoolSize" value="10"></property> <property name="maxStatements" value="100"></property> <property name="acquireIncrement" value="2"></property> </bean> <!-- 2. JdbcTemplate工具类实例 --> <bean id="jdbcTemplate" class="org.springframework.jdbc.core.JdbcTemplate"> <property name="dataSource" ref="dataSource"></property> </bean> <!-- 3. dao实例 --> <bean id="deptDao" class="cn.itcast.a_tx.DeptDao"> <property name="jdbcTemplate" ref="jdbcTemplate"></property> </bean> <!-- 4. service实例 --> <bean id="deptService" class="cn.itcast.a_tx.DeptService"> <property name="deptDao" ref="deptDao"></property> </bean> <!-- #############5. Spring声明式事务管理配置############### --> <!-- 5.1 配置事务管理器类 --> <bean id="txManager" class="org.springframework.jdbc.datasource.DataSourceTransactionManager"> <property name="dataSource" ref="dataSource"></property> </bean> <!-- 5.2 配置事务增强(如果管理事务?) --> <tx:advice id="txAdvice" transaction-manager="txManager"> <tx:attributes> <tx:method name="get*" read-only="true"/> <tx:method name="find*" read-only="true"/> <tx:method name="*" read-only="false"/> </tx:attributes> </tx:advice> <!-- 5.3 Aop配置: 拦截哪些方法(切入点表表达式) + 应用上面的事务增强配置 --> <aop:config> <aop:pointcut expression="execution(* cn.itcast.a_tx.DeptService.*())" id="pt"/> <aop:advisor advice-ref="txAdvice" pointcut-ref="pt"/> </aop:config> </beans> |
注解方式实现
使用注解实现Spring的声明式事务管理,更加简单!
步骤:
1) 必须引入Aop相关的jar文件
2) bean.xml中指定注解方式实现声明式事务管理以及应用的事务管理器类
3)在需要添加事务控制的地方,写上: @Transactional
@Transactional注解:
1)应用事务的注解
2)定义到方法上: 当前方法应用spring的声明式事务
3)定义到类上: 当前类的所有的方法都应用Spring声明式事务管理;
4)定义到父类上: 当执行父类的方法时候应用事务。
|
Bean.xm |
|
<?xml version="1.0" encoding="UTF-8"?> <beans xmlns="http://www.springframework.org/schema/beans" xmlns:xsi="http://www.w3.org/2001/XMLSchema-instance" xmlns:p="http://www.springframework.org/schema/p" xmlns:context="http://www.springframework.org/schema/context" xmlns:aop="http://www.springframework.org/schema/aop" xmlns:tx="http://www.springframework.org/schema/tx" xsi:schemaLocation="http://www.springframework.org/schema/beans http://www.springframework.org/schema/beans/spring-beans.xsd http://www.springframework.org/schema/context http://www.springframework.org/schema/context/spring-context.xsd http://www.springframework.org/schema/aop http://www.springframework.org/schema/aop/spring-aop.xsd http://www.springframework.org/schema/tx http://www.springframework.org/schema/tx/spring-tx.xsd"> <!-- 1. 数据源对象: C3P0连接池 --> <bean id="dataSource" class="com.mchange.v2.c3p0.ComboPooledDataSource"> <property name="driverClass" value="com.mysql.jdbc.Driver"></property> <property name="jdbcUrl" value="jdbc:mysql:///hib_demo"></property> <property name="user" value="root"></property> <property name="password" value="root"></property> <property name="initialPoolSize" value="3"></property> <property name="maxPoolSize" value="10"></property> <property name="maxStatements" value="100"></property> <property name="acquireIncrement" value="2"></property> </bean> <!-- 2. JdbcTemplate工具类实例 --> <bean id="jdbcTemplate" class="org.springframework.jdbc.core.JdbcTemplate"> <property name="dataSource" ref="dataSource"></property> </bean> <!-- 事务管理器类 --> <bean id="txManager" class="org.springframework.jdbc.datasource.DataSourceTransactionManager"> <property name="dataSource" ref="dataSource"></property> </bean> <!-- 开启注解扫描 --> <context:component-scan base-package="cn.itcast.b_anno"></context:component-scan> <!-- 注解方式实现事务: 指定注解方式实现事务 --> <tx:annotation-driven transaction-manager="txManager"/> </beans> |
|
DeptService |
|
@Service public class DeptService { @Resource private DeptDao deptDao; /* * 事务控制? */ @Transactional public void save(Dept dept){ deptDao.save(dept); int i = 1/0; deptDao.save(dept); } } |
事务属性
|
@Transactional( readOnly = false, // 读写事务 timeout = -1, // 事务的超时时间不限制 noRollbackFor = ArithmeticException.class, // 遇到数学异常不回滚 isolation = Isolation.DEFAULT, // 事务的隔离级别,数据库的默认 propagation = Propagation.REQUIRED // 事务的传播行为 ) public void save(Dept dept){ deptDao.save(dept); int i = 1/0; deptDao.save(dept); } |
事务传播行为:
Propagation.REQUIRED
指定当前的方法必须在事务的环境下执行;
如果当前运行的方法,已经存在事务, 就会加入当前的事务;
Propagation.REQUIRED_NEW
指定当前的方法必须在事务的环境下执行;
如果当前运行的方法,已经存在事务: 事务会挂起; 会始终开启一个新的事务,执行完后; 刚才挂起的事务才继续运行。
举例:
Class Log{
Propagation.REQUIRED
insertLog();
}
Propagation.REQUIRED
Void saveDept(){
insertLog(); // 加入当前事务
.. 异常, 会回滚
saveDept();
}
Class Log{
Propagation.REQUIRED_NEW
insertLog();
}
Propagation.REQUIRED
Void saveDept(){
insertLog(); // 始终开启事务
.. 异常, 日志不会回滚
saveDept();
}
测试步骤:
1)日志表Log_
2)LogService.java
insertLog();
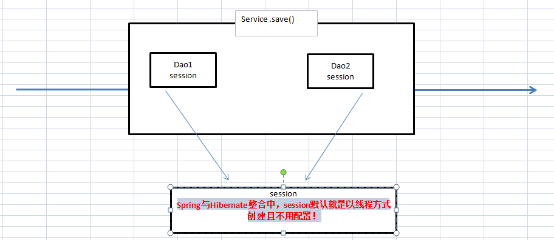
4. Spring与Hibernate整合
Spring与Hibernate整合关键点:
1) Hibernate的SessionFactory对象交给Spring创建;
2) hibernate事务交给spring的声明式事务管理。
SSH整合:
Spring与Struts;
Spring与hibernate整合;
SH整合步骤:
1)引入jar包
连接池/数据库驱动包
Hibernate相关jar
Spring 核心包(5个)
Spring aop 包(4个)
spring-orm-3.2.5.RELEASE.jar【spring对hibernate的支持】
spring-tx-3.2.5.RELEASE.jar【事务相关】
2)配置
hibernate.cfg.xml
bean.xml
3)搭建环境、单独测试
步骤实现
|
1. DeptDao.java |
|
// 数据访问层 public class DeptDao { // Spring与Hibernate整合: IOC容器注入 private SessionFactory sessionFactory; public void setSessionFactory(SessionFactory sessionFactory) { this.sessionFactory = sessionFactory; } // 保存一个记录 // Spring与Hibernate整合:事务管理交给Spring public void save(Dept dept) { sessionFactory.getCurrentSession().save(dept); } } |
|
2. DeptService |
|
public class DeptService { private DeptDao deptDao; public void setDeptDao(DeptDao deptDao) { this.deptDao = deptDao; } public void save(Dept dept){ deptDao.save(dept); } } |
|
3. App.java 测试 |
|
public class App { // 容器 private ApplicationContext ac = new ClassPathXmlApplicationContext("bean.xml"); @Test public void testApp() throws Exception { DeptService deptServie = (DeptService) ac.getBean("deptService"); System.out.println(deptServie.getClass()); deptServie.save(new Dept()); } } |
|
4. bean.xml 配置 【Spring管理SessionFactory的3中方式】 |
|
<?xml version="1.0" encoding="UTF-8"?> <beans xmlns="http://www.springframework.org/schema/beans" xmlns:xsi="http://www.w3.org/2001/XMLSchema-instance" xmlns:p="http://www.springframework.org/schema/p" xmlns:context="http://www.springframework.org/schema/context" xmlns:aop="http://www.springframework.org/schema/aop" xmlns:tx="http://www.springframework.org/schema/tx" xsi:schemaLocation="http://www.springframework.org/schema/beans http://www.springframework.org/schema/beans/spring-beans.xsd http://www.springframework.org/schema/context http://www.springframework.org/schema/context/spring-context.xsd http://www.springframework.org/schema/aop http://www.springframework.org/schema/aop/spring-aop.xsd http://www.springframework.org/schema/tx http://www.springframework.org/schema/tx/spring-tx.xsd"> <!-- dao 实例 --> <bean id="deptDao" class="cn.itcast.dao.DeptDao"> <property name="sessionFactory" ref="sessionFactory"></property> </bean> <!-- service 实例 --> <bean id="deptService" class="cn.itcast.service.DeptService"> <property name="deptDao" ref="deptDao"></property> </bean> <!-- 数据源配置 --> <bean id="dataSource" class="com.mchange.v2.c3p0.ComboPooledDataSource"> <property name="driverClass" value="com.mysql.jdbc.Driver"></property> <property name="jdbcUrl" value="jdbc:mysql:///hib_demo"></property> <property name="user" value="root"></property> <property name="password" value="root"></property> <property name="initialPoolSize" value="3"></property> <property name="maxPoolSize" value="10"></property> <property name="maxStatements" value="100"></property> <property name="acquireIncrement" value="2"></property> </bean> <!-- ###########Spring与Hibernate整合 start########### --> <!-- 方式(1)直接加载hibernate.cfg.xml文件的方式整合 <bean id="sessionFactory" class="org.springframework.orm.hibernate3.LocalSessionFactoryBean"> <property name="configLocation" value="classpath:hibernate.cfg.xml"></property> </bean> --> <!-- 方式(2)连接池交给spring管理 【一部分配置写到hibernate中,一份分在spring中完成】 <bean id="sessionFactory" class="org.springframework.orm.hibernate3.LocalSessionFactoryBean"> <property name="configLocation" value="classpath:hibernate.cfg.xml"></property> <property name="dataSource" ref="dataSource"></property> </bean> --> <!-- 【推荐】方式(3)所有的配置全部都在Spring配置文件中完成 --> <bean id="sessionFactory" class="org.springframework.orm.hibernate3.LocalSessionFactoryBean"> <!-- 注入连接池对象 --> <property name="dataSource" ref="dataSource"></property> <!-- hibernate常用配置 --> <property name="hibernateProperties"> <props> <prop key="hibernate.dialect">org.hibernate.dialect.MySQLDialect</prop> <prop key="hibernate.show_sql">true</prop> <prop key="hibernate.hbm2ddl.auto">update</prop> </props> </property> <!-- hibernate映射配置 <property name="mappingLocations"> <list> <value>classpath:cn/itcast/entity/*.hbm.xml</value> </list> </property> --> <property name="mappingDirectoryLocations"> <list> <value>classpath:cn/itcast/entity/</value> </list> </property> </bean> <!-- ###########Spring与Hibernate整合 end########### --> <!-- 事务配置 --> <!-- a. 配置事务管理器类 --> <bean id="txManager" class="org.springframework.orm.hibernate3.HibernateTransactionManager"> <property name="sessionFactory" ref="sessionFactory"></property> </bean> <!-- b. 配置事务增强(拦截到方法后如果管理事务?) --> <tx:advice id="txAdvice" transaction-manager="txManager"> <tx:attributes> <tx:method name="*" read-only="false"/> </tx:attributes> </tx:advice> <!-- c. Aop配置 --> <aop:config> <aop:pointcut expression="execution(* cn.itcast.service.*.*(..))" id="pt"/> <aop:advisor advice-ref="txAdvice" pointcut-ref="pt"/> </aop:config> </beans> |
细节
5. SSH整合
即:
Spring与Struts整合
Spring与Hibernate整合
需求:
JSP页面显示员工信息 (查询)
整合步骤:
1) 引入SSH Jar文件
Struts 核心jar
Hibernate 核心jar
Spring
Core 核心功能
Web 对web模块支持
Aop aop支持
Orm 对hibernate支持
Jdbc/tx jdbc支持包、事务相关包
2)配置
Web.xml
初始化struts功能、spring容器
Struts.xml 配置请求路径与映射action的关系
Spring.xml IOC容器配置
bean-base.xml 【公用信息】
bean-service.xml
bean-dao.xml
bean-action.xml
3)开发
Entity/Dao/service/action