本文希望达到的目标:
- 多线程的基本认识
- 多线程编程的模块和类的使用
- Cpython的全局解释器锁GIL
一、多线程的基本认识
多线程编程的目的:并行处理子任务,大幅度地提升整个任务的效率。
线程就是运行在进程上下文的逻辑流。每个线程都有自己的线程上下文,包含唯一的线程ID(就当前所属进程而言),栈,栈指针,程序计数器,通用寄存器和条件码等。
同一个进程中的线程,共享相同的运行环境,共享同一片数据空间,所以线程间的通讯笔进程间的通信更简单,但是这样的共享是会有危险的,如果多线程共同访问同一数据,因为访问顺序的不同,可能会导致结果不一致。
二、多线程编程的模块和类的使用
为了更好说明多线程的优点以及多个标准库使用的差异性,以模拟“一个程序完成2个独立任务时间总和”为例子。
0、单进程单线程运行两个独立的任务:顺序执行,完成第一个任务后,再完成第二个任务。总时间是各个循环 运行时间之和,实际两个任务是完全独立的,如果并行执行,是可以减少运行时间的。
import thread
from time import sleep,ctime

def loop0():
    print 'start loop0','at:',ctime()
    sleep(4)
    print 'loop0','done at:',ctime()

def loop1():
    print 'start loop1','at:',ctime()
    sleep(3)
    print 'loop1','done at:',ctime()

def main():
    print 'starting at:',ctime()
    loop0()
    loop1()
    print 'all done at:',ctime()

if __name__=='__main__':
    main()

1、thread模块
python提供了两个标准库用于多线程编程,thread模块提供了基本的线程和锁的支持,而 threading 提供了更高级别,功能更强的线程管理的功能。一般都建议使用threading模块,毕竟功能更强大,更好管理。
thread模块和对象:(官网:https://docs.python.org/2/library/thread.html)
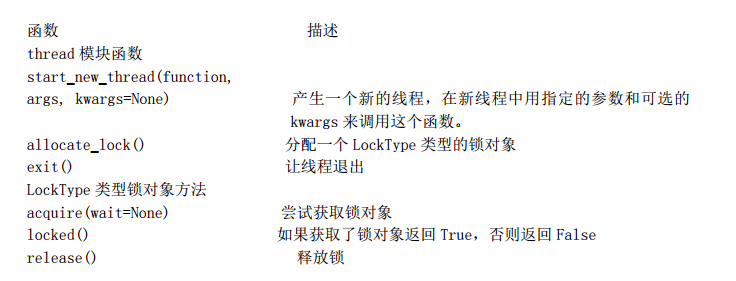
使用多线程编程,创建两个线程同时执行两个独立的任务,需要考虑,主线程执行时间和子线程执行时间的关系,如果单纯的创建线程去运行这2个任务,主线程执行完成时间必然比子线程快,子线程未运行完,主线程就已经退出了,在thread模块使用锁对象lock来管理,为每个线程创建一个锁对象,在线程执行完成后释放锁,而主线程判断所有的锁都释放后才能结束,进程间的通讯机制就这样简单的建立起来。
import thread
from time import sleep,ctime

loops =[4,3]

def loop(nloop,nsec,lock):
    print 'start loop',nloop,'at:',ctime()
    sleep(nsec)
    print 'loop',nloop,'done at:',ctime()
    lock.release()

def main():
    print 'starting at:',ctime()
    locks = []
    nloops = range(len(loops))

    for i in nloops:
        lock = thread.allocate_lock()
        lock.acquire()
        locks.append(lock)

    for i in nloops:
        thread.start_new_thread(loop,(i,loops[i],locks[i]))

    for i in nloops:
        print 'check lock'
        while locks[i].locked():
            pass

    print 'all done at:',ctime()

if __name__=='__main__':
    main()
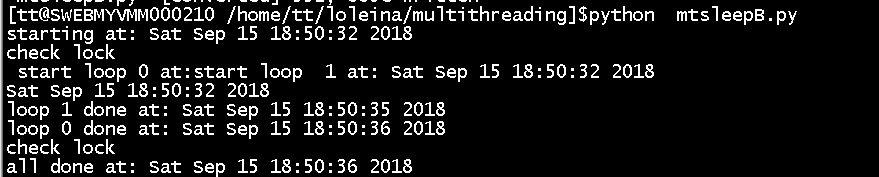
运行时间为4s,单进程耗时7s,运行时间有减少。为什么不在创建锁的循环里创建线程呢?有以下几个原因:(1) 我 们想到实现线程的同步,所以要让“所有的马同时冲出栅栏”。(2) 获取锁要花一些时间,如果线程退出得“太快”,可能会导致还没有获得锁,线程就已经结束了的情况。
注意:
A:子线程开始:创建对象调用start_new_thread函数时,该函数不是在主线程里运行, 而是产生一个新的线程来运行这个函数。一旦调用该函数,子线程已经开始运行。
B:子线程退出:它不支持守护线程。当主线程退出时,所有的子线程不论它们是否还在工作,都会被强行退出。
2、threading模块 :创建一个 Thread 的实例,传给它一个函数
它不仅提供了 Thread 类,还提供了各 种非常好用的同步机制。
threading模块和对象:(官网:https://docs.python.org/2/library/threading.html)

import threading
from time import sleep,ctime

loops =[4,3]

def loop(nloop,nsec):
    print 'start loop',nloop,'at:',ctime()
    sleep(nsec)
    print 'loop',nloop,'done at:',ctime()

def main():
    print 'starting at:',ctime()
    threads = []
    nloops = range(len(loops))

    for i in nloops:
        t = threading.Thread(target=loop,args=(i,loops[i]))
        threads.append(t)

    for i in nloops:
        print 'thread',i,'start'
        threads[i].start()

    for i in nloops:
        print 'thread',i,'join'
        threads[i].join()

    print 'all done at:',ctime()

if __name__=='__main__':
    main()

注意:
A、子线程开始:调用start函数。所有的线程都创建了之后,再一起调用 start()函数启动,而不是创建一个启动一个。而且, 不用再管理一堆锁(分配锁,获得锁,释放锁,检查锁的状态等)
B、子线程结束:可以控制子线程和主线程结束的顺序,调用join(timeout=None) 程序挂起,直到线程结束;
C、守护线程一般是一个等待客户请求的服务器, 如果没有客户提出请求,它就在那等着。如果设定一个线程为守护线程,就表示这个线程 是不重要的,在进程退出的时候,不用等待这个线程退出。
3、thread类 :Thread 派生出一个子类,创建一个这个子类的实例
import threading
from time import sleep,ctime

loops =(4,3)

class MyThread(threading.Thread):
    def __init__(self,func,args,name=''):
        threading.Thread.__init__(self)
        self.name = name
        self.func = func
        self.args = args

    def run(self):
        self.func(*self.args)

def loop(nloop,nsec):
    print 'start loop',nloop,'at:',ctime()
    sleep(nsec)
    print 'loop',nloop,'done at:',ctime()

def main():
    print 'starting at:',ctime()
    threads = []
    nloops = range(len(loops))

    for i in nloops:
        t = MyThread(loop,(i,loops[i]),loop.__name__)
        threads.append(t)

    for i in nloops:
        print 'thread',i,'start'
        threads[i].start()
    for i in nloops:
        print 'thread',i,'join'
        threads[i].join()

    print 'all done at:',ctime()

if __name__=='__main__':
    main()
4、threading模块中的thread类部分源码解析
thread模块提供了一系列基础函数,其实不是不能用,书本上写着的是不建议使用,但是如果用于底层开发是可以的。threading模块与之相比,最大的不同就是,threading模块中的thread类的属性特别多,
包含了对多线程的各自管理上的纬度属性,所以特别方便使用,实际上threading模块就是在thread模块上开发的,做了进一步的集成化和封装以便于用户更轻便的管理。
A :threadding模块有引用thread模块:
try:
    import thread
except ImportError:
    del _sys.modules[__name__]
    raise
B: thread类的初始化函数部分截图如下:初始化的过程,其实就是多线程的属性的初始化的过程。把其中需要的资源,入参,thread管理的各自对象都初始化。
def __init__(self, group=None, target=None, name=None,
                 args=(), kwargs=None, verbose=None):

        assert group is None, "group argument must be None for now"
        _Verbose.__init__(self, verbose)
        if kwargs is None:
            kwargs = {}
        self.__target = target
        self.__name = str(name or _newname())
        self.__args = args
        self.__kwargs = kwargs
        self.__daemonic = self._set_daemon()
        self.__ident = None
        self.__started = Event()
        self.__stopped = False
        self.__block = Condition(Lock())
        self.__initialized = True
        # sys.stderr is not stored in the class like
        # sys.exc_info since it can be changed between instances
        self.__stderr = _sys.stderr
C:thread类的start函数,看到调用底层的_start_new_thread函数,就明白了,为啥thread类是调用start函数来启动线程,还调用了self.__started.wait(),__started对象实际是_Condition类的实例,这是一个对
线程锁管理的实例,调用这个类的wait方法就是在获取一把锁。
 def start(self):
        if not self.__initialized:
            raise RuntimeError("thread.__init__() not called")
        if self.__started.is_set():
            raise RuntimeError("threads can only be started once")
        if __debug__:
            self._note("%s.start(): starting thread", self)
        with _active_limbo_lock:
            _limbo[self] = self
        try:
            _start_new_thread(self.__bootstrap, ())
        except Exception:
            with _active_limbo_lock:
                del _limbo[self]
            raise
        self.__started.wait()
 def wait(self, timeout=None):
        if not self._is_owned():
            raise RuntimeError("cannot wait on un-acquired lock")
        waiter = _allocate_lock()
        waiter.acquire()
        self.__waiters.append(waiter)
        saved_state = self._release_save()
        try:    # restore state no matter what (e.g., KeyboardInterrupt)
            if timeout is None:
                waiter.acquire()
                if __debug__:
                    self._note("%s.wait(): got it", self)
            else:
                # Balancing act:  We can't afford a pure busy loop, so we
                # have to sleep; but if we sleep the whole timeout time,
                # we'll be unresponsive.  The scheme here sleeps very
                # little at first, longer as time goes on, but never longer
                # than 20 times per second (or the timeout time remaining).
                endtime = _time() + timeout
                delay = 0.0005 # 500 us -> initial delay of 1 ms
                while True:
                    gotit = waiter.acquire(0)
                    if gotit:
                        break
                    remaining = endtime - _time()
                    if remaining <= 0:
                        break
                    delay = min(delay * 2, remaining, .05)
                    _sleep(delay)
                if not gotit:
                    if __debug__:
                        self._note("%s.wait(%s): timed out", self, timeout)
                    try:
                        self.__waiters.remove(waiter)
                    except ValueError:
                        pass
                else:
                    if __debug__:
                        self._note("%s.wait(%s): got it", self, timeout)
        finally:
            self._acquire_restore(saved_state)
D:而调用join方法,实际也是调用_Condition类的实例,判断当前锁的状态,在线程运行完毕后,释放锁。
    def join(self, timeout=None):
        if not self.__initialized:
            raise RuntimeError("Thread.__init__() not called")
        if not self.__started.is_set():
            raise RuntimeError("cannot join thread before it is started")
        if self is current_thread():
            raise RuntimeError("cannot join current thread")

        if __debug__:
            if not self.__stopped:
                self._note("%s.join(): waiting until thread stops", self)
        self.__block.acquire()
        try:
            if timeout is None:
                while not self.__stopped:
                    self.__block.wait()
                if __debug__:
                    self._note("%s.join(): thread stopped", self)
            else:
                deadline = _time() + timeout
                while not self.__stopped:
                    delay = deadline - _time()
                    if delay <= 0:
                        if __debug__:
                            self._note("%s.join(): timed out", self)
                        break
                    self.__block.wait(delay)
                else:
                    if __debug__:
                        self._note("%s.join(): thread stopped", self)
        finally:
            self.__block.release()
三、Cpython的全局解释器锁GIL
推荐一篇更全面介绍的博客:https://www.cnblogs.com/frchen/p/5740606.html
GIL全称 Global Interpreter Lock, 这个问题。像单 CPU 的系统中运行多个进程那样,内存中可以存放多个程序,但任意时刻,只有一个程序在 CPU 中运行。 在CPython 解释器中可以“运行” 多个线程,但在任意时刻,只有一个线程在解释器中运行。而对 Python 虚拟机的访问由全局解释器锁(GIL)来控制,正是这个锁能保证同一时刻只有一个线程在运行。GIL 并不是Python的特性,它是在实现Python解析器(CPython)时所引入的一个概念。实际现在一般使用的解析器都是基于CPython的,如果是Jpython(基于java),可能就不存在
对所有面向 I/O 的(会调用内建的操作系统 C 代码的)程序来说,GIL 会在这个 I/O 调用之前被释放,以允许其它的线程在这个线程等待 I/O 的时候运行。如果某线程并未使用很多 I/O 操作, 它会在自己的时间片内一直占用处理器(和 GIL)。也就是说,I/O 密集型的 Python 程序比计算密集型的程序更能充分利用多线程环境的好处。
简单的总结下就是:Python的多线程在多核CPU上,只对于IO密集型计算产生积极效果;而当有至少有一个CPU密集型线程存在,那么多线程效率会由于GIL而大幅下降。