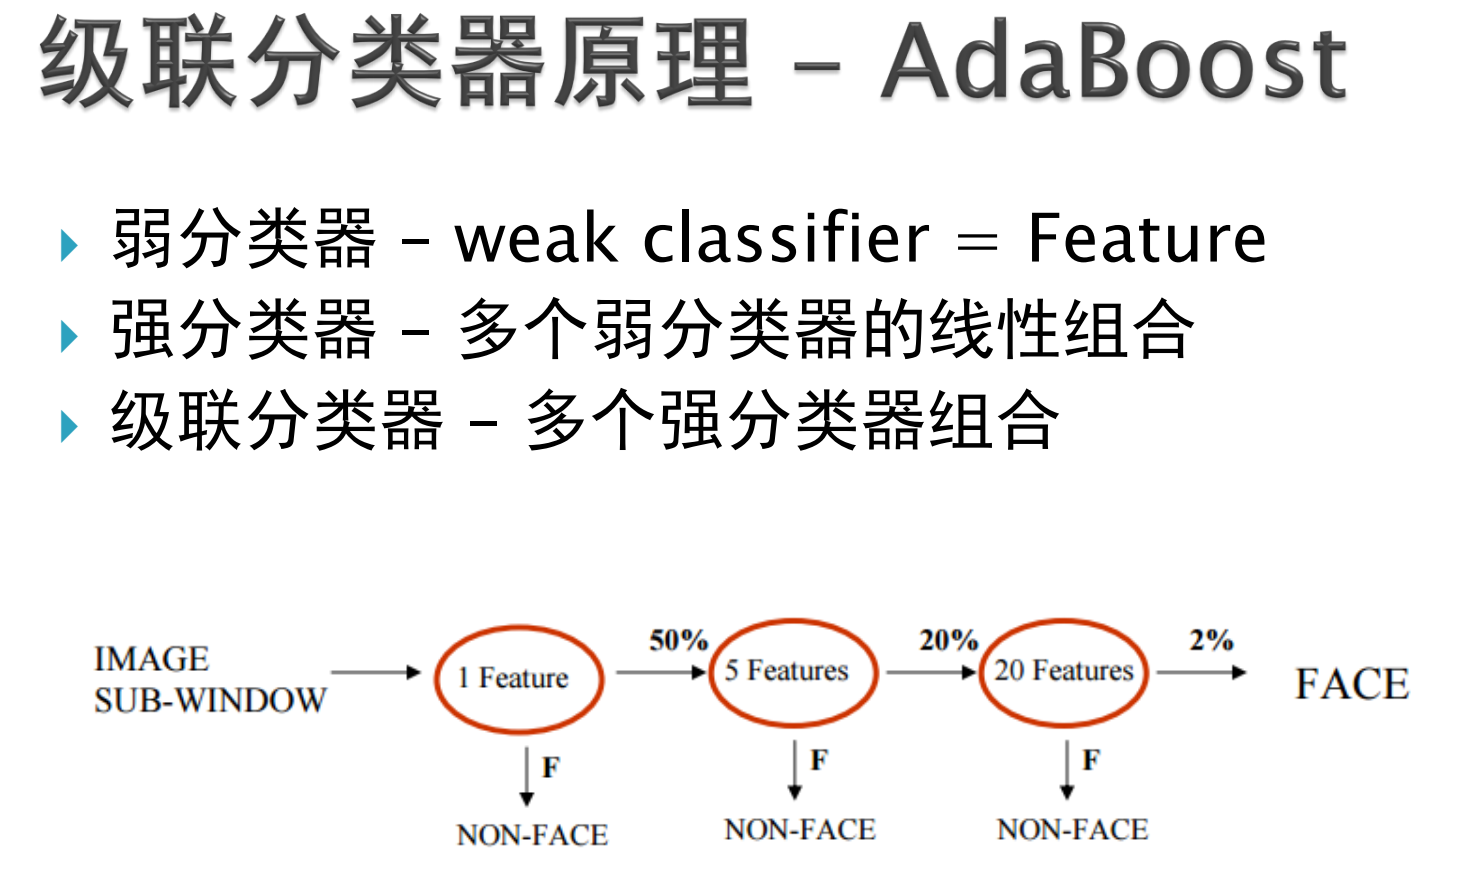

API说明:
1 cv::CascadeClassifier::detectMultiScale(InputArray image,//输入灰度图像
2                                         CV_OUT std::vector<Rect>& objects,//返回目标的外接矩形
3                                         double scaleFactor = 1.1,//检测的尺度跳变量,这个值越大,某些尺寸的对象无法被检测,但检测更快
4                                         int minNeighbors = 3,//有多少个重叠的检测标记才被认为有小
5                                         int flags = 0,  //新版本中没用
6                                         Size minSize = Size(),//目标的最小尺寸
7                                         Size maxSize = Size()//目标的最大尺寸,可以排除尺寸不合理的对象
8 );
利用opencv自带的数据进行人脸检测:
 1 #include <opencv2/opencv.hpp>
 2 #include <iostream>
 3
 4 using namespace cv;
 5 using namespace std;
 6
 7 String fileName = "D:/opencv3.1/opencv/build/etc/haarcascades/haarcascade_frontalface_alt.xml";//设置文件路径
 8 CascadeClassifier face_classifier;//创建分类器
 9
10 int main(int argc, char** argv) {
11     if (!face_classifier.load(fileName)) {//加载分类数据
12         printf("could not load face feature data...
");
13         return -1;
14     }
15
16     Mat src = imread("D:/vcprojects/images/test.png");
17     if (src.empty()) {
18         printf("could not load image...
");
19         return -1;
20     }
21     imshow("input image", src);
22     Mat gray;
23     cvtColor(src, gray, COLOR_BGR2GRAY);//转成灰度图
24     equalizeHist(gray, gray);//直方图均衡化,提高对比度
25
26     vector<Rect> faces;
27     face_classifier.detectMultiScale(gray, faces, 1.2, 3, 0, Size(24, 24));//在多尺度上检测
28     for (size_t t = 0; t < faces.size(); t++) {
29         rectangle(src, faces[static_cast<int>(t)], Scalar(0, 0, 255), 2, 8, 0);
30     }
31
32     imshow("detect faces", src);
33     waitKey(0);
34     return 0;
35 }
进阶:人眼检测
 1 #include<opencv2/opencv.hpp>
 2 #include<iostream>
 3
 4 using namespace cv;
 5 using namespace std;
 6
 7 CascadeClassifier face_cascader;
 8 CascadeClassifier eye_cascader;
 9 String facefile = "D:/opencv3.1/opencv/build/etc/haarcascades/haarcascade_frontalface_alt.xml";
10 String eyefile = "D:/opencv3.1/opencv/build/etc/haarcascades/haarcascade_eye.xml";
11
12 int main(int argc, char** argv) {
13     if (!face_cascader.load(facefile)) {
14         printf("could not load face feature data...
");
15         return -1;
16     }
17     if (!eye_cascader.load(eyefile)) {
18         printf("could not load eye feature data...
");
19         return -1;
20     }
21     namedWindow("camera-demo", CV_WINDOW_AUTOSIZE);
22     VideoCapture capture(0);
23     Mat frame;
24     Mat gray;
25     vector<Rect> faces;
26     vector<Rect> eyes;
27     while (capture.read(frame)) {
28         cvtColor(frame, gray, COLOR_BGR2GRAY);
29         equalizeHist(gray, gray);
30         face_cascader.detectMultiScale(gray, faces, 1.2, 3, 0, Size(30, 30));
31
32         //眼睛一定在人脸范围内,通过截取ROI,缩小检测范围提高检测的准确度和速度
33         for (size_t t = 0; t < faces.size(); t++) {
34             Rect roi;
35             roi.x = faces[static_cast<int>(t)].x;
36             roi.y = faces[static_cast<int>(t)].y;
37             roi.width = faces[static_cast<int>(t)].width;
38             roi.height = faces[static_cast<int>(t)].height / 2;
39             Mat faceROI = frame(roi);//截取眼睛ROI,在脸的上半部分
40             eye_cascader.detectMultiScale(faceROI, eyes, 1.2, 3, 0, Size(20, 20));
41             for (size_t k = 0; k < eyes.size(); k++) {
42                 Rect rect;
43                 rect.x = faces[static_cast<int>(t)].x + eyes[k].x;
44                 rect.y = faces[static_cast<int>(t)].y + eyes[k].y;
45                 rect.width = eyes[k].width;
46                 rect.height = eyes[k].height;
47                 rectangle(frame, rect, Scalar(0, 255, 0), 2, 8, 0);//坐标变换得到眼睛真正的坐标
48             }
49             rectangle(frame, faces[static_cast<int>(t)], Scalar(0, 0, 255), 2, 8, 0);
50         }
51         imshow("camera-demo", frame);
52         char c = waitKey(30);
53         if (c == 27) {
54             break;
55         }
56     }
57     waitKey(0);
58     return 0;
59 }
级联分类器+模板匹配提高检测的稳定性,实现眼睛的追踪:
  1 #include <opencv2/opencv.hpp>
  2 #include <iostream>
  3
  4 using namespace cv;
  5 using namespace std;
  6
  7 String facefile = "D:/opencv3.1/opencv/build/etc/haarcascades/haarcascade_frontalface_alt.xml";//人脸数据
  8 String lefteyefile = "D:/opencv3.1/opencv/build/etc/haarcascades/haarcascade_eye.xml";//左眼数据
  9 String righteyefile = "D:/opencv3.1/opencv/build/etc/haarcascades/haarcascade_eye.xml";//右眼数据
 10 CascadeClassifier face_detector;
 11 CascadeClassifier leftyeye_detector;
 12 CascadeClassifier righteye_detector;
 13
 14 Rect leftEye, rightEye;
 15 //Mat&  im:ROI区域的图片
 16 //Mat& tpl:模板图片
 17 //Rect& rect:输入原来目标的外接矩形,返回目标的新外接矩形
 18 void trackEye(Mat&  im, Mat& tpl, Rect& rect) {
 19     Mat result;
 20     int result_cols = im.cols - tpl.cols + 1;
 21     int result_rows = im.rows - tpl.rows + 1;
 22
 23     // 模板匹配
 24     result.create(result_rows, result_cols, CV_32FC1);
 25     matchTemplate(im, tpl, result, TM_CCORR_NORMED);
 26
 27     // 寻找位置
 28     double minval, maxval;
 29     Point minloc, maxloc;
 30     minMaxLoc(result, &minval, &maxval, &minloc, &maxloc);
 31     if (maxval > 0.75) {
 32         rect.x = rect.x + maxloc.x;//从ROI中的坐标变换为原图的坐标
 33         rect.y = rect.y + maxloc.y;
 34     }
 35     else {
 36         rect.x = rect.y = rect.width = rect.height = 0;
 37     }
 38 }
 39
 40 int main(int argc, char** argv) {
 41     //加载特征数据
 42     if (!face_detector.load(facefile)) {
 43         printf("could not load data file...
");
 44         return -1;
 45     }
 46     if (!leftyeye_detector.load(lefteyefile)) {
 47         printf("could not load data file...
");
 48         return -1;
 49     }
 50     if (!righteye_detector.load(righteyefile)) {
 51         printf("could not load data file...
");
 52         return -1;
 53     }
 54
 55     Mat frame;
 56     VideoCapture capture(0);
 57     namedWindow("demo-win", CV_WINDOW_AUTOSIZE);
 58
 59     Mat gray;
 60     vector<Rect> faces;
 61     vector<Rect> eyes;
 62     Mat lefttpl, righttpl; // 模板
 63     while (capture.read(frame)) {
 64         flip(frame, frame, 1);
 65         cvtColor(frame, gray, COLOR_BGR2GRAY);
 66         equalizeHist(gray, gray);
 67         face_detector.detectMultiScale(gray, faces, 1.1, 3, 0, Size(30, 30));//检测人脸
 68         for (size_t t = 0; t < faces.size(); t++) {
 69             rectangle(frame, faces[t], Scalar(255, 0, 0), 2, 8, 0);
 70
 71             // 计算 offset ROI
 72             int offsety = faces[t].height / 4;
 73             int offsetx = faces[t].width / 8;
 74             int eyeheight = faces[t].height / 2 - offsety;
 75             int eyewidth = faces[t].width / 2 - offsetx;
 76
 77             // 截取左眼区域
 78             Rect leftRect;
 79             leftRect.x = faces[t].x + offsetx;
 80             leftRect.y = faces[t].y + offsety;
 81             leftRect.width = eyewidth;
 82             leftRect.height = eyeheight;
 83             Mat leftRoi = gray(leftRect);
 84
 85             // 检测左眼
 86             leftyeye_detector.detectMultiScale(leftRoi, eyes, 1.1, 1, 0, Size(20, 20));
 87             if (lefttpl.empty()) {
 88                 if (eyes.size()) {
 89                     leftRect = eyes[0] + Point(leftRect.x, leftRect.y);
 90                     lefttpl = gray(leftRect);
 91                     rectangle(frame, leftRect, Scalar(0, 0, 255), 2, 8, 0);
 92                 }
 93             }
 94             else {
 95                 // 跟踪, 基于模板匹配
 96                 leftEye.x = leftRect.x;
 97                 leftEye.y = leftRect.y;
 98                 trackEye(leftRoi, lefttpl, leftEye);
 99                 if (leftEye.x > 0 && leftEye.y > 0) {
100                     leftEye.width = lefttpl.cols;
101                     leftEye.height = lefttpl.rows;
102                     rectangle(frame, leftEye, Scalar(0, 0, 255), 2, 8, 0);
103                 }
104             }
105
106             // 截取右眼区域
107             Rect rightRect;
108             rightRect.x = faces[t].x + faces[t].width / 2;
109             rightRect.y = faces[t].y + offsety;
110             rightRect.width = eyewidth;
111             rightRect.height = eyeheight;
112             Mat rightRoi = gray(rightRect);
113
114             // 检测右眼
115             righteye_detector.detectMultiScale(rightRoi, eyes, 1.1, 1, 0, Size(20, 20));
116             if (righttpl.empty()) {
117                 if (eyes.size()) {
118                     rightRect = eyes[0] + Point(rightRect.x, rightRect.y);
119                     righttpl = gray(rightRect);
120                     rectangle(frame, rightRect, Scalar(0, 255, 255), 2, 8, 0);
121                 }
122             }
123             else {
124                 // 跟踪, 基于模板匹配
125                 rightEye.x = rightRect.x;
126                 rightEye.y = rightRect.y;
127                 trackEye(rightRoi, righttpl, rightEye);
128                 if (rightEye.x > 0 && rightEye.y > 0) {
129                     rightEye.width = righttpl.cols;
130                     rightEye.height = righttpl.rows;
131                     rectangle(frame, rightEye, Scalar(0, 255, 255), 2, 8, 0);
132                 }
133             }
134         }
135         imshow("demo-win", frame);
136         char c = waitKey(100);
137         if (c == 27) { // ESC
138             break;
139         }
140     }
141
142     // release resource
143     capture.release();
144     waitKey(0);
145     return 0;
146 }
自定义级联分类器的训练和使用:待续
命令行参数:
-
-vec <vec_file_name>
输出文件,内含用于训练的正样本。
-
-img <image_file_name>
输入图像文件名(例如一个公司的标志)。
-
-bg <background_file_name>
背景图像的描述文件,文件中包含一系列的图像文件名,这些图像将被随机选作物体的背景。
-
-num <number_of_samples>
生成的正样本的数目。
-
-bgcolor <background_color>
背景颜色(目前为灰度图);背景颜色表示透明颜色。因为图像压缩可造成颜色偏差,颜色的容差可以由 -bgthresh 指定。所有处于 bgcolor-bgthresh 和 bgcolor+bgthresh 之间的像素都被设置为透明像素。
-
-bgthresh <background_color_threshold>
-
-inv
如果指定该标志,前景图像的颜色将翻转。
-
-randinv
如果指定该标志,颜色将随机地翻转。
-
-maxidev <max_intensity_deviation>
前景样本里像素的亮度梯度的最大值。
-
-maxxangle <max_x_rotation_angle>
X轴最大旋转角度,必须以弧度为单位。
-
-maxyangle <max_y_rotation_angle>
Y轴最大旋转角度,必须以弧度为单位。
-
-maxzangle <max_z_rotation_angle>
Z轴最大旋转角度,必须以弧度为单位。
-
-show
很有用的调试选项。如果指定该选项,每个样本都将被显示。如果按下 Esc 键,程序将继续创建样本但不再显示。
-
-w <sample_width>
输出样本的宽度(以像素为单位)。
-
-h <sample_height>
输出样本的高度(以像素为单位)。