Grunt是一个前端自动化工具,基于Node.js,可以实现自动前端代码维护,包括htmlhint,sass,jshint等工具方法的自动化实现。
安装:
首先安装Node。
其次安装npm。
下载npm源码
https://github.com/isaacs/npm/zipball/v1.0.104
执行:
D:>cd npmjs
D:
pmjs>node cli.js install -gf
再次,安装grunt-cli。
npm install -g grunt-cli
最后,配置grunt。
1.创建package.json
{
"name": "grunt-test",
"version": "0.1.0",
"author": "yinqiao",
"devDependencies": {
"grunt": "~0.4.1",
"grunt-contrib-jshint": "~0.6.3",
"grunt-contrib-watch": "~0.5.3",
"grunt-contrib-compass": "~0.6.0",
"grunt-browser-sync": "~0.3.0",
"grunt-contrib-sass": "~0.5.1",
"grunt-contrib-uglify": "~0.2.7",
"uglify-js": "~2.4.7",
"htmlhint": "~0.9.3"
}
}
2.创建gruntfile.js
module.exports = function(grunt){
grunt.initConfig({
//JSHint (http://www.jshint.com/docs)
jshint: {
all: {
src: 'assets/js/*.js',
options: {
bitwise: true,
camelcase: true,
curly: true,
eqeqeq: true,
forin: true,
immed: true,
indent: 4,
latedef: true,
newcap: true,
noarg: true,
noempty: true,
nonew: true,
quotmark: 'single',
regexp: true,
undef: true,
unused: true,
trailing: true,
maxlen: 120
}
}
},
//Uglify
uglify: {
all: {
files: {
'public/javascripts/all.min.js':'assets/js/*.js'
}
}
},
//Sass
sass: {
options: {
style: 'compressed',
precision: 5
},
all: {
files: {
'public/stylesheets/style.css':'assets/sass/style.scss'
}
}
},
//Htmlhint
htmlhint: {
build: {
options: {
'tag-pair':true,
'tagname-lowercase':true,
'attr-lowercase':true,
'attr-value-double-quotes':true,
'doctype-first':true,
'spec-char-escape':true,
'id-unique':true,
'head-script-disabled':true,
'style-disabled':true
},
src:['index.html']
}
},
//watch
watch: {
javascript: {
files: 'assets/js/*.js',
tasks: ['jshint','uglify']
},
sass: {
files: 'assets/sass/*.scss',
tasks: 'sass'
},
html: {
files:['index.html'],
tasks:['htmlhint']
}
}
});
grunt.loadNpmTasks('grunt-contrib-jshint');
grunt.loadNpmTasks('grunt-contrib-watch');
grunt.loadNpmTasks('grunt-contrib-uglify');
grunt.loadNpmTasks('grunt-contrib-sass');
grunt.loadNpmTasks('grunt-htmlhint');
};
3.创建index.js。创建资源目录assets。该目录下可有js、sass等文件夹,分别把不同的资源文件放置在相应的目录下。
4.运行grunt。
grunt watch
grunt jshint
grunt htmlhint
grunt sass
5.在运行的过程中,如遇到Warning: Task "uglify" not found. Use --fouce to continue.
即是没有安装uglify安装,通过命令进行安装:npm install uglify-js --save-dev。
使用--save-dev参数,安装该模块完成后会自动将该模块添加到package.json模块依赖关系中。
遇到其他模块没有完成安装的解决方法类似。

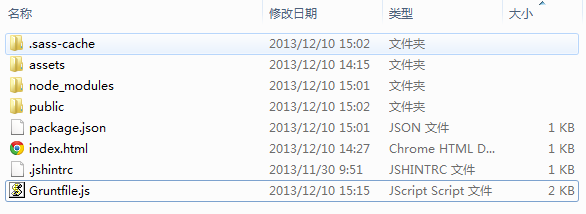
我的工程目录结构如下图所示:

modules
