一、前言
根据前面一章的内容,继续第三章的学习。
二、正文
一起绘制三个点,这里要使用到缓存了
 var n = initVertexBuffers(gl);  //返回绘制点的个数 n
  if (n < 0) {
    console.log('Failed to set the positions of the vertices');
    return;
  }

  gl.clearColor(0, 0, 0, 1);
  gl.clear(gl.COLOR_BUFFER_BIT);
  gl.drawArrays(gl.POINTS, 0, n); //(mode,first,count)
function initVertexBuffers(gl) {
  var vertices = new Float32Array([
    0.0, 0.5,
   -0.5, -0.5,
    0.5, -0.5
  ]);
  var n = 3; // 顶点个数

  // Step1:创建缓冲区对象
  var vertexBuffer = gl.createBuffer();
  if (!vertexBuffer) {
    console.log('Failed to create the buffer object');
    return -1;
  }


  // Step2:绑定缓冲区对象(Buffer类型,Buffer对象)
  // gl.ARRAY_BUFFER 缓存区对象包含了顶点的数据
  // gl.ELEMENT_ARRAY_BUFFER 缓存区对象包含了顶点的索引值
  gl.bindBuffer(gl.ARRAY_BUFFER, vertexBuffer);


  // Step3: 向缓冲区对象写入数据(Buffer类型,顶点数据,写入标识符)
  // gl.STATIC_DRAW  STATIC意味着一次修改,多次使用
  // gl.STREAM_DRAW  STREAM意味着一次修改,一次使用,因为每个数据帧都不同
  // gl.DYNAMIC_DRAW DYNAMIC意味着多次修改,多次使用
  // DRAW 意味着数据会被送往GPU进行绘制
  gl.bufferData(gl.ARRAY_BUFFER, vertices, gl.STATIC_DRAW);
  var a_Position = gl.getAttribLocation(gl.program, 'a_Position');
  if (a_Position < 0)
  {
    console.log('Failed to get the storage location of a_Position');
    return -1;
  }


  // Step4: 将缓冲区对象分配给a_Position变量(location,size,type,normalized,stride,offset)
  // location: 变量的存储位置
  // size: 提供的顶点参数的个数
  // type: 数据格式类型
  // normalized: 是否归一化
  // stride: 相邻两个顶点间的字节数
  // offset:偏移值
  gl.vertexAttribPointer(a_Position, 2, gl.FLOAT, false, 0, 0);

  // Step5: 开启a_Position变量
  gl.enableVertexAttribArray(a_Position); return n; }
gl.drawArrays(mode,first,count)中mode分为以下几种:
- gl.POINTS-> v0,v1,v2,......
- gl.LINKS-> (v0,v1) 、(v2,v3) 、(v4,v5) ... ...
- gl.LINE_STRIP -> (v0,v1) 、(v1,v2) 、(v2,v3) ... ...
- gl.TRIANGLES-> (v0,v1,v2) 、(v3,v4,v5) 、(v6,v7,v8) ... ...
- gl.TRIANGLES_STRIP-> (v0,v1,v2) 、(v1,v2,v3) 、(v2,v3,v4) ... ...
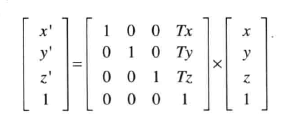
平移矩阵:
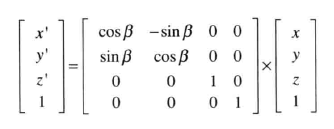
旋转矩阵:
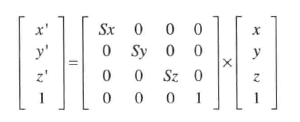
缩放矩阵:
var xformMatrix = new Float32Array([
     cosB, sinB, 0.0, 0.0,
    -sinB, cosB, 0.0, 0.0,
      0.0,  0.0, 1.0, 0.0,
      0.0,  0.0, 0.0, 1.0
  ]);

  var u_xformMatrix = gl.getUniformLocation(gl.program, 'u_xformMatrix');
  if (!u_xformMatrix) {
    console.log('Failed to get the storage location of u_xformMatrix');
    return;
  }

 // 用于uniform变量,将矩阵数据传给uniform矩阵变量的存储位置,
 // uniformMatrix4fv(location,transpose,array)其中transpose必须为false
 gl.uniformMatrix4fv(u_xformMatrix, false, xformMatrix);
三、结尾
以上代码除部分注释外均来自于《WEBGL编程指南》,周日希望能更新个第4章的读书笔记。