前言
web.xml中标签的加载顺序:
<context-param>><listener> (spring的相关工作)>filter>servlet(springmvc的相关工作)
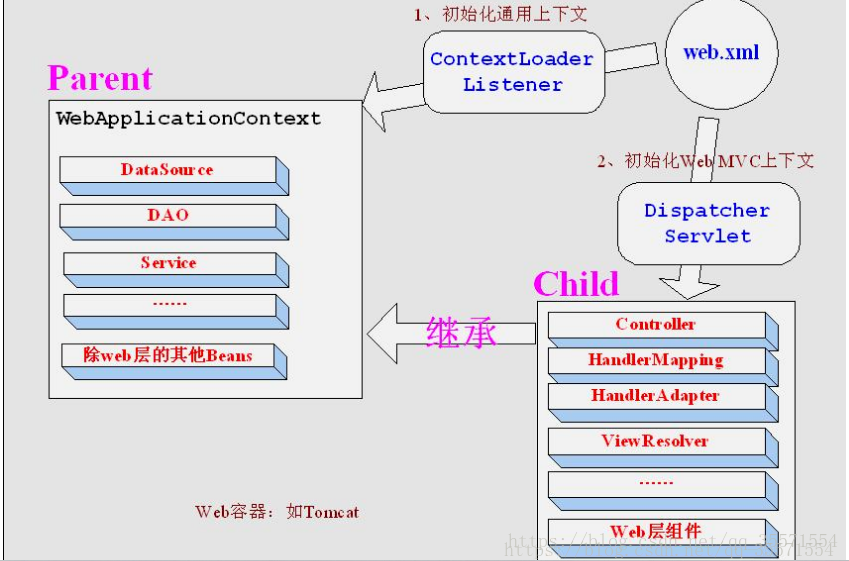
web.xml中spring的核心ContextLoaderListener初始化的上下文和springmvc的核心DispatcherServlet初始化的上下文关系
ContextLoaderListener初始化的上下文加载的Bean是对于整个应用程序共享的 :一般如DAO层、Service层Bean;DispatcherServlet初始化的上下文加载的Bean是只对Spring Web MVC有效的Bean,如Controller,该初始化上下文应该只加载Web相关组件。
javaEE项目启动过程:首先加载Spring上下文环境配置文件,然后加载SpringMVC配置文件。
spring和springMVC整合后,可以取消掉web.xml中spring的listener配置
contextLoaderListener创建的上下文context默认配置就是applicationContext.xml,而DispatchServlet创建的context默认配置是spring-servlet.xml。
contextLoaderListener先创建上下文–app上下文,后者DipatcherServlet将前者的上下文作为父亲上下文进行继承然后再创建自己的上下文–mvc上下文,当一个bean在mvc上下文中无法获取就会溯源到父上下文–app上下文获取。
因为同时有父子上下文,所以假如两个配置中都配置了同样的bean或者contextLoaderListener和DispatcherServlet中都使用同一个配置,那么就会产生初始化两次的囧况。
- 如果只有 Spring mvc 的一个 Servlet,listener 可以不用。
- 但是如果用了Shiro 等,Shiro 用到的 Spring 的配置必须在 listener 里加载。
- 一般 Dao, Service 的 Spring 配置都会在 listener 里加载,因为可能会在多个 Servlet 里用到,因为父子 Context 的可见性问题,防止重复加载所以在 listener 里加载。
配置详情
<web-app xmlns="http://xmlns.jcp.org/xml/ns/javaee"
         xmlns:xsi="http://www.w3.org/2001/XMLSchema-instance"
         xsi:schemaLocation="http://xmlns.jcp.org/xml/ns/javaee
                             http://xmlns.jcp.org/xml/ns/javaee/web-app_3_1.xsd"
         version="3.1" metadata-complete="true">

    <!--默认欢迎页-->
    <welcome-file-list>
        <welcome-file>index.jsp</welcome-file>
    </welcome-file-list>


    <!-- 启动Spring容器,声明应用范围(整个WEB项目)内的上下文初始化参数 -->
    <context-param>
        <param-name>contextConfigLocation</param-name>
        <!--如果没有显式声明,则 系统默认 在WEB-INF/applicationContext.xml -->
        <param-value>classpath:spring/applicationContext.xml</param-value>
    </context-param>
    <!--ContextLoaderListener的作用:为项目提供了spring支持,初始化了Ioc容器。
        就是启动Web容器时,读取在contextConfigLocation中定义的xml文件,
        自动装配ApplicationContext的配置信息,并产生WebApplicationContext对象,然后将这个对象放置在ServletContext的属性里-->
    <listener>
        <listener-class>org.springframework.web.context.ContextLoaderListener</listener-class>
    </listener>


    <!-- 配置spring字符编码为utf-8 -->
    <filter>
        <filter-name>encodingFilter</filter-name>
        <filter-class>org.springframework.web.filter.CharacterEncodingFilter</filter-class>
        <init-param>
            <param-name>encoding</param-name>
            <param-value>UTF-8</param-value>
        </init-param>
        <!--参数forceEncoding的作用:
            以前只是对request字符编码起作用,现在如果将forceEncoding设为true也会影响到response中的字符编码-->
        <init-param>
            <param-name>forceEncoding</param-name>
            <param-value>false</param-value>
        </init-param>
    </filter>
    <filter-mapping>
        <filter-name>encodingFilter</filter-name>
        <url-pattern>/*</url-pattern>
    </filter-mapping>


    <!-- 配置DispatcherServlet表示,该工程将采用springmvc的方式 -->
    <servlet>
        <servlet-name>dispatcher</servlet-name>
        <servlet-class>org.springframework.web.servlet.DispatcherServlet</servlet-class>
        <!-- 配置springMVC需要加载的配置文件 -->
        <init-param>
            <param-name>contextConfigLocation</param-name>
            <param-value>classpath:spring/spring-mvc.xml</param-value>
        </init-param>
        <!-- 应用启动时,加载servlet -->
        <load-on-startup>1</load-on-startup>
        <!-- 支持异步处理 -->
        <async-supported>true</async-supported>
    </servlet>
    <servlet-mapping>
        <servlet-name>dispatcher</servlet-name>
        <!-- 默认匹配所有的请求 -->
        <url-pattern>/</url-pattern>
        <!-- 拦截Action -->
        <!--<url-pattern>*.do</url-pattern>-->
    </servlet-mapping>


    <!-- session 时间 -->
    <session-config>
        <session-timeout>30</session-timeout>
    </session-config>

</web-app>