技巧1. 在写布局文件时,有时不需要给控件指定text值,但是又想知道他的位置是否是自己想要他在的位置。这种情况只有在运行时给他指定text值才能确切地知道它显示的位置。
现在有一种方法可以实现,即利用tools命名空间,在布局文件中给控件指定text值,让我们可以在预览时知道控件的位置,但在真实运行时不显示。
<RelativeLayout xmlns:android="http://schemas.android.com/apk/res/android"
    xmlns:tools="http://schemas.android.com/tools"
    android:layout_width="match_parent"
    android:layout_height="match_parent"
    >

    <TextView
        android:id="@+id/main_tv_ordercount"
        android:layout_width="wrap_content"
        android:layout_height="wrap_content"
        android:paddingBottom="100dp"
        tools:text=" test"/>    //将tools代替android就可以实现该内容只在预览时显示的效果
</RelativeLayout>
技巧2. 加载数据时的进度条动画
之前每次遇到需要用进度条的时候,如果不是产品需要,总是采用android自带的小黑圈来应付,不过看起来还真丑,也有去尝试写个漂亮点的自定义,总是不太满意。
一次偶然的机会看到了github上的这个AVLoadingIndicatorView,简直太漂亮了,并且支持动画达20多种,还可以根据源码开发出自己想要的动画,用法简单,感谢开源,传送门:https://github.com/81813780/AVLoadingIndicatorView
动画效果
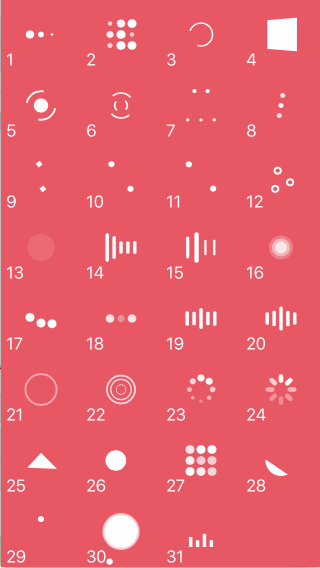
每种动画对应的名字如下:
- BallPulse
- BallGridPulse
- BallClipRotate
- SquareSpin
- BallClipRotatePulse
- BallClipRotateMultiple
- BallPulseRise
- BallRotate
- CubeTransition
- BallZigZag
- BallZigZagDeflect
- BallTrianglePath
- BallScale
- LineScale
- LineScaleParty
- BallScaleMultiple
- BallPulseSync
- BallBeat
- LineScalePulseOut
- LineScalePulseOutRapid
- BallScaleRipple
- BallScaleRippleMultiple
- BallSpinFadeLoader
- LineSpinFadeLoader
- TriangleSkewSpin
- Pacman
- BallGridBeat
- SemiCircleSpin
- BallRotateChase
- Orbit
- AudioEqualizer
使用方法
step 1.AndroidStudio框架引入配置:build.grade配置
dependencies {
       compile 'com.wang.avi:library:1.0.5'
       compile 'com.nineoldandroids:library:2.4.0'
    }
step 2. 布局文件
<com.wang.avi.AVLoadingIndicatorView
        android:id="@+id/avloadingIndicatorView"
        android:layout_width="wrap_content"  //or your custom size
        android:layout_height="wrap_content"  //or your custom size
        android:visibility="visible"  //visible or gone
        app:indicator="BallPulse"    //指明采用哪种动画,动画名字与效果图一一对应
        app:indicator_color="your color"   //颜色指定
        />
step 3. activity中调用
void startAnim(){
        findViewById(R.id.avloadingIndicatorView).setVisibility(View.VISIBLE);
   }

   void stopAnim(){
        findViewById(R.id.avloadingIndicatorView).setVisibility(View.GONE);
   }
上面的几步在github上都有说明,在此只作备忘,其它用法可参考作者上传的demo。