官网指导文档:
http://flume.apache.org/releases/content/1.7.0/FlumeDeveloperGuide.html
http://flume.apache.org/releases/content/1.9.0/FlumeDeveloperGuide.html
4.2.1、案例一:监控端口数据
目标:Flume监控一端Console,另一端Console发送消息,使被监控端实时显示。
分步实现:
1) 创建Flume Agent配置文件flume-telnet.conf
|
# Name the components on this agent a1.sources = r1 a1.sinks = k1 a1.channels = c1 # Describe/configure the source a1.sources.r1.type = netcat a1.sources.r1.bind = localhost a1.sources.r1.port = 44444 # Describe the sink a1.sinks.k1.type = logger # Use a channel which buffers events in memory a1.channels.c1.type = memory a1.channels.c1.capacity = 1000 a1.channels.c1.transactionCapacity = 100 # Bind the source and sink to the channel a1.sources.r1.channels = c1 a1.sinks.k1.channel = c1 |
2) 安装telnet工具
|
$ sudo rpm -ivh xinetd-2.3.14-40.el6.x86_64.rpm $ sudo rpm -ivh telnet-0.17-48.el6.x86_64.rpm $ sudo rpm -ivh telnet-server-0.17-48.el6.x86_64.rpm |
3) 判断44444端口是否被占用
|
$ netstat -tunlp | grep 44444 |
4) 先开启flume先听端口
|
$ bin/flume-ng agent --conf conf/ --name a1 --conf-file job/flume-telnet.conf -Dflume.root.logger==INFO,console |
|
Remark: --config the localtion of config --name the name of agent |
5) 使用telnet工具向本机的44444端口发送内容
|
$ telnet localhost 44444 |
4.2.2、案例二:实时读取本地文件到HDFS
目标:实时监控hive日志,并上传到HDFS中
分步实现:
1) 拷贝Hadoop相关jar到Flume的lib目录下
|
$ cp share/hadoop/common/lib/hadoop-auth-2.5.0-cdh5.3.6.jar ./lib/ $ cp share/hadoop/common/lib/commons-configuration-1.6.jar ./lib/ $ cp share/hadoop/mapreduce1/lib/hadoop-hdfs-2.5.0-cdh5.3.6.jar ./lib/ $ cp share/hadoop/common/hadoop-common-2.5.0-cdh5.3.6.jar ./lib/ $ cp ./share/hadoop/hdfs/lib/htrace-core-3.1.0-incubating.jar ./lib/ $ cp ./share/hadoop/hdfs/lib/commons-io-2.4.jar ./lib/ |
尖叫提示:标红的jar为1.99版本flume必须引用的jar
2) 创建flume-hdfs.conf文件
|
# Name the components on this agent a2.sources = r2 a2.sinks = k2 a2.channels = c2 # Describe/configure the source a2.sources.r2.type = exec a2.sources.r2.command = tail -F /home/admin/modules/apache-hive-1.2.2-bin/hive.log a2.sources.r2.shell = /bin/bash -c # Describe the sink a2.sinks.k2.type = hdfs a2.sinks.k2.hdfs.path = hdfs://linux01:8020/flume/%Y%m%d/%H #上传文件的前缀 a2.sinks.k2.hdfs.filePrefix = logs- #是否按照时间滚动文件夹 a2.sinks.k2.hdfs.round = true #多少时间单位创建一个新的文件夹 a2.sinks.k2.hdfs.roundValue = 1 #重新定义时间单位 a2.sinks.k2.hdfs.roundUnit = hour #是否使用本地时间戳 a2.sinks.k2.hdfs.useLocalTimeStamp = true #积攒多少个Event才flush到HDFS一次 a2.sinks.k2.hdfs.batchSize = 1000 #设置文件类型,可支持压缩 a2.sinks.k2.hdfs.fileType = DataStream #多久生成一个新的文件 a2.sinks.k2.hdfs.rollInterval = 600 #设置每个文件的滚动大小 a2.sinks.k2.hdfs.rollSize = 134217700 #文件的滚动与Event数量无关 a2.sinks.k2.hdfs.rollCount = 0 #最小冗余数 a2.sinks.k2.hdfs.minBlockReplicas = 1 # Use a channel which buffers events in memory a2.channels.c2.type = memory a2.channels.c2.capacity = 1000 a2.channels.c2.transactionCapacity = 100 # Bind the source and sink to the channel a2.sources.r2.channels = c2 a2.sinks.k2.channel = c2 |
3) 执行监控配置
|
$ bin/flume-ng agent --conf conf/ --name a2 --conf-file job/flume-hdfs.conf |
4.2.3、案例三:实时读取目录文件到HDFS
目标:使用flume监听整个目录的文件
分步实现:
1) 创建配置文件flume-dir.conf
|
a3.sources = r3 a3.sinks = k3 a3.channels = c3 # Describe/configure the source a3.sources.r3.type = spooldir a3.sources.r3.spoolDir = /home/admin/modules/apache-flume-1.7.0-bin/upload a3.sources.r3.fileSuffix = .COMPLETED a3.sources.r3.fileHeader = true #忽略所有以.tmp结尾的文件,不上传 a3.sources.r3.ignorePattern = ([^ ]*.tmp) # Describe the sink a3.sinks.k3.type = hdfs a3.sinks.k3.hdfs.path = hdfs://linux01:8020/flume/upload/%Y%m%d/%H #上传文件的前缀 a3.sinks.k3.hdfs.filePrefix = upload- #是否按照时间滚动文件夹 a3.sinks.k3.hdfs.round = true #多少时间单位创建一个新的文件夹 a3.sinks.k3.hdfs.roundValue = 1 #重新定义时间单位 a3.sinks.k3.hdfs.roundUnit = hour #是否使用本地时间戳 a3.sinks.k3.hdfs.useLocalTimeStamp = true #积攒多少个Event才flush到HDFS一次 a3.sinks.k3.hdfs.batchSize = 100 #设置文件类型,可支持压缩 a3.sinks.k3.hdfs.fileType = DataStream #多久生成一个新的文件 a3.sinks.k3.hdfs.rollInterval = 600 #设置每个文件的滚动大小大概是128M a3.sinks.k3.hdfs.rollSize = 134217700 #文件的滚动与Event数量无关 a3.sinks.k3.hdfs.rollCount = 0 #最小冗余数 a3.sinks.k3.hdfs.minBlockReplicas = 1 # Use a channel which buffers events in memory a3.channels.c3.type = memory a3.channels.c3.capacity = 1000 a3.channels.c3.transactionCapacity = 100 # Bind the source and sink to the channel a3.sources.r3.channels = c3 a3.sinks.k3.channel = c3 |
2) 执行测试:执行如下脚本后,请向upload文件夹中添加文件试试
|
$ bin/flume-ng agent --conf conf/ --name a3 --conf-file job/flume-dir.conf |
尖叫提示: 在使用Spooling Directory Source时
1) 不要在监控目录中创建并持续修改文件
2) 上传完成的文件会以.COMPLETED结尾
3) 被监控文件夹每600毫秒扫描一次文件变动
4.2.4、案例四:Flume与Flume之间数据传递:单Flume多Channel、Sink,
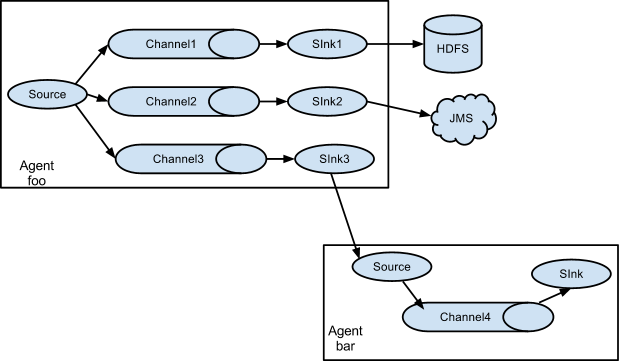
目标:使用flume-1监控文件变动,flume-1将变动内容传递给flume-2,flume-2负责存储到HDFS。同时flume-1将变动内容传递给flume-3,flume-3负责输出到。
local filesystem。
分步实现:
1) 创建flume-1.conf,用于监控hive.log文件的变动,同时产生两个channel和两个sink分别输送给flume-2和flume3:
|
# Name the components on this agent a1.sources = r1 a1.sinks = k1 k2 a1.channels = c1 c2 # 将数据流复制给多个channel a1.sources.r1.selector.type = replicating # Describe/configure the source a1.sources.r1.type = exec a1.sources.r1.command = tail -F /home/admin/modules/apache-hive-1.2.2-bin/hive.log a1.sources.r1.shell = /bin/bash -c # Describe the sink a1.sinks.k1.type = avro a1.sinks.k1.hostname = linux01 a1.sinks.k1.port = 4141 a1.sinks.k2.type = avro a1.sinks.k2.hostname = linux01 a1.sinks.k2.port = 4142 # Describe the channel a1.channels.c1.type = memory a1.channels.c1.capacity = 1000 a1.channels.c1.transactionCapacity = 100 a1.channels.c2.type = memory a1.channels.c2.capacity = 1000 a1.channels.c2.transactionCapacity = 100 # Bind the source and sink to the channel a1.sources.r1.channels = c1 c2 a1.sinks.k1.channel = c1 a1.sinks.k2.channel = c2 |
2) 创建flume-2.conf,用于接收flume-1的event,同时产生1个channel和1个sink,将数据输送给hdfs:
|
# Name the components on this agent a2.sources = r1 a2.sinks = k1 a2.channels = c1 # Describe/configure the source a2.sources.r1.type = avro a2.sources.r1.bind = linux01 a2.sources.r1.port = 4141 # Describe the sink a2.sinks.k1.type = hdfs a2.sinks.k1.hdfs.path = hdfs://linux01:8020/flume2/%Y%m%d/%H #上传文件的前缀 a2.sinks.k1.hdfs.filePrefix = flume2- #是否按照时间滚动文件夹 a2.sinks.k1.hdfs.round = true #多少时间单位创建一个新的文件夹 a2.sinks.k1.hdfs.roundValue = 1 #重新定义时间单位 a2.sinks.k1.hdfs.roundUnit = hour #是否使用本地时间戳 a2.sinks.k1.hdfs.useLocalTimeStamp = true #积攒多少个Event才flush到HDFS一次 a2.sinks.k1.hdfs.batchSize = 100 #设置文件类型,可支持压缩 a2.sinks.k1.hdfs.fileType = DataStream #多久生成一个新的文件 a2.sinks.k1.hdfs.rollInterval = 600 #设置每个文件的滚动大小大概是128M a2.sinks.k1.hdfs.rollSize = 134217700 #文件的滚动与Event数量无关 a2.sinks.k1.hdfs.rollCount = 0 #最小冗余数 a2.sinks.k1.hdfs.minBlockReplicas = 1 # Describe the channel a2.channels.c1.type = memory a2.channels.c1.capacity = 1000 a2.channels.c1.transactionCapacity = 100 # Bind the source and sink to the channel a2.sources.r1.channels = c1 a2.sinks.k1.channel = c1 |
3) 创建flume-3.conf,用于接收flume-1的event,同时产生1个channel和1个sink,将数据输送给本地目录:
|
# Name the components on this agent a3.sources = r1 a3.sinks = k1 a3.channels = c1 # Describe/configure the source a3.sources.r1.type = avro a3.sources.r1.bind = linux01 a3.sources.r1.port = 4142 # Describe the sink a3.sinks.k1.type = file_roll a3.sinks.k1.sink.directory = /home/admin/Desktop/flume3 # Describe the channel a3.channels.c1.type = memory a3.channels.c1.capacity = 1000 a3.channels.c1.transactionCapacity = 100 # Bind the source and sink to the channel a3.sources.r1.channels = c1 a3.sinks.k1.channel = c1 |
尖叫提示:输出的本地目录必须是已经存在的目录,如果该目录不存在,并不会创建新的目录。
4) 执行测试:分别开启对应flume-job(依次启动flume-3,flume-2,flume-1),同时产生文件变动并观察结果:
|
$ bin/flume-ng agent --conf conf/ --name a3 --conf-file job/group-job1/flume-3.conf $ bin/flume-ng agent --conf conf/ --name a2 --conf-file job/group-job1/flume-2.conf $ bin/flume-ng agent --conf conf/ --name a1 --conf-file job/group-job1/flume-1.conf |
4.2.5、案例五:Flume与Flume之间数据传递,多Flume汇总数据到单Flume
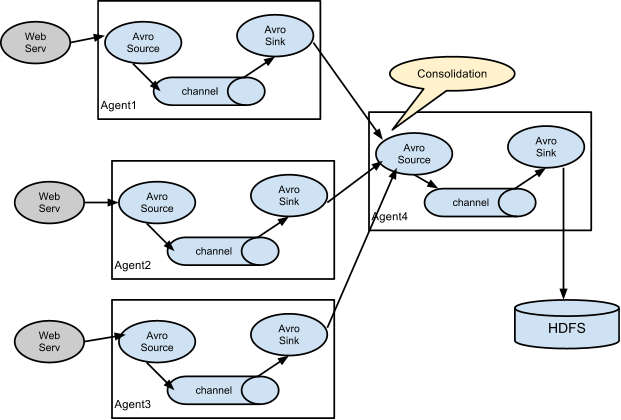
目标:flume-1监控文件hive.log,flume-2监控某一个端口的数据流,flume-1与flume-2将数据发送给flume-3,flume3将最终数据写入到HDFS。
分步实现:
1) 创建flume-1.conf,用于监控hive.log文件,同时sink数据到flume-3:
|
# Name the components on this agent a1.sources = r1 a1.sinks = k1 a1.channels = c1 # Describe/configure the source a1.sources.r1.type = exec a1.sources.r1.command = tail -F /home/admin/modules/apache-hive-1.2.2-bin/hive.log a1.sources.r1.shell = /bin/bash -c # Describe the sink a1.sinks.k1.type = avro a1.sinks.k1.hostname = linux01 a1.sinks.k1.port = 4141 # Describe the channel a1.channels.c1.type = memory a1.channels.c1.capacity = 1000 a1.channels.c1.transactionCapacity = 100 # Bind the source and sink to the channel a1.sources.r1.channels = c1 a1.sinks.k1.channel = c1 |
2) 创建flume-2.conf,用于监控端口44444数据流,同时sink数据到flume-3:
|
# Name the components on this agent a2.sources = r1 a2.sinks = k1 a2.channels = c1 # Describe/configure the source a2.sources.r1.type = netcat a2.sources.r1.bind = linux01 a2.sources.r1.port = 44444 # Describe the sink a2.sinks.k1.type = avro a2.sinks.k1.hostname = linux01 a2.sinks.k1.port = 4141 # Use a channel which buffers events in memory a2.channels.c1.type = memory a2.channels.c1.capacity = 1000 a2.channels.c1.transactionCapacity = 100 # Bind the source and sink to the channel a2.sources.r1.channels = c1 a2.sinks.k1.channel = c1 |
3) 创建flume-3.conf,用于接收flume-1与flume-2发送过来的数据流,最终合并后sink到HDFS:
|
# Name the components on this agent a3.sources = r1 a3.sinks = k1 a3.channels = c1 # Describe/configure the source a3.sources.r1.type = avro a3.sources.r1.bind = linux01 a3.sources.r1.port = 4141 # Describe the sink a3.sinks.k1.type = hdfs a3.sinks.k1.hdfs.path = hdfs://linux01:8020/flume3/%Y%m%d/%H #上传文件的前缀 a3.sinks.k1.hdfs.filePrefix = flume3- #是否按照时间滚动文件夹 a3.sinks.k1.hdfs.round = true #多少时间单位创建一个新的文件夹 a3.sinks.k1.hdfs.roundValue = 1 #重新定义时间单位 a3.sinks.k1.hdfs.roundUnit = hour #是否使用本地时间戳 a3.sinks.k1.hdfs.useLocalTimeStamp = true #积攒多少个Event才flush到HDFS一次 a3.sinks.k1.hdfs.batchSize = 100 #设置文件类型,可支持压缩 a3.sinks.k1.hdfs.fileType = DataStream #多久生成一个新的文件 a3.sinks.k1.hdfs.rollInterval = 600 #设置每个文件的滚动大小大概是128M a3.sinks.k1.hdfs.rollSize = 134217700 #文件的滚动与Event数量无关 a3.sinks.k1.hdfs.rollCount = 0 #最小冗余数 a3.sinks.k1.hdfs.minBlockReplicas = 1 # Describe the channel a3.channels.c1.type = memory a3.channels.c1.capacity = 1000 a3.channels.c1.transactionCapacity = 100 # Bind the source and sink to the channel a3.sources.r1.channels = c1 a3.sinks.k1.channel = c1 |
4) 执行测试:分别开启对应flume-job(依次启动flume-3,flume-2,flume-1),同时产生文件变动并观察结果:
|
$ bin/flume-ng agent --conf conf/ --name a3 --conf-file job/group-job2/flume-3.conf $ bin/flume-ng agent --conf conf/ --name a2 --conf-file job/group-job2/flume-2.conf $ bin/flume-ng agent --conf conf/ --name a1 --conf-file job/group-job2/flume-1.conf |
尖叫提示:测试时记得启动hive产生一些日志,同时使用telnet向44444端口发送内容,如:
|
$ bin/hive $ telnet linux01 44444 |