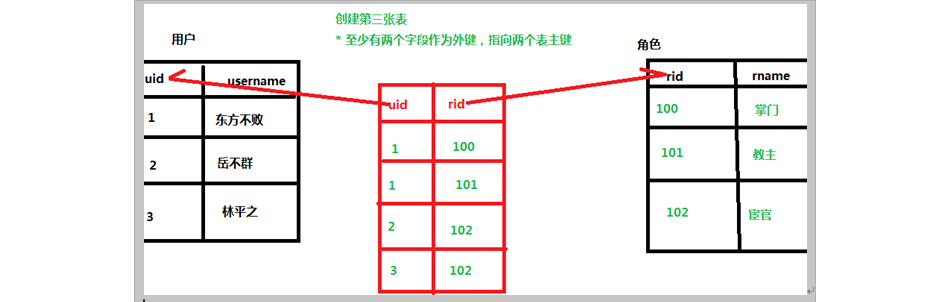
1:Hibernate的一对多操作(重点)
一对多映射配置
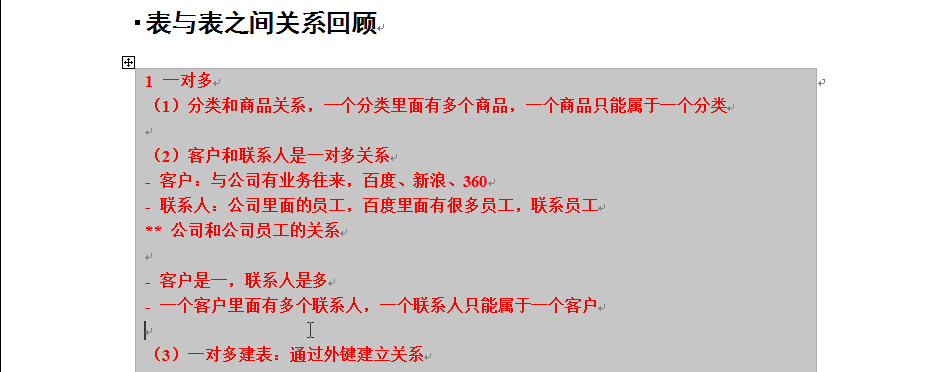
第一步:创建两个实体类:客户和联系人(例)以客户为一,联系人为多:


 1 package com.yinfu.entity;
 2
 3 public class LinkMan {
 4
 5     private Integer lkm_id;
 6     private String lkm_name;
 7     private String lkm_gender;
 8     private String lkm_phone;
 9     public Integer getLkm_id() {
10         return lkm_id;
11     }
12     public void setLkm_id(Integer lkm_id) {
13         this.lkm_id = lkm_id;
14     }
15     public String getLkm_name() {
16         return lkm_name;
17     }
18     public void setLkm_name(String lkm_name) {
19         this.lkm_name = lkm_name;
20     }
21     public String getLkm_gender() {
22         return lkm_gender;
23     }
24     public void setLkm_gender(String lkm_gender) {
25         this.lkm_gender = lkm_gender;
26     }
27     public String getLkm_phone() {
28         return lkm_phone;
29     }
30     public void setLkm_phone(String lkm_phone) {
31         this.lkm_phone = lkm_phone;
32     }
33 }
 1 package com.yinfu.entity;
 2
 3 public class Customer {
 4
 5     private Integer cid;
 6     private String custName;
 7     private String custLevel;
 8     private String custSource;
 9     private String custPhone;
10     private String custMobile;
11     public Integer getCid() {
12         return cid;
13     }
14     public void setCid(Integer cid) {
15         this.cid = cid;
16     }
17     public String getCustName() {
18         return custName;
19     }
20     public void setCustName(String custName) {
21         this.custName = custName;
22     }
23     public String getCustLevel() {
24         return custLevel;
25     }
26     public void setCustLevel(String custLevel) {
27         this.custLevel = custLevel;
28     }
29     public String getCustSource() {
30         return custSource;
31     }
32     public void setCustSource(String custSource) {
33         this.custSource = custSource;
34     }
35     public String getCustPhone() {
36         return custPhone;
37     }
38     public void setCustPhone(String custPhone) {
39         this.custPhone = custPhone;
40     }
41     public String getCustMobile() {
42         return custMobile;
43     }
44     public void setCustMobile(String custMobile) {
45         this.custMobile = custMobile;
46     }
47 }
第二步:让两个实体类之间互相表示
在客户实体类里面表示多个联系人(一个客户里面多个联系人):
 1 package com.yinfu.entity;
 2
 3 import java.util.HashSet;
 4 import java.util.Set;
 5
 6 public class Customer {
 7
 8     private Integer cid;
 9     private String custName;
10     private String custLevel;
11     private String custSource;
12     private String custPhone;
13     private String custMobile;
14
15     //客户中表示多个联系人,一个客户有多个联系人
16     //Hibernate要求使用集合表示多的数据,有set表示(set无序,主要是set可有重复元素)
17     private Set<LinkMan> setLinkMan = new HashSet<LinkMan>();
18
19     public Set<LinkMan> getSetLinkMan() {
20         return setLinkMan;
21     }
22     public void setSetLinkMan(Set<LinkMan> setLinkMan) {
23         this.setLinkMan = setLinkMan;
24     }
25     public Integer getCid() {
26         return cid;
27     }
28     public void setCid(Integer cid) {
29         this.cid = cid;
30     }
31     public String getCustName() {
32         return custName;
33     }
34     public void setCustName(String custName) {
35         this.custName = custName;
36     }
37     public String getCustLevel() {
38         return custLevel;
39     }
40     public void setCustLevel(String custLevel) {
41         this.custLevel = custLevel;
42     }
43     public String getCustSource() {
44         return custSource;
45     }
46     public void setCustSource(String custSource) {
47         this.custSource = custSource;
48     }
49     public String getCustPhone() {
50         return custPhone;
51     }
52     public void setCustPhone(String custPhone) {
53         this.custPhone = custPhone;
54     }
55     public String getCustMobile() {
56         return custMobile;
57     }
58     public void setCustMobile(String custMobile) {
59         this.custMobile = custMobile;
60     }
61 }
联系人实体类里面表示所属客户(一个联系人只能属于一个客户):
 1 package com.yinfu.entity;
 2
 3 public class LinkMan {
 4
 5     private Integer lkm_id;
 6     private String lkm_name;
 7     private String lkm_gender;
 8     private String lkm_phone;
 9
10     //在联系人中表示所属客户,一个联系人对应一个客户
11     private Customer customer;
12
13     public Customer getCustomer() {
14         return customer;
15     }
16     public void setCustomer(Customer customer) {
17         this.customer = customer;
18     }
19     public Integer getLkm_id() {
20         return lkm_id;
21     }
22     public void setLkm_id(Integer lkm_id) {
23         this.lkm_id = lkm_id;
24     }
25     public String getLkm_name() {
26         return lkm_name;
27     }
28     public void setLkm_name(String lkm_name) {
29         this.lkm_name = lkm_name;
30     }
31     public String getLkm_gender() {
32         return lkm_gender;
33     }
34     public void setLkm_gender(String lkm_gender) {
35         this.lkm_gender = lkm_gender;
36     }
37     public String getLkm_phone() {
38         return lkm_phone;
39     }
40     public void setLkm_phone(String lkm_phone) {
41         this.lkm_phone = lkm_phone;
42     }
43 }
第三步:配置映射关系(映射文件)
在映射文件中配置一对多关系
Customer的配置文件:
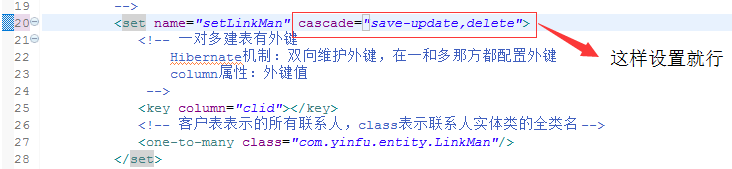
 1 <?xml version="1.0" encoding="UTF-8"?>
 2 <!DOCTYPE hibernate-mapping PUBLIC
 3     "-//Hibernate/Hibernate Mapping DTD 3.0//EN"
 4     "http://www.hibernate.org/dtd/hibernate-mapping-3.0.dtd">
 5 <hibernate-mapping>
 6
 7     <class name="com.yinfu.entity.Customer" table="t_customer">
 8         <id name="cid" column="cid">
 9             <generator class="native"></generator>
10         </id>
11         <property name="custName" column="custName"></property>
12         <property name="custLevel" column="custLevel"></property>
13         <property name="custSource" column="custSource"></property>
14         <property name="custPhone" column="custPhone"></property>
15         <property name="custMobile" column="custMobile"></property>
16         <!-- 客户配置文件中表示所有的联系人
17             set标签表示所有联系人
18             set标签中的name属性:写在客户实体类里面表示所有联系人的set集合名称
19          -->
20          <set name="setLinkMan" cascade="save-update,delete" inverse="true">
21              <!-- 一对多建表有外键
22                  Hibernate机制:双向维护外键,在一和多那方都配置外键
23                  column属性:外键值
24               -->
25              <key column="clid"></key>
26              <!-- 客户表表示的所有联系人,class表示联系人实体类的全类名 -->
27              <one-to-many class="com.yinfu.entity.LinkMan"/>
28          </set>
29     </class>
30
31 </hibernate-mapping>
LinkMan的配置文件:
 1 <?xml version="1.0" encoding="UTF-8"?>
 2 <!DOCTYPE hibernate-mapping PUBLIC
 3     "-//Hibernate/Hibernate Mapping DTD 3.0//EN"
 4     "http://www.hibernate.org/dtd/hibernate-mapping-3.0.dtd">
 5 <hibernate-mapping>
 6
 7     <class name="com.yinfu.entity.LinkMan" table="t_linkman">
 8         <id name="lkm_id" column="lkm_id">
 9             <generator class="native"></generator>
10         </id>
11         <property name="lkm_name" column="lkm_name"></property>
12         <property name="lkm_gender" column="lkm_gender"></property>
13         <property name="lkm_phone" column="lkm_phone"></property>
14         <!-- 表示联系人所属的客户
15             name属性:在联系人实体类中用来表示客户的字段名
16             class属性:客户实体类的全类名
17             column属性:外键名,要与客户映射文件中的外键名相同
18          -->
19         <many-to-one name="customer" class="com.yinfu.entity.Customer" column="clid"></many-to-one>
20     </class>
21
22 </hibernate-mapping>
第四步:创建核心配置文件
 1 <?xml version="1.0" encoding="UTF-8"?>
 2 <!DOCTYPE hibernate-configuration PUBLIC
 3     "-//Hibernate/Hibernate Configuration DTD 3.0//EN"
 4     "http://www.hibernate.org/dtd/hibernate-configuration-3.0.dtd">
 5 <hibernate-configuration>
 6 <!-- 此配置文件的文件名和位置是固定的的
 7     文件名:hibernate.cfg.xml
 8     位置:要写在src文件中
 9  -->
10     <session-factory>
11         <!-- 第一部分:配置数据库信息 -->
12         <property name="hibernate.connection.driver_class">com.mysql.jdbc.Driver</property>
13         <property name="hibernate.connection.url">jdbc:mysql://localhost:3306/test</property>
14         <property name="hibernate.connection.username">root</property>
15         <property name="hibernate.connection.password">song12345</property>
16
17         <!-- 第二部分:配置hibernate信息(可有可无) -->
18         <!-- 输出底层的SQL语句 -->
19         <property name="hibernate.show_sql">true</property>
20         <!-- 对底曾语句进行格式化 -->
21         <property name="hibernate.format_sql">true</property>
22         <!-- hibernate帮创建表,需要配置
23             update:如果有表就更新,没有表就创建
24          -->
25         <property name="hibernate.hbm2ddl.auto">update</property>
26         <!-- 配置数据库的方言
27             识别不同数据库中的特有的语句和关键字
28             比如:分页查询
29                     MySQL关键字是limit
30                     oracle中的使用的是top-n分析中的rownum
31         -->
32         <property name="hibernate.dialect">org.hibernate.dialect.MySQLDialect</property>
33         <!-- 指定线程管理方式,与本地线程进行绑定,实现单线程操作 -->
34         <property name="hibernate.current_session_context_class">thread</property>
35
36         <!-- 第三部分:把映射文件放到核心配置文件中 -->
37         <mapping resource="com/yinfu/entity/Customer.hbm.xml"/>
38         <mapping resource="com/yinfu/entity/LinkMan.hbm.xml"/>
39     </session-factory>
40
41 </hibernate-configuration>
创建工具类生成SessionFactory和session对象
 1 package com.yinfu.utils;
 2
 3 import org.hibernate.Session;
 4 import org.hibernate.SessionFactory;
 5 import org.hibernate.cfg.Configuration;
 6
 7 //工具类
 8 public class HibernateUtils {
 9
10     private final static Configuration cfg;
11     private final static SessionFactory sessionFactory;
12
13     //用静态代码块来实现对象只在类加载的时候创建一次(静态代码块只执行一次)
14     static{
15         //创建configuration对象,
16         cfg = new Configuration();
17         cfg.configure();
18         //根据Configuration对象创建sessionFactory对象
19         sessionFactory = cfg.buildSessionFactory();
20     }
21
22     //返回与本地线程绑定的session
23     public static Session getSession(){
24         return sessionFactory.getCurrentSession();
25     }
26
27     //创建一个方法用于返回sessionFactory对象
28     public static SessionFactory getSessionFactory(){
29         return sessionFactory;
30     }
31
32
33 }
在工具类中直接写一个main方法,内部不写代码,直接执行,生成两个表,而外键是在一对多的多中的表上创建的
(一:级联保存):
复杂的测试类:
 1 package com.yinfu.test;
 2
 3 import java.util.List;
 4
 5 import org.hibernate.SQLQuery;
 6 import org.hibernate.Session;
 7 import org.hibernate.SessionFactory;
 8 import org.hibernate.Transaction;
 9 import org.junit.Test;
10
11 import com.yinfu.entity.Customer;
12 import com.yinfu.entity.LinkMan;
13 import com.yinfu.entity.User;
14 import com.yinfu.utils.HibernateUtils;
15
16 public class HibernateOneToMany {
17
18     //一对多的级联保存
19     @Test
20     public void testAddDemo(){
21         SessionFactory sessionFactory = null;
22         Session session = null;
23         Transaction tx = null;
24         try {
25             sessionFactory = HibernateUtils.getSessionFactory();
26             session = sessionFactory.openSession();
27             tx = session.beginTransaction();
28
29             //添加客户,为这个客户添加一个联系人
30             //1:创建客户和联系人对象
31             Customer customer = new Customer();
32             customer.setCustName("传智播客");
33             customer.setCustLevel("VIP");
34             customer.setCustSource("网络");
35             customer.setCustMobile("110");
36             customer.setCustPhone("911");
37
38             LinkMan linkMan = new LinkMan();
39             linkMan.setLkm_name("张三");
40             linkMan.setLkm_gender("男");
41             linkMan.setLkm_phone("123");;
42
43             //2:客户里面表示所有联系人,联系人里面表示客户
44             //建立客户对象和联系人对象关系
45             //2.1:把联系人对象放到客户对象中的set集合里面
46             customer.getSetLinkMan().add(linkMan);
47             //2.2把客户对象放到联系人中的Customer属性中
48             linkMan.setCustomer(customer);
49
50             //3:保存到数据库
51             session.save(customer);
52             session.save(linkMan);
53
54             tx.commit();
55         } catch (Exception e) {
56             e.printStackTrace();
57             tx.rollback();
58         }finally{
59             session.close();
60             sessionFactory.close();
61         }
62     }
63 }
简化做法:
首先在Customer的配置文件Customer.hbm.xml文件中的set标签上添加一个cascade属性值为save-update:
然后在测试类中这样修改一下就行:

(二:级联删除)
删除客户的同时将客户对应的联系人全部删除
首先在Customer的配置文件Customer.hbm.xml文件中的set标签上添加一个cascade属性值为delete,如果cascade属性有多个值,用英文逗号隔开;
测试代码:根据ID查出customer在调用delete方法就行:

 1 Hibernate:
 2     select
 3         customer0_.cid as cid1_0_0_,
 4         customer0_.custName as custName2_0_0_,
 5         customer0_.custLevel as custLeve3_0_0_,
 6         customer0_.custSource as custSour4_0_0_,
 7         customer0_.custPhone as custPhon5_0_0_,
 8         customer0_.custMobile as custMobi6_0_0_
 9     from
10         t_customer customer0_
11     where
12         customer0_.cid=?
13 Hibernate:
14     select
15         setlinkman0_.clid as clid5_1_0_,
16         setlinkman0_.lkm_id as lkm_id1_1_0_,
17         setlinkman0_.lkm_id as lkm_id1_1_1_,
18         setlinkman0_.lkm_name as lkm_name2_1_1_,
19         setlinkman0_.lkm_gender as lkm_gend3_1_1_,
20         setlinkman0_.lkm_phone as lkm_phon4_1_1_,
21         setlinkman0_.clid as clid5_1_1_
22     from
23         t_linkman setlinkman0_
24     where
25         setlinkman0_.clid=?
26 Hibernate:
27     update
28         t_linkman
29     set
30         clid=null
31     where
32         clid=?
33 Hibernate:
34     delete
35     from
36         t_linkman
37     where
38         lkm_id=?
39 Hibernate:
40     delete
41     from
42         t_customer
43     where
44         cid=?
(一对多修改操作)

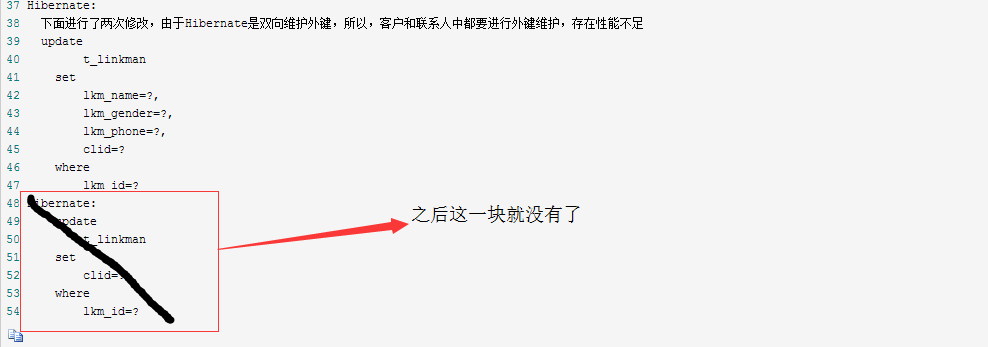
执行结果底层的SQL语句:(这样存在双向维护外键,存在性能不足)
 1 Hibernate:
 2     select
 3         customer0_.cid as cid1_0_0_,
 4         customer0_.custName as custName2_0_0_,
 5         customer0_.custLevel as custLeve3_0_0_,
 6         customer0_.custSource as custSour4_0_0_,
 7         customer0_.custPhone as custPhon5_0_0_,
 8         customer0_.custMobile as custMobi6_0_0_
 9     from
10         t_customer customer0_
11     where
12         customer0_.cid=?
13 Hibernate:
14     select
15         linkman0_.lkm_id as lkm_id1_1_0_,
16         linkman0_.lkm_name as lkm_name2_1_0_,
17         linkman0_.lkm_gender as lkm_gend3_1_0_,
18         linkman0_.lkm_phone as lkm_phon4_1_0_,
19         linkman0_.clid as clid5_1_0_
20     from
21         t_linkman linkman0_
22     where
23         linkman0_.lkm_id=?
24 Hibernate:
25     select
26         setlinkman0_.clid as clid5_1_0_,
27         setlinkman0_.lkm_id as lkm_id1_1_0_,
28         setlinkman0_.lkm_id as lkm_id1_1_1_,
29         setlinkman0_.lkm_name as lkm_name2_1_1_,
30         setlinkman0_.lkm_gender as lkm_gend3_1_1_,
31         setlinkman0_.lkm_phone as lkm_phon4_1_1_,
32         setlinkman0_.clid as clid5_1_1_
33     from
34         t_linkman setlinkman0_
35     where
36         setlinkman0_.clid=?
37 Hibernate:
38   下面进行了两次修改,由于Hibernate是双向维护外键,所以,客户和联系人中都要进行外键维护,存在性能不足
39   update
40         t_linkman
41     set
42         lkm_name=?,
43         lkm_gender=?,
44         lkm_phone=?,
45         clid=?
46     where
47         lkm_id=?
48 Hibernate:
49     update
50         t_linkman
51     set
52         clid=?
53     where
54         lkm_id=?
性能优化,解决方法,在一对多中让一放弃外键维护,即让customer放弃外键维护
具体实现:
在需要放弃外键的对象的映射文件中的set标签中进行配置,添加inverse属性:默认值是false,修改为true,就是放弃外键维护

底层SQL的变化: