好久没画图了,看下这个序列图,还算比较清晰的:
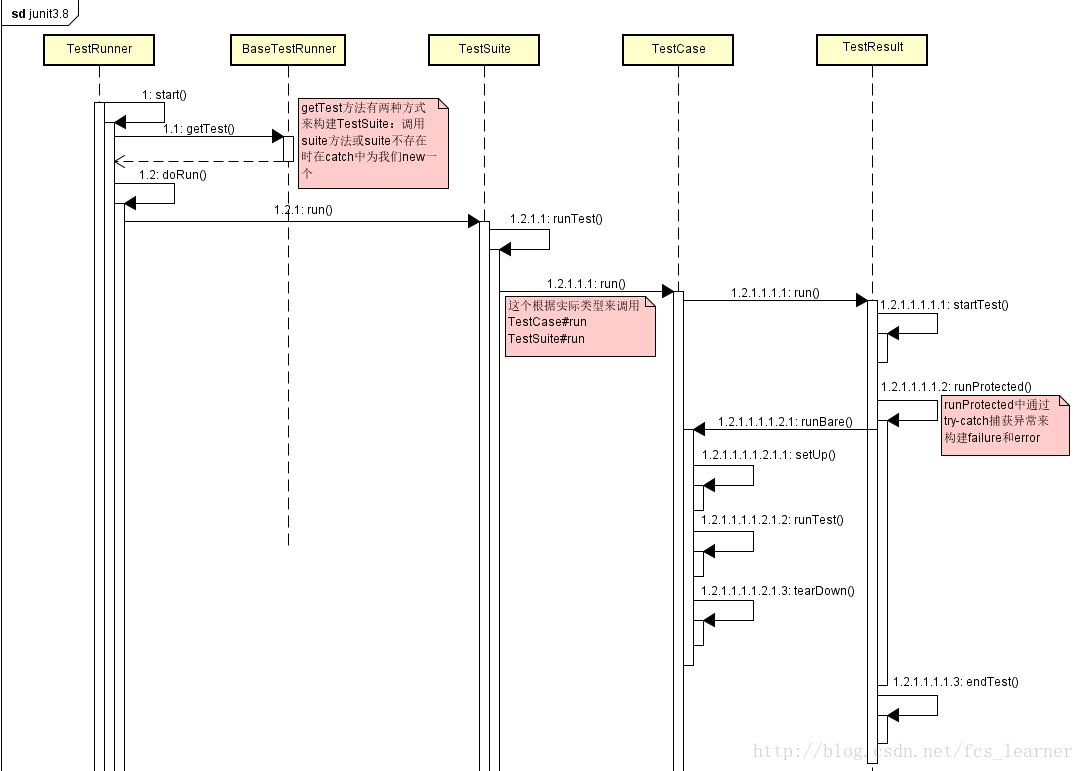
以textui来分析:
Test
顶层接口。TestSuite和TestCase均实现此接口,在具体执行的时候面向此接口编程,弱化类型,实现各自的执行流程。
TestSuite中的run方法:
public void run(TestResult result) {
    for (Enumeration e= tests(); e.hasMoreElements(); ) {
        if (result.shouldStop() )
            break;
        Test test= (Test)e.nextElement();
        runTest(test, result);
    }
}

public void runTest(Test test, TestResult result) {
    test.run(result);
}
如果当前Test是TestSuite类型的,上面的runTest将会继续调用其上的run方法,遍历其维护的Test集合,如果遍历的是TestCase,将走常规路线,否则依旧。
这样就相当于由树到叶的过程,最终的run在叶节点。
TestRunner
测试运行类。
启动测试用例
通过调用BaseTestRunner的getTest方法来获取TestSuite。
TestSuite
测试集合类
构建用户自定义的测试集合。将一组方法整合在一起来测试,自定义组合。如果用户不定义suite方法来创建Testsuite,框架默认生成一个,包含所有的测试方法(TestCase)。
Method suiteMethod= null;
try {
    suiteMethod= testClass.getMethod(SUITE_METHODNAME, new Class[0]);
} catch(Exception e) {
    // try to extract a test suite automatically
    clearStatus();
    return new TestSuite(testClass);
}
如果我们自己来构建就是这样:
public static Test suite(){
    TestSuite suite = new TestSuite();
    // 自定义类集合
    suite.addTestSuite(DemoTest.class);
    suite.addTestSuite(DemoTwoTest.class);
    return suite;
}
跟踪一下addTestSuite方法:
public void addTestSuite(Class testClass) {
    addTest(new TestSuite(testClass));
}

public void addTest(Test test) {
    fTests.addElement(test);
}
这个过程可以让顶层的TestSuite包含两个子TestSuite,一个是关于DemoTest的,另一个是DemoTwoTest,两者又包含了各自的TestCase。
TestCase
测试用例类
为每个测试方法创建一个TestCase。包含一个最本质的run方法,仅仅持有该方法的名称,利用反射来调用测试方法。
/**
 * Runs the test case and collects the results in TestResult.
 */
public void run(TestResult result) {
    result.run(this);
}
TestCase的run方法会调用TestResult的run
TestResult
测试结果类
维护测试结果。最基本的测试方法最终都会在这里运行,方便统计结果。
/**
 * Runs a TestCase.
 */
protected void run(final TestCase test) {
    startTest(test);
    Protectable p= new Protectable() {
        public void protect() throws Throwable {
            test.runBare();
        }
    };
    runProtected(test, p);

    endTest(test);
}

/**
 * Runs a TestCase.
 */
public void runProtected(final Test test, Protectable p) {
    try {
        p.protect();
    }
    catch (AssertionFailedError e) {
        addFailure(test, e);
    }
    catch (ThreadDeath e) { // don't catch ThreadDeath by accident
        throw e;
    }
    catch (Throwable e) {
        addError(test, e);
    }
}
TestResult的run又反过来调用TestCase的runBare