作业一:完成作业未做完的集群架构
作业二:临时配置网络(ip,网关,dns)+永久配置
临时配置:
[root@nfs-server ~]# ifconfig
ens32: flags=4163<UP,BROADCAST,RUNNING,MULTICAST>  mtu 1500
        inet 192.168.152.134  netmask 255.255.255.0  broadcast 192.168.152.255
        inet6 fe80::e33a:cec4:b0d4:c884  prefixlen 64  scopeid 0x20<link>
        ether 00:0c:29:f7:dc:59  txqueuelen 1000  (Ethernet)
        RX packets 241828  bytes 275307222 (262.5 MiB)
        RX errors 0  dropped 0  overruns 0  frame 0
        TX packets 7200  bytes 1083100 (1.0 MiB)
        TX errors 0  dropped 0 overruns 0  carrier 0  collisions 0

lo: flags=73<UP,LOOPBACK,RUNNING>  mtu 65536
        inet 127.0.0.1  netmask 255.0.0.0
        inet6 ::1  prefixlen 128  scopeid 0x10<host>
        loop  txqueuelen 1  (Local Loopback)
        RX packets 327  bytes 33260 (32.4 KiB)
        RX errors 0  dropped 0  overruns 0  frame 0
        TX packets 327  bytes 33260 (32.4 KiB)
        TX errors 0  dropped 0 overruns 0  carrier 0  collisions 0

[root@nfs-server ~]# ifconfig ens32 192.168.152.135
[root@nfs-server ~]# route -n
Kernel IP routing table
Destination     Gateway         Genmask         Flags Metric Ref    Use Iface
192.168.152.0   0.0.0.0         255.255.255.0   U     0      0        0 ens32
[root@nfs-server ~]# route add default gw 192.168.152.2
[root@nfs-server ~]# route -n
Kernel IP routing table
Destination     Gateway         Genmask         Flags Metric Ref    Use Iface
0.0.0.0         192.168.152.2   0.0.0.0         UG    0      0        0 ens32
192.168.152.0   0.0.0.0         255.255.255.0   U     0      0        0 ens32
[root@nfs-server ~]# cat /etc/resolv.conf
# Generated by NetworkManager
search localdomain
nameserver 192.168.152.2
nameserver 202.106.0.20
永久配置:
[root@nfs-server ~]# cat /etc/sysconfig/network-scripts/ifcfg-ens32
TYPE=Ethernet
BOOTPROTO=dhcp
IPADDR=192.168.152.134
NETMASK=255.255.255.0
GATEWAY=192.168.152.2
DNS1=192.168.152.2
DNS2=202.106.0.20
DEFROUTE=yes
PEERDNS=yes
PEERROUTES=yes
IPV4_FAILURE_FATAL=no
IPV6INIT=yes
IPV6_AUTOCONF=yes
IPV6_DEFROUTE=yes
IPV6_PEERDNS=yes
IPV6_PEERROUTES=yes
IPV6_FAILURE_FATAL=no
IPV6_ADDR_GEN_MODE=stable-privacy
NAME=ens32
UUID=9eff3909-2614-4df9-80c9-a6a7d9f1be28
DEVICE=ens32
ONBOOT=yes

[root@nfs-server ~]# systemctl restart network
作业三:为集群内的机器设定主机名,利用/etc/hosts文件来解析自己的集群中所有的主机名,相应的,集群的配置应该改成使用主机名的方式
# 修改主机名
[root@nfs-server ~]# hostnamectl set-hostname proxy-nfs
[root@bogon ~]# hostnamectl set-hostname web01
[root@bogon ~]# hostnamectl set-hostname web02
[root@bogon ~]# hostnamectl set-hostname web03

[root@proxy-nfs ~]# echo "192.168.152.134       proxy-nfs" >> /etc/hosts
[root@proxy-nfs ~]# echo "192.168.152.135       web01" >> /etc/hosts
[root@proxy-nfs ~]# echo "192.168.152.136       web02" >> /etc/hosts
[root@proxy-nfs ~]# echo "192.168.152.137       web03" >> /etc/hosts

[root@web01 ~]# echo "192.168.152.134       proxy-nfs" >> /etc/hosts
[root@web01 ~]# echo "192.168.152.135       web01" >> /etc/hosts
[root@web01 ~]# echo "192.168.152.136       web02" >> /etc/hosts
[root@web01 ~]# echo "192.168.152.137       web03" >> /etc/hosts

[root@web02 ~]# echo "192.168.152.134       proxy-nfs" >> /etc/hosts
[root@web02 ~]# echo "192.168.152.135       web01" >> /etc/hosts
[root@web02 ~]# echo "192.168.152.136       web02" >> /etc/hosts
[root@web02 ~]# echo "192.168.152.137       web03" >> /etc/hosts

[root@web03 ~]# echo "192.168.152.134       proxy-nfs" >> /etc/hosts
[root@web03 ~]# echo "192.168.152.135       web01" >> /etc/hosts
[root@web03 ~]# echo "192.168.152.136       web02" >> /etc/hosts
[root@web03 ~]# echo "192.168.152.137       web03" >> /etc/hosts

[root@proxy-nfs ~]# egrep -v "#|^$|^#" /etc/nginx/nginx.conf  # 修改配置文件已主机名方式解析
user nginx;
worker_processes auto;
error_log /var/log/nginx/error.log;
pid /run/nginx.pid;
include /usr/share/nginx/modules/*.conf;
events {
    worker_connections 1024;
}
http {
    upstream luchuangao {
        server web01;
        server web02;
        server web03;
    }
    log_format  main  '$remote_addr - $remote_user [$time_local] "$request" '
                      '$status $body_bytes_sent "$http_referer" '
                      '"$http_user_agent" "$http_x_forwarded_for"';
    access_log  /var/log/nginx/access.log  main;
    sendfile            on;
    tcp_nopush          on;
    tcp_nodelay         on;
    keepalive_timeout   65;
    types_hash_max_size 2048;
    include             /etc/nginx/mime.types;
    default_type        application/octet-stream;
    include /etc/nginx/conf.d/*.conf;
    server {
        listen       80 default_server;
        listen       [::]:80 default_server;
        server_name  _;
        root         /usr/share/nginx/html;
        include /etc/nginx/default.d/*.conf;
        location / {
                proxy_pass http://luchuangao;
        }
        error_page 404 /404.html;
            location = /40x.html {
        }
        error_page 500 502 503 504 /50x.html;
            location = /50x.html {
        }
    }
}

[root@proxy-nfs ~]# /usr/sbin/nginx -t  # 检查配置文件是否正确
nginx: the configuration file /etc/nginx/nginx.conf syntax is ok
nginx: configuration file /etc/nginx/nginx.conf test is successful
[root@proxy-nfs ~]# systemctl reload nginx  # 重新加载配置文件

# 测试:
[root@proxy-nfs ~]# curl 192.168.152.134
web01
[root@proxy-nfs ~]# curl 192.168.152.134
web02
[root@proxy-nfs ~]# curl 192.168.152.134
web03
作业四:ssh登录,scp上传、下载,ssh秘钥登录,修改ssh server端的端口为8888然后进行登录和scp测试
SSH登录:
[root@proxy-nfs ~]# scp /etc/hosts web01:/tmp
The authenticity of host 'web01 (192.168.152.135)' can't be established.
ECDSA key fingerprint is 4c:ee:a3:f1:5c:37:43:32:bd:06:4e:cc:3f:5a:0a:04.
Are you sure you want to continue connecting (yes/no)? yes
Warning: Permanently added 'web01,192.168.152.135' (ECDSA) to the list of known hosts.
root@web01's password:
hosts                                                                     100%  274     0.3KB/s   00:00
[root@proxy-nfs ~]# scp web01:/tmp/hosts .
root@web01's password:
hosts                                                                     100%  274     0.3KB/s   00:00
[root@proxy-nfs ~]# ls -l hosts
-rw-r--r-- 1 root root 274 Mar 21 15:05 hosts
秘钥登录:
[root@proxy-nfs ~]# ssh-keygen
Generating public/private rsa key pair.
Enter file in which to save the key (/root/.ssh/id_rsa):
Enter passphrase (empty for no passphrase):
Enter same passphrase again:
Your identification has been saved in /root/.ssh/id_rsa.
Your public key has been saved in /root/.ssh/id_rsa.pub.
The key fingerprint is:
29:90:f7:3a:24:0a:e2:f9:22:ec:f4:07:75:7c:10:6b root@proxy-nfs
The key's randomart image is:
+--[ RSA 2048]----+
|       ..        |
|     . ..        |
|    o oE.        |
|     +.+ o       |
|o   o + S        |
|o..o o o         |
|.+. . o          |
|ooo  . .         |
|o..o.            |
+-----------------+
[root@proxy-nfs ~]# ssh-copy-id -i web01
/usr/bin/ssh-copy-id: INFO: attempting to log in with the new key(s), to filter out any that are already installed
/usr/bin/ssh-copy-id: INFO: 1 key(s) remain to be installed -- if you are prompted now it is to install the new keys
root@web01's password:

Number of key(s) added: 1

Now try logging into the machine, with:   "ssh 'web01'"
and check to make sure that only the key(s) you wanted were added.
[root@proxy-nfs ~]#
[root@proxy-nfs ~]# ssh-copy-id -i web02
The authenticity of host 'web02 (192.168.152.136)' can't be established.
ECDSA key fingerprint is 4c:ee:a3:f1:5c:37:43:32:bd:06:4e:cc:3f:5a:0a:04.
Are you sure you want to continue connecting (yes/no)? yes
/usr/bin/ssh-copy-id: INFO: attempting to log in with the new key(s), to filter out any that are already installed
/usr/bin/ssh-copy-id: INFO: 1 key(s) remain to be installed -- if you are prompted now it is to install the new keys
root@web02's password:

Number of key(s) added: 1

Now try logging into the machine, with:   "ssh 'web02'"
and check to make sure that only the key(s) you wanted were added.

[root@proxy-nfs ~]# ssh-copy-id -i web03
The authenticity of host 'web03 (192.168.152.137)' can't be established.
ECDSA key fingerprint is 4c:ee:a3:f1:5c:37:43:32:bd:06:4e:cc:3f:5a:0a:04.
Are you sure you want to continue connecting (yes/no)? yes
/usr/bin/ssh-copy-id: INFO: attempting to log in with the new key(s), to filter out any that are already installed
/usr/bin/ssh-copy-id: INFO: 1 key(s) remain to be installed -- if you are prompted now it is to install the new keys
root@web03's password:

Number of key(s) added: 1

Now try logging into the machine, with:   "ssh 'web03'"
and check to make sure that only the key(s) you wanted were added.

# 修改SSH端口
[root@proxy-nfs ~]# ssh web01
Last login: Tue Mar 21 15:08:30 2017 from proxy-nfs
[root@web01 ~]# sed -i s'/^#Port 22/Port 8888/g' /etc/ssh/sshd_config
[root@web01 ~]# grep 8888 /etc/ssh/sshd_config
Port 8888
[root@web01 ~]# exit
logout
Connection to web01 closed.
[root@proxy-nfs ~]# ssh web02
Last login: Tue Mar 21 14:53:19 2017 from 192.168.152.1
[root@web02 ~]# sed -i s'/^#Port 22/Port 8888/g' /etc/ssh/sshd_config
[root@web02 ~]# grep 8888 /etc/ssh/sshd_config
Port 8888
[root@web02 ~]# exit
logout
Connection to web02 closed.
[root@proxy-nfs ~]# ssh web03
Last login: Tue Mar 21 14:53:20 2017 from 192.168.152.1
[root@web03 ~]# sed -i s'/^#Port 22/Port 8888/g' /etc/ssh/sshd_config
[root@web03 ~]# grep 8888 /etc/ssh/sshd_config
Port 8888
[root@web03 ~]# exit
logout
Connection to web03 closed.
[root@proxy-nfs ~]#

# SCP 远程拷贝文件
[root@proxy-nfs ~]# touch oldgirl.txt
[root@proxy-nfs ~]# scp oldgirl.txt web01:/tmp
oldgirl.txt                                                                                                                          100%    0     0.0KB/s   00:00
[root@proxy-nfs ~]# scp web01:/etc/passwd .
passwd                                                                                                                               100% 2375     2.3KB/s   00:00
作业五:整理bash命令类型,验证寻找一个命令的优先级
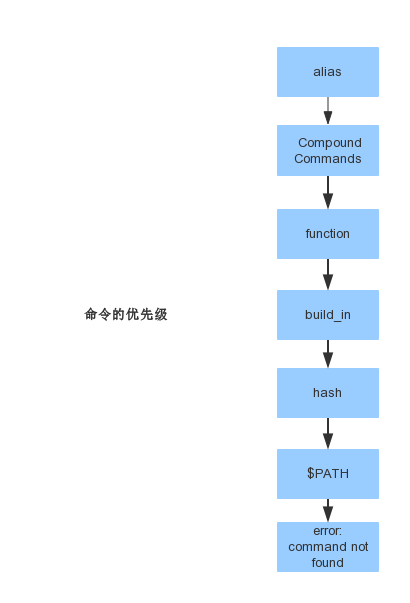
# 以ls命令为例
#1、ls命令有别名
[root@proxy-nfs ~]# alias  ls
alias ls='ls --color=auto'
#2、ls BASH自带的命令
[root@proxy-nfs ~]# rpm -qf /usr/bin/cd
bash-4.2.46-20.el7_2.x86_64
#3、ls 命令之前操作过后会有hash缓存
[root@proxy-nfs ~]# hash
hits    command
   1    /usr/bin/egrep
   1    /usr/bin/hostname
   2    /usr/bin/systemctl
   1    /usr/bin/cat
   4    /usr/bin/vim
   1    /usr/bin/touch
   4    /usr/bin/ssh
   3    /usr/bin/ssh-copy-id
   4    /usr/bin/scp
   3    /usr/bin/curl
   3    /usr/bin/ls
   2    /usr/bin/ssh-keygen
   1    /usr/bin/clear
#4、根据PATH寻找路径
[root@proxy-nfs ~]# which ls
alias ls='ls --color=auto'
        /usr/bin/ls
#5、如果命令不存在,则提示找不到
[root@proxy-nfs ~]# lls
-bash: lls: command not found
作业六:通配符实验
#1、~ 家目录
[root@proxy-nfs ~]# cd /tmp/
[root@proxy-nfs tmp]# cd ~
[root@proxy-nfs ~]# pwd
/root

#2、``命令的替换 取命令的执行结果
[root@proxy-nfs ~]# ret=`free -m`
[root@proxy-nfs ~]# echo $ret
total used free shared buff/cache available Mem: 322 115 12 8 194 161 Swap: 2047 0 2047

[root@proxy-nfs test]# echo `ls`
1.txt 2.txt 3.txt 4.txt a.sh sshd_config
[root@proxy-nfs test]# a=`echo `ls``
[root@proxy-nfs test]# echo $a
ls
[root@proxy-nfs test]# b=$(echo $(ls))
[root@proxy-nfs test]# echo $b
1.txt 2.txt 3.txt 4.txt a.sh sshd_config
#尽量使用括号

#3、!取非
[root@proxy-nfs test]# ls [!a-z].txt
1.txt  2.txt  3.txt  4.txt

#4、@ 无特殊含义
#5、# 注释
[root@proxy-nfs test]# cat /etc/resolv.conf
# Generated by NetworkManager

#6、
$变量取值
[root@proxy-nfs test]# echo $ret
total used free shared buff/cache available Mem: 322 115 12 8 194 161 Swap: 2047 0 2047

$()同``
[root@proxy-nfs test]# ret=$(ls)
[root@proxy-nfs test]# echo $ret
1.txt 2.txt 3.txt 4.txt

${}变量名的范围
[root@proxy-nfs test]# aa=old
[root@proxy-nfs test]# echo ${aa}girl
oldgirl

$[]整数计算echo $[2+3]-*/%浮点数用echo "sclae=3;10/3"|bc -l
[root@proxy-nfs test]# echo $[1 + 1]
2

#7、杀后台进程jobs号;取莫
杀后台进程jobs号
kill -9 %1
#取模
[root@proxy-nfs test]# echo $[10%3]
1

#8、^取非和!雷同
[root@proxy-nfs test]# ls [^01].txt
2.txt  3.txt  4.txt

#9、& 后台进程
[root@proxy-nfs test]# ./test.sh &
逻辑与
[root@proxy-nfs test]# ls && pwd
1.txt  2.txt  3.txt  4.txt
/test

#10、*通配符;任意字符
[root@proxy-nfs test]# ls *
1.txt  2.txt  3.txt  4.txt
[root@proxy-nfs test]# ls *.txt
1.txt  2.txt  3.txt  4.txt

#11、()在子进程中执行
[root@proxy-nfs test]# a=1
[root@proxy-nfs test]# (a=2;echo $a)
2
[root@proxy-nfs test]# echo $a
1

#12、-减号;区间;cd-;
减号
echo $[5 - 1]
区间
ls [a-z].txt
返回上一次工作的目录
cd -

#13、|管道;||逻辑或
管道
[root@proxy-nfs test]# netstat -tunapl|grep nginx
tcp        0      0 0.0.0.0:80              0.0.0.0:*               LISTEN      9440/nginx: master
tcp6       0      0 :::80                   :::*                    LISTEN      9440/nginx: master
逻辑或
[root@proxy-nfs test]# ls || pwd
1.txt  2.txt  3.txt  4.txt

#14、{}命令列表#括号内的开头和结尾必须是空格
[root@proxy-nfs test]# { ls;cd /; }
1.txt  2.txt  3.txt  4.txt
[root@proxy-nfs /]#

#15、转义
[root@proxy-nfs ~]# rm -f [1].txt

#16、:空命令 真值
[root@proxy-nfs ~]# :
[root@proxy-nfs ~]# echo $?
0

#17、;可以接多个命令,无论对错,会一直执行到最后一条命令
[root@proxy-nfs ~]# pwd;who
/root
root     tty1         2017-03-21 09:35
root     pts/1        2017-03-21 14:53 (192.168.152.1)

#18、“” 软引 ‘’硬引
[root@proxy-nfs ~]# aa=oldboy
[root@proxy-nfs ~]# echo $aa
oldboy
[root@proxy-nfs ~]# echo "$aa"   #软引用
oldboy
[root@proxy-nfs ~]# echo '$aa'   #硬引用
$aa
[root@proxy-nfs ~]#

#19、,枚举分隔符
[root@proxy-nfs ~]# echo {a,b,c,d}
a b c d

#20、<输入重定向

#21、>输出重定向
echo aa > aa.txt

#22、追加
echo bb > aa.txt

#23、. source 当前目录
[root@proxy-nfs test]# ./a.sh
1.txt  2.txt  3.txt  4.txt  a.sh
[root@proxy-nfs test]# source a.sh
1.txt  2.txt  3.txt  4.txt  a.sh

#24、/ 目录分隔符
[root@proxy-nfs test]# pwd
/test/

#25、?通配符:任一字符
[root@proxy-nfs test]# echo ????
a.sh