spring cloud 之 Config
Spring Cloud Config 解决了在分布式场景下多环境配置文件的管理和维护
- 建立gitee仓库
- 导入config server依赖
-
1 <dependencies>
2     <!-- config-server -->
3     <dependency>
4         <groupId>org.springframework.cloud</groupId>
5         <artifactId>spring-cloud-config-server</artifactId>
6     </dependency>
7 </dependencies>
-
- 配置文件编写,设置远程仓库地址
-
server:
  port: 9527

spring:
  application:
    name: config-server
  # spring cloud config
  cloud:
    config:
      server:
        # git 的 远程仓库地址
        git:
          uri: https://gitee.com/itheima_cch/itheima-configs.git
      label: master # 分支配置
-
config client搭建
- 导入依赖坐标
-
1     <dependency>
2
3             <groupId>org.springframework.boot</groupId>
4
5             <artifactId>spring-boot-starter-actuator</artifactId>
6
7         </dependency>
-
- 配置文件配置 bootstrap.yml
-
  # 配置config-server地址
  # 配置获得配置文件的名称等信息
  spring:
    cloud:
      config:
        # 配置config-server地址
        uri: http://localhost:9527
        # 配置获得配置文件的名称等信息
        name: config # 文件名
        profile: dev # profile指定,  config-dev.yml
        label: master # 分支

  management:
    endpoints:
      web:
        exposure:
          include: refresh
-
- 需要使用远程配置信息的类 需要添加@RefreshScope注解
- 修改git中的文件内容,config中刷新就可以直接获取到,而client中无法立即刷新,必须使用 curl -X POST http://localhost:8000/actuator/refresh 向客户端发送请求
config集成eureka
- config server 导入坐标
-
1 <!-- eureka-client -->
2         <dependency>
3
4             <groupId>org.springframework.cloud</groupId>
5
6             <artifactId>spring-cloud-starter-netflix-eureka-client</artifactId>
7
8         </dependency>
-
- server中配置eureka地址
-
eureka:
    client:
        service-url:
            defaultZone: http://localhost:8761/eureka/
-
- 启动类添加 @EnableEurekaClient 注解
- config client bootstrap.yml改成从Eureka中获取地址
-
 1 # 配置config-server地址
 2 # 配置获得配置文件的名称等信息
 3 spring:
 4   cloud:
 5     config:
 6       # 配置config-server地址
 7       #uri: http://localhost:9527
 8       # 配置获得配置文件的名称等信息
 9       name: config # 文件名
10       profile: dev # profile指定,  config-dev.yml
11       label: master # 分支
12
13
14       #从注册中心获取config-server地址
15       discovery:
16           enabled:true
17           service-id:CONFIG-SERVER
注意:需要将client中eureka的地址需要放在bootstrap.yml中,否则会一直重复no instance 错误
-
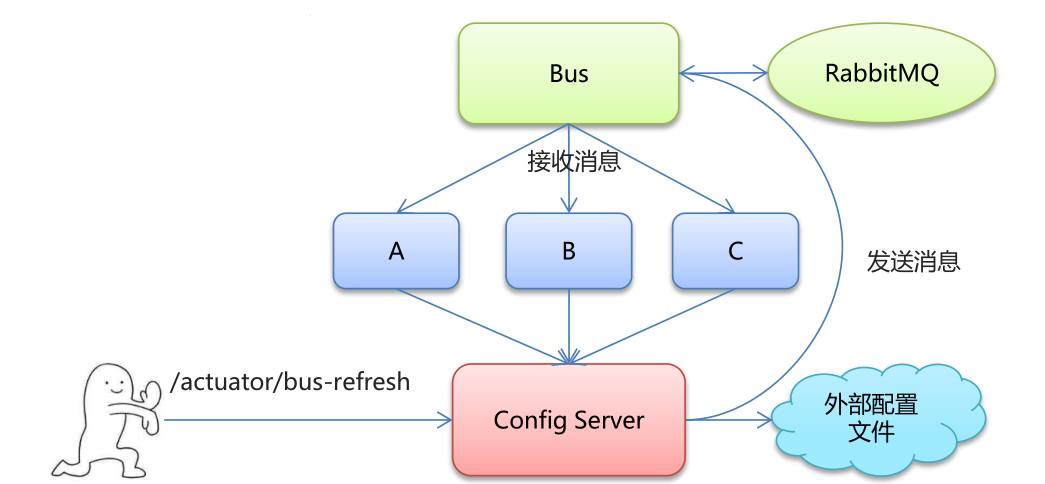
Bus 消息总线
Spring Cloud Bus 是用轻量的消息中间件将分布式的节点连接起来,可以用于广播配置文件的更改或者服务的监控管理。关键的思想就是,消息总线可以为微服务做监控,也可以实现应用程序之间相通信
Spring Cloud Bus 可选的消息中间件包括 RabbitMQ 和 Kafka
bus的快速搭建
- server与 client 导入坐标
-
1  <!-- bus -->
2         <dependency>
3
4             <groupId>org.springframework.cloud</groupId>
5
6             <artifactId>spring-cloud-starter-bus-amqp</artifactId>
7         </dependency>
-
- server与 client 配置中间件配置
-
1  #配置rabbitmq信息
2   rabbitmq:
3     host: localhost
4     port: 5672
5     username: guest
6     password: guest
7     virtual-host: /
-
- server中暴露bus的刷新端点
-
 1 # 暴露bus的刷新端点
 2
 3 management:
 4
 5   endpoints:
 6
 7     web:
 8
 9       exposure:
10         include: 'bus-refresh'
-
- cmd中发送 curl -X POST http://localhost:8888/actuator/bus-refresh 端口号与server的一致