在前面的博客中如果用到了异步请求的话,也是用到的第三方的东西,没有正儿八经的用过iOS中多线程的东西。其实多线程的东西还是蛮重要的,如果对于之前学过操作系统的小伙伴来说,理解多线程的东西还是比较容易的,今天就做一个小的demo来详细的了解一下iOS中的多线程的东西。可能下面的东西会比较枯燥,但还是比较实用的。
多线程用的还是比较多的,废话少说了,下面的两张截图是今天我们实验的最终结果,应该是比较全的,小伙伴们由图来分析具体的功能吧:
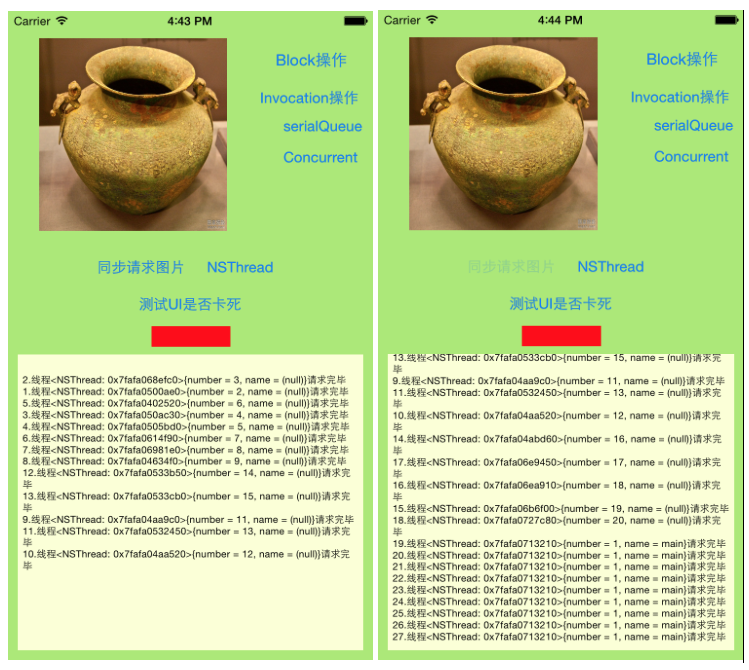
功能说明:
1、点击同步请求图片,观察整个UI界面的变化,并点击测试按钮,红色是否会变成绿色。
2、NSThread按钮,是由NSThread方式创建线程并执行相应的操作。
3、Block操作按钮是用Block创建操作,并在操作队列中执行,下面的是Invocation操作
4、serial是GCD中的串行队列,concurrent是GCD中的并行队列
好啦,上面的咸蛋先到这儿,代码该走起啦。
一、准备阶段
1.不管使用代码写,还是storyboard或者xib等,先把上面所需的控件初始化好以便使用
2.点击测试UI按钮,改变下边label的颜色的代码如下:
 1 //改变lable的颜色,在红绿颜色之间进行交换
 2 - (IBAction)tapTestButton:(id)sender {
 3     static int i = 1;
 4     if (i == 1) {
 5         _testLabel.backgroundColor = [UIColor redColor];
 6         i = 0;
 7     }
 8     else
 9     {
10         _testLabel.backgroundColor = [UIColor greenColor];
11         i = 1;
12     }
13
14 }
3.从网络上获取图片,并使用主线程显示进程调用情况
 1 //从wang'lu获取图片数据
 2 -(NSData *) getImageData
 3 {
 4
 5     _count ++;
 6     int count = _count;
    //线程开始启动
 7   NSString *str = [NSString stringWithFormat:@"%d.线程%@",count,[NSThread currentThread]];
    NSLog(@"%@",str);
 8     NSData *data;
 9     [NSThread sleepForTimeInterval:0.5];
10     data = [NSData dataWithContentsOfURL:[NSURL URLWithString:IMAGEURL]];
11
12     NSString *str = [NSString stringWithFormat:@"%d.线程%@完毕",count,[NSThread currentThread]];
13     //请求数据的任务由其他线程解决,所以LogTextView的内容由主线程更新,也只有主线程才能更新UI
14     [self performSelectorOnMainThread:@selector(updateTextViewWithString:) withObject:str waitUntilDone:YES];
15     return data;
16 }
4.上面的用到了主线程来调用updateTextViewWithString方法,因为只有主线程才能更新UI,updateTextViewWithString:这个方法负责把线程的执行信息显示在View上,代码如下:
1 //在ViewController上显示图片请求情况
2 -(void)updateTextViewWithString:(NSString *)str
3 {
4     NSString *old_str = [NSString stringWithFormat:@"%@
%@",_logTextView.text, str];
5
6     _logTextView.text = old_str;
7     //改变Label的颜色,便于观察
8     [self tapTestButton:nil];
9 }
5.把请求完的图片加载到ImageView上
1 //更新图片
2 -(void) updateImageWithData:(NSData *)data
3 {
4     UIImage *image = [UIImage imageWithData:data];
5     [_testImage setImage:image];
6 }
6.加载图片的,也就是请求数据后在ImageView上显示
1 //由其他线程请求数据,由主线程来更新UI
2 -(void)loadImageWithThreadName:(NSString *)threadName
3 {
4     [[NSThread currentThread] setName:threadName];
5
6     NSData *data = [self getImageData];
7     [self performSelectorOnMainThread:@selector(updateImageWithData:) withObject:data waitUntilDone:YES];
8 }
二、通过各种方式来
1.同步请求图片测试,请求数据和更新UI都放在主线程中顺序执行,这样在请求数据的时候UI会卡死,代码如下;
1 //同步请求图片,视图阻塞的,因为主线程被占用,无法进行视图的更新
2 - (IBAction)tapButton:(id)sender {
3     NSData *data = [self getImageData];
4     [self updateImageWithData:data];
5 }
2.NSThread创建线程测试,用detachNewThreadSelector方法来创建新的线程会自动启动并执行,而不用调用start方法。代码如下:
1 //NSThread
2 - (IBAction)tapButton2:(id)sender {
3     //点击一次button就创建一个新的线程来请求图片数据
4     for (int i = 0;i < 10; i ++) {
5         [NSThread detachNewThreadSelector:@selector(loadImageWithThreadName:) toTarget:self withObject:@"NSThread"];
6     }
7  }
3.NSInvocationOperation的使用,新建一个调用操作,然后添加到队列中执行,代码如下:
 1 //NSInvocationOperation
 2 - (IBAction)tapInvocationOperation:(id)sender {
 3
 4
 5     //上面的调用操作需要放到调用队列里才执行的
 6     //创建操作队列
 7     NSOperationQueue *operationQueue = [[NSOperationQueue alloc] init];
 8
 9     for (int i = 0;i < 10; i ++) {
10         //实例化一个调用操作,来执行数据请求
11         NSInvocationOperation *invocationOperation = [[NSInvocationOperation alloc] initWithTarget:self selector:@selector(loadImageWithThreadName:) object:@"Invocation"];
12         //把上面的调用操作放到操作队列里,队列会自动开启一个线程调用我们指定的方法
13         [operationQueue addOperation:invocationOperation];
14     }
15 }
4.block的操作,新建一个block操作,并添加到队列中执行,代码如下:
 1 //BlockOperation
 2 - (IBAction)tapBlockOperation:(id)sender {
 3     __weak __block ViewController *copy_self = self;
 4
 5     //创建BlockOperation
 6     NSBlockOperation *blockOperation = [NSBlockOperation blockOperationWithBlock:^{
 7         [copy_self loadImageWithThreadName:@"Block"];
 8     }];
 9
10     //添加到操作队列
11     NSOperationQueue *operationQueue = [[NSOperationQueue alloc] init];
12     [operationQueue addOperation:blockOperation];
13
14     for (int i = 0;i < 10; i ++) {
15
16         //另一种方式
17         [operationQueue addOperationWithBlock:^{
18             [copy_self loadImageWithThreadName:@"Block"];
19         }];
20     }
21 }
5.GCD中的串行队列:
 1 //串行队列
 2 - (IBAction)tapGCDserialQueue:(id)sender {
 3     //创建串行队列
 4     dispatch_queue_t serialQueue = dispatch_queue_create("mySerialQueue", DISPATCH_QUEUE_SERIAL);
 5
 6
 7     __weak __block ViewController *copy_self = self;
 8
 9
10     for (int i = 0;i < 10; i ++) {
11         //异步执行队列
12         dispatch_async(serialQueue, ^{
13             [copy_self loadImageWithThreadName:@"Serial"];
14         });
15     }
16
17
18 }
6.GCD中的并行队列:
 1 //并行队列
 2 - (IBAction)tapGCDConcurrentQueue:(id)sender {
 3     //创建并行队列
 4     dispatch_queue_t concurrentQueue = dispatch_queue_create("myConcurrentQueue", DISPATCH_QUEUE_CONCURRENT);
 5     __weak __block ViewController *copy_self = self;
 6
 7     for (int i = 0;i < 10; i ++) {
 8         //异步执行队列
 9         dispatch_async(concurrentQueue, ^{
10             [copy_self loadImageWithThreadName:@"Concurrent"];
11         });
12
13     }
14
15 }
以上是各个按钮对应的方法,下面的截图是执行结果:

三、线程间的同步问题(为我们的线程添加上同步锁)
在操作系统中讲多线程时有一个名词叫脏数据,就是多个线程操作同一块资源造成的,下面就修改一下代码,让数据出现问题,然后用同步锁来解决这个问题
1.在getImageData方法(标题一中的第3个方法)中有两条语句。这个用来显示线程的标号。上面的标号是没有重复的。
1     _count ++;
2     int count = _count;
在两条语句中间加一个延迟,如下:
    _count ++;
    [NSThread sleepForTimeInterval:1];
    int count = _count;
如果运行的话,会有好多标号是重复的,如图一,__count是成员变量,多个线程对此他进行操作,所以会出现标号不一致的情况,下面我们加上同步锁
(1)用NSLock加同步锁,代码如下:
1     //通过NSLock加锁
2     [_lock lock];
3     _count ++;
4     [NSThread sleepForTimeInterval:1];
5     int count = _count;
6     [_lock unlock];
(2)通过@synchronized加同步锁,代码如下:
1     //通过synchronized加锁
2     int count;
3     @synchronized(self){
4         _count ++;
5         [NSThread sleepForTimeInterval:1];
6          count = _count;
7     }
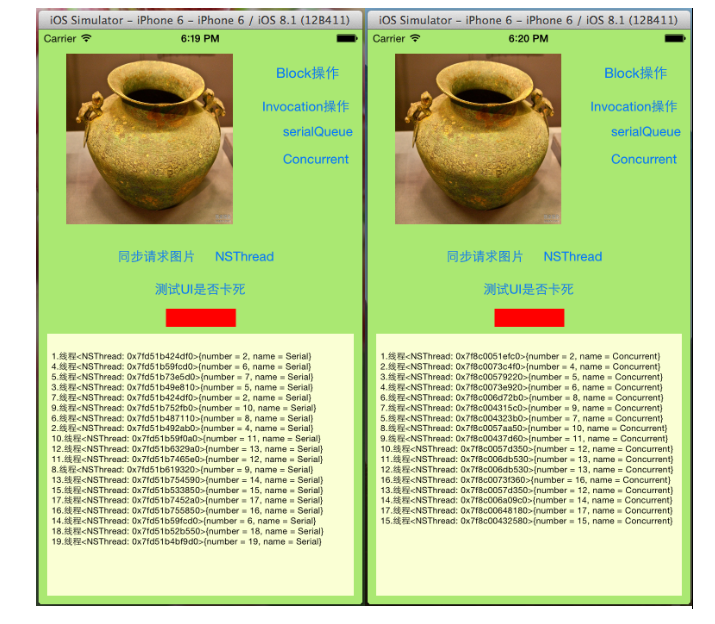
加锁前后的运行效果如下:

GCD的串行队列开始执行的顺序如下,下面是是在一个线程中按FIFO的顺序执行的:

GCD中的并行队列,是在不同的线程中同时执行的:

今天博客中的内容还是蛮多的,如果之前接触过Java的多线程的东西,或者其他语言中的多线程的话,理解起来应该问题不大。