对我来说link没有成功过,所以参考了其他人的文章,原文:https://www.jianshu.com/p/6a792118fae4
第一步:要去:https://open.weixin.qq.com (微信开发平台)注册账号并且创建一个移动应用。

创建应用的时候需要填写Bundle ID(ios)和包名(安卓)
Bundle ID在哪里? 原文:https://blog.csdn.net/a546822414/article/details/71403641
1、修改 info.plist 文件中的 Bundle identifier(改成你想要的那个Bundle identifier,如:com.example.xxx),编译通过后,此时你会发现个 project ->Target ->General 中的 Bundle identifier发生了变化,变成了 com.example.xxx。
2、修改 Project -> Build Setting -> Packaging -> Produce Bundle Identifier
安卓的包名在哪?
在android/app/src/main/java![]() ,
,![]()
应用签名(安卓需要):需要下载签名生成工具,输入包名获取
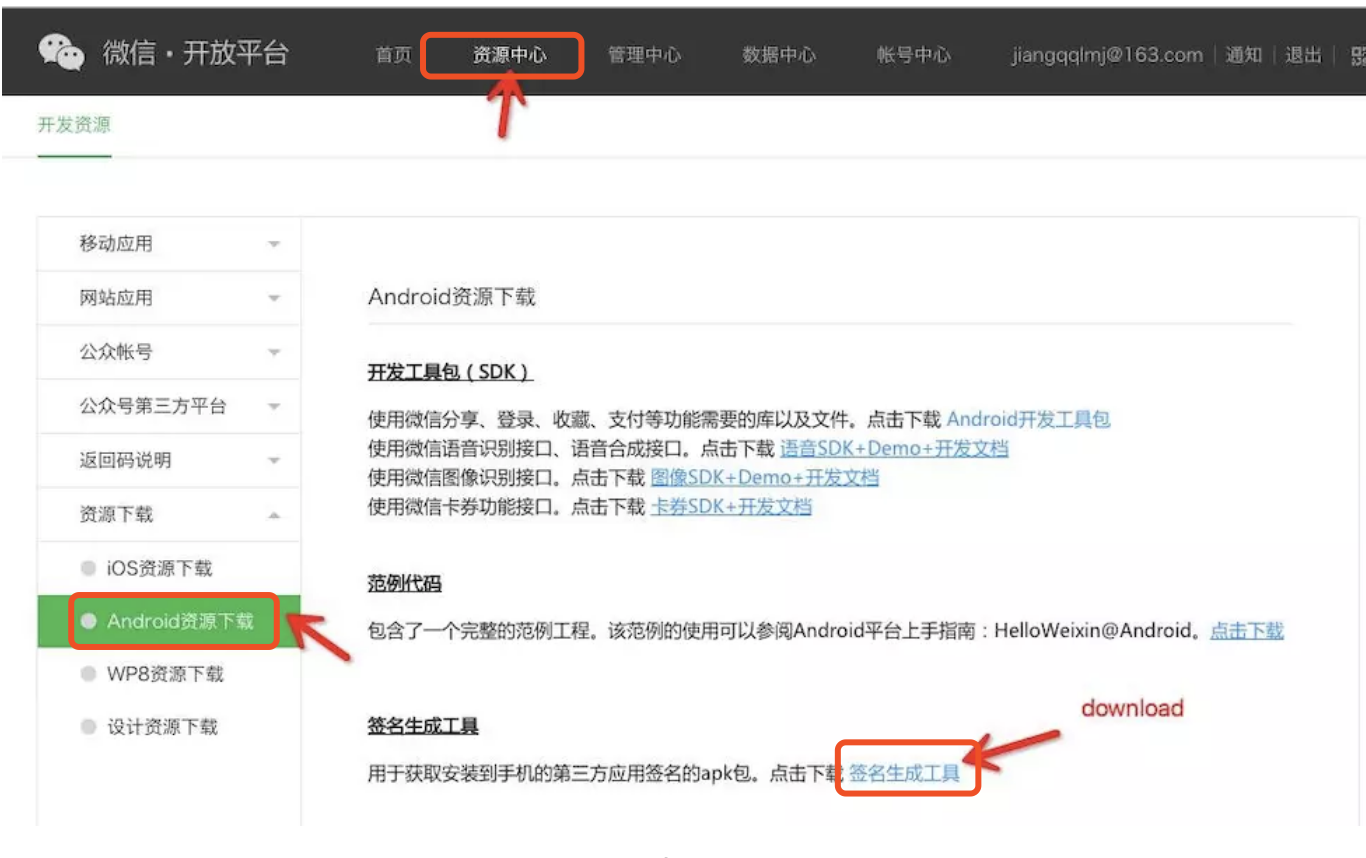 下载签名生成工具
第二步安装:npm install react-native-wechat --save
安卓配置:
1.在android/settings.gradle文件下添加以下代码:
include ':RCTWeChat'
project(':RCTWeChat').projectDir = new File(rootProject.projectDir, '../node_modules/react-native-wechat/android')


2.在android/app/build.gradle的dependencies部分添加以下代码:
dependencies {
  compile project(':RCTWeChat')
}

3.在MainActivity.java或者MainApplication.java(我是配置了这个文件)文件中添加以下代码:
import com.theweflex.react.WeChatPackage;
@Override
protected List<ReactPackage> getPackages() {
return Arrays.<ReactPackage>asList(
...
new WeChatPackage()
);
}
4.创建名为'wxapi'的文件夹,
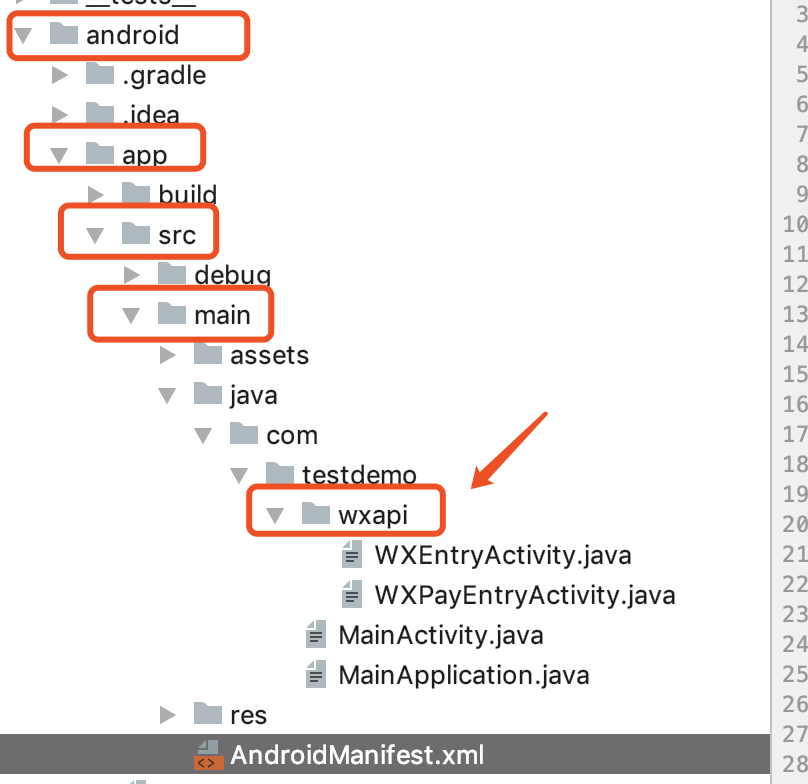
并在文件夹内创建WXEntryActivity.java,用于获得微信的授权和分享权限。再创建WXPayEntryActivity.java,用于获得微信的授权和支付权限。WXEntryActivity.java代码:
package 你的包名.wxapi;

import android.app.Activity;
import android.os.Bundle;
import com.theweflex.react.WeChatModule;

public class WXEntryActivity extends Activity {
  @Override
  protected void onCreate(Bundle savedInstanceState) {
    super.onCreate(savedInstanceState);
    WeChatModule.handleIntent(getIntent());
    finish();
  }
}

WXPayEntryActivity.java代码
package 你的包名.wxapi;

import android.app.Activity;
import android.os.Bundle;
import com.theweflex.react.WeChatModule;

public class WXPayEntryActivity extends Activity {
  @Override
  protected void onCreate(Bundle savedInstanceState) {
    super.onCreate(savedInstanceState);
    WeChatModule.handleIntent(getIntent());
    finish();
  }
}

5.在AndroidManifest.xml添加声明
<manifest>
  <application>
    <activity
      android:name=".wxapi.WXEntryActivity"
      android:label="@string/app_name"
      android:exported="true"
    />
    <activity
      android:name=".wxapi.WXPayEntryActivity"
      android:label="@string/app_name"
      android:exported="true"
    />
  </application>
</manifest>
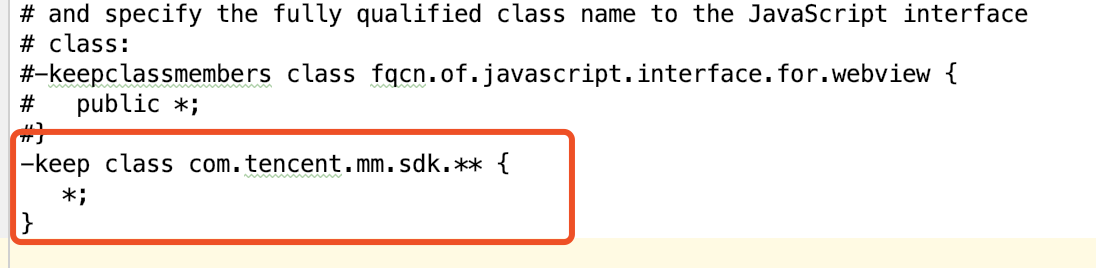
6.在proguard-rules.pro中添加(代码为混淆设置):直接复制在文件最后一行
-keep class com.tencent.mm.sdk.** {
   *;
}
ios配置
 1.打开xcode,选中Libaries---》Add Files to “项目名”
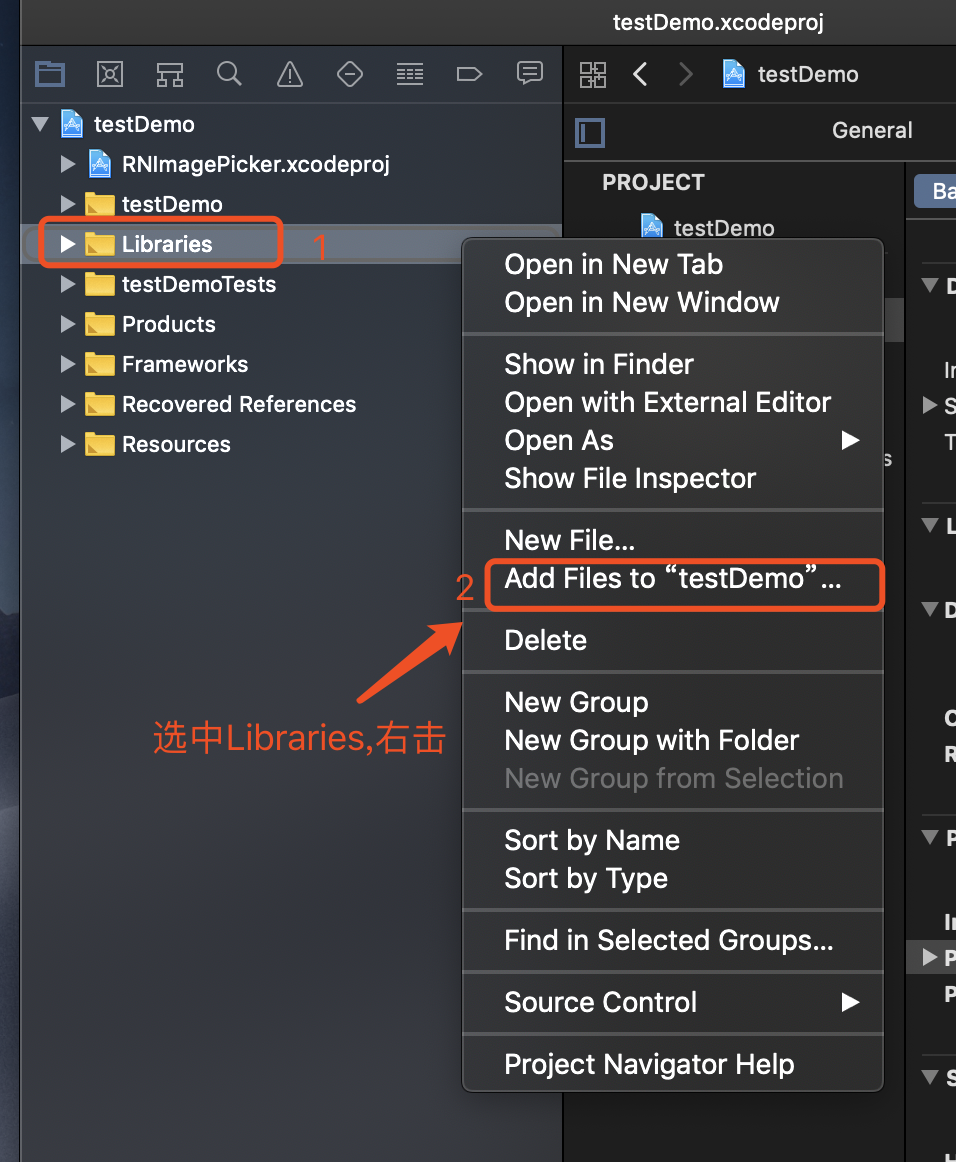
2.添加项目下的node_modules/react-native-wechat/ios/RCTWeChat.xcodeproj 
3.添加库文件(看图片第5步可以添加,以下5个库文件是要添加的)
SystemConfiguration.framework
CoreTelephony.framework
libsqlite3.0
libc++
libz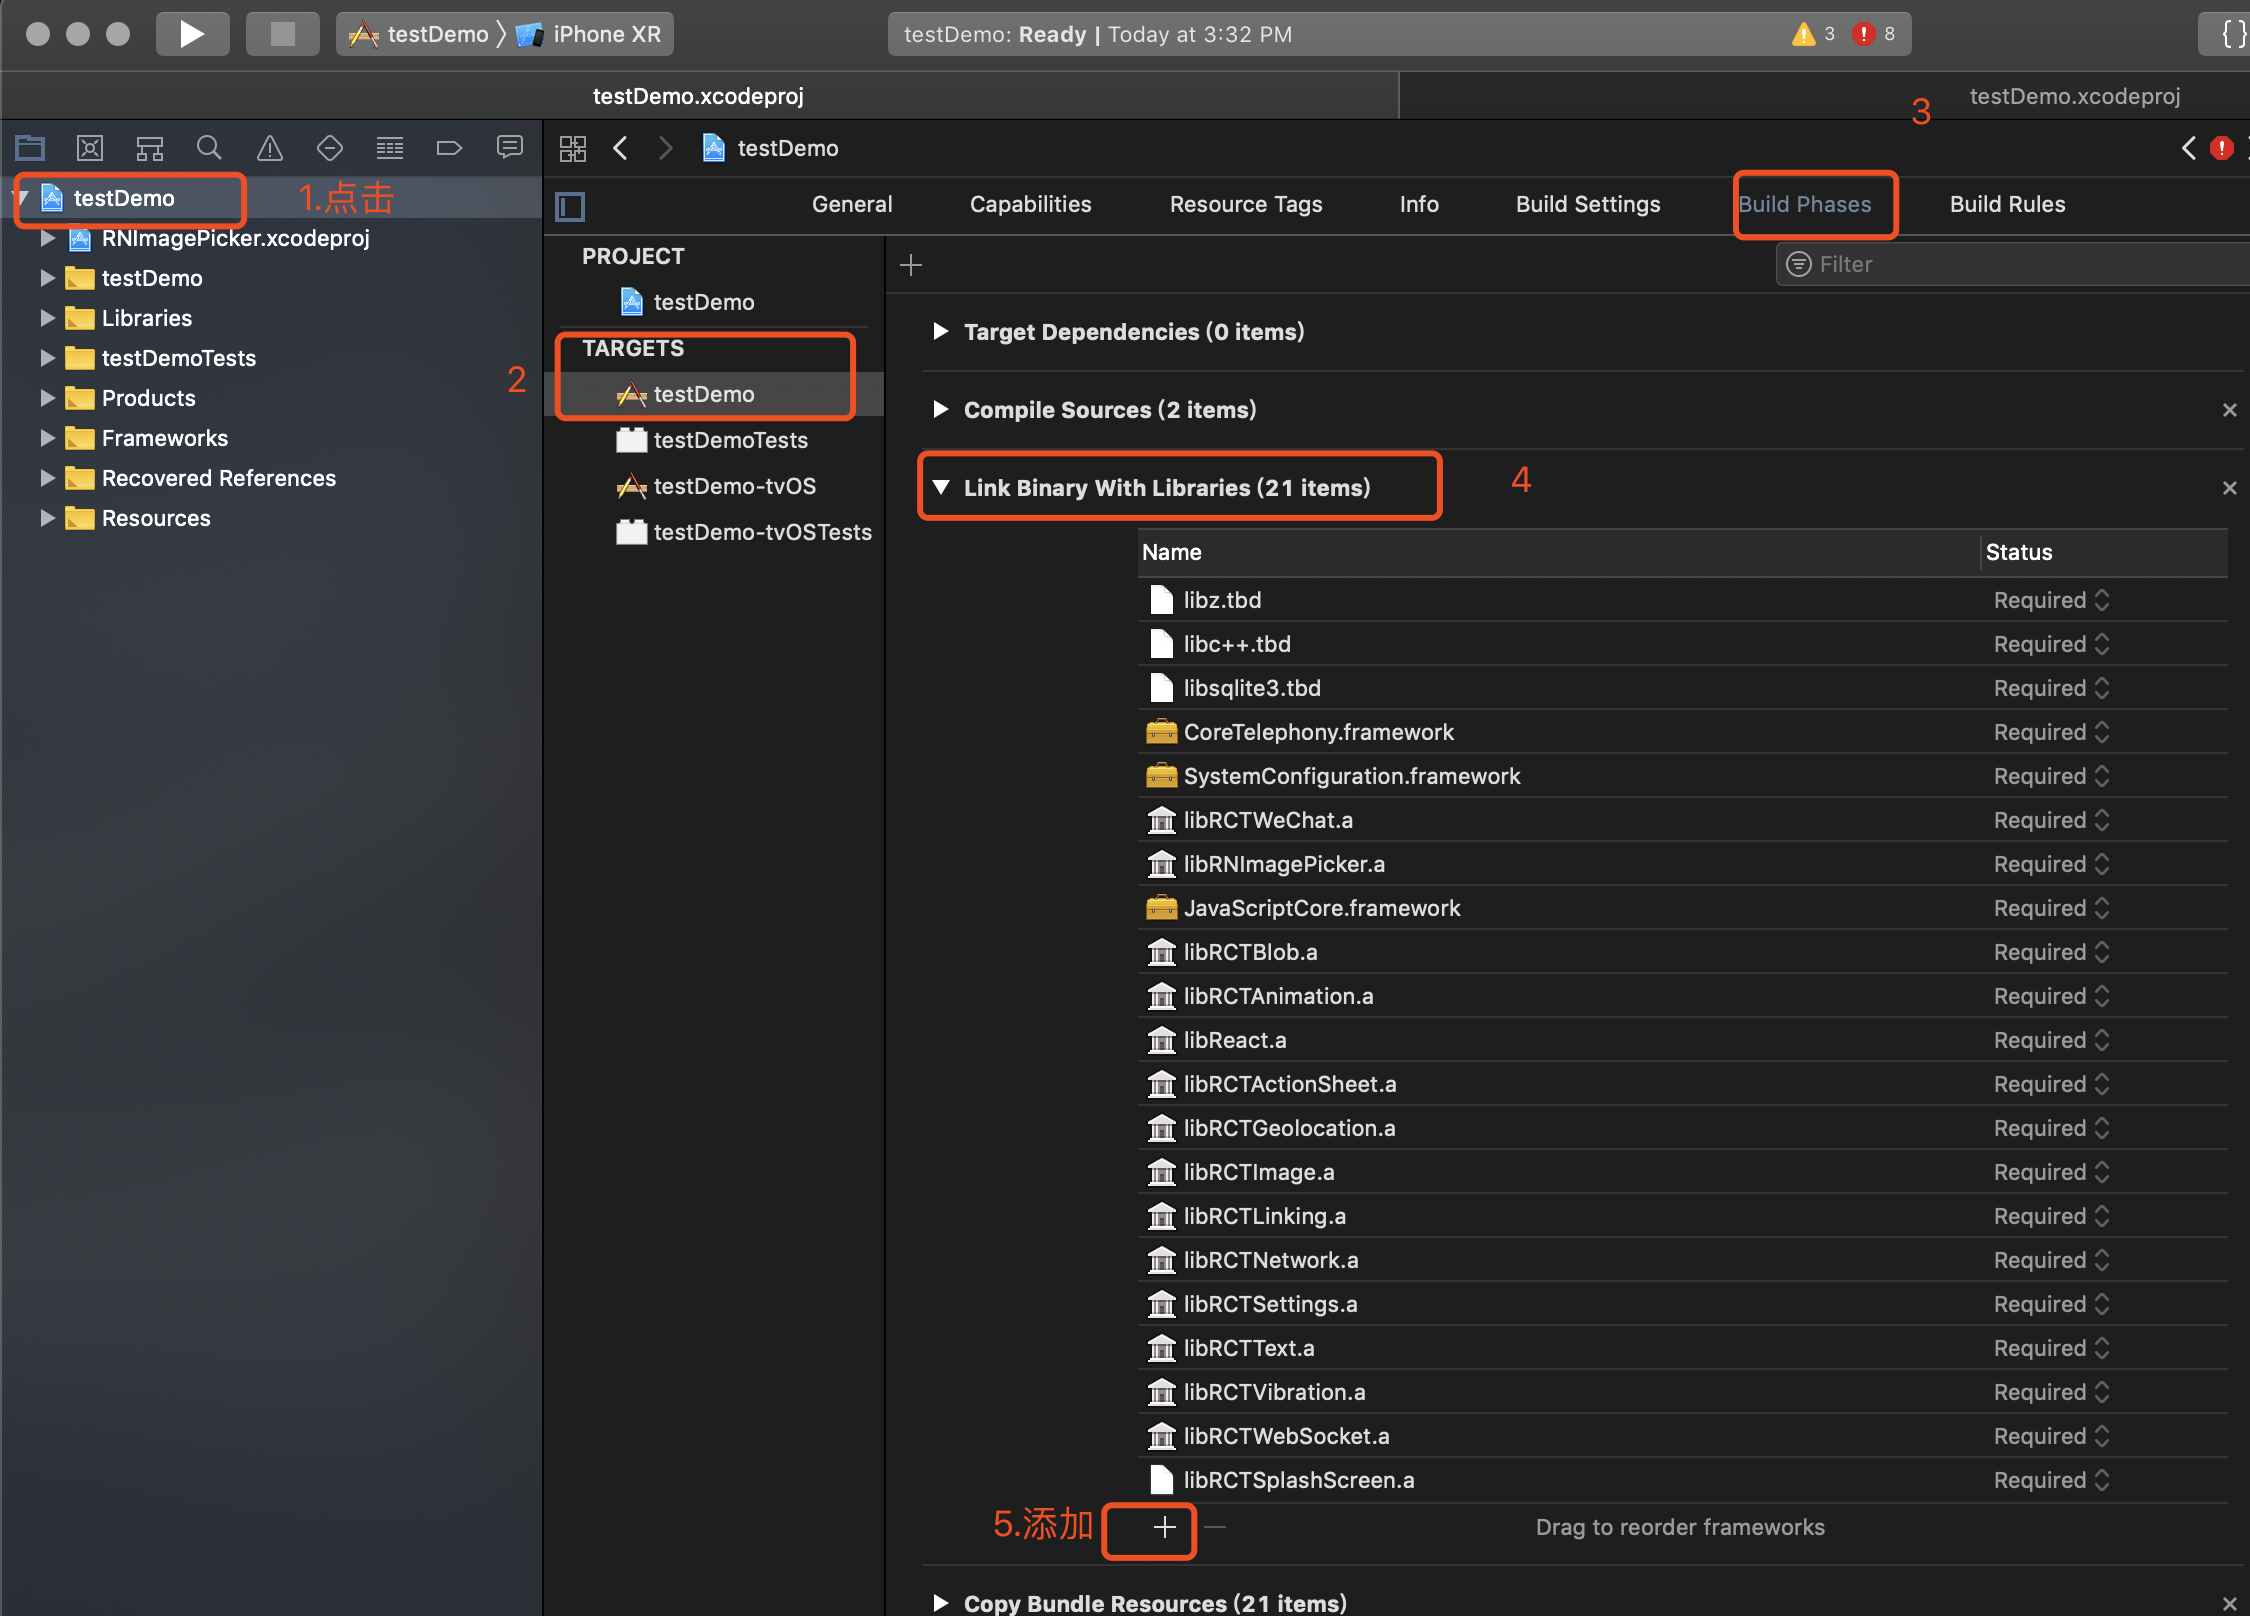
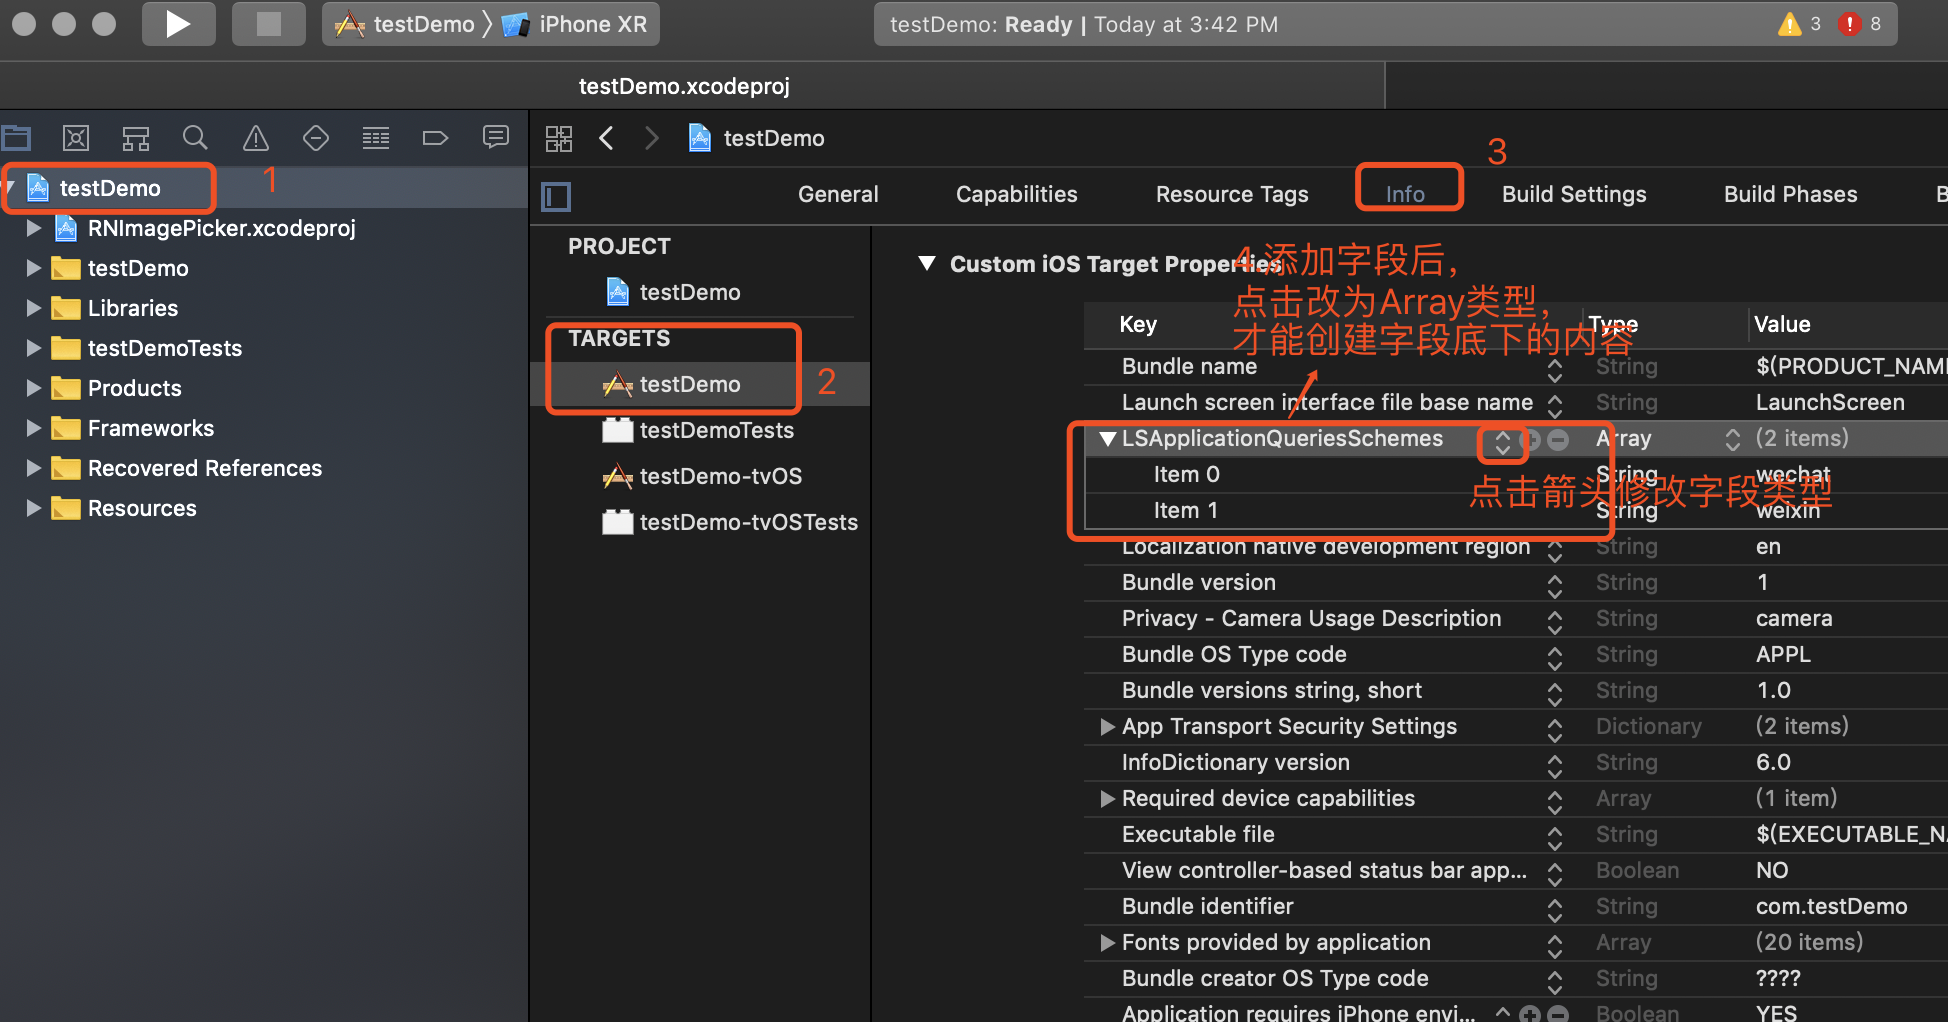
4.添加url type

5.iOS9 以上,添加 微信白名单
6.在项目的AppDelegate.m添加以下代码
#import <React/RCTLinkingManager.h>

- (BOOL)application:(UIApplication *)application openURL:(NSURL *)url
sourceApplication:(NSString *)sourceApplication annotation:(id)annotation
{
  return [RCTLinkingManager application:application openURL:url
   sourceApplication:sourceApplication annotation:annotation];
}
以下是配置完后组件使用:
/**
 * Sample React Native App
 * https://github.com/facebook/react-native
 * @flow
 */

import React, { Component } from 'react';
import {
    AppRegistry,
    StyleSheet,
    Text,
    View,
    TouchableHighlight,
    ToastAndroid,
} from 'react-native';
import * as WeChat from 'react-native-wechat';

//import fs from 'react-native-fs';
class CustomButton extends Component {
    render() {
        return (
            <TouchableHighlight
                style={styles.button}
                underlayColor="#a5a5a5"
                onPress={this.props.onPress}>
                <Text style={styles.buttonText}>{this.props.text}</Text>
            </TouchableHighlight>
        );
    }
}
export default class RNWeChatDemo extends Component {
    constructor(props) {
        super(props);
        //应用注册
        // WeChat.registerApp('wx17256bd80120bb2b');
    }
    componentDidMount(){
        WeChat.registerApp('wx17256bd80120bb2b').then(function(){
            // return WeChat.openWXApp()
        })}

    render() {
        return (
            <View style={{margin:20}}>
                <Text style={styles.welcome}>
                    微信好友/朋友圈分享实例
                </Text>
                <CustomButton text='微信好友分享-文本'
                              onPress={() => {
                                  WeChat.isWXAppInstalled()
                                      .then((isInstalled) => {
                                          if (isInstalled) {
                                              WeChat.shareToSession({type: 'text', description: '测试微信好友分享文本'})
                                                  .catch((error) => {
                                                      ToastShort(error.message);
                                                  });
                                          } else {
                                              ToastShort('没有安装微信软件,请您安装微信之后再试');
                                          }
                                      });
                              }}
                />
                <CustomButton text='微信好友分享-链接'
                              onPress={() => {
                                  WeChat.isWXAppInstalled()
                                      .then((isInstalled) => {
                                          if (isInstalled) {
                                              WeChat.shareToSession({
                                                  title:'微信好友测试链接',
                                                  description: '分享自:江清清的技术专栏(www.lcode.org)',
                                                  thumbImage: 'http://mta.zttit.com:8080/images/ZTT_1404756641470_image.jpg',
                                                  type: 'news',
                                                  webpageUrl: 'http://www.lcode.org'
                                              })
                                                  .catch((error) => {
                                                      ToastShort(error.message);
                                                  });
                                          } else {
                                              ToastShort('没有安装微信软件,请您安装微信之后再试');
                                          }
                                      });
                              }}
                />
                <CustomButton text='微信朋友圈分享-文本'
                              onPress={() => {
                                  WeChat.isWXAppInstalled()
                                      .then((isInstalled) => {
                                          if (isInstalled) {
                                              WeChat.shareToTimeline({type: 'text', description: '测试微信朋友圈分享文本'})
                                                  .catch((error) => {
                                                      ToastShort(error.message);
                                                  });
                                          } else {
                                              ToastShort('没有安装微信软件,请您安装微信之后再试');
                                          }
                                      });
                              }}
                />
                <CustomButton text='微信朋友圈分享-链接'
                              onPress={() => {
                                  WeChat.isWXAppInstalled()
                                      .then((isInstalled) => {
                                          if (isInstalled) {
                                              WeChat.shareToTimeline({
                                                  title:'微信朋友圈测试链接',
                                                  description: '分享自:江清清的技术专栏(www.lcode.org)',
                                                  thumbImage: 'http://mta.zttit.com:8080/images/ZTT_1404756641470_image.jpg',
                                                  type: 'news',
                                                  webpageUrl: 'http://www.lcode.org'
                                              })
                                                  .catch((error) => {
                                                      ToastShort(error.message);
                                                  });
                                          } else {
                                              ToastShort('没有安装微信软件,请您安装微信之后再试');
                                          }
                                      });
                              }}
                />
            </View>
        );
    }
}
const styles = StyleSheet.create({

    welcome: {
        fontSize: 20,
        textAlign: 'center',
        margin: 10,
    },
    button: {
        margin:5,
        backgroundColor: 'white',
        padding: 15,
        borderBottomWidth: StyleSheet.hairlineWidth,
        borderBottomColor: '#cdcdcd',
    },
});