1. 获取 Window 对象
可以用两种方式获得Window对象。正规的HTML5方式是在Document对象上使用defaultView属性。另一种是使用所有浏览器都支持的全局变量window 。
<!DOCTYPE html>
<html lang="en">
<head>
    <meta charset="UTF-8">
    <title>获取Window对象</title>
</head>
<body id="bod">
<table>
    <tr><th>outerWidth:</th><td id="owidth"></td></tr>
    <tr><th>outerHeight:</th><td id="oheight"></td> </tr>
</table>

<script>
    document.getElementById("owidth").innerHTML = window.outerWidth;
    document.getElementById("oheight").innerHTML = document.defaultView.outerHeight;
</script>
</body>
</html>
2. 获取窗口信息
顾名思义,Window对象的基本功能涉及当前文档所显示的窗口。下表列出了运作这些功能的属性和方法。就HTML而言,浏览器窗口里的标签页被视为窗口本身。

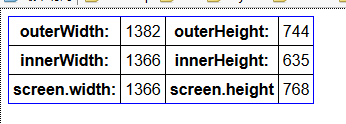
<!DOCTYPE html>
<html lang="en">
<head>
    <meta charset="UTF-8">
    <title>获取窗口信息</title>
    <style>
        table {border-collapse: collapse; border: thin solid blue;}
        th,td {padding: 4px;}
    </style>
</head>
<body>
<table border="1">
    <tr>
        <th>outerWidth:</th><td id="ow"></td><th>outerHeight:</th><td id="oh"></td>
    </tr>
    <tr>
        <th>innerWidth:</th><td id="iw"></td><th>innerHeight:</th><td id="ih"></td>
    </tr>
    <tr>
        <th>screen.</th><td id="sw"></td>
        <th>screen.height</th><td id="sh"></td>
    </tr>
</table>

<script>
    document.getElementById("ow").innerHTML = window.outerWidth;
    document.getElementById("oh").innerHTML = window.outerHeight;
    document.getElementById("iw").innerHTML = window.innerWidth;
    document.getElementById("ih").innerHTML = window.innerHeight;
    document.getElementById("sw").innerHTML = window.screen.width;
    document.getElementById("sh").innerHTML = window.screen.height;
</script>
</body>
</html>
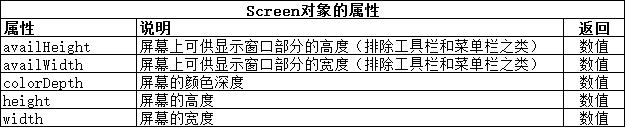
此例的脚本在一个表格里显示各种 Window属性的值。其中有使用screen属性来获取一个Screen对象。这个对象提供了显示此窗口的屏幕信息,并定义了下表里展示的这些属性:
从效果图可以看到这段脚本的效果。
3. 与窗口进行交互
Window对象提供了一组方法,可以用它们与包含文档的窗口进行交互。
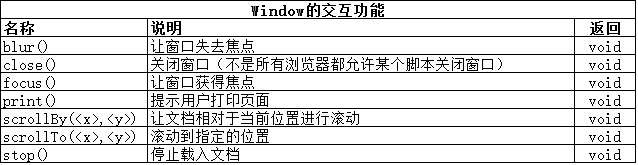
所有这些方法都应该谨慎使用,因为它们会让用户失去对浏览器窗口的控制。用户对应用程序应该具有什么行为有着相当固定的预期,而那些会滚动、打印和关闭自己的窗口一般来说是不受欢迎的。如果不得不使用这些方法,请把控制权交给用户,并提供非常清晰的视觉线索来告诉他们即将发生什么。
<!DOCTYPE html>
<html lang="en">
<head>
    <meta charset="UTF-8">
    <title>与窗口进行交互</title>
</head>
<body>
<p>
    <button id="scroll">Scroll</button>
    <button id="print">Print</button>
    <button id="close">Close</button>
</p>
<p>
    1 <br /> 2 <br /> 3 <br /> 4 <br /> 5 <br /> 6 <br /> 7 <br /> 8  <br /> 9 <br /> 10 <br /> 11 <br /> 12 <br />
    1 <br /> 2 <br /> 3 <br /> 4 <br /> 5 <br /> 6 <br /> 7 <br /> 8  <br /> 9 <br /> 10 <br /> 11 <br /> 12 <br />
    1 <br /> 2 <br /> 3 <br /> 4 <br /> 5 <br /> 6 <br /> 7 <br /> 8  <br /> 9 <br /> 10 <br /> 11 <br /> 12 <br />
</p>

<script>
    var buttons = document.getElementsByTagName("button");
    for(var i=0;i<buttons.length;i++){
        buttons[i].onclick = handleButtonPress;
    }

    function handleButtonPress(e){
        if(e.target.id == "print"){
            window.print();
        }else if(e.target.id == "close"){
            window.close();
        }else {
            window.scrollTo(0,300);
        }
    }
</script>
</body>
</html>
此例的脚本会打印、关闭和滚动窗口,作为对用户按下按钮的反馈。
4. 对用户进行提示
Window对象包含一组方法,能以不同的方式对用户进行提示。

这些方法里的每一种都会呈现出不同的提示类型。
<!DOCTYPE html>
<html lang="en">
<head>
    <meta charset="UTF-8">
    <title>对用户进行提示</title>
</head>
<body>
<form id="theform">
<button id="alert">Alert</button>
<button id="confirm">Confirm</button>
<button id="prompt">Prompt</button>
<button id="modal">Modal</button>
</form>
<script>
    var buttons = document.getElementsByTagName("button");
    for(var i=0;i<buttons.length;i++){
        buttons[i].onclick = handleButtonPress;
    }

    function  handleButtonPress(e){
        if(e.target.id == "alert"){
            window.alert("This is an alert");
        }else if(e.target.id == "confirm"){
            var confirmed = window.confirm("This is a confirm - do you want to proceed?")
            alert("Confirmed? "+confirmed);
        }else if(e.target.id == "prompt"){
            var response = window.prompt("Enter a word","Hello");
            alert(response);
        }else if(e.target.id == "modal"){
            //模块对话框。
            // 第一个参数为url地址,
            // 第二个参数是向子窗口传递的参数,如把父窗口中的window对象,form对象传递过去,在子窗口中可以获取此参数。以便与子窗口进行交互,
            // 第三个参数为设置子窗口的属性,如子窗口的高,宽等
            //第二,三个参数可选。
            window.showModalDialog(
                    "https://yexiaochao.github.io",
                    theform,
                    "dialogHeight: 500px; dialogWidth: 260px;;");
        }
    }
</script>
</body>
</html>
这些功能应该谨慎使用。浏览器处理提示的方式各有不同,会给用户带来不同的体验。此例的显示效果如下:

showModalDialog方法创建了一个弹出窗口(这个功能已经被广告商严重滥用了)。事实上,它的滥用程度是如此严重,以至于所有浏览器都对这个功能加以限制,仅允许用户事先许可的网站使用。如果依赖弹出窗口向用户提供关键信息,则会面临它们根本看不到的风险。
PS:如果想要吸引用户的注意,可以考虑使用jQuery这样的JavaScript库所提供的的内联对话框。它们易于使用,打扰程度低,而且在各个浏览器上有着一致的行为和外观。
5. 获取基本信息
Window对象能访问某些返回基本信息的对象,这些信息包括当前地址(即文档载入的来源URL)的详情和用户浏览历史。

Window.location 属性返回的Location 对象和 Document.location 属性返回的相同。
6. 使用浏览器历史
Window.history 属性返回一个 History对象,可以用它对浏览器历史进行一些基本的操作。

6.1 在浏览历史中导航
back、forward 和 go 这三个方法告诉浏览器该导航到浏览历史中的哪个URL上。back/forward方法的效果与浏览器的后退/前进按钮时一致的。 go方法会导航至相对于当前文档的某个浏览历史位置。正值指示浏览器应该在浏览历史中前进,负值则是后退。值的大小指定了具体的步数。举个例子,-2这个值告诉浏览器要导航至最近浏览历史之前的那个文档。
<!DOCTYPE html>
<html lang="en">
<head>
    <meta charset="UTF-8">
    <title>在浏览历史中导航</title>
</head>
<body>
<button id="back">Back</button>
<button id="forward">Forward</button>
<button id="go">Go</button>

<script>
    var buttons = document.getElementsByTagName("button");
    for (var i=0;i<buttons.length;i++){
        buttons[i].onclick = handleButtonPress;
    }

    function  handleButtonPress(e){
        if(e.target.id == "back"){
            window.history.back();
        }else if(e.target.id == "forward"){
            window.history.forward();
        }else if(e.target.id == "go"){
            window.history.go(-2);
        }
    }
</script>
</body>
</html>
演示效果如下:

除了这些基本的函数,HTML5还支持在某些约束条件下对浏览器历史进行修改。如下代码所示:
<!DOCTYPE html>
<html lang="en">
<head>
    <meta charset="UTF-8">
    <title>处理浏览器历史</title>
</head>
<body>
<p id="msg"></p>
<button id="banana">Banana</button>
<button id="apple">Apple</button>

<script>
    var sel = "No selection made";
    document.getElementById("msg").innerHTML = sel;

    var buttons = document.getElementsByTagName("button");
    for(var i=0;i<buttons.length;i++){
        buttons[i].onclick = function(e){
            document.getElementById("msg").innerHTML = e.target.innerHTML;
        }
    }
</script>
</body>
</html>
这个例子包含一段脚本,它根据用户点击的按钮显示出一段对应的消息。问题在于,当用户离开示例文档后,关于被点击按钮的信息就丢失了。从下面的效果图可以看到这一点。
各个事件的发生顺序如下所示:
(1) 导航至示例文档,显示的是No selection made这条消息;
(2) 点击Banana按钮,现在显示的是Banana这条消息;
(3) 导航至http://www.baidu.com;
(4) 点击后退按钮返回到示例文档。
在这一串事件的最后,回到了示例文档,但里面没有了之前选择的记录。这是浏览器的常规行为,它处理浏览历史用的是URL。
6.2 在浏览历史里插入条目
History.pushState 方法允许给浏览器历史添加一个URL,但带有一些约束条件。URL的服务器名称和端口号必须与当前文档的相同。添加URL的方法之一是只使用附在当前文档后面的查询字符串和锚片段,如下面代码所示:
<!DOCTYPE html>
<html lang="en">
<head>
    <meta charset="UTF-8">
    <title>向浏览历史里插入条目</title>
</head>
<body>
<p id="msg"></p>
<button id="banana">Banana</button>
<button id="apple">Apple</button>

<script>
    var sel = "No selection made";
    if(window.location.search == "?banana"){
        sel = "Selection: Banana";
    }else if (window.location.search == "?apple"){
        sel = "Selection: Apple";
    }
    document.getElementById("msg").innerHTML = sel;

    var buttons = document.getElementsByTagName("button");
    for(var i=0;i<buttons.length;i++){
        buttons[i].onclick = function(e){
            document.getElementById("msg").innerHTML = e.target.innerHTML;
            window.history.pushState("","","?"+ e.target.id);
        }
    }
</script>
</body>
</html>
此例中的脚本使用pushState方法来向浏览器历史添加一个条目。它添加的URL是当前文档的URL加上一个标识用户点击了哪个按钮的查询字符串。这里还添加了一些代码,用Location对象来读取查询字符串和所选择的值。这段脚本带来了两种用户可以识别的变化。第一种在用户点击某个按钮时出现。

当用户点击Banana按钮时,推入浏览器历史的URL会显示在浏览器的导航栏中。文档并没有被重新加载,只有浏览历史和显示的URL发生了变化。此时,浏览器历史看上去就行这样:
* http://localhost:63342/HTML5/window/window-07.html
* http://localhost:63342/HTML5/window/window-07.html?banana
用户点击某个按钮后,一个新的URL就会被添加到浏览历史当中,以此创建一个条目来记录用户的导航路径。这些额外条目的好处体现在用户导航至别处然后返回时,如下图所示:
6.3 为不同的文档添加条目
当向浏览器历史添加条目时,不需要局限于将查询字符串或者文档片段作为URL。可以指定任何URL,只要它的来源和当前文档相同即可。不过,有一个特别之处需要注意。下面代码对此进行了演示,修改前面例子的JavaScript代码如下:
    var sel = "No selection made";
    if(window.location.search == "?banana"){
        sel = "Selection: Banana";
    }else if (window.location.search == "?apple"){
        sel = "Selection: Apple";
    }
    document.getElementById("msg").innerHTML = sel;

    var buttons = document.getElementsByTagName("button");
    for(var i=0;i<buttons.length;i++){
        buttons[i].onclick = function(e){
            document.getElementById("msg").innerHTML = e.target.innerHTML;
            window.history.pushState("","","otherpage.html?"+ e.target.id);
        }
    }
这段脚本只有一处变化:把pushState方法的URL参数设为otherpage.html。otherpage.html的内容如下:
<!DOCTYPE html>
<html lang="en">
<head>
    <meta charset="UTF-8">
    <title>Other Page</title>
</head>
<body>
<h1>Other Page</h1>
<p id="msg"></p>

<script>
    var sel = "No selection made";
    if(window.location.search == "?banana"){
        sel = "Selection: Banana";
    }else if (window.location.search == "?apple"){
        sel = "Selection: Apple";
    }
    document.getElementById("msg").innerHTML = sel;
</script>
</body>
</html>
这里仍然使用查询字符串来保存用户的选择,但是文档本身发生了改变。特别之处此处时就会表现出来。此例的运行效果如下图所示:

如图所示,导航框里显示的是另一个文档的URL,但文档自身并没有发生变化。
6.4 在浏览历史中保存复杂状态
利用pushState的第一个参数可以保存复杂的数据。
<!DOCTYPE html>
<html lang="en">
<head>
    <meta charset="UTF-8">
    <title>在浏览历史中保存状态对象</title>
    <style>
        * {margin: 2px; padding: 4px; border-collapse:collapse; }
    </style>
</head>
<body>
<table border="1">
    <tr><th>Name:</th><td id="name"></td> </tr>
    <tr><th>Color:</th><td id="color"></td> </tr>
    <tr><th>Size:</th><td id="size"></td> </tr>
    <tr><th>State:</th><td id="state"></td> </tr>
    <tr><th>Event:</th><td id="event"></td> </tr>
</table>
<button id="banana">Banana</button>
<button id="apple">Apple</button>

<script>
    if(window.history.state){
        displayState(window.history.state);
        document.getElementById("state").innerHTML = "Yes";
    }else {
        document.getElementById("name").innerHTML = "No Selection";
    }

    window.onpopstate = function(e){
        displayState(e.state);
        document.getElementById("event").innerHTML = "Yes";
    }

    var buttons = document.getElementsByTagName("button");
    for(var i=0;i < buttons.length;i++){
        buttons[i].onclick = function(e){
            var stateObj;
            if(e.target.id == "banana"){
                stateObj = {name:"banana",color:"yellow",size:"large"};
            }else {
                stateObj = {name:"apple",color:"red",size:"medium"};
            }
            window.history.pushState(stateObj,"");
            displayState(stateObj);
        }
    }

    function  displayState(stateObj){
        document.getElementById("name").innerHTML = stateObj.name;
        document.getElementById("color").innerHTML = stateObj.color;
        document.getElementById("size").innerHTML = stateObj.size;
    }
</script>
</body>
</html>
此例中,用一个对象来代表用户的选择。它带有三个属性,分部是用户所选水果的名称、颜色和尺寸,就像这样:
stateObj = {name:"apple",color:"red",size:"medium"};
当用户做出选择后,用History.pushState方法创建一个新的浏览历史条目,并把它与状态对象进行关联,就像这样:
window.history.pushState(stateObj,"");
此例中没有指定一个URL,这就意味着状态对象是关联到当前文档上。
当用户返回到文档,可以使用两种方式来取回状态对象。第一种方式是通过 history.state 属性。
...
if(window.history.state){
        displayState(window.history.state);
...
此时面临一个问题:不是所有的浏览器都支持通过这个属性获取状态对象。要解决这个问题,必须同时监听postate事件。下面这段代码会监听和响应popstate事件:
    window.onpopstate = function(e){
        displayState(e.state);
        document.getElementById("event").innerHTML = "Yes";
    }
此例中在一个table元素里显示状态信息,并加上了状态对象的获取细节:是通过属性还是通过事件。此例的显示效果如下:
6.5 替换浏览历史中的条目
之前的例子都把焦点放在给当前文档的浏览历史添加条目上,但还可以用replaceState方法来为当前文档替换条目。下面代码对此进行了演示:
<!DOCTYPE html>
<html lang="en">
<head>
    <meta charset="UTF-8">
    <title>替换浏览器历史中的当前条目</title>
</head>
<body>
<p id="msg"></p>
<button id="banana">Banana</button>
<button id="apple">Apple</button>

<script type="application/javascript">
    var sel = "No selection made";
    if(window.location.search == "?banana"){
        sel = "Selection: Banana";
    }else if(window.location.search == "?apple"){
        sel = "Selection: Apple";
    }
    document.getElementById("msg").innerHTML = sel;

    var buttons = document.getElementsByTagName("button");
    for(var i=0;i<buttons.length;i++){
        buttons[i].onclick = function(e){
            document.getElementById("msg").innerHTML = e.target.innerHTML;
            window.history.replaceState("","","otherpage?"+ e.target.id);
        };
    }
</script>
</body>
</html>

7. 使用跨文档消息传递
Window对象还为另一种名为“跨文档消息传递”(cross-document messaging)的HTML5新功能提供了入口。通常情况下,不同来源(被称为“origins”)的脚本是不允许进行通信的,但是对脚本间通信这一功能的强烈需求下,以至于出现了无数的补丁和变通方法来绕过浏览器的安全防护措施。
理解脚本的来源
浏览器通过URL各个组成部分来判断某个资源(比如一个脚本)的来源。不同来源的脚本间会被加上交互和通信限制。如果两个脚本的协议、主机号和端口号相同,那么它们就被认为是拥有同一个来源,即使URL的其他部分不一样也是如此。下面表格给出了一些例子,其中每一项都是与 http://titan.mydomain.com/example.html 这个URL进行比较。

脚本可以使用document.domain 属性来改变它们的来源,但是只能扩展当前URL的涵盖范围。举个例子,来源属于 http://server1.domain.com 和 http://server2.domain.com 的两个脚本可以把它们的domain属性都设置为 domain.com 以获得相同的来源。
HTML5通过Window里的方法为这类通信提供了一种规范,如下表所示:

作为给这个功能设置的一个场景,下面代码展示了想要解决的问题:
<!DOCTYPE html>
<html lang="en">
<head>
    <meta charset="UTF-8">
    <title>跨文档问题</title>
</head>
<body>
<p id="msg">Ready</p>
<button id="send">Send Message</button>
<p>
    <iframe name="nested" src="http://localhost:53396/show/otherdomain.html" width="38%" height="160px"></iframe>
</p>
<script>
    document.getElementById("send").onclick = function(){
        document.getElementById("msg").innerHTML = "Message Sent";
    }
</script>
</body>
</html>
这个文档包含一个iframe元素,用于载入一个不同来源的文档。脚本只有来自相同主机和端口才算属于同一个来源。这里会从本地服务器上的53396 端口载入这个文档,因此 63342端口的另一个服务器就被认为是不同的来源。下面代码展示了文档 otherdomain.html的内容,它会由 iframe 载入。
<!DOCTYPE html>
<html>
<head>
    <title>Other Page</title>
</head>
<body>
     <h1 id="banner">This is the nested document</h1>
    <script>
        function displayMessage(msg) {
            document.getElementById("banner").innerHTML = msg;
        }
    </script>
</body>
</html>
主文档 window-11.html 的目标是 能够调用嵌入文档 otherdomain.html里script元素所定义的displayMessage函数。
这里将使用postMessage方法,但是需要在包含目标文件的Window上调用这个方法,而且Window对象提供了寻找嵌入文档所需的支持,如下表所示:
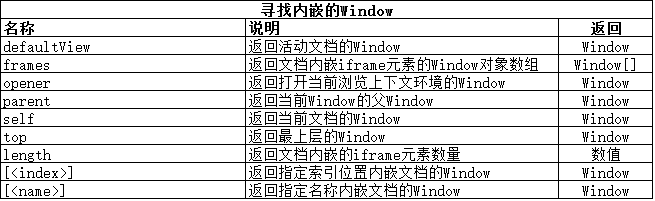
此例中,将使用数组风格的表示法来定位要的Window对象,这样就能调用postMessage方法了。修改文档window-11.html的JavaScript代码如下:
<script>
    document.getElementById("send").onclick = function(){
        window["nested"].postMessage("我的心愿是 - 世界和平!","http://localhost:53396");
        document.getElementById("msg").innerHTML = "Message Sent";
    }
</script
先找到目标Window对象(window["nested"]),它包含想要发送消息的脚本,接着再调用postMessage方法。其中的两个参数是想要发送的消息和目标脚本的来源。来源在这个例子中是 http://localhost:53396,但如果你正在重现这个例子,则会根据你的运行环境有所不同。
PS:作为一项安全措施,如果调用postMessage方法时目标来源错误,浏览器就会丢弃这条消息。
为了接受这条消息,需要在另一个脚本里监听message事件。浏览器会传递一个MessageEvent对象,它定义的属性如下表所示:

修改otherdomain.html 代码如下,使用message事件来接受跨文档的消息。
<!DOCTYPE html>
<html>
<head>
    <title>Other Page</title>
</head>
<body>
     <h1 id="banner">This is the nested document</h1>
    <script>
        window.addEventListener("message", receiveMessage,false);

        function receiveMessage(e) {
            if (e.origin == "http://localhost:63342") {
                displayMessage(e.data);
            } else {
                displayMessage("Message Discarded");
            }
        }

        function displayMessage(msg) {
            document.getElementById("banner").innerHTML = msg;
        }
    </script>
</body>
</html>
当收到message 事件时,会检查MessageEvent对象的origin属性,以确保能识别并信任另一个脚本。 这是个重要的预防措施,防止对来自未知和不受信任脚本的消息进行操作。现在这里就有了一套简单的机制,可以从一个脚本向另一个发送消息,即使它们的来源不同也没有问题。此例的显示效果如下:
8. 使用计时器
Window对象提供的一个有用功能是可以设置一次性和循环的计时器。这些计时器被用于在预设的时间段后执行某个函数。下表概述了支持这项功能的方法。

setTimeout 方法创建的计时器只执行以此指定的函数,而setInterval 方法创建的计时器会重复执行某个函数。这些方法返回一个唯一的标识符,可以稍后把它们作为clearTimeout和clearInterval 方法的参数来撤销计时器。下面代码展示了如何使用这些计时器方法。
<!DOCTYPE html>
<html lang="en">
<head>
    <meta charset="UTF-8">
    <title>使用计时器方法</title>
</head>
<body>
<p id="msg"></p>
<p>
    <button id="settime">Set Time</button>
    <button id="cleartime">Clear Time</button>
    <button id="setinterval">Set Interrval</button>
    <button id="clearinterval">Clear Interval</button>
</p>
<script>
    var buttons = document.getElementsByTagName("button");
    for(var i=0;i<buttons.length;i++){
        buttons[i].onclick = handleButtonPress;
    }

    var timeID;
    var intervalID;
    var count = 0;

    function handleButtonPress(e){
        if(e.target.id == "settime"){
            timeID = window.setTimeout(function(){
                dispalyMsg("Timeout Expired");
            },200)
            dispalyMsg("Timeout Set");
        }else if(e.target.id == "cleartime"){
            window.clearTimeout(timeID);
            dispalyMsg("Timeout Cleared");
        }else if(e.target.id == "setinterval"){
            intervalID = window.setInterval(function(){
               dispalyMsg("Interval expired. Counter: "+ count++);
            },200);
            dispalyMsg("Interval Set");
        }else  if(e.target.id == "clearinterval"){
            window.clearInterval(intervalID);
            dispalyMsg("Interval Cleared");
        }
    }

    function dispalyMsg(msg){
        document.getElementById("msg").innerHTML = msg;
    }
</script>
</body>
</html>
此例中的脚本会设置并撤销计时器与时间间隔计时器,这些计时器调用displayMsg函数来设置某个p元素的内容。从下图可以看到实现效果: