我们在开发WebPart的时候,有的时候需要增加一些动态的配置属性,这些属性我们想保存一些对WebPart的配置参数,比如WebPart要显示的数据是从那个Customer List中抓取的,怎样的显示等等配置,这个时候我们就需要对WebPart的参数进行设置。
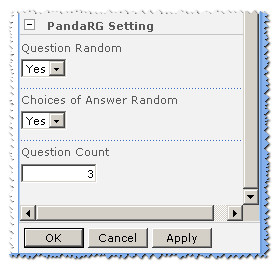
WebPart属性设置,一般分为两类,一种是简单的无服务控件,我们只需声明一个Public类型的属性就可以,在属性上打上一些Attribute就可以了,如下图:

 View Code
 后台代码如下:
public enum YesOrNo
{
No = 0,
Yes = 1
}
[Personalizable(),
WebBrowsable(),
Category("PandaRG Setting"),
DefaultValue(""),
WebPartStorage(Storage.Shared),
FriendlyName("Question Random"),
Description("Question Random") ]
public YesOrNo QuestionRandom
{
get;
set;
}
[Personalizable(),
WebBrowsable(),
Category("PandaRG Setting"),
DefaultValue(""),
WebPartStorage(Storage.Shared),
FriendlyName("Choices of Answer Random"),
Description("Choices of Answer Random")]
public YesOrNo OptionRandom
{
get;
set;
}
[Personalizable(),
WebBrowsable(),
Category("PandaRG Setting"),
DefaultValue("3"),
WebPartStorage(Storage.Shared),
FriendlyName("Question Count"),
Description("Question Count")]
public int QuestionCount
{
get;
set;
}
[Personalizable(),
WebBrowsable(false),
Category("PandaRG Setting"),
DefaultValue("3"),
WebPartStorage(Storage.Shared),
FriendlyName("Exam Count"),
Description("Exam Count")]
public string SourceList
{
get;
set;
}
private string QuestionQueue
{
get
{
if (this.ViewState["_QuestionQueue"] == null)
{
this.ViewState["_QuestionQueue"] = string.Empty;
}
return this.ViewState["_QuestionQueue"].ToString();
}
set
{
this.ViewState["_QuestionQueue"] = value;
}
这是我们最常用的设置方法,也是最简单的设置方法。我们只需在公共属性前加上 这些Attribute就可以了。
[Personalizable(),
WebBrowsable(),
Category("PandaRG Setting"),
DefaultValue(""),
WebPartStorage(Storage.Shared),
FriendlyName("Question Random"),
Description("Question Random") ]
Category 属性为我们进行了分组定义,WebBrowsable()属性为我们的可编辑定义,DefaultValue()属性为默认值做了定义,其它我也不做过多的说明了,通过名称我们也差不多明白它们用途了。
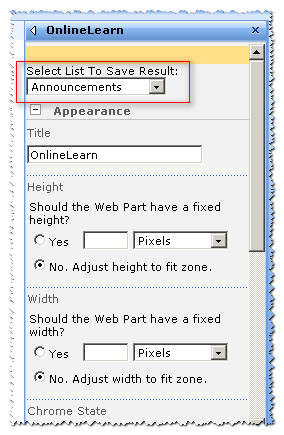
但是,往往这些简单的属性不能够满足我们的需求,我们需要更高级别的设置,这个时候,我们就需要定义EditPart类的帮助了,对我们的属性进行高级的配置开发了,如下图:
我们需要一个下拉选择框对网站所有列表进行筛选,将选择的的结果作为返回值设置到自定义的WebPart中。这时,我们就需要对WebPart的CreateEditorParts()函数进行重写,实现我们需求的逻辑,首先是定义一个衍生的EditPart类,继承EditPart,具体实现,可参考如下代码:
 View Code
 public class ToolPanl : EditorPart
{
private DropDownList dplOptionList;
public ToolPanl()
{
this.ID = "toolPanl";
}
public override bool ApplyChanges()
{
OnlineLearn pt = WebPartToEdit as OnlineLearn;
pt.SourceList = this.dplOptionList.SelectedValue;
return true;
}
public override void SyncChanges()
{
EnsureChildControls();
OnlineLearn pt = WebPartToEdit as OnlineLearn;
pt.SourceList = this.dplOptionList.SelectedValue;
}
protected override void CreateChildControls()
{
this.dplOptionList = new DropDownList();
this.dplOptionList.ID = "drpOption";
SPListCollection lists= SPContext.Current.Web.Lists;
foreach (SPList item in lists)
{
this.dplOptionList.Items.Add(new ListItem(item.Title));
}
this.Controls.Add(this.dplOptionList);
}
protected override void Render(HtmlTextWriter writer)
{
writer.Write("Select List To Save Result: ");
writer.WriteBreak();
this.dplOptionList.RenderControl(writer);
}
protected override void OnInit(EventArgs e)
{
this.EnsureChildControls();
base.OnInit(e);
}
{
private DropDownList dplOptionList;
public ToolPanl()
{
this.ID = "toolPanl";
}
public override bool ApplyChanges()
{
OnlineLearn pt = WebPartToEdit as OnlineLearn;
pt.SourceList = this.dplOptionList.SelectedValue;
return true;
}
public override void SyncChanges()
{
EnsureChildControls();
OnlineLearn pt = WebPartToEdit as OnlineLearn;
pt.SourceList = this.dplOptionList.SelectedValue;
}
protected override void CreateChildControls()
{
this.dplOptionList = new DropDownList();
this.dplOptionList.ID = "drpOption";
SPListCollection lists= SPContext.Current.Web.Lists;
foreach (SPList item in lists)
{
this.dplOptionList.Items.Add(new ListItem(item.Title));
}
this.Controls.Add(this.dplOptionList);
}
protected override void Render(HtmlTextWriter writer)
{
writer.Write("Select List To Save Result: ");
writer.WriteBreak();
this.dplOptionList.RenderControl(writer);
}
protected override void OnInit(EventArgs e)
{
this.EnsureChildControls();
base.OnInit(e);
}
下个章节,我们将对EditPart的高级开发进行详解。

