一:效果图
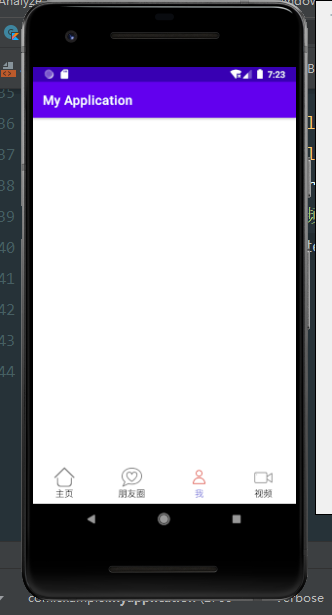
一次只能点击一个标签,当一个标签不是红色(未被选中时才可以被点击),当选中另一个时,
前一个被选中的就会恢复为未被选中
GitHub地址:https://github.com/luofangli/Custom_Bottom_tableBar
 中:
中:
package com.example.myapplication

import android.content.Context
import android.graphics.Color
import android.util.AttributeSet
import android.util.Log
import android.view.Gravity
import android.view.MotionEvent
import android.view.ViewGroup
import android.widget.ImageView
import android.widget.LinearLayout
import android.widget.TextView

class BarItem:LinearLayout {
    //回调状态
    var selectedCallback:((Int)->Unit)?=null
    //记录控件的序号
    var index = -1
    //正常图片
    var nonorImage = 0
    //被选中时的图片
     var selectImage = 0
    //被选中时的颜色,lateinit是稍后初始化,Int类型是没法稍后初始化的
    //初始化时必须要附一个初始值,而现在不想给它初始值就可以用稍后初始化
      var selectColor = 0
    //控件的标题 稍后初始化就表示待会儿一定会有
       var title = ""
    set(value) {
        field = value
        titleTextView?.text = field
    }
    //记录当前点击的状态
     var misSelected = false
    set(value) {
        field = value
        //更新状态
        upDateUI()
    }
    //图片与文本
    private  var iconImageView:ImageView? = null
    private  var titleTextView:TextView? = null
//更新状态图片
    private fun upDateUI() {
      if (misSelected){
          //被选中,切换为选中
          iconImageView?.setImageResource(selectImage)
          titleTextView?.setTextColor(selectColor)
      }else{
          //没有被选中, 切换为未选中状态
          iconImageView?.setImageResource(nonorImage)
          titleTextView?.setTextColor(resources.getColor(R.color.black))
      }
    }

    //构造函数,构造函数就是创建该控件的时候调用
    constructor(context: Context):super(context){
        initView()
    }
    constructor(context: Context,attributeSet: AttributeSet):super(context,attributeSet){
        //解析
        val typedArray = context.obtainStyledAttributes(attributeSet,R.styleable.BarItem)
        //正常图片
        nonorImage = typedArray.getResourceId(R.styleable.BarItem_normalImage,R.drawable.home)
        //被选中时的图片
        selectImage = typedArray.getResourceId(R.styleable.BarItem_selectImage,R.drawable.home_selected)
        //被选中时的颜色
        //getColor得到的返回值是一个整形
        selectColor = typedArray.getColor(R.styleable.BarItem_selectColor,resources.getColor(R.color.red))
        //控件的标题 text是用的稍后初始化,所以这个是一定有的
        title = typedArray.getString(R.styleable.BarItem_title).toString()
        //控件的初始状态
        misSelected = typedArray.getBoolean(R.styleable.BarItem_misSelected,false)
        initView()
    }
    //初始化控件,并添加内容(图片和文字)
    private fun initView(){
        orientation = VERTICAL
        gravity = Gravity.CENTER
        //添加图片
     iconImageView = ImageView(context).apply {
        }.also {
            val lp = LinearLayout.LayoutParams(dp2px(32),dp2px(32))
            addView(it,lp)
        }
        //添加文字
    titleTextView = TextView(context).also {
            val lp = LinearLayout.LayoutParams(ViewGroup.LayoutParams.WRAP_CONTENT,
                ViewGroup.LayoutParams.WRAP_CONTENT )
            addView(it,lp)
        }
    }
    //将dp值转换为px值
    private fun dp2px(dp:Int) = (resources.displayMetrics.density*dp).toInt()
    override fun onTouchEvent(event: MotionEvent?): Boolean {
        if (event?.action == MotionEvent.ACTION_DOWN){
            if (!misSelected){
                misSelected = true
                //回调被点击的事件
                selectedCallback?.let {
                    it(index)
                }
            }
        }
        return true
    }
}
values下  :
:
<?xml version="1.0" encoding="utf-8"?>
<resources>
    <declare-styleable name="BarItem">
        <attr name="normalImage" format="reference"/>
        <attr name="selectImage" format="reference"/>
        <attr name="title" format="string|reference"/>
        <attr name="selectColor" format="color|reference"/>
        <attr name="misSelected" format="boolean|reference"/>
    </declare-styleable>
</resources>

package com.example.myapplication

import android.widget.ImageView

data class ItemModel (
    //data class 数据类,没有任何的计算,仅仅是封装,将散零的数据封装成一个整体
    var normalImageView: Int,
    var selectImageView: Int,
    var selectColor: Int,
    var title: String,
    var misSelected :Boolean
        )
 :
:
package com.example.myapplication

import android.content.Context
import android.util.AttributeSet
import android.view.Gravity
import android.view.ViewGroup
import android.widget.LinearLayout
import java.lang.reflect.Array
import kotlin.jvm.internal.Intrinsics

class TableBar:LinearLayout {
    //记录先前点击的序号
    private var currunt = -1
    //共有多少个item
    var number = 0
    //保存所有item的所有模型数据
    var itemModel:kotlin.Array<ItemModel> = emptyArray<ItemModel>()
    set(value) {
        field = value
        //数据一来就调用某个方法,就在数据来的路上添加set方法,在set方法里面调用,
        upDataUI()
    }
    //保存创建的对象
    val items = mutableListOf<BarItem>()


    //在调用一个控件时,是先调用xml里面的配置,根据配置调用xml构造方法,然后在调用代码的构造方法
    constructor(context: Context):super(context){
        initView()
    }
    constructor(context: Context,attributeSet: AttributeSet):super(context,attributeSet){
        //解析整体
        val typedArray = context.obtainStyledAttributes(attributeSet,R.styleable.TableBar)
        //解析单个
        number = typedArray.getInt(R.styleable.TableBar_number,4)
        typedArray.recycle()
        initView()
    }
    //初始化整体
    private fun initView(){
        orientation = HORIZONTAL
        gravity = Gravity.CENTER_VERTICAL
                for(i in 0 until number){
                    BarItem(context).also {
                        //创建对象但是没有添加内容
                        //lp是设置空间的宽高,加的哪个控件就对哪个控件的宽高进行设置
                        val lp = LinearLayout.LayoutParams(ViewGroup.LayoutParams.WRAP_CONTENT,
                            ViewGroup.LayoutParams.WRAP_CONTENT).apply {
                                weight = 1f
                        }
                        addView(it,lp)
                        //为控件添加监听事件
                        it.selectedCallback = {
                            //还原之前的控件
                            items[currunt].misSelected = false
                            //保存索引
                            currunt = it
                        }
                        items.add(it)
                    }
                }
    }
    //将传过来的内容添加到一个个的创建好的控件上
    private fun upDataUI() {
        for ((i,item) in items.withIndex()){
            item.apply {
                val model = itemModel[i]
                index = i
                nonorImage = model.normalImageView
                selectImage = model.selectImageView
                selectColor = model.selectColor
                title = model.title
                misSelected = model.misSelected
                if (misSelected){
                    currunt = i
                }
            }
        }
    }
}
values下:

<?xml version="1.0" encoding="utf-8"?>
<resources>
    <!--在xml里面配置的只是只有一层关系的属性-->
    <declare-styleable name="TableBar">
        <attr name="number" format="integer|reference"/>
    </declare-styleable>
</resources>
 :
:
<?xml version="1.0" encoding="utf-8"?>
<androidx.constraintlayout.widget.ConstraintLayout xmlns:android="http://schemas.android.com/apk/res/android"
    xmlns:app="http://schemas.android.com/apk/res-auto"
    xmlns:tools="http://schemas.android.com/tools"
    android:layout_width="match_parent"
    android:layout_height="match_parent"
    tools:context=".MainActivity">

    <com.example.myapplication.TableBar
        android:layout_width="match_parent"
        android:layout_height="64dp"
        android:id="@+id/tableBar"
        app:number="4"
        app:layout_constraintBottom_toBottomOf="parent"
        app:layout_constraintEnd_toEndOf="parent"
        app:layout_constraintStart_toStartOf="parent" >
    </com.example.myapplication.TableBar>
</androidx.constraintlayout.widget.ConstraintLayout>

package com.example.myapplication

import android.content.Context
import androidx.appcompat.app.AppCompatActivity
import android.os.Bundle
import android.widget.ImageView
import kotlinx.android.synthetic.main.activity_main.*

class MainActivity : AppCompatActivity() {
    override fun onCreate(savedInstanceState: Bundle?) {
        super.onCreate(savedInstanceState)
        setContentView(R.layout.activity_main)
        tableBar.itemModel = arrayOf(
            ItemModel(
                R.drawable.home,
                R.drawable.home_selected,
                R.color.red,
                "主页",
                true
            ),
            ItemModel(
                R.drawable.circle,
                R.drawable.circle_selected,
                R.color.red,
                "朋友圈",
                false
            ),
            ItemModel(
                R.drawable.me,
                R.drawable.me_selected,
                R.color.red,
                "我",
                false
            ),
            ItemModel(
                R.drawable.video,
                R.drawable.video_selected,
                R.color.red,
                "视频",
                false
            )
        )
    }
}