ASP.NET对请求处理的过程:
当请求一个*.aspx文件的时候,这个请求会被inetinfo.exe进程截获,它判断文件的后缀(aspx)之后,将这个请求转交给 ASPNET_ISAPI.dll,ASPNET_ISAPI.dll会通过http管道(Http PipeLine)将请求发送给ASPNET_WP.exe进程,在ASPNET_WP.exe进程中通过HttpRuntime来处理这个请求,处理完 毕将结果返回客户端。
inetinfo.exe进程:是www服务的进程,IIS服务和ASPNET_ISAPI.DLL都寄存在此进程中。
ASPNET_ISAPI.DLL:是处理.aspx文件的win32组件。其实IIS服务器是只能识别.html文件的,当IIS服务器发现被请求的文件是.aspx文件时,IIS服务器将其交给aspnet_isapi.dll来处理。
aspnet_wp.exe进程:ASP.NET框架进程,提供.net运行的托管环境,.net的CLR(公共语言运行时)就是寄存在此进程中。
ASP.NET Framework处理一个Http Request的流程:
HttpRequest-->inetinfo.exe-->ASPNET_ISAPI.dll-->ASPNET_WP.exe-->HttpRuntime-->HttpApplication Factory-->HttpApplication-->HttpModule-->HttpHandler Factory-->HttpHandler-->HttpHandler.ProcessRequest()
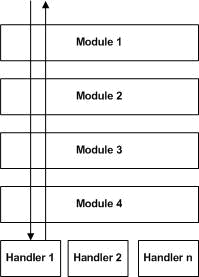
ASP.NET请求处理过程是基于管道模型的,这个管道模型是由多个HttpModule和HttpHandler组成,ASP.NET 把http请求依次传递给管道中各个HttpModule,最终被HttpHandler处理,处理完成后,再次经过管道中的HTTP模块,把结果返回给 客户端。我们可以在每个HttpModule中都可以干预请求的处理过程。

注意:在http请求的处理过程中,只能调用一个HttpHandler,但可以调用多个HttpModule。
当请求到达HttpModule的时候,系统还没有对这个请求真正处理,但是我们可以在这个请求传递到处理中心(HttpHandler)之前附加一些其 它信息,或者截获的这个请求并作一些额外的工作,也或者终止请求等。在HttpHandler处理完请求之后,我们可以再在相应的HttpModule中 把请求处理的结果进行再次加工返回客户端。
HttpModule
HTTP模块是实现了System.Web.IhttpModule接口的类。
IHttpModule接口的声明:
public interface IHttpModule
{
void Init (HttpApplication context);
void Dispose ();
}
Init 方法:系统初始化的时候自动调用,这个方法允许HTTP模块向HttpApplication 对象中的事件注册自己的事件处理程序。
Dispose方法: 这个方法给予HTTP模块在对象被垃圾收集之前执行清理的机会。此方法一般无需编写代码。
HTTP模块可以向System.Web.HttpApplication对象注册下面一系列事件:
AcquireRequestState 当ASP.NET运行时准备好接收当前HTTP请求的对话状态的时候引发这个事件。
AuthenticateRequest 当ASP.NET 运行时准备验证用户身份的时候引发这个事件。
AuthorizeRequest 当ASP.NET运行时准备授权用户访问资源的时候引发这个事件。
BeginRequest 当ASP.NET运行时接收到新的HTTP请求的时候引发这个事件。
Disposed 当ASP.NET完成HTTP请求的处理过程时引发这个事件。
EndRequest 把响应内容发送到客户端之前引发这个事件。
Error 在处理HTTP请求的过程中出现未处理异常的时候引发这个事件。
PostRequestHandlerExecute 在HTTP处理程序结束执行的时候引发这个事件。
PreRequestHandlerExecute 在ASP.NET开始执行HTTP请求的处理程序之前引发这个事件。在这个事件之后,ASP.NET 把该请求转发给适当的HTTP处理程序。
PreSendRequestContent 在ASP.NET把响应内容发送到客户端之前引发这个事件。这个事件允许我们在内容到达客户端之前改变响应内容。我们可以使用这个事件给页面输出添加用于所有页面的内容。例如通用菜单、头信息或脚信息。
PreSendRequestHeaders 在ASP.NET把HTTP响应头信息发送给客户端之前引发这个事件。在头信息到达客户端之前,这个事件允许我们改变它的内容。我们可以使用这个事件在头信息中添加cookie和自定义数据。
ReleaseRequestState 当ASP.NET结束所搜有的请求处理程序执行的时候引发这个事件。
ResolveRequestCache 我们引发这个事件来决定是否可以使用从输出缓冲返回的内容来结束请求。这依赖于Web应用程序的输出缓冲时怎样设置的。
UpdateRequestCache 当ASP.NET完成了当前的HTTP请求的处理,并且输出内容已经准备好添加给输出缓冲的时候,引发这个事件。这依赖于Web应用程序的输出缓冲是如何设置的。
上面这么多的事件,我们看起来可能会有些眼晕,但没关系,下面一步一步地看。
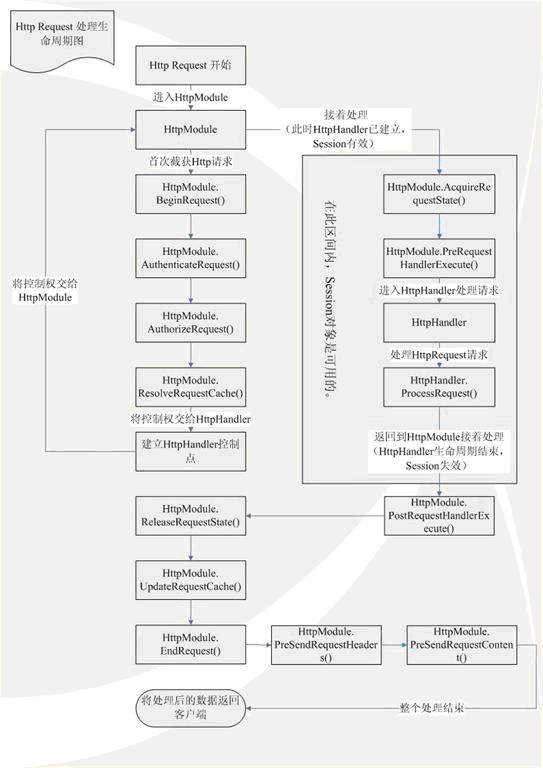
HttpModule生命周期示意图

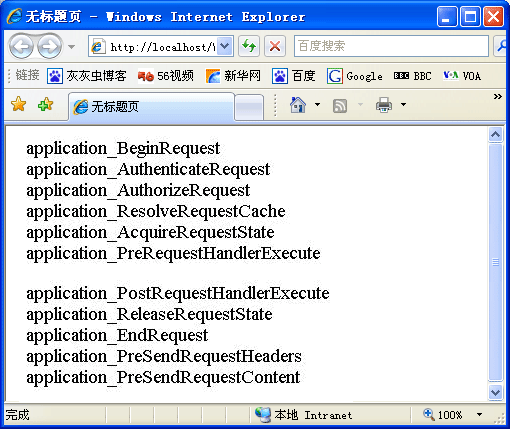
下面是事件的触发顺序:

BeginRequest和PreRequestHandlerExecute之间的事件是在服务器执行HttpHandler处理之前触发。
PostRequestHandlerExecute和PreSendRequestContent之间的事件是在服务器执行Handler处理之后触发。
下面我们看一下如何使用HttpModule来实现我们日常的应用:
HttpModule通过在某些事件中注册,把自己插入ASP.NET请求处理管道。当这些事件发生的时候,ASP.NET调用对相应的HTTP模块,这样该模块就能处理请求了。
1、向每个页面动态添加一些备注或说明性的文字:
有的网站每一个页面都会弹出一个广告或在每个页面都以注释形式(<!-- -->)加入网站的版权信息。如果在每个页面教编写这样的JS代码的话,对于大一点的网站,这种JS代码的编写与维护可是一个很繁琐枯燥的工作。
有了HttpModule我们就可以很简单地解决这个问题了。HttpModule是客户端发出请求到客户端接收到服务器响应之间的一段必经之路。我们完 全可以在服务器处理完请求之后,并在向客户端发送响应文本之前这段时机,把这段注释文字添加到页面文本之后。这样,每一个页面请求都会被附加上这段注释文 字。
这段代码究竟该在哪个事件里实现呢? PostRequestHandlerExecute和PreSendRequestContent之间的任何一个事件都可以,但我比较喜欢在EndRequest事件里编写代码。
第一步:创建一个类库ClassLibrary831。
第二步:编写一个类实现IHttpModule接口
class TestModule:IHttpModule
{
public void Dispose()
{
}
public void Init(HttpApplication context)
{
}
}
第三步:在Init事件中注册EndRequest事件,并实现事件处理方法
class TestModule:IHttpModule
{
public void Dispose(){}
public void Init(HttpApplication context)
{
context.EndRequest += new EventHandler(context_EndRequest);
}
void context_EndRequest(object sender, EventArgs e)
{
HttpApplication ha = (HttpApplication)sender;
ha.Response.Write("<!--这是每个页面都会动态生成的文字。--grayworm-->");
}
}
第四步:在Web.Conofig中注册一下这个HttpModule模块
<httpModules>
<add name="TestModule" type="ClassLibrary831.TestModule,ClassLibrary831"></add>
</httpModules>
name:模块名称,一般是类名
type:有两部分组成,前半部分是命名空间和类名组成的全名,后半部分是程序集名称,如果类是直接放在App_Code文件夹中,那程序名称是App_Code。
这样在Web站点是添加该类库的引用后,运行每个页面,会发现其源文件中都会加入“<!--这是每个页面都会动态生成的文字。--grayworm-->”这句话。同样的方法你也可以在其中加入JS代码。
2、身份检查
大家在作登录时,登录成功后,一般要把用户名放在Session中保存,在其它每一个页面的Page_Load事件中都检查Session中是否存在用户名,如果不存在就说明用户未登录,就不让其访问其中的内容。
在比较大的程序中,这种做法实在是太笨拙,因为你几乎要在每一个页面中都加入检测Session的代码,导致难以开发和维护。下面我们看看如何使用HttpModule来减少我们的工作量
由于在这里我们要用到Session中的内容,我们只能在AcquireRequestState和PreRequestHandlerExecute事 件中编写代码,因为在HttpModule中只有这两事件中可以访问Session。这里我们选择PreRequestHandlerExecute事件 编写代码。
第一步:创建一个类库ClassLibrary831。
第二步:编写一个类实现IHttpModule接口
class TestModule:IHttpModule
{
public void Dispose()
{
}
public void Init(HttpApplication context)
{
}
}
第三步:在Init事件中注册PreRequestHandlerExecute事件,并实现事件处理方法
class AuthenticModule:IHttpModule
{
public void Dispose(){}
public void Init(HttpApplication context)
{
context.PreRequestHandlerExecute += new EventHandler(context_PreRequestHandlerExecute);
}
void context_PreRequestHandlerExecute(object sender, EventArgs e)
{
HttpApplication ha = (HttpApplication)sender;
string path = ha.Context.Request.Url.ToString();
int n = path.ToLower().IndexOf("Login.aspx");
if (n == -1) //是否是登录页面,不是登录页面的话则进入{}
{
if (ha.Context.Session["user"] == null) //是否Session中有用户名,若是空的话,转向登录页。
{
ha.Context.Response.Redirect("Login.aspx?source=" + path);
}
}
}
}
第四步:在Login.aspx页面的“登录”按钮中加入下面代码
protected void Button1_Click(object sender, EventArgs e)
{
if(true) //判断用户名密码是否正确
{
if (Request.QueryString["source"] != null)
{
string s = Request.QueryString["source"].ToLower().ToString(); //取出从哪个页面转来的
Session["user"] = txtUID.Text;
Response.Redirect(s); //转到用户想去的页面
}
else
{
Response.Redirect("main.aspx"); //默认转向main.aspx
}
}
}
第五步:在Web.Conofig中注册一下这个HttpModule模块
<httpModules>
<add name="TestModule" type="ClassLibrary831.TestModule,ClassLibrary831"></add>
</httpModules>
3、多模块的操作
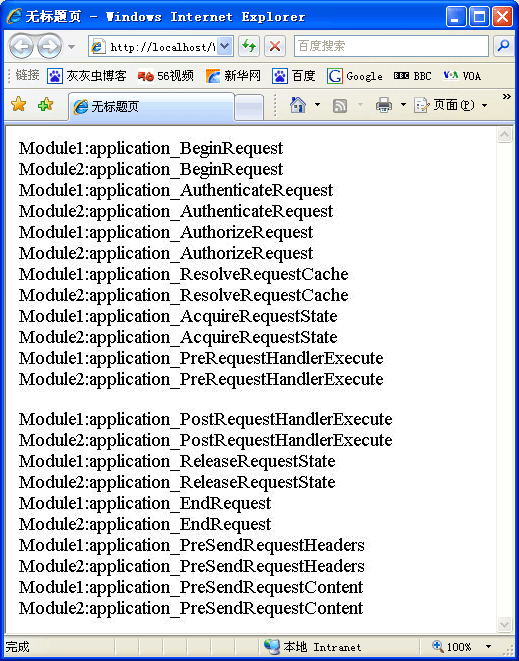
如果定义了多个HttpModule,在web.config文件中引入自定义HttpModule的顺序就决定了多个自定义HttpModule在处理一个HTTP请求的接管顺序。

HttpHandler
HttpHandler是HTTP请求的处理中心,真正地对客户端请求的服务器页面做出编译和执行,并将处理过后的信息附加在HTTP请求信息流中再次返回到HttpModule中。
HttpHandler与HttpModule不同,一旦定义了自己的HttpHandler类,那么它对系统的HttpHandler的关系将是“覆盖”关系。
IHttpHandler接口声明
public interface IHttpHandler
{
bool IsReusable { get; }
public void ProcessRequest(HttpContext context); //请求处理函数
}
示例:把硬盘上的图片以流的方式写在页面上
class TestHandler : IHttpHandler
{
public void ProcessRequest(HttpContext context)
{
FileStream fs = new FileStream(context.Server.MapPath("worm.jpg"), FileMode.Open);
byte[] b = new byte[fs.Length];
fs.Read(b, 0, (int)fs.Length);
fs.Close();
context.Response.OutputStream.Write(b, 0, b.Length);
}
public bool IsReusable
{
get
{
return true;
}
}
}
Web.Config配置文件
<httpHandlers>
<add verb="*" path="*" type="ClassLibrary831.TestHandler,ClassLibrary831"></add>
</httpHandlers>
Verb属性:指定了处理程序支持的HTTP动作。*-支持所有的HTTP动作;“GET”-支持Get操作;“POST”-支持Post操作;“GET, POST”-支持两种操作。
Path属性:指定了需要调用处理程序的路径和文件名(可以包含通配符)。“*”、“*.aspx”、“showImage.aspx”、“test1.aspx,test2.aspx”
Type属性:用名字空间、类名称和程序集名称的组合形式指定处理程序或处理程序工厂的实际类型。ASP.NET运行时首先搜索bin目录中的DLL,接着在GAC中搜索。
这样程序运行的效果是该网站的任何一个页面都会显示worm.jpg图片。如何只让一个页面(default21.aspx)执行HttpHandler 中的ProcessRequest方法呢?最简单的办法是在Web.Config文件中把path配置信息设为default21.aspx。
根据这个例子大家可以考虑一下如何编写“验证码”了。
IHttpHandler工厂
IHttpHandlerFactory的作用是对IHttpHandler进行管理。工厂的作用请见http://hi.baidu.com/grayworm/blog/item/4a832160f8c9de46eaf8f8c1.html"
IHttpHandlerFactory接口的声明:
public interface IHttpHandlerFactory
{
IHttpHandler GetHandler (HttpContext context,string requestType,string url,string pathTranslated);
void ReleaseHandler (IHttpHandler handler);
}
GetHandler返回实现IHttpHandler接口的类的实例,ReleaseHandler使工厂可以重用现有的处理程序实例。
示例:两个用IHttpHandlerFactory来实现对不同HttpHandler的调用。
有两个HttpHandler:将图片显示在页面上的HttpHandler和生成验证码的Handler
//将图片显示在页面上的Handler
class TestHandler : IHttpHandler
{
public void ProcessRequest(HttpContext context)
{
FileStream fs = new FileStream(context.Server.MapPath("worm.jpg"), FileMode.Open);
byte[] b = new byte[fs.Length];
fs.Read(b, 0, (int)fs.Length);
fs.Close();
context.Response.OutputStream.Write(b, 0, b.Length);
}
public bool IsReusable
{
get
{
return true;
}
}
}
//生成验证码的Handler
class CodeHandler:IHttpHandler
{
public bool IsReusable
{
get
{
return true;
}
}
public void ProcessRequest(HttpContext context)
{
Image b = new Bitmap(50,20);
Graphics g = Graphics.FromImage(b);
SolidBrush sb = new SolidBrush(Color.White);
Font f = new Font("宋体", 12);
string str = "";
Random r = new Random();
for (int i = 0; i < 4; i++)
{
str += r.Next(10);
}
g.DrawString(str,f,sb,0,0);
b.Save(context.Response.OutputStream, System.Drawing.Imaging.ImageFormat.Jpeg);
}
}
IHttpHandler工厂
class TestHandlerFactory : IHttpHandlerFactory
{
public IHttpHandler GetHandler(HttpContext context, string requestType, string url, string pathTranslated)
{
string fname = url.Substring(url.IndexOf('/') + 1);
while (fname.IndexOf('/') != -1)
fname = fname.Substring(fname.IndexOf('/') + 1);
string cname = fname.Substring(0, fname.IndexOf('.'));
string className ="";
className = "ClassLibrary831.CodeHandler";
object h = null;
try
{
//h = new TestHandler();
h = Activator.CreateInstance(Type.GetType(className));
}
catch (Exception e)
{
throw new HttpException("工厂不能为类型" + cname + "创建实例。", e);
}
return (IHttpHandler)h;
}
public void ReleaseHandler(IHttpHandler handler)
{
}
}(车延禄)
配置文件
<httpHandlers>
<add verb="*" path="default21.aspx,default22.aspx" type="ClassLibrary831.TestHandlerFactory,ClassLibrary831"></add>
</httpHandlers>
这样TestHandlerFactory就会根据请求的不同页面执行不同的HttpHandler处理程序了。
HttpHandler使用会话
如果要在处理程序中使用Session,那必须把该HttpHandler实现IRequiresSessionState接口,,IRequiresSessionState接口是个空接口,它没有抽象方法,只是一个标记。此处就不作例子验证了。