各位中秋节快乐啊,我觉得在这个月圆之夜有必要写一篇源码解析,以表示我内心的高兴~
Sentinel源码解析系列:
1.Sentinel源码分析—FlowRuleManager加载规则做了什么?
2. Sentinel源码分析—Sentinel是如何进行流量统计的?
3. Sentinel源码分析— QPS流量控制是如何实现的?
在我的第二篇文章里面2. Sentinel源码分析—Sentinel是如何进行流量统计的?里面介绍了整个Sentinel的主流程是怎样的。所以降级的大致流程可以概述为:
1. 设置降级策略,是根据平均响应时间还是异常比例来进行降级的
2. 根据资源创建一系列的插槽
3. 依次调用插槽,根据设定的插槽类型来进行降级
我们先来看个例子,方便大家自己断点跟踪:
private static final String KEY = "abc";
private static final int threadCount = 100;
private static int seconds = 60 + 40;

public static void main(String[] args) throws Exception {

		List<DegradeRule> rules = new ArrayList<DegradeRule>();
		DegradeRule rule = new DegradeRule();
		rule.setResource(KEY);
		// set threshold rt, 10 ms
		rule.setCount(10);
		rule.setGrade(RuleConstant.DEGRADE_GRADE_RT);
		rule.setTimeWindow(10);
		rules.add(rule);
		DegradeRuleManager.loadRules(rules);

    for (int i = 0; i < threadCount; i++) {
        Thread entryThread = new Thread(new Runnable() {

            @Override
            public void run() {
                while (true) {
                    Entry entry = null;
                    try {
                        TimeUnit.MILLISECONDS.sleep(5);
                        entry = SphU.entry(KEY);
                        // token acquired
                        pass.incrementAndGet();
                        // sleep 600 ms, as rt
                        TimeUnit.MILLISECONDS.sleep(600);
                    } catch (Exception e) {
                        block.incrementAndGet();
                    } finally {
                        total.incrementAndGet();
                        if (entry != null) {
                            entry.exit();
                        }
                    }
                }
            }
        });
        entryThread.setName("working-thread");
        entryThread.start();
    }
}
其他的流程基本上和第二篇文章里介绍的差不多,这篇文章来介绍Sentinel的主流程,Sentinel的降级策略全部都是在DegradeSlot中进行操作的。
DegradeSlot
public class DegradeSlot extends AbstractLinkedProcessorSlot<DefaultNode> {
    @Override
    public void entry(Context context, ResourceWrapper resourceWrapper, DefaultNode node, int count, boolean prioritized, Object... args)
        throws Throwable {
        DegradeRuleManager.checkDegrade(resourceWrapper, context, node, count);
        fireEntry(context, resourceWrapper, node, count, prioritized, args);
    }
}
DegradeSlot会直接调用DegradeRuleManager进行降级的操作,我们直接进入到DegradeRuleManager.checkDegrade方法中。
DegradeRuleManager#checkDegrade
public static void checkDegrade(ResourceWrapper resource, Context context, DefaultNode node, int count)
    throws BlockException {
    //根据resource来获取降级策略
    Set<DegradeRule> rules = degradeRules.get(resource.getName());
    if (rules == null) {
        return;
    }

    for (DegradeRule rule : rules) {
        if (!rule.passCheck(context, node, count)) {
            throw new DegradeException(rule.getLimitApp(), rule);
        }
    }
}
这个方法逻辑也是非常的清晰,首先是根据资源名获取到注册过的降级规则,然后遍历规则集合调用规则的passCheck,如果返回false那么就抛出异常进行降级。
DegradeRule#passCheck
public boolean passCheck(Context context, DefaultNode node, int acquireCount, Object... args) {
    //返回false直接进行降级
    if (cut.get()) {
        return false;
    }
    //降级是根据资源的全局节点来进行判断降级策略的
    ClusterNode clusterNode = ClusterBuilderSlot.getClusterNode(this.getResource());
    if (clusterNode == null) {
        return true;
    }
    //根据响应时间降级策略
    if (grade == RuleConstant.DEGRADE_GRADE_RT) {
        //获取节点的平均响应时间
        double rt = clusterNode.avgRt();
        if (rt < this.count) {
            passCount.set(0);
            return true;
        }
        //rtSlowRequestAmount默认是5
        // Sentinel will degrade the service only if count exceeds.
        if (passCount.incrementAndGet() < rtSlowRequestAmount) {
            return true;
        }
        //    根据异常比例降级
    } else if (grade == RuleConstant.DEGRADE_GRADE_EXCEPTION_RATIO) {
        double exception = clusterNode.exceptionQps();
        double success = clusterNode.successQps();
        double total = clusterNode.totalQps();
        // If total amount is less than minRequestAmount, the request will pass.
        if (total < minRequestAmount) {
            return true;
        }

        // In the same aligned statistic time window,
        // "success" (aka. completed count) = exception count + non-exception count (realSuccess)
        double realSuccess = success - exception;
        if (realSuccess <= 0 && exception < minRequestAmount) {
            return true;
        }

        if (exception / success < count) {
            return true;
        }
        //    根据异常数降级
    } else if (grade == RuleConstant.DEGRADE_GRADE_EXCEPTION_COUNT) {
        double exception = clusterNode.totalException();
        if (exception < count) {
            return true;
        }
    }
    //根据设置的时间窗口进行重置
    if (cut.compareAndSet(false, true)) {
        ResetTask resetTask = new ResetTask(this);
        pool.schedule(resetTask, timeWindow, TimeUnit.SECONDS);
    }

    return false;
}
这个方法首先会去获取cut的值,如果是true那么就直接进行限流操作。然后会根据resource获取ClusterNode全局节点。往下分别根据三种不同的策略来进行降级。
DEGRADE_GRADE_RT根据响应时间进行降级
if (grade == RuleConstant.DEGRADE_GRADE_RT) {
    //获取节点的平均响应时间
    double rt = clusterNode.avgRt();
    if (rt < this.count) {
        passCount.set(0);
        return true;
    }
    //rtSlowRequestAmount默认是5
    // Sentinel will degrade the service only if count exceeds.
    if (passCount.incrementAndGet() < rtSlowRequestAmount) {
        return true;
    }
}
如果是根据响应时间进行降级,那么会获取clusterNode的平均响应时间,如果平均响应时间大于所设定的count(默认是毫秒),那么就调用passCount加1,如果passCount大于5,那么直接降级。
所以看到这里我们应该知道根据平均响应时间降级前几个请求即使响应过长也不会立马降级,而是要等到第六个请求到来才会进行降级。
我们进入到clusterNode的avgRt方法中看一下是如何获取到clusterNode的平均响应时间的。
clusterNode是StatisticNode的实例
StatisticNode#avgRt
public double avgRt() {
    //获取当前时间窗口内调用成功的次数
    long successCount = rollingCounterInSecond.success();
    if (successCount == 0) {
        return 0;
    }
    //获取窗口内的响应时间
    return rollingCounterInSecond.rt() * 1.0 / successCount;
}
```e

这个方法主要是调用rollingCounterInSecond获取成功次数,然后再获取窗口内的响应时间,用总响应时间除以次数得到平均每次成功调用的响应时间。

在[1.Sentinel源码分析—FlowRuleManager加载规则做了什么?](https://www.cnblogs.com/luozhiyun/p/11439993.html)中,我已经具体讲述了StatisticNode里面的rollingCounterInMinute实现原理,rollingCounterInMinute是按分钟进行统计的时间窗口。现在我们来讲一下rollingCounterInSecond按秒来进行统计的时间窗口。

在StatisticNode里面初始化rollingCounterInSecond:
```java
private transient volatile Metric rollingCounterInSecond = new ArrayMetric(SampleCountProperty.SAMPLE_COUNT,
    IntervalProperty.INTERVAL);
在这个初始化的方法里,会传入两个参数,SampleCountProperty.SAMPLE_COUNT的值是2,
IntervalProperty.INTERVAL的值是1000。
我们进入到ArrayMetric的构造方法中:
private final LeapArray<MetricBucket> data;
public ArrayMetric(int sampleCount, int intervalInMs) {
    this.data = new OccupiableBucketLeapArray(sampleCount, intervalInMs);
}
在创建ArrayMetric实例的时候会给data创建一个OccupiableBucketLeapArray实例。
OccupiableBucketLeapArray
public OccupiableBucketLeapArray(int sampleCount, int intervalInMs) {
    // This class is the original "CombinedBucketArray".
    super(sampleCount, intervalInMs);
    this.borrowArray = new FutureBucketLeapArray(sampleCount, intervalInMs);
}
OccupiableBucketLeapArray继承LeapArray这个抽象类,初始化的时候会调用父类的构造器:
LeapArray
public LeapArray(int sampleCount, int intervalInMs) {
    AssertUtil.isTrue(sampleCount > 0, "bucket count is invalid: " + sampleCount);
    AssertUtil.isTrue(intervalInMs > 0, "total time interval of the sliding window should be positive");
    //intervalInMs是sampleCount的整数
    AssertUtil.isTrue(intervalInMs % sampleCount == 0, "time span needs to be evenly divided");
    //每个小窗口的时间跨度
    this.windowLengthInMs = intervalInMs / sampleCount;
    //窗口的长度
    this.intervalInMs = intervalInMs;
    //窗口个数
    this.sampleCount = sampleCount;

    this.array = new AtomicReferenceArray<>(sampleCount);
}
OccupiableBucketLeapArray在初始化的时候也会创建一个FutureBucketLeapArray实例赋值给borrowArray。
FutureBucketLeapArray也是继承LeapArray:
public FutureBucketLeapArray(int sampleCount, int intervalInMs) {
    // This class is the original "BorrowBucketArray".
    super(sampleCount, intervalInMs);
}
直接通过调用父类LeapArray的构造方法进行初始化。
到这里rollingCounterInSecond的创建过程讲完了。
下面我们再回到StatisticNode中,在调用StatisticNode的avgRt方法的时候会调用rollingCounterInSecond.success()方法获取当前时间窗口的调用成功次数:
ArrayMetric#success
public long success() {
    //设置或更新当前的时间窗口
    data.currentWindow();
    long success = 0;
    //获取窗口里有效的Bucket
    List<MetricBucket> list = data.values();
    for (MetricBucket window : list) {
        success += window.success();
    }
    return success;
}
这里的data是的父类是LeapArray,LeapArray里面有一个array数组,用来记录时间窗口,在我们这里是基于秒钟的时间窗口,所以array的大小为2。data的结构图我直接从1.Sentinel源码分析—FlowRuleManager加载规则做了什么?中拿过来:
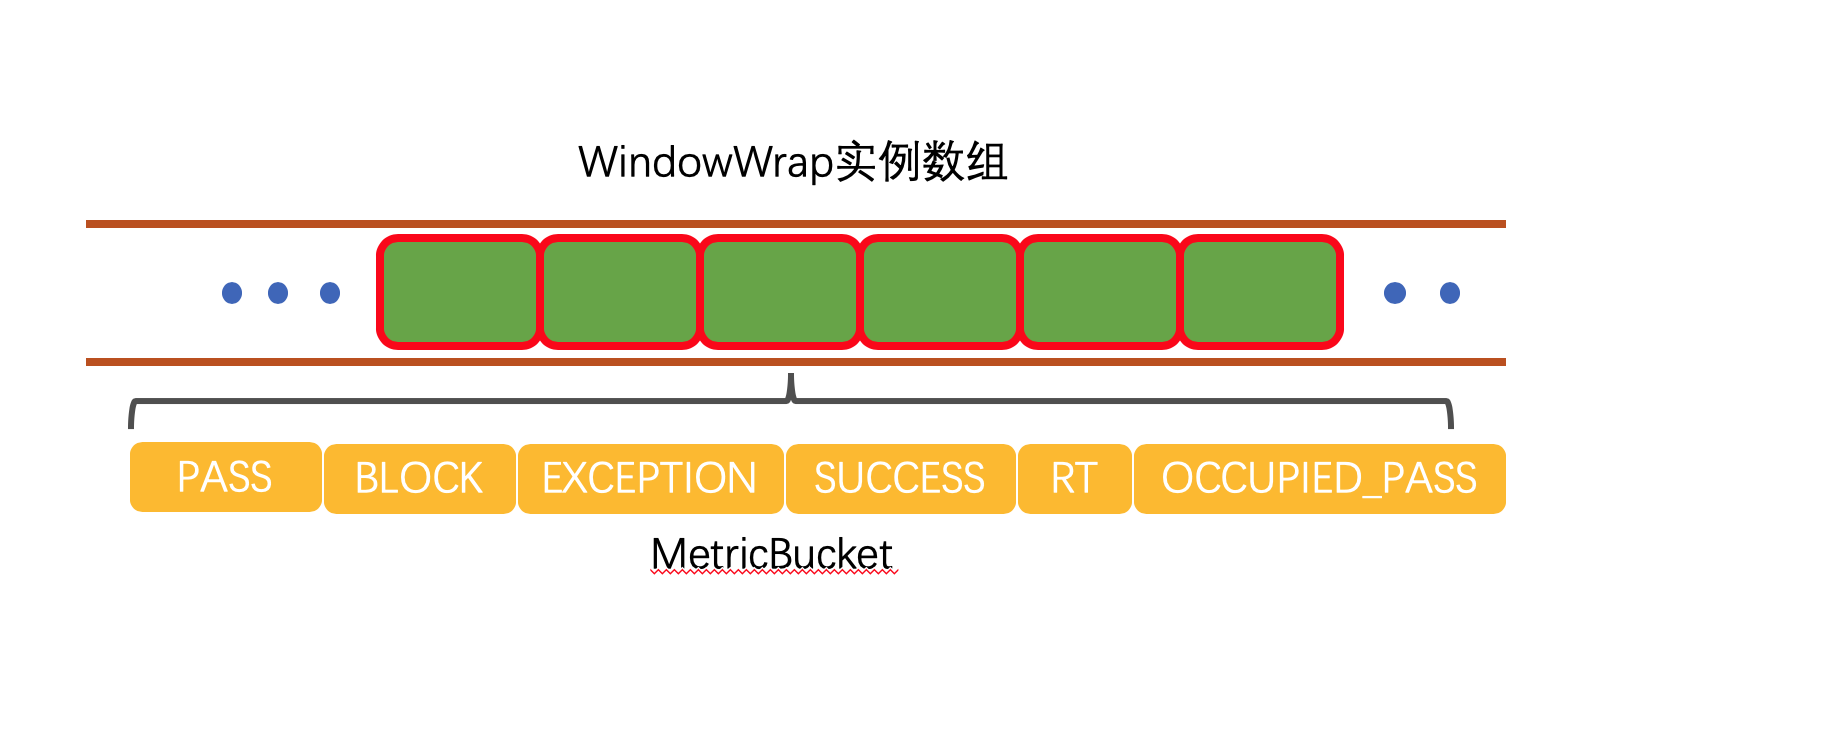
只不过这里的WindowWrap数组元素只有两个,每一个WindowWrap元素由MetricBucket对象构成,用来统计数据,如:通过次数、阻塞次数、异常次数等~
调用data的currentWindow方法会调用到LeapArray的currentWindow方法中去:
LeapArray#currentWindow
public WindowWrap<T> currentWindow(long timeMillis) {
    if (timeMillis < 0) {
        return null;
    }
    //通过当前时间判断属于哪个窗口
    int idx = calculateTimeIdx(timeMillis);
    //计算出窗口开始时间
    // Calculate current bucket start time.
    long windowStart = calculateWindowStart(timeMillis);

    while (true) {
        //获取数组里的老数据
        WindowWrap<T> old = array.get(idx);
        if (old == null) {

            WindowWrap<T> window = new WindowWrap<T>(windowLengthInMs, windowStart, newEmptyBucket(timeMillis));
            if (array.compareAndSet(idx, null, window)) {
                // Successfully updated, return the created bucket.
                return window;
            } else {
                // Contention failed, the thread will yield its time slice to wait for bucket available.
                Thread.yield();
            }
            // 如果对应时间窗口的开始时间与计算得到的开始时间一样
            // 那么代表当前即是我们要找的窗口对象,直接返回
        } else if (windowStart == old.windowStart()) {

            return old;
        } else if (windowStart > old.windowStart()) {
            //如果当前的开始时间小于原开始时间,那么就更新到新的开始时间
            if (updateLock.tryLock()) {
                try {
                    // Successfully get the update lock, now we reset the bucket.
                    return resetWindowTo(old, windowStart);
                } finally {
                    updateLock.unlock();
                }
            } else {
                // Contention failed, the thread will yield its time slice to wait for bucket available.
                Thread.yield();
            }
        } else if (windowStart < old.windowStart()) {
            //一般来说不会走到这里
            // Should not go through here, as the provided time is already behind.
            return new WindowWrap<T>(windowLengthInMs, windowStart, newEmptyBucket(timeMillis));
        }
    }
}
这里我简单介绍一下这个方法,这个方法的详细讲解已经在第一篇源码分析里做了。
这个方法里面会根据当前的时间戳来计算出array数组里面的index,然后去array数组中找相应的数据,如果节点已经存在,那么用CAS更新一个新的节点;如果节点是新的,那么直接返回;如果节点失效了,设置当前节点,清除所有失效节点。
这里我直接引用1.Sentinel源码分析—FlowRuleManager加载规则做了什么?中的例子:
1. 如果array数据里面的bucket数据如下所示:
  NULL      B4
|_______|_______|
800     1000    1200
    ^
   time=888
正好当前时间所对应的槽位里面的数据是空的,那么就用CAS更新

2. 如果array里面已经有数据了,并且槽位里面的窗口开始时间和当前的开始时间相等,那么直接返回
      B3      B4
 ||_______|_______||___
800     1000    1200  timestamp
      ^
    time=888

3. 例如当前时间是1676,所对应窗口里面的数据的窗口开始时间小于当前的窗口开始时间,那么加上锁,然后设置槽位的窗口开始时间为当前窗口开始时间,并把槽位里面的数据重置
   (old)
             B0
 |_______||_______|
 ...    1200     1400
    ^
  time=1676
再回到ArrayMetric的success方法中,往下走调用data.values()方法:
LeapArray#success
public List<T> values(long timeMillis) {
    if (timeMillis < 0) {
        return new ArrayList<T>();
    }
    int size = array.length();
    List<T> result = new ArrayList<T>(size);

    for (int i = 0; i < size; i++) {
        WindowWrap<T> windowWrap = array.get(i);
        if (windowWrap == null || isWindowDeprecated(timeMillis, windowWrap)) {
            continue;
        }
        result.add(windowWrap.value());
    }
    return result;
}
这个方法就是用来获取所有有效的MetricBucket,并返回。
然后通过调用MetricBucket的success方法获取被成功调用的次数。
我们接着来看ArrayMetric的rt方法:
public long rt() {
    data.currentWindow();
    long rt = 0;
    //获取当前时间窗口的统计数据
    List<MetricBucket> list = data.values();
    //统计当前时间窗口的平均相应时间之和
    for (MetricBucket window : list) {
        rt += window.rt();
    }
    return rt;
}
这个方法和上面的success方法差不多,获取所有的MetricBucket的rt数据求和返回。
然后就可以通过rt方法返回的时间总和除以成功调用的总和求得平均数。
我们再回到DegradeRule的passCheck方法中的响应时间降级策略中:
if (grade == RuleConstant.DEGRADE_GRADE_RT) {
    //获取节点的平均响应时间
    double rt = clusterNode.avgRt();
    if (rt < this.count) {
        passCount.set(0);
        return true;
    }
    //rtSlowRequestAmount默认是5
    // Sentinel will degrade the service only if count exceeds.
    if (passCount.incrementAndGet() < rtSlowRequestAmount) {
        return true;
    }
    //    根据异常比例降级
}
//省略
return false;
如果求得的平均响应时间小于设置的count时间,那么就重置passCount并返回true,表示不抛出异常;如果有连续5次的响应时间都超过了count,那么就返回false抛出异常进行降级。
DEGRADE_GRADE_EXCEPTION_RATIO根据异常比例降级
if (grade == RuleConstant.DEGRADE_GRADE_EXCEPTION_RATIO) {
    //获取每秒异常的次数
    double exception = clusterNode.exceptionQps();
    //获取每秒成功的次数
    double success = clusterNode.successQps();
    //获取每秒总调用次数
    double total = clusterNode.totalQps();
    // If total amount is less than minRequestAmount, the request will pass.
    // 如果总调用次数少于5,那么不进行降级
    if (total < minRequestAmount) {
        return true;
    }

    // In the same aligned statistic time window,
    // "success" (aka. completed count) = exception count + non-exception count (realSuccess)
    double realSuccess = success - exception;
    if (realSuccess <= 0 && exception < minRequestAmount) {
        return true;
    }

    if (exception / success < count) {
        return true;
    }
}
。。。
return false;
这个方法中获取成功调用的Qps和异常调用的Qps,验证后,然后求一下比率,如果没有大于count,那么就返回true,否则返回false抛出异常。
我们再进入到exceptionQps方法中看一下:
StatisticNode#exceptionQps
public double exceptionQps() {
    return rollingCounterInSecond.exception() / rollingCounterInSecond.getWindowIntervalInSec();
}
rollingCounterInSecond.getWindowIntervalInSec方法是表示窗口的时间长度,用秒来表示。这里返回的是1。
ArrayMetric#exception
public long exception() {
    data.currentWindow();
    long exception = 0;
    List<MetricBucket> list = data.values();
    for (MetricBucket window : list) {
        exception += window.exception();
    }
    return exception;
}
这个方法和我上面分析的差不多,大家看看就好了。
根据异常数降级DEGRADE_GRADE_EXCEPTION_COUNT
if (grade == RuleConstant.DEGRADE_GRADE_EXCEPTION_COUNT) {
    double exception = clusterNode.totalException();
    if (exception < count) {
        return true;
    }
}
根据异常数降级是非常的直接的,直接根据统计的异常总次数判断是否超过count。
到这里就讲完了降级的实现咯~~