Exercise:PCA and Whitening
第0步:数据准备
UFLDL下载的文件中,包含数据集IMAGES_RAW,它是一个512*512*10的矩阵,也就是10幅512*512的图像
(a)载入数据
利用sampleIMAGESRAW函数,从IMAGES_RAW中提取numPatches个图像块儿,每个图像块儿大小为patchSize,并将提取到的图像块儿按列存放,分别存放在在矩阵patches的每一列中,即patches(:,i)存放的是第i个图像块儿的所有像素值
(b)数据去均值化处理
将每一个图像块儿的所有像素值都减去该图像块儿的平均像素值,实现数据的去均值化
下图是显示的随机选取的图像块儿

第一步:执行PCA
该部分分为两部分
(1)进行PCA计算,这里仅仅对数据x进行旋转得到xrot,而不进行主成分的提取
具体地:
①计算数据x的协方差矩阵sigma
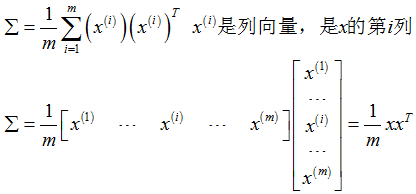
②对sigma进行特征分解,利用matlab的eig函数,从而得到sigma的特征向量构成的矩阵U
[U,S,V]=eig(sigma);
U=[u1,...,ui,...,un],它的每一列分别是sigma的特征向量,n是输入数据的特征维数
S=diag([λ1,...λi,...,λn])是由sigma的特征值作为对角元素的对角阵,ui和λi相对应;
为了后续的计算,这里要将U的各列次序进行调换,使得调换后的各列所对应的特征值大小依次递减;
调换后的矩阵仍记作U,相应的特征值对角阵仍即为S,即:
U=[u1,...,ui,...,un],S=diag([λ1,...λi,...,λn]),满足:λ1>=...>=λi>=...>=λn
③利用矩阵U对数据x进行旋转,得到xrot,即xrot=U‘*x
(2)对旋转后的数据求解协方差矩阵covar,并将其可视化,观察得到的选择后的数据是否正确
PCA保证选择后的数据的协方差矩阵是一个对角阵,如果covar是正确的
那么它的图像应该是一个蓝色背景,并且在对角线位置有一斜线
这里显示协方差矩阵covar利用了matlab的imagesc,该函数真的很强大呀
imagesc(covar)的作用是:把矩阵covar以图像形式显示出来,矩阵中不同的数值会被赋予不同的颜色
得到的协方差矩阵的图像如下:可以看到,图像处了对角线位置外,其余部分颜色都相同

第二步:满足条件的主成分个数
本部分,找到满足条件的主成分的个数k
也就是找到最小的k值,使得(λ1+...+ λk)/(λ1+...+ λn)>某个百分数,如99%
第三步:利用找到的主成分个数,对数据进行降维
在第二步,已经找到了数字k,也就是,保留数据的k个主成分就满足了要求
在该步,将对数据x进行降维,只留下k个主成分,得到xTidle
同时,为了观察降维后的数据的好坏,在利用U(:,k)将降维后的数据变换会原来的维数,也就是得到了原数据的近似恢复数据
并利用网格将恢复出的图像显示出,与原图像进行比较,下面第一幅图是由降维后的图像恢复出的原数据,下图是相应的原数据,可以发现,降维后的数据基本可以恢复出于原数据非常相近的数据


第四步:PCA白化+正则化
该部分分为两步
(1)执行具有白化和正则化的PCA
首先,对数据进行旋转(利用特征矩阵U)
然后,利用特征值对旋转后的数据进行缩放,实现白化
同时,在利用特征值缩放时,利用参数ε对特征值进行微调,实现正则化

(b)计算百化后的数据的协方差矩阵,观察该协方差矩阵
如果加入了正则化项,则该协方差矩阵的对角线元素都小于1
如果没有加入正则项(即仅有旋转+白化),则该协方差矩阵的对角线元素都为1(实际上,是令ε为一个极小的数)
下图是白化后数据的协方差矩阵对应的图像,上图是加入正则化后的结果,下图是没有加入正则化后的结果


第五步:ZCA白化
ZCA白化,就是在PCA白化的基础上做了一个旋转,即

下面的第一幅图是ZCA白化后的结果图,第二幅图是相应的原始图像
可以看到,ZCA白化的结果图似乎是原始图像的边缘


下面,是该部分的pca_gen的代码
clc
clear
close all

%%================================================================
%% Step 0a: Load data
%  Here we provide the code to load natural image data into x.
%  x will be a 144 * 10000 matrix, where the kth column x(:, k) corresponds to
%  the raw image data from the kth 12x12 image patch sampled.
%  You do not need to change the code below.
x = sampleIMAGESRAW();%从IMAGES_RAW中读取一些图像patches
figure('name','Raw images');%显示一个figure,标题为raw images
randsel = randi(size(x,2),200,1); % A random selection of samples for visualization
display_network(x(:,randsel));%显示随机选取的图像块儿
%% Step 0b: Zero-mean the data (by row)
%  You can make use of the mean and repmat/bsxfun functions.
% -------------------- YOUR CODE HERE --------------------
x=x-repmat(mean(x),size(x,1),1);%x的每一列的所有元素都减去该列的均值


%%================================================================
%% Step 1a: Implement PCA to obtain xRot
%  Implement PCA to obtain xRot, the matrix in which the data is expressed
%  with respect to the eigenbasis of sigma, which is the matrix U.
% -------------------- YOUR CODE HERE --------------------
xRot = zeros(size(x)); % You need to compute this
% 计算协方差矩阵并进行特征值分解
m=size(x,1);%输入的样本个数
sigma=x*x'/m;%输入数据的协方差矩阵
[U,S,V]=eig(sigma);%对协方差矩阵进行特征值分解
[S_Value,S_Index]=sort(diag(S),'descend');%提取S的对角线元素,将其按降序排列,sIndex是排序后的编号
U=U(:,S_Index);
S=diag(S_Value);
% 对数据进行旋转
xRot=U'*x;

%% Step 1b: Check your implementation of PCA
%  The covariance matrix for the data expressed with respect to the basis U
%  should be a diagonal matrix with non-zero entries only along the main
%  diagonal. We will verify this here.
%  Write code to compute the covariance matrix, covar.
%  When visualised as an image, you should see a straight line across the
%  diagonal (non-zero entries) against a blue background (zero entries).
% -------------------- YOUR CODE HERE --------------------
covar = zeros(size(x, 1)); % You need to compute this
covar=xRot*xRot'/m;%旋转数据后的数据对应的协方差矩阵
% Visualise the covariance matrix. You should see a line across the
% diagonal against a blue background.
figure('name','Visualisation of covariance matrix');
imagesc(covar);

%%================================================================
%% Step 2: Find k, the number of components to retain
%  Write code to determine k, the number of components to retain in order
%  to retain at least 99% of the variance.
% -------------------- YOUR CODE HERE --------------------
k = 0; % Set k accordingly
S_diag=diag(S);
S_sum=sum(S_diag);
for k=1:size(x,1)
    Sk_sum=sum(S_diag(1:k));
    if Sk_sum/S_sum>=0.99
        break;
    end
end

%%================================================================
%% Step 3: Implement PCA with dimension reduction
%  Now that you have found k, you can reduce the dimension of the data by
%  discarding the remaining dimensions. In this way, you can represent the
%  data in k dimensions instead of the original 144, which will save you
%  computational time when running learning algorithms on the reduced
%  representation.
%
%  Following the dimension reduction, invert the PCA transformation to produce
%  the matrix xHat, the dimension-reduced data with respect to the original basis.
%  Visualise the data and compare it to the raw data. You will observe that
%  there is little loss due to throwing away the principal components that
%  correspond to dimensions with low variation.

% -------------------- YOUR CODE HERE --------------------
% 对数据进行降维
xTidle=U(:,1:k)'*x;
% 利用降维后的数据xTidle对数据进行恢复
xHat = zeros(size(x));  % You need to compute this
xHat = U*[xTidle;zeros(m-k,size(x,2))];

% Visualise the data, and compare it to the raw data
% You should observe that the raw and processed data are of comparable quality.
% For comparison, you may wish to generate a PCA reduced image which
% retains only 90% of the variance.

figure('name',['PCA processed images ',sprintf('(%d / %d dimensions)', k, size(x, 1)),'']);
display_network(xHat(:,randsel));
figure('name','Raw images');
display_network(x(:,randsel));

%%================================================================
%% Step 4a: Implement PCA with whitening and regularisation
%  Implement PCA with whitening and regularisation to produce the matrix
%  xPCAWhite.
epsilon =0.000001;
% -------------------- YOUR CODE HERE --------------------
xPCAWhite = zeros(size(x));
xPCAWhite=diag(1./sqrt(S_diag+epsilon))*xRot;
%% Step 4b: Check your implementation of PCA whitening
%  Check your implementation of PCA whitening with and without regularisation.
%  PCA whitening without regularisation results a covariance matrix
%  that is equal to the identity matrix. PCA whitening with regularisation
%  results in a covariance matrix with diagonal entries starting close to
%  1 and gradually becoming smaller. We will verify these properties here.
%  Write code to compute the covariance matrix, covar.
%
%  Without regularisation (set epsilon to 0 or close to 0),
%  when visualised as an image, you should see a red line across the
%  diagonal (one entries) against a blue background (zero entries).
%  With regularisation, you should see a red line that slowly turns
%  blue across the diagonal, corresponding to the one entries slowly
%  becoming smaller.
% -------------------- YOUR CODE HERE --------------------
covar=xPCAWhite*xPCAWhite'/m;
% Visualise the covariance matrix. You should see a red line across the
% diagonal against a blue background.
figure('name','Visualisation of covariance matrix');
imagesc(covar);

%%================================================================
%% Step 5: Implement ZCA whitening
%  Now implement ZCA whitening to produce the matrix xZCAWhite.
%  Visualise the data and compare it to the raw data. You should observe
%  that whitening results in, among other things, enhanced edges.
xZCAWhite = zeros(size(x));
% -------------------- YOUR CODE HERE --------------------
xZCAWhite=U*xPCAWhite;%ZCA白化即在PCA白化基础上做了一个旋转
% Visualise the data, and compare it to the raw data.
% You should observe that the whitened images have enhanced edges.
figure('name','ZCA whitened images');
display_network(xZCAWhite(:,randsel));
figure('name','Raw images');
display_network(x(:,randsel));