解决什么样的问题?
@Override
public void transfer(String sourceName,String targetName,Float money){
//1.根据名称查询转出账户
Account source=accountDao.findByName(sourceName);
//2.根据名称查询转入账户
Account target=accountDao.findByName(targetName);
//3.转出账户减钱
source.setMoney(source.getMoney()-money);
//4.转入账户加钱
target.setMoney(target.getMoney()+money);
//5.更新转出账户
accountDao.update(source);
//模拟转账异常
int i=1/0;//6.更新转入账户
accountDao.update(target);
动态代理
1.基于接口
/*创建一个被代理的类(这里加入是笔记本电脑生产厂家),被代理类要实现代理类接口*/
public class ComputerFactory implements IAgent{
    public void sale(Float money){
        System.out.println("一手交钱"+money+"一手交货");
    }
    public void afterService(Float money){
        System.out.println("维想修,拿钱来"+money);
    }
}
/*创建一个代理类(接口),(这里假设是生产厂家的代理,帮着买电脑等...)*/

public interface IAgent {
    public void sale(Float money);
    public void afterService(Float money);
}
/*下面是如何使用代理类代理处理业务的*/
package spring.day03.agent;

import java.lang.reflect.InvocationHandler;
import java.lang.reflect.Method;
import java.lang.reflect.Proxy;

public class Demo {
    /**
     * 动态代理
     * 特点:字节码随用随创建,随用随加载
     * 分类:
     * 基于接口的
     * 基于子类的
     * 作用:
     * 在不改变源码的基础上对已有方法增强
     * 此类讲解的是基于接口的动态代理
     * 提供者:JDK官方
   * 涉及的类:Proxy
     * 创建代理对象的方法:newProxyInstance
   * 方法的参数:
     * ClassLoader:类加载器。和被代理象使用相同的类加载器。该参数是固定写法。
     * Class[]:字节码数组。和被代理对象具有相同的行为,实现相同的接口。
     * InvocationHandler:它是一个接口。提供如何代理的代码。也就是增强的代码。该参数一般都成名内部类。
     * 并且它是策略模式的体现。
     * 策略模式:
     * 要求:数据已经有了,目的明确。
     * 达成目标的过程就是策略。
     * 该参数是谁用谁写。
     * 使用要求:被代理类最少实现一个接口。
     */
    public static void main(String[] args) {
        final ComputerFactory factory = new ComputerFactory();
        IAgent proxyFactory = (IAgent) Proxy.newProxyInstance(factory.getClass().getClassLoader(), factory.getClass().getInterfaces(), new InvocationHandler() {
            /**
             *该方法的特征:
             *执行被代理对象的任何方法,都会经过该方法。该方法有拦截的特点
             *方法的参数:
             *Object proxy:代理对象的引用。
             *Method method:当前执行的方法
             *Object[]args:当前执行方法所需的参数
             *方法的返回值:
             *Object:和被代理对象的方法返回值一致。
             * */
            @Override
            public Object invoke(Object proxy, Method method, Object[] args) throws Throwable {

                Object rtValue = null;
                //1.获取正在执行方法的参数
                Float money = (Float) args[0];
                //2.判断正在执行的方法
                if ("sale".equals(method.getName())) {
                    //经销商最少一台电脑挣2000元钱
                    if (money > 7000) {
                        rtValue = method.invoke(factory, money / 2);
                    }
                }
                if ("afterservice".equals(method.getName())) {
                    //经销商最少一台电脑正600元
                    if (money > 1600) {
                        rtValue = method.invoke(factory, money / 4 * 3);
                    }
                }
                return rtValue;
//                return method.invoke(factory,args);
            }
        });
//        factory.sale(5000f);
//        factory.afterService(100f);
        proxyFactory.sale(10000f);
        proxyFactory.afterService(100f);
    }
}
2.基于子类
<!--所需依赖-->
  <dependency>
      <groupId>cglib</groupId>
      <artifactId>cglib</artifactId>
      <version>2.2.2</version>
    </dependency>
    <dependency>
      <groupId>asm</groupId>
      <artifactId>asm</artifactId>
      <version>3.3.1</version>
    </dependency>
/*被代理的类*/
public class ComputerFactory {
    public void sale(Float money){
        System.out.println("一手交钱"+money+"一手交货");
    }
    public void afterService(Float money){
        System.out.println("维想修,拿钱来"+money);
    }
}
/*执行代理的代码*/
public class Demo {
    /**
     * 动态代理
     * 特点:字节码随用随创建,随用随加载
     * 分类:
     * 基于接口的
     * 基于子类的
     * 作用:
     * 在不改变源码的基础上对已有方法增强
     * 此类讲解的是基于子类的动态代理
     * 提供者:cglib
     * 依赖外部jar:cglib;asm;
     * 涉及的类:Enhancer
     * 创建代理对象的方法:create
     * 方法的参数:
     * Class:字节码。指定被代理文件的字节码文件
     * CallBack:如何代理。
     * <p>
     * 使用要求:被代理类不能是最终类
     */
    public static void main(String[] args) {
        ComputerFactory factory = new ComputerFactory();
        ComputerFactory cglibfactory = (ComputerFactory) Enhancer.create(factory.getClass(), new MethodInterceptor() {
            /**
             *它和InvocationHandler中的invoke方法作用是一样的
             *该方法的前3个参数和invoke方法的三个参数作用是一样的。
             *该方法的返回值和invoke方法的返回值作用也是一样的。
             *
             *MethodProxy参数:它是当前执行方法的代理对象,一般用不到。
             */
            @Override
            public Object intercept(Object Proxy, Method method, Object[] args, MethodProxy methodProxy) throws Throwable {

                Object rtValue = null;
                //1.获取正在执行方法的参数
                Float money = (Float) args[0];
                //2.判断正在执行的方法
                if ("sale".equals(method.getName())) {
                    //经销商最少一台电脑挣2000元钱
                    if (money > 7000) {
                        rtValue = method.invoke(factory, money / 2);
                    }
                }
                if ("afterService".equals(method.getName())) {
                    //经销商最少一台电脑正600元
                    if (money > 1600) {
                        rtValue = method.invoke(factory, money / 4 * 3);
                    }
                }
                return rtValue;
//                return method.invoke(factory,args);
            }
        });
        cglibfactory.sale(10000f);
        cglibfactory.afterService(5000f);
    }
}
AOP概述

简单的说它就是把我们程序重复的代码抽取出来,在需要执行的时候,使用动态代理的技术,在不修改源码的基础上,对我们的已有方法进行增强。
作用:
在程运行期间:不修改源码对已有方法进行增强。
优点:
减少重复代码
提高开发效案
维护方便
基于XML的AOP配置
项目依赖:
        <!--    junit:方便我们进行方法的测试-->
        <dependency>
            <groupId>junit</groupId>
            <artifactId>junit</artifactId>
            <version>4.12</version>
            <!--      <scope>test</scope>-->
        </dependency>
        <!--  spring-context:导入spring核心jar包  -->
        <dependency>
            <groupId>org.springframework</groupId>
            <artifactId>spring-context</artifactId>
            <version>5.0.7.RELEASE</version>
            <!--      <scope>test</scope>-->
        </dependency>
        <dependency>
            <groupId>mysql</groupId>
            <artifactId>mysql-connector-java</artifactId>
            <version>5.1.46</version>
        </dependency>
        <!--    导入日志jar包-->
        <dependency>
            <groupId>commons-logging</groupId>
            <artifactId>commons-logging</artifactId>
            <version>1.2</version>
        </dependency>
        <dependency>
            <groupId>jakarta.annotation</groupId>
            <artifactId>jakarta.annotation-api</artifactId>
            <version>1.3.4</version>
        </dependency>
        <dependency>
            <groupId>cglib</groupId>
            <artifactId>cglib</artifactId>
            <version>2.2.2</version>
        </dependency>
        <dependency>
            <groupId>asm</groupId>
            <artifactId>asm</artifactId>
            <version>3.3.1</version>
        </dependency>
        <dependency>
            <groupId>org.aspectj</groupId>
            <artifactId>aspectjweaver</artifactId>
            <version>1.9.2</version>
        </dependency>
SpringXML配置文件:
<?xml version="1.0" encoding="UTF-8"?>
<beans xmlns="http://www.springframework.org/schema/beans"
       xmlns:xsi="http://www.w3.org/2001/XMLSchema-instance"
       xmlns:aop="http://www.springframework.org/schema/aop"
       xsi:schemaLocation="http://www.springframework.org/schema/beans
        http://www.springframework.org/schema/beans/spring-beans.xsd
        http://www.springframework.org/schema/aop
        http://www.springframework.org/schema/aop/spring-aop.xsd">
    <!--    配置业务逻辑层-->
    <bean id="AccountService" class="main.java.spring.day03.aop.impl.AccountServiceImpl"></bean>
    <!--spring基于xml的aop配置步骤:
    前期准备:
    1.拷贝aop的jar包
    2.在配置文件中导入aop的约束
    配置步骤:
        1.把通知bean也交给spring来管理
        2.使用aop名称空间下的aop:config标签开始aop的配置
        3.使用aop:aspect标签,开始配置切面。
            id属性:用于给切面提供一个唯一标识
            ref属性:用于引用通知bean的id。
        4.使用aop:before标签配置前置通知
            method属性:用于指定通知类中的哪个方法是前置通知
            pointcut属性:用于指定切入点表达式。
                切入点表达式:
                    关键字:execution(表达式)
                表达式的写法:
                    访问修饰符返回值包名。包名...类名.方法名(参数列表)
                    全匹配方式:
                        public vdid main.java.spring.day03.aop.impl.AccountServiceImpl.saveAccount()
                    访问修饰符可以省略:
                                void main.java.spring.day03.aop.impl.AccountServiceImpl.saveAccount()
                    返回值可以使用*,表示任意返回值类型
                        * main.java.spring.day03.aop.impl.AccountServiceImpl.saveAccount()
                    包名可以使用*,表示任意包。但是有几级包,需要写几个*
                        * *,*,*,*,*,*.AccountServiceImpl.saveAccount()
                    包名可以使用..表示当前包及其子包:
                        * *..AccountServiceImpl.saveAccount()
                    类名可以使用*,表示任意类
                        **..*.saveAccount()
                    方法名可以使用*,表示任意方法
                        *main.java.spring..*.*()
                    参数列表可以指定具体类型:
                        基本类型直接写类型名称:*main.java.spring..*.*(int)
                        引用类型必须是包名,类名的方式:*main.java.spring..*.*(java.lang.String)
                    参数列表可以使用*,表示任意参数类型,但是必须有参数
                            *main.java.spring..*.*(*)
                    参数列表可以使用..,表示有无参数均可:
                            *main.java.spring..*.*(..)
  -->
    <bean id="logger" class="main.java.spring.day03.aop.Logger"></bean>
    <aop:config>
        <!--使用aop:pointcut标签可以配置通用切入点表达式 ;写在切面aop:aspect标签内部,只能当前切面使用。
  如果要想所有切面使用,请写到aop:aspect标签外面-->
        <aop:pointcut expression="execution(* main.java.spring..*.*(..)) " id="pt"/>
        <aop:aspect id="logerAop" ref="logger">
            <!--        配置前置通知:她永远都会在切入点方法执行之前执行-->
            <aop:before method="beforeprintLog"
                        pointcut="execution(public void main.java.spring.day03.aop.impl.AccountServiceImpl.saveAccount())"></aop:before>
            <!--配置后置通知:当切入点方法正常执行之后,后置通知执行。它和异常通知只能有一个执行-->
            <aop:after-returning method="afterReturningPrintLog" pointcut="execution(* main.java.spring..*.*(..))"/>
            <!--配置异常通知:当切入点方法执行产生异常后执行。它和后置通知是互斥的-->
            <aop:after-throwing method="afterThrowingPrintLog" pointcut="execution(* main.java.spring..*.*(..))"/>
            <!--配置最终通知:无论切入点方法是否正常执行,它都会在其后面执行-->
            <aop:after method="afterPrintLog" pointcut="execution (* main.java.spring..*.*(..))"/>
            <!--配置环绕通知:详细注释写到Logger类里了-->
            <aop:around method="aroundPrintLog" pointcut-ref="pt"/>
        </aop:aspect>

    </aop:config>
</beans>
/*
业务层代码
*/
public interface AccountService {
    /**
     * 保存账户
     */
    void saveAccount();
}

/*
业务层实现类
 */
public class AccountServiceImpl implements AccountService {
    private AccountDao accountDao;

    public void setAccountDao(AccountDao accountDao) {
        this.accountDao = accountDao;
    }

    @Override
    public void saveAccount() {
        System.out.println("保存账户!!!");
//        int a=1/0;//模拟异常
    }
}
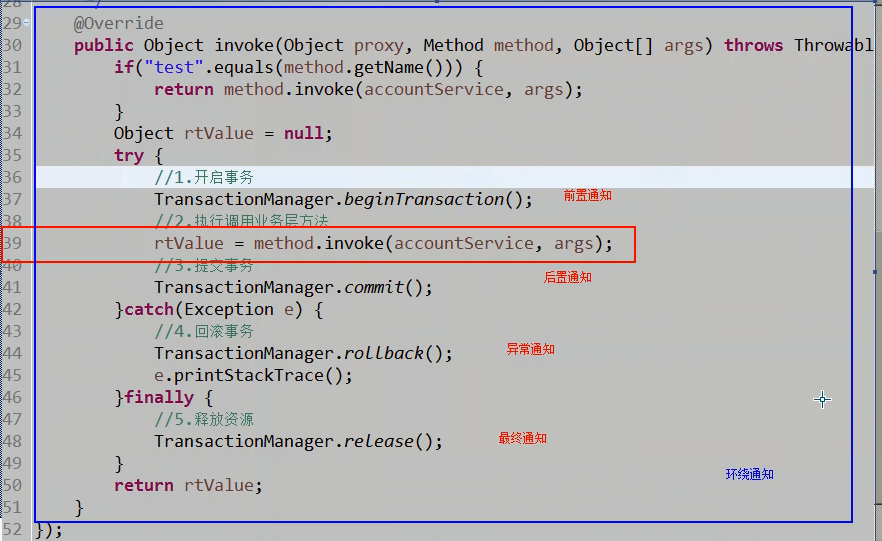
/*****************切面类*************************/
package main.java.spring.day03.aop;

import org.springframework.aop.aspectj.MethodInvocationProceedingJoinPoint;

public class Logger {
    /**
     *计划让其在切入点方法执行之前执行
     */
    public void beforeprintLog() {
        System.out.println("Logger类中的beforePrintLog方法开始记录日志了。。。前置");
    }

    /**
     * 后置通知
     */
     public void afterReturningPrintLog(){
     System.out.println("Logger类中的afterReturningPrintLog方法开始记录日志了。。。后置");
     }

     /**
     *异常通知
     */
    public void afterThrowingPrintLog(){
        System.out.println("Logger类中的afterThrowingPrintLog方法开始记录日志了。。。异常");
    }
    /**
     *最终通知
     */
    public void afterPrintLog() {
        System.out.println("Logger类中的afterPrintLog方法开始记录日志了。。。最终");

    }

    /**
     *环绕通知
     * 问题:
     * 当我们配置了环绕通知之后,执行切入点方法时,最终的结果是环绕通知的代码执行了,而切入点方法却没有执行。
     * 分析:
     * 根据动态代理的代码分析,可以看到invoke方法中有一个明确调用切入点方法的代码。而我们spring中的环绕通知目前没有调用切入点方法
     * 解决办法:
     *  思路:我们也需要在环绕通知中明确调用一下切入点方法。
     *  Spring框架为我们提供了一个接口:ProceedingJoinPoint。该接口可以作为环绕通知的方法参数来使用。
     *  在程序运行时spring框架会为我们注入该接口的实现类供我们使用。I
     *  该接口有个方法:
     *             proceed()方法,它就相当于明确调用切入点方
     *   环绕通知:它是spring为我们提供的一种可以在代码中手动控制通知何时执行的方式方式。
     */

    public Object aroundPrintLog(MethodInvocationProceedingJoinPoint pjp) {
        //获取方法所需参数
        Object[] args = pjp.getArgs();
        Object rtValue = null;
        try {
            System.out.println("Logger类中的aroundPrintLog方法开始记录日志了。。。前置");
            rtValue = pjp.proceed(args);
            System.out.println("Logger类中的aroundPrintLog方法开始记录日志了。。。后置");
        } catch (Throwable throwable) {
            System.out.println("Logger类中的aroundPrintLog方法开始记录日志了。。。异常");
            throwable.printStackTrace();
        }finally {
            System.out.println("Logger类中的aroundPrintLog方法开始记录日志了。。。最终");
        }
        return rtValue;
    }

}
/******************测试类**************/
public class Client {
    public static void main(String[] args) {
        ClassPathXmlApplicationContext context = new ClassPathXmlApplicationContext("config/bean_aop.xml");
        AccountServiceImpl accountService = context.getBean("AccountService", AccountServiceImpl.class);
        accountService.saveAccount();
        context.close();
    }
}
基于注解的AOP配置
项目依赖:
 <!--    junit:方便我们进行方法的测试-->
        <dependency>
            <groupId>junit</groupId>
            <artifactId>junit</artifactId>
            <version>4.12</version>
            <!--      <scope>test</scope>-->
        </dependency>
        <!--  spring-context:导入spring核心jar包  -->
        <dependency>
            <groupId>org.springframework</groupId>
            <artifactId>spring-context</artifactId>
            <version>5.1.2.RELEASE</version>
            <!--      <scope>test</scope>-->
        </dependency>
        <dependency>
            <groupId>mysql</groupId>
            <artifactId>mysql-connector-java</artifactId>
            <version>5.1.46</version>
        </dependency>
        <!--    导入日志jar包-->
        <dependency>
            <groupId>commons-logging</groupId>
            <artifactId>commons-logging</artifactId>
            <version>1.2</version>
        </dependency>
        <dependency>
            <groupId>jakarta.annotation</groupId>
            <artifactId>jakarta.annotation-api</artifactId>
            <version>1.3.4</version>
        </dependency>
        <dependency>
            <groupId>cglib</groupId>
            <artifactId>cglib</artifactId>
            <version>2.2.2</version>
        </dependency>
        <dependency>
            <groupId>asm</groupId>
            <artifactId>asm</artifactId>
            <version>3.3.1</version>
        </dependency>
        <dependency>
            <groupId>org.aspectj</groupId>
            <artifactId>aspectjweaver</artifactId>
            <version>1.9.2</version>
        </dependency>
spring配置类
/**
 * 创建spring的配置类,相当于原来的bean.xml
 */
@Configuration
@ComponentScan("spring")//配置要扫描的包
@EnableAspectJAutoProxy//开启spring对注解AOP的支持
public class SpringConfigtion {

}
业务层实现类
/*
业务层实现类
 */
@Service("accountService")
public class AccountServiceImpl implements AccountService {


    @Override
    public void saveAccount() {
        System.out.println("保存账户!!!");
//        int a=1/0;//模拟异常
    }
}
切面类
@Component("logger")
@Aspect//把此类配置成一个切面
public class Logger {
    @Pointcut("execution(* spring..*.*(..))")
    public void pt(){

    }
    /**
     * 前置通知
     *计划让其在切入点方法执行之前执行
     */
    @Before(value = "pt()")
    public void beforeprintLog() {
        System.out.println("Logger类中的beforePrintLog方法开始记录日志了。。。前置");
    }

    /**
     * 后置通知
     */
    @AfterReturning(value = "pt()")
     public void afterReturningPrintLog(){
     System.out.println("Logger类中的afterReturningPrintLog方法开始记录日志了。。。后置");
     }

     /**
     *异常通知
     */
     @AfterThrowing(value = "pt()")
    public void afterThrowingPrintLog(){
        System.out.println("Logger类中的afterThrowingPrintLog方法开始记录日志了。。。异常");
    }
    /**
     *最终通知
     */
    @After(value = "pt()")
    public void afterPrintLog() {
        System.out.println("Logger类中的afterPrintLog方法开始记录日志了。。。最终");

    }


//    @Around(value = "pt()")
    public Object aroundPrintLog(ProceedingJoinPoint pjp) {
        //获取方法所需参数
        Object[] args = pjp.getArgs();
        Object rtValue = null;
        try {
            System.out.println("Logger类中的aroundPrintLog方法开始记录日志了。。。前置");
            rtValue = pjp.proceed(args);
            System.out.println("Logger类中的aroundPrintLog方法开始记录日志了。。。后置");
        } catch (Throwable throwable) {
            System.out.println("Logger类中的aroundPrintLog方法开始记录日志了。。。异常");
            throwable.printStackTrace();
        }finally {
            System.out.println("Logger类中的aroundPrintLog方法开始记录日志了。。。最终");
        }
        return rtValue;
    }

}
测试类
public class Client {
    public static void main(String[] args) {
        AnnotationConfigApplicationContext context = new AnnotationConfigApplicationContext(SpringConfigtion.class);
        AccountService accountService = (AccountService)context.getBean("accountService");
        accountService.saveAccount();
        context.close();
    }
}