0X01 Thinkphp 的安装
我这里选择的是使用 windows 下的 composer 进行安装,收下首先下载 composer 这个工具,安装完成以后进入我们想要创建项目的文件夹输入下面的命令
|
1
|
composer create-project topthink/think tp5 dev-master --prefer-dist |
这样就会在当前目录下形成一个 名为 tp5 的文件夹,这个文件夹中存放的就是 thinkphp5 的基本的框架
0X02 重点目录结构及文件介绍
1.目录结构
application : 应用目录,我们的模型视图控制器都会放在这个文件夹下,这是我们开发的主阵地
public : 这个是我们项目的入口文件,thinkphp 是一个单一入口的框架
thinkphp : 框架的核心目录
2.关键文件
application/config.php 项目配置文件,开启 debug 调试模式(在开发中)
application/database.php 数据库配置文件
public/index.php 项目入口文件,定义了应用目录的位置以及包含框架启动文件来启动框架
0X03 配置虚拟主机
1.httpd.conf 中判断下面是否被注释,如果被注释请取消注释
(1)Include conf/vhosts.conf (2)LoadModule vhost_alias_module modules/mod_vhost_alias.so
2.删除 vhost.conf 中原有的默认内容,添加如下内容
|
1
2
3
4
5
6
7
8
9
10
11
|
<VirtualHost *:80> DocumentRoot "E:phpstudyPHPTutorialWWW p5public" ServerName localhost <Directory "E:phpstudyPHPTutorialWWW p5public"> Options FollowSymLinks ExecCGI AllowOverride All Order allow,deny Allow from all Require all granted </Directory> </VirtualHost> |
3.配置 URL 重写
http.conf 中解开下面的注释
|
1
|
LoadModule rewrite_module modules/mod_rewrite.so |
并在虚拟主机配置中写上
|
1
|
AllowOverride All |
注意:如果使用 phpstudy 的话,官方默认的 .htaccess 是不可以的,需要修改成下面这个样子
|
1
2
3
4
5
6
7
|
<IfModule mod_rewrite.c> RewriteEngine on RewriteCond %{REQUEST_FILENAME} !-d RewriteCond %{REQUEST_FILENAME} !-f RewriteRule ^(.*)$ index.php [L,E=PATH_INFO:$1] </IfModule> |
0X04 基本的写法
1.控制器的基本写法
(1)模块中的控制器实际上就是一个一个的类,这个类写的时候要继承 Controller 并且要在前面写上命名空间
(2) thinkPHP5 使用 return 来返回一个html ,自动渲染到页面上
(3)tp5 使用的是 $this->requrst->param() 接受参数,当然也要在开始写上命名空间
示例代码:
|
1
2
3
4
5
6
7
8
9
10
11
12
|
<?php namespace appindexcontroller; use thinkController; use thinkRequest; class Index extends Controller { public function index() { print_r($this->request->param()); return '<style type="text/css">*{ padding: 0; margin: 0; } .think_default_text{ padding: 4px 48px;} a{color:#2E5CD5;cursor: pointer;text-decoration: none} a:hover{text-decoration:underline; } body{ background: #fff; font-family: "Century Gothic","Microsoft yahei"; color: #333;font-size:18px} h1{ font-size: 100px; font-weight: normal; margin-bottom: 12px; } p{ line-height: 1.6em; font-size: 42px }</style><div style="padding: 24px 48px;"> <h1>:)</h1><p> ThinkPHP V5<br/><span style="font-size:30px">十年磨一剑 - 为API开发设计的高性能框架</span></p><span style="font-size:22px;">[ V5.0 版本由 <a href="http://www.qiniu.com" rel="external nofollow" target="qiniu">七牛云</a> 独家赞助发布 ]</span></div><script type="text/javascript" src="https://tajs.qq.com/stats?sId=9347272" charset="UTF-8"></script><script type="text/javascript" src="https://e.topthink.com/Public/static/client.js"></script><think id="ad_bd568ce7058a1091"></think>'; } } |
我们这样访问
http://localhost/index.php/index/index/index/a/3/b/4/c/5
结果:

2.模板和控制器的关系
每一个模块都有自己的控制器、视图、和模型,访问的时候是按照 index.php/模块/控制器/方法,访问的,然后每一个控制器在 view 中对应着一个同名的文件夹,比如说 controller/Index 控制器, view/Index 就是这个控制器对应的模板文件夹,那么每一个方法都会在模板文件夹下对应一个同名的 html 文件作为这个方法的模板
tp5 是通过
|
1
|
$this->assign('data',$data); |
进行赋值并通过
|
1
|
return $this->fetch('模板名'); |
进行渲染的
示例代码:
index/controller/Index.php
|
1
2
3
4
5
6
7
8
9
10
11
12
13
|
<?php namespace appindexcontroller; use thinkController; class Index extends Controller { public function index() { $data = "K0rz3n"; $this->assign('data',$data); return $this->fetch(); } } |
Index/view/Index/index.html
|
1
2
3
4
5
6
7
8
|
<html> <head> </head> <body> hello {$data}! </body> </html> |
3.对 SEO 友好的路由
我们知道,我们的搜索引擎抓取页面最多抓三层,但是我们刚刚写的那种 URL 已经太多层了,这非常不利于搜索引擎的收录,于是 tp5 给我们提供了一种简化的方法,就是 route.php
示例代码:
|
1
2
3
4
5
6
7
8
9
10
11
12
|
return [ '__pattern__' => [ 'name' => 'w+', ], '[hello]' => [ // ':id' => ['index/hello', ['method' => 'get'], ['id' => 'd+']], // ':name' => ['index/hello', ['method' => 'post']], ], 'hello/[:name]' => ['index/Index/hello',['method' => 'get','ext' => 'html']], ]; |
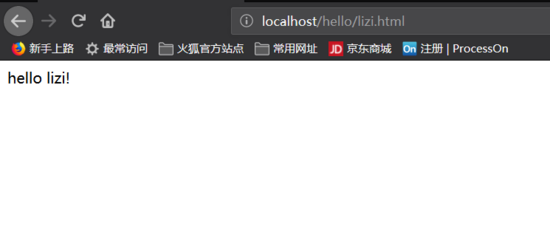
这个意思就是我们访问 hello/name 就会转给 index/Index/hello ,并且要求是 Get 方法,后缀名是 HTML
配置好后我们只要添加这样几个东西就 OK 了
|
1
2
3
4
5
|
public function hello($name = 'zhangsan') { $this->assign('name',$name); return $this->fetch(); } |
hello.html
|
1
2
3
4
5
6
7
8
|
<html> <head> </head> <body> hello {$name}! </body> </html> |
如图所示:
当然在这种情况下参数名还是会很多斜杠,还是不是很友好,于是我们可以在 config.php 中将默认的斜杠分隔符进行修改,改成其他的这样就避免了这个问题
4.URL 自动生成
tp5 给我们提供了 url() 这个函数帮我们自动生成 Url
|
1
2
3
4
|
public function url() { echo url('url2','a=1&b=2'); } |
这个方法运行的结果就是
/index/index/url2/a/1/b/2.html
5.请求和响应
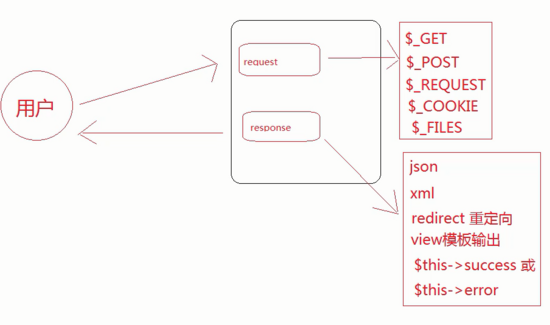
1.接收请求的参数
访问: http://localhost/index/index/req/username/test
通过以下代码可以得到 username
|
1
|
echo $this->request->param('username'); |
或者我们可以使用函数助手 input(),下面这段代码能达到和上面一样的效果
|
1
|
echo input('username'); |
包括我们通过下面的代码获取 url
|
1
|
echo $this->request->url(); |
这个也有自己的函数助手
|
1
|
echo request()->url(); |
我们可以获分别获取 get post cookie file 等方式的参数
|
1
2
3
4
|
$this->request->get() $this->request->post() $this->request->cookie() $this->request->file() |
或者实例化一个 Request 对象,但是这种方法只能接受 url 后面是 & 连接的参数,重写的好像不行
|
1
2
3
4
5
6
|
$Request = Request::instance() $request->get() $Rquest->post() $Request->cookie() $Request->file() |
2.绑定参数
|
1
2
|
$this->request->bind('user',"hh"); echo $this->request->user; |
那么为什么请求还要动态地绑定参数呢?因为很多时候需要传递 session 的值,来维持会话
3.返回值
可以返回多种格式的值 比如 json xml 或者通过 $this->fetch() 来进行模板渲染
|
1
2
|
return json($data); return xml($data); |
当然我们的 tp 也有对一些东西的封装,比如实现输出一段话然后进行跳转到某个方法,或者是直接进行重定向
|
1
2
|
return json($data); return xml($data); |
6.模板与输出
一般的模板渲染就不想介绍了,这里说下模板布局,其实就是在 view 文件夹下有一个 layout.html 文件,这个文件的内容是这样的
layout.html
|
1
2
3
|
{include file="/index/header"/} {__CONTENT__} {include file="/index/footer"/} |
然后我们写模板的时候就在最上面加上对这个文件的引用
|
1
|
{layout name="layout"/} |
如果我们想全局引入页眉页脚,这个配置需要在 config.php 中进行设置,在模板配置中添加下面的代码
|
1
2
3
|
'layout_on' => 'true', 'layout_name' => 'layout', 'layout_item' => '{__CONTENT__}', |
这样的话就是进行了全配置但是如果我们有些页面不想这样配置的话我们需要在这样的页面上写上
|
1
|
{__NOLAYOUT__} |
如果我们模板文件中的静态文件路径想要不写死的话,我们可以在 php 文件中的 fecth 前设置字符替换
|
1
|
$this->view->replace(['__PUBLIC__' => '/static',]); |
如果我们想每个方法都使用这个操作,我们就把上面这段代码放到 控制器的构造函数里面
|
1
2
3
4
|
function __construct(){ parent::__construct(); $this->view->replace(['__PUBLIC__' => '/static',]); } |