一、HDR简介
HDR(High Dynamic Range,高动态范围)是一种图像后处理技术,是一种表达超过了显示器所能表现的亮度范围的图像映射技术。高动态范围技术能够很好地再现现实生活中丰富的亮度级别,产生逼真的效果。HDR已成为目前游戏应用不可或缺的一部分。通常,显示器能够显示R、G、B分量在[0,255]之间的像素值。而256个不同的亮度级别显然不能表示自然界中光线的亮度情况。比如,太阳的亮度可能是一个白炽灯亮度的几千倍,是一个被白炽灯照亮的桌面的亮度的几十万倍,这远远超出了显示器的亮度表示能力。如何在有限的亮度范围内显示如此宽广的亮度范围,正是HDR技术所要解决的问题。
将一个宽广的亮度范围映射到纸张或屏幕能表示的亮度范围类似于照相机的曝光功能。人眼也有类似的功能。通过照相机的光圈,可以控制进入感光器的光线数量,感光器得到的明暗程度经过一定的处理,就可以得到令人信服的照片。照相机是一个典型的从高动态范围映射到低动态范围的例子。如果我们能够在一定程度上模拟照相机的工作原理,就可以在屏幕上显示高动态范围的图像。对于人眼或镜头,过亮的光线射入时会产生光晕效果,这一点也可以通过一些方法模拟。动态曝光控制和光晕效果结合起来,就构成了一个经典的高动态范围渲染器。
二、HDR Lighting
光线在真实世界中有一个介于最高和最低亮度的很高的比值;在我们生活中从太阳到星光的可见光,被称为动态范围的比值大约是1012:1;可是,人类视觉系统只能适应部分暴光在1000:1左右的动态范围。为了看到高动态范围内的光线传播,人类视觉系统会自动调整暴光光线,在进入的光线强度中选择一个小范围亮度,这个过程不是瞬间的,就像你进入一个阳光下的黑暗建筑中所注意到的,反之亦然。这种对光适应性延迟的暴光调整,能被应用程序实时模拟。
计算机显示和打印媒体的动态范围在100:1,所以要在高动态范围下显示场景我们不得不去找折衷的办法;该范例展示了在摄影术中称为色调映射的原开发技术,它描述了一个映射HDR图像到低动态范围空间的方法。色调映射有效地产生出与发生在人类视觉系统上的自动暴光控制同样的效果。
最后,当一个亮光冲击镜头,必然会出现不自然的情况,包括如图片中的光晕和星光现象。如果在渲染过程中高强光值没有被丢弃,这些现象能在场景以真实级别进行渲染的图像上产生。由于这是一个快速处理的效果,所需时间取决于显示它们所唯一依赖的屏幕分辨率,而不是场景或光照复杂度。
三、原理

如上图所示,可以分为几个步骤:
1.将场景渲染成浮点型纹理;
2.缩放到1/4大小;
3.计算亮度;
4.截取高亮区域;
5.Bloom效果;
6.Star效果;
7.最终纹理应用Tone mapping。
计算亮度
这里介绍Direct9 SDK中介绍的方法:
对于一个像素P(r,g,b),计算像素的亮度Lum
Lum(P) = 0.2125*r + 0.7154*g + 0.0721*b
计算图像平均亮度

上式中,δ=0.0001是一个较小的常数,用于防止求对数的计算结果趋于负无穷的情况。对于原始图像每个像素,计算出该像素的亮度值Lum(x,y),然后求出该亮度值的自然对数。接着对所有像素亮度值的对数求平均值,再求平均值的自然指数值。
则对于原始图像中任意一像素点Lum(x,y),有如下映射关系:
α为一个常数,决定了映射后场景的整体明暗程度,可以根据需要适当调整 ,这个值在以后的实现中称为Key值。最终需要将该值映射到[0,1]上
Bloom效果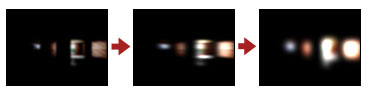
模糊效果的算法就比较多了,这里采取里比较简单的模糊效果-Gaussian Filter(高斯模糊)。简单来说,就是在多次采样后,利用高斯分布计算各点权重,再将各点按照权重进行合成。
这个思想也很好理解,公式如下:

不难发现,σ一定时,μ为标准位置时,采样点离标准位置越近,则权重越高。
例中用了2个pass分别进行了横向处理和纵向处理。效果如下图所示:
Star效果
Star效果可能需要对每个星光光线至少三次以上的渲染。该效果在这个例子中使用了八个光线,结果可能花费了24次处理来渲染(实际上处理了4条光线,共12次渲染)。GlareDefD3D.cpp文件定义了不同星光类型的特征,包括光线数目,光线方向,和色彩偏移。如上图所示,一次渲染单独方向的光线,通过四个单独方向光线纹理的平均值求得最终的合成星光纹理。
四、代码实现
首先要明白渲染到纹理(RTT)的思想。简单说,就是将纹理的surface当做RenderTarget进行渲染。详细介绍:http://www.cnblogs.com/graphics/archive/2011/04/23/2024294.html
接下来看看Sample使用的主要的Texture。
PDIRECT3DTEXTURE9 m_pTexScene;            // HDR render target containing the scene
    //保持整个场景的FP Texture格式是D3DFMT_A16B16G16R16F这样保存的颜色值就可以突破0-1的限制
PDIRECT3DTEXTURE9 m_pTexSceneScaled;      // Scaled copy of the HDR scene
    //一个上面m_pTexScene的缩小到1/4的FP Texture格式和m_pTexScene一样,这个是我们后面的一些post-process的来源
PDIRECT3DTEXTURE9 m_pTexBrightPass;       // Bright-pass filtered copy of the scene
    //保存了m_pTexScene通过Bright-Pass Filter后的,只剩下了亮度高的部分。因为这个Texture不需要去做一些HDR相关的操作,所以格式32bit贴图就行了。这个是后面我们做Bloom,Star的来源。
PDIRECT3DTEXTURE9 m_pTexAdaptedLuminanceCur;  // The luminance that the user is currenly adapted to
    //当前适合的亮度值,我们为了模拟出眼睛对于光的适应过程,采用的两个亮度值之一。格式是D3DFMT_R16F,大小是1x1
PDIRECT3DTEXTURE9 m_pTexAdaptedLuminanceLast; // The luminance that the user is currenly adapted to
    //和上面的那个一样,我们通过交换这两个贴图来作出对于光的适应过程
PDIRECT3DTEXTURE9 m_pTexStarSource;       // Star effect source texture
    //做Star的来源,格式是D3DFMT_A8R8G8B8
PDIRECT3DTEXTURE9 m_pTexBloomSource;      // Bloom effect source texture
    //做Bloom的来源,格式是D3DFMT_A8R8G8B8
PDIRECT3DTEXTURE9 m_apTexBloom[NUM_BLOOM_TEXTURES];     // Blooming effect working textures
    //Bloom效果用的系列贴图,格式是D3DFMT_A8R8G8B8,这里一共3张
PDIRECT3DTEXTURE9 m_apTexStar[NUM_STAR_TEXTURES];       // Star effect working textures
    //Star效果用的系列贴图,格式是D3DFMT_A8R8G8B8,这里一共12张
PDIRECT3DTEXTURE9 m_apTexToneMap[NUM_TONEMAP_TEXTURES]; // Log average luminance samples
//计算场景的亮度值用的系列贴图,格式是D3DFMT_R16F,在这里大小为1X1,4X4,16X16,64X64,一共4张
在OnFrameRender()中可以看到整个渲染流程如下:
RenderScene();     // Render the HDR Scene
Scene_To_SceneScaled();    // Create a scaled copy of the scene
MeasureLuminance();     // Setup tone mapping technique
CalculateAdaptation();    // Calculate the current luminance adaptation level
SceneScaled_To_BrightPass();   // Now that luminance information has been gathered, the scene can be bright-pass filtered to remove everything except bright lights and reflections.
BrightPass_To_StarSource();    // Blur the bright-pass filtered image to create the source texture for the star effect.
StarSource_To_BloomSource();    // Scale-down the source texture for the star effect to create the source texture for the bloom effect.
RenderBloom();    //Render post-process lighting effects
RenderStar();
g_pEffect->SetTechnique( "FinalScenePass" );
下面就顺着流程看。
RenderScene()里面就不用看了,主要是把场景渲染出来并保存。但需注意在OnFrameRender()中有:
g_pTexScene->GetSurfaceLevel( 0, &pSurfHDR );
g_pd3dDevice->SetRenderTarget( 0, g_pFloatMSRT );
RenderScene();
g_pd3dDevice->StretchRect( g_pFloatMSRT, NULL, pSurfHDR, NULL, D3DTEXF_NONE );
很明显,这里将场景都渲染到了g_pFloatMSRT,并复制到了g_pTexScene的surface中。
Scene_To_SceneScaled()
hr = g_pTexSceneScaled->GetSurfaceLevel( 0, &pSurfScaledScene );
GetSampleOffsets_DownScale4x4( pBackBufferDesc->Width, pBackBufferDesc->Height, avSampleOffsets );
g_pEffect->SetValue( "g_avSampleOffsets", avSampleOffsets, sizeof( avSampleOffsets ) );
g_pd3dDevice->SetRenderTarget( 0, pSurfScaledScene );
g_pd3dDevice->SetTexture( 0, g_pTexScene );
这个函数主要从g_pTexScene采样,渲染到1/4X1/4大小的g_pTexSceneScaled的surface中。GetSampleOffsets_DownScale4x4函数生成4*4偏移向量组。Shader中,根据偏移向量组在采样点附近采16个点,并求平均。
MeasureLuminance()
这个函数主要就是计算亮度。
首先对缩放后的场景纹理进行3X3采样,再次缩小到64X64大小,计算并输出平均对数亮度。
hr = g_apTexToneMap[i]->GetSurfaceLevel( 0, &apSurfToneMap[i] );    //获取每个g_apTexToneMap的surface
g_pd3dDevice->SetRenderTarget( 0, apSurfToneMap[dwCurTexture] );    //将渲染目标设为g_apTexToneMap[3]的surface
g_pd3dDevice->SetTexture( 0, g_pTexSceneScaled );            //从缩小的场景纹理中采样
下面是Shader code,主要就是将9次采样点的亮度取对数进行平均。
float4 SampleLumInitial(in float2 vScreenPosition : TEXCOORD0) : COLOR
{
    float3 vSample = 0.0f;
    float  fLogLumSum = 0.0f;

    for(int iSample = 0; iSample < 9; iSample++)
    {
        // Compute the sum of log(luminance) throughout the sample points
        vSample = tex2D(s0, vScreenPosition+g_avSampleOffsets[iSample]);
        fLogLumSum += log(dot(vSample, LUMINANCE_VECTOR)+0.0001f);
    }

    // Divide the sum to complete the average
    fLogLumSum /= 9;

    return float4(fLogLumSum, fLogLumSum, fLogLumSum, 1.0f);
}
接下来再分别缩小到16X16、4X4、1X1,计算最终的Lumaverage。
while(dwCurTexture > 0)
{
    g_apTexToneMap[dwCurTexture + 1]->GetLevelDesc( 0, &desc );
        GetSampleOffsets_DownScale4x4( desc.Width, desc.Height, avSampleOffsets );
    g_pEffect->SetValue( "g_avSampleOffsets", avSampleOffsets, sizeof( avSampleOffsets ) );
        g_pd3dDevice->SetRenderTarget( 0, apSurfToneMap[dwCurTexture] );
        g_pd3dDevice->SetTexture( 0, g_apTexToneMap[dwCurTexture + 1] );    //从上一次渲染的纹理中采样
    dwCurTexture--;
}
g_apTexToneMap[1]->GetLevelDesc( 0, &desc );
GetSampleOffsets_DownScale4x4( desc.Width, desc.Height, avSampleOffsets );
g_pd3dDevice->SetRenderTarget( 0, apSurfToneMap[0] );        //最终得到1*1的texture
g_pd3dDevice->SetTexture( 0, g_apTexToneMap[1] );
这里的两段段Shader code与上一段类似,不同处在于,采样纹理是上个Shader的输出,即亮度对数。因此不需要再求对数,直接平均即可。
最后利用exp()函数求出场景的平均亮度并存放在m_apTexToneMap[0]这个1X1的贴图里面。
CalculateAdaptation()
当我们的眼睛遇到强光时,并不是一下子就能适应,而是有个渐进的过程。这个函数主要就是完成这么一个过程。
//交换当前帧和上一帧的亮度
PDIRECT3DTEXTURE9 pTexSwap = g_pTexAdaptedLuminanceLast;
g_pTexAdaptedLuminanceLast = g_pTexAdaptedLuminanceCur;
g_pTexAdaptedLuminanceCur = pTexSwap;

//利用上一帧的亮度,目标亮度,以及时间来计算当前帧亮度
g_pTexAdaptedLuminanceCur->GetSurfaceLevel( 0, &pSurfAdaptedLum );
g_pEffect->SetFloat( "g_fElapsedTime", DXUTGetElapsedTime() );
g_pd3dDevice->SetRenderTarget( 0, pSurfAdaptedLum );
g_pd3dDevice->SetTexture( 0, g_pTexAdaptedLuminanceLast );
g_pd3dDevice->SetTexture( 1, g_apTexToneMap[0] );
Shader Code
float4 CalculateAdaptedLumPS(in float2 vScreenPosition : TEXCOORD0) : COLOR
{
    float fAdaptedLum = tex2D(s0, float2(0.5f, 0.5f));
    float fCurrentLum = tex2D(s1, float2(0.5f, 0.5f));

    // The user's adapted luminance level is simulated by closing the gap between
    // adapted luminance and current luminance by 2% every frame, based on a
    // 30 fps rate. This is not an accurate model of human adaptation, which can
    // take longer than half an hour.
    float fNewAdaptation = fAdaptedLum + (fCurrentLum - fAdaptedLum) * ( 1 - pow( 0.98f, 30 * g_fElapsedTime ) );
    return float4(fNewAdaptation, fNewAdaptation, fNewAdaptation, 1.0f);
}
fAdaptedLum表示目标亮度值,fCurrentLum表示当前亮度值。通过每一帧更新fCurrentLum和g_fElapsedTime ,来使当前亮度值随时间不断逼近目标亮度值,从而实现两个亮度之间过渡的过程。
SceneScaled_To_BrightPass()
在渲染Star和Bloom效果之前,首先需要将场景中特别亮的像素提取出来。这里设置了一个Bright-pass filter,这也正是这个函数的功能。
g_pTexBrightPass->GetSurfaceLevel( 0, &pSurfBrightPass );
// Get the correct texture coordinates to apply to the rendered quad in order
// to sample from the source rectangle and render into the destination rectangle
GetTextureCoords( g_pTexSceneScaled, &rectSrc, g_pTexBrightPass, &rectDest, &coords );
g_pd3dDevice->SetRenderTarget( 0, pSurfBrightPass );
g_pd3dDevice->SetTexture( 0, g_pTexSceneScaled );
g_pd3dDevice->SetTexture( 1, g_pTexAdaptedLuminanceCur );
g_pd3dDevice->SetRenderState( D3DRS_SCISSORTESTENABLE, TRUE );
g_pd3dDevice->SetScissorRect( &rectDest );
这里有点不是太明白。g_pTexBrightPass创建的时候,width和height都+2,计算coords时,rectSrc和rectDest进行了InflateRect( ..., -1, -1 ),渲染完之后又SetScissorRect( &rectDest )。通过注释,大概明白这样做是为了裁剪黑边。但是黑边是如何产生的,以及这样做带来的实际效果就不得而知了(去掉SetScissorRect,结果看不出来有什么区别)。
Shader Code中,在乘上一个α(即Key value)之后,设置了一个门限,截掉了亮度小于这个门限的亮度值,最后映射到[0,1]上。其中设置了BRIGHT_PASS_OFFSET,这个值越大,光源附近强光进行bloom和star的范围越小,也就是注释所说的更独立吧。
float4 BrightPassFilterPS(in float2 vScreenPosition : TEXCOORD0) : COLOR
{
    float4 vSample = tex2D( s0, vScreenPosition );
    float  fAdaptedLum = tex2D( s1, float2(0.5f, 0.5f) );

    // Determine what the pixel's value will be after tone-mapping occurs
    vSample.rgb *= g_fMiddleGray/(fAdaptedLum + 0.001f);    //g_fMiddleGray is the KayValue

    // Subtract out dark pixels
    vSample.rgb -= BRIGHT_PASS_THRESHOLD;        //5.0f Threshold for BrightPass filter

    // Clamp to 0
    vSample = max(vSample, 0.0f);

    // Map the resulting value into the 0 to 1 range. Higher values for
    // BRIGHT_PASS_OFFSET will isolate lights from illuminated scene
    // objects.
    vSample.rgb /= (BRIGHT_PASS_OFFSET+vSample);    //10.0f isolate lights

    return vSample;
}
BrightPass_To_StarSource()
为了避免混叠效应,在做Star效果之前需要对提取之后的纹理做了一个5X5的高斯模糊。
g_pTexStarSource->GetSurfaceLevel( 0, &pSurfStarSource );
GetSampleOffsets_GaussBlur5x5( desc.Width, desc.Height, avSampleOffsets, avSampleWeights );
g_pd3dDevice->SetRenderTarget( 0, pSurfStarSource );
g_pd3dDevice->SetTexture( 0, g_pTexBrightPass );
其中GetSampleOffsets_GaussBlur5x5即在计算模糊时需要用到的offsets和weights。
 for( int x = -2; x <= 2; x++ )
{
        for( int y = -2; y <= 2; y++ )
        {
            // Exclude pixels with a block distance greater than 2. This will
            // create a kernel which approximates a 5x5 kernel using only 13
            // sample points instead of 25; this is necessary since 2.0 shaders
            // only support 16 texture grabs.
             if( abs( x ) + abs( y ) > 2 )
                continue;

            // Get the unscaled Gaussian intensity for this offset
            avTexCoordOffset[index] = D3DXVECTOR2( x * tu, y * tv );
            avSampleWeight[index] = vWhite * GaussianDistribution( ( float )x, ( float )y, 1.0f );
            totalWeight += avSampleWeight[index].x;

            index++;
        }
}

    // Divide the current weight by the total weight of all the samples; Gaussian
    // blur kernels add to 1.0f to ensure that the intensity of the image isn't
    // changed when the blur occurs. An optional multiplier variable is used to
    // add or remove image intensity during the blur.
for( int i = 0; i < index; i++ )
{
        avSampleWeight[i] /= totalWeight;
        avSampleWeight[i] *= fMultiplier;
}
仅计算落在菱形区域内的offset和weight,weight就是以sqrt(x*x+y*y)为自变量的高斯函数值,即反应的是离中心越近,权值越大。
这里也有个地方不太明白,既然shader只支持同时抓取16次,为什么要用一个菱形去近似一个5x5的采样,为什么不直接用4x4的矩形?
Shader就很容易了,采样后按各点权重进行加成。
StarSource_To_BloomSource()
将上面得到的纹理进行1/2X1/2的缩放,作为Bloom的source。
g_pTexBloomSource->GetSurfaceLevel( 0, &pSurfBloomSource );
GetSampleOffsets_DownScale2x2( desc.Width, desc.Height, avSampleOffsets );
g_pd3dDevice->SetRenderTarget( 0, pSurfBloomSource );
g_pd3dDevice->SetTexture( 0, g_pTexStarSource );
RenderBloom()
下面就开始做Bloom效果
g_pTexSceneScaled->GetSurfaceLevel( 0, &pSurfScaledHDR );
g_pTexScene->GetSurfaceLevel( 0, &pSurfHDR );
g_apTexBloom[0]->GetSurfaceLevel( 0, &pSurfBloom );
g_apTexBloom[1]->GetSurfaceLevel( 0, &pSurfTempBloom );
g_apTexBloom[2]->GetSurfaceLevel( 0, &pSurfBloomSource );

g_pTexBloomSource->GetLevelDesc( 0, &desc );
GetSampleOffsets_GaussBlur5x5( desc.Width, desc.Height, avSampleOffsets, avSampleWeights, 1.0f );
g_pd3dDevice->SetRenderTarget( 0, pSurfBloomSource );
g_pd3dDevice->SetTexture( 0, g_pTexBloomSource );

g_apTexBloom[2]->GetLevelDesc( 0, &desc );
GetSampleOffsets_Bloom( desc.Width, afSampleOffsets, avSampleWeights, 3.0f, 2.0f );
for( i = 0; i < MAX_SAMPLES; i++ )
{
    avSampleOffsets[i] = D3DXVECTOR2( afSampleOffsets[i], 0.0f );
}
g_pd3dDevice->SetRenderTarget( 0, pSurfTempBloom );
g_pd3dDevice->SetTexture( 0, g_apTexBloom[2] );

g_apTexBloom[1]->GetLevelDesc( 0, &desc );
GetSampleOffsets_Bloom( desc.Height, afSampleOffsets, avSampleWeights, 3.0f, 2.0f );
for( i = 0; i < MAX_SAMPLES; i++ )
{
        avSampleOffsets[i] = D3DXVECTOR2( 0.0f, afSampleOffsets[i] );
}
g_pd3dDevice->SetRenderTarget( 0, pSurfBloom );
g_pd3dDevice->SetTexture( 0, g_apTexBloom[1] );
代码流程很清晰,首先对source进行一次5x5高斯模糊,然后分别对x方向和y方向进行高斯模糊,σ=3.0f,意味亮度值更分散,而不是仅仅集中在采样点中心。
RenderStar()
作为一个初学者,代码看到这里我已经有点小累了,对于这一部分Star效果原理里面的涉及一些复杂的公式就不再深究了,主要介绍一些效果产生的流程吧。
g_apTexStar[0]->GetSurfaceLevel( 0, &pSurfStar );
hr = g_apTexStar[i]->GetSurfaceLevel( 0, &apSurfStar[i] );    //for i
//两次线性差值,计算出对一条光线3次渲染,24次采样时权重矩阵
D3DXColorLerp( &chromaticAberrColor,
               &( CStarDef::GetChromaticAberrationColor( s ) ),
               &s_colorWhite,
               ratio );
D3DXColorLerp( ( D3DXCOLOR* )&( s_aaColor[p][s] ),
               &s_colorWhite, &chromaticAberrColor,
               g_GlareDef.m_fChromaticAberration );
radOffset = g_GlareDef.m_fStarInclination + starDef.m_fInclination;    //求偏转的角度
// Direction loop,渲染4条光线
for( d = 0; d < starDef.m_nStarLines; d ++ )
{
    CONST STARLINE& starLine = starDef.m_pStarLine[d];
    pTexSource = g_pTexStarSource;                //指向前面计算的纹理
    rad = radOffset + starLine.fInclination;        //求当前光线偏转的角度
    vtStepUV.x = sn / srcW * starLine.fSampleLength;    //根据角度和采样长度,求采样步长(距离间隔)
        vtStepUV.y = cs / srcH * starLine.fSampleLength;
    //每条光线渲染3次
    for( p = 0; p < starLine.nPasses; p ++ )
        {
        //确定RanderTarget,每循环三次,将最后的结果存在apSurfStar[d+4]中
        if( p == starLine.nPasses - 1 )
        {
            // Last pass move to other work buffer
            pSurfDest = apSurfStar[d + 4];
                }
                else
                {
                    pSurfDest = apSurfStar[iWorkTexture];
                }
        //每次采样8个点
        for( i = 0; i < nSamples; i ++ )
        {
            float lum;
            lum = powf( starLine.fAttenuation, attnPowScale * i );        //求衰减(应该有个公式,我也就不求甚解了)
            avSampleWeights[i] = s_aaColor[starLine.nPasses - 1 - p][i] *    //在前面的权重矩阵上面乘上衰减
            lum * ( p + 1.0f ) * 0.5f;
             // Offset of sampling coordinate
            avSampleOffsets[i].x = vtStepUV.x * i;        //求采样偏移矩阵
            avSampleOffsets[i].y = vtStepUV.y * i;
                }
        g_pd3dDevice->SetRenderTarget( 0, pSurfDest );
                g_pd3dDevice->SetTexture( 0, pTexSource );
        ...
        pTexSource = g_apTexStar[iWorkTexture];        //将这次渲染的结果作为下次的纹理
    }
}
pSurfDest = apSurfStar[0];
for( i = 0; i < starDef.m_nStarLines; i++ )
{
    g_pd3dDevice->SetTexture( i, g_apTexStar[i + 4] );
    avSampleWeights[i] = vWhite * 1.0f / ( FLOAT )starDef.m_nStarLines;
}
g_pd3dDevice->SetRenderTarget( 0, pSurfDest );    //将最终结果渲染到g_apTexStar[0];
Shader主要实现了Tone mapping,最后将Bloom和Star效果叠加上去。
float4 FinalScenePassPS(in float2 vScreenPosition : TEXCOORD0) : COLOR
{
    float4 vSample = tex2D(s0, vScreenPosition);
    float4 vBloom = tex2D(s1, vScreenPosition);
    float4 vStar = tex2D(s2, vScreenPosition);
    float fAdaptedLum = tex2D(s3, float2(0.5f, 0.5f));

    // For very low light conditions, the rods will dominate the perception
    // of light, and therefore color will be desaturated and shifted
    // towards blue.
    if( g_bEnableBlueShift )
    {
    // Define a linear blending from -1.5 to 2.6 (log scale) which
    // determines the lerp amount for blue shift
        float fBlueShiftCoefficient = 1.0f - (fAdaptedLum + 1.5)/4.1;
        fBlueShiftCoefficient = saturate(fBlueShiftCoefficient);

    // Lerp between current color and blue, desaturated copy
        float3 vRodColor = dot( (float3)vSample, LUMINANCE_VECTOR ) * BLUE_SHIFT_VECTOR;
        vSample.rgb = lerp( (float3)vSample, vRodColor, fBlueShiftCoefficient );
    }


    // Map the high range of color values into a range appropriate for
    // display, taking into account the user's adaptation level, and selected
    // values for for middle gray and white cutoff.
    if( g_bEnableToneMap )
    {
        vSample.rgb *= g_fMiddleGray/(fAdaptedLum + 0.001f);
        vSample.rgb /= (1.0f+vSample);
    }

    // Add the star and bloom post processing effects
    vSample += g_fStarScale * vStar;
    vSample += g_fBloomScale * vBloom;

    return vSample;
}
在进行Tone mapping之前,实现了蓝移(Blue shift)。在低光照条件下,需要进行蓝移,至于为什么就不深究了。下面一段话,可以简单解释一下:
The human eye is made up of two main types of photo receptors, rods and cones. As the luminance of an area being viewed decreases the rods shut down and all vision is done through the cones. Although this isn't exactly true since there are a small number of rods on at even very low luminance. When cones become the dominant photo receptors there is a very slight shift in colors to a more bluish range. This is due to the fact that there is only one type of cone which is optimal at absorbing blues while rods come in three types(red, green, blue). This shift is know as the Blue Shift. Not only is there a shift to a bluish range but also since there are fewer photons entering the eye there is more noise and there is a general loss of detail.
五、参考
推荐:
DirectX9 HDRLighting Sample
D3DBook:High-Dynamic Range Rendering:http://content.gpwiki.org/index.php/D3DBook:High-Dynamic_Range_Rendering
(写得还不错,在写完这篇笔记之后才看到,可以仔细研究下。如果上文有些什么分析得不好的地方,可以参考这篇)
翻译SDK:
HDR渲染器的实现(基于OpenGL):http://dev.gameres.com/Program/Visual/3D/HDRTutorial/HDRTutorial.htm
HDR光照示例:http://dev.gameres.com/Program/Visual/3D/HDRlight/HDRLight.htm
其他:
DX9 Update中的HDRLighting Sample分析(百度即可)