先贴一张 header 的 UI 图
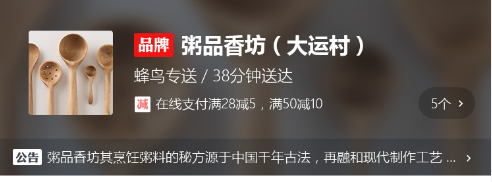
一、header 组件
1)传入 seller 数据
// App.vue
<template>
  <div id="app">
    <v-header :seller="seller"></v-header> <!--传入seller数据到header组件-->
    <!--省略部分已有内容-->
  </div>
</template>
2)header 组件接收 seller 属性
// header.vue
<script>
  export default {
    props: {
      seller: {
        type: Object
      }
    }
  };
</script>
3)拆分 header 组件
// header.vue
<template>
  <div class="header">
    <div class="content-wrapper">
      <div class="avatar"> <!--左侧商家头像-->
        <img width="64" height="64" :src="seller.avatar" alt="">
      </div>
      <div class="content">
        <div class="title"> <!--标题-->
          <span class="brand"></span>
          <span class="name">{{ seller.name }}</span>
        </div>
        <div class="description"> <!--描述-->
          {{ seller.description }}/{{ seller.deliveryTime }}分钟送达
        </div>
        <div v-if="seller.supports" class="support"> <!--支持的活动-->
          <span class="icon"></span> <!--满减 折扣 套餐 发票 保障等图标-->
          <span class="text">{{ seller.supports[0].description }}</span> <!--默认取第0个活动-->
        </div>
      </div>
      <div v-if="seller.supports" class="support-count"> <!--活动个数-->
        <span class="count">{{ seller.supports.length }}个</span>
        <span class="icon-keyboard_arrow_right"></span> <!--右箭头-->
      </div>
    </div>
    <div class="bulletin-wrapper"></div> <!--公告-->
  </div>
</template>
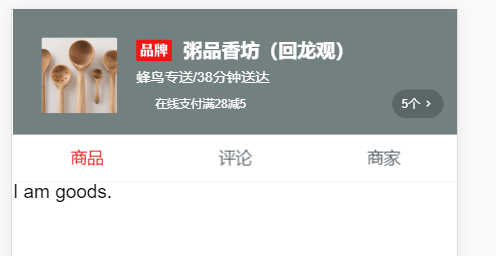
4)添加样式
// header.vue

<style lang="stylus" rel="stylesheet/stylus">
  @import '../../common/stylus/mixin.styl'; // 此处不可用alias省略

  .header
   background-color: #728080
     color: #fff
    .content-wrapper
      position: relative
      padding: 24px 12px 18px 24px
      font-size: 0
      .avatar
        display: inline-block
        vertical-align: top
        img
          border-radius: 2px
      .content
        display: inline-block
        margin-left 16px
        font-size: 14px
        .title
          margin: 2px 0 8px 0
          .brand
            display: inline-block
            vertical-align: top
             30px
            height: 18px
            bg-image('brand')
            background-size: 30px 18px
            background-repeat: no-repeat
          .name
            margin-left: 6px
            font-size: 16px
            line-height: 18px
            font-weight: bold
        .description
          margin-bottom: 10px
          line-height: 12px
          font-size: 12px;
        .support
          font-size: 0
          .icon
            display: inline-block
            vertical-align: top
             12px
            height: 12px
            margin-right: 4px
            background-size: 12px 12px
            background-repeat: no-repeat
          .text
            line-height: 12px
            font-size: 10px
      .support-count
        position: absolute
        right: 12px
        bottom: 14px
        padding: 0 8px
        height: 24px
        line-height: 24px
        border-radius: 14px
        background-color: rgba(0,0,0,0.2)
        text-align: center
        .count
          vertical-align: top
          font-size: 10px
        .icon-keyboard_arrow_right
          margin-left: 2px
          line-height: 24px
          font-size: 10px
</style>
效果图如下:
5)为满减 折扣等图标添加动态class
5.1 先添加相应class的样式
// header.vue
<style lang="stylus" rel="stylesheet/stylus">
  @import '../../common/stylus/mixin.styl'; // 此处不可用alias省略

  .header
    .content-wrapper
       // 省略已有样式
        .support
          font-size: 0
          .icon
            display: inline-block
            vertical-align: top
             12px
            height: 12px
            margin-right: 4px
            background-size: 12px 12px
            background-repeat: no-repeat
            // 以下为新增样式
            &.decrease // 满减
              bg-image('decrease_1')
            &.discount // 折扣
              bg-image('discount_1')
            &.guarantee // 保障
              bg-image('guarantee_1')
            &.invoice // 发票
              bg-image('invoice_1')
            &.special // 套餐
              bg-image('special_1')
</style>
5.2 在 html 元素上添加 class
// header.vue
<template>
  <div class="header">
    <div class="content-wrapper">
        <!-- 省略已有内容 -->
        <div v-if="seller.supports" class="support"> <!--支持的活动-->
          <span class="icon" :class="classMap[seller.supports[0].type]"></span><!--满减 折扣 套餐 发票 保障等图标-->
          <span class="text">{{ seller.supports[0].description }}</span> <!--默认取第0个活动-->
        </div>
      </div>
    <!-- 省略已有内容 -->
  </div>
</template>
可以看到,在span 元素上加了 :class="classMap[seller.supports[0].type]"
因为 type 是 0, 1, 2, 3, 4,见下图,如果要对应 5.1 中的 class,需进行一次 classMap。
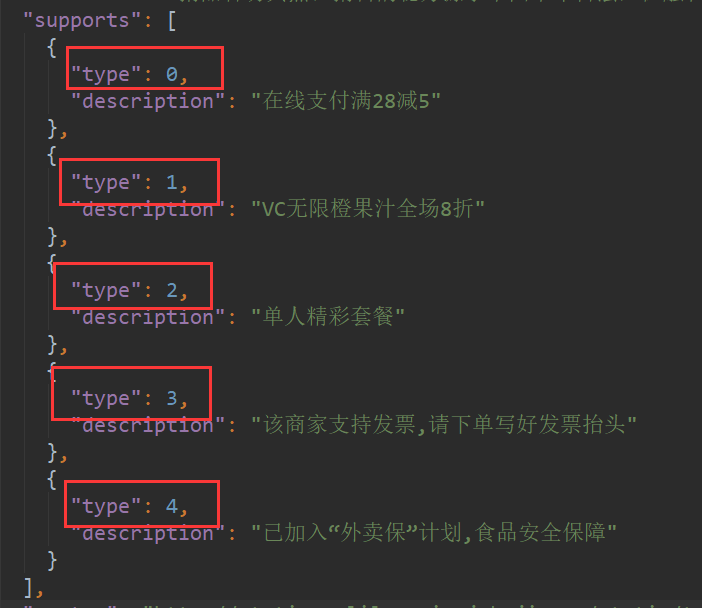
在 header 组件的 created 方法中,添加 classMap
// header.vue
<script>
  export default {
    props: {
      seller: {
        type: Object
      }
    },
    created() {
      this.classMap = ['decrease', 'discount', 'special', 'invoice', 'guarantee']; // 添加 classMap
    }
  };
</script>
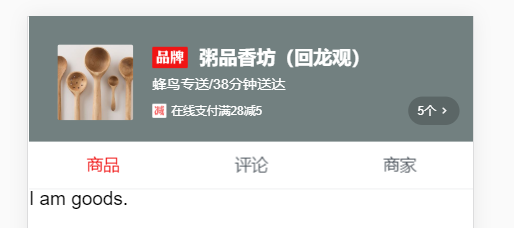
完成后的效果:
如果想在手机上访问,可以通过在控制台输入 ipconfig (windows系统) 来获取当前电脑的 IP
可以看到我当前的IP为192.168.1.107
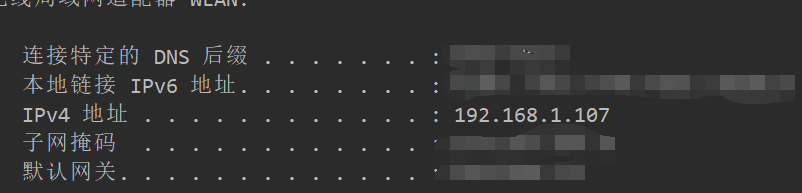
然后在手机上(确保在同一个局域网内)输入 192.168.1.107:8082,即可访问。
如果无法通过 IP 访问,解决方案可参考:https://www.cnblogs.com/wangyanhua95/p/7954019.html
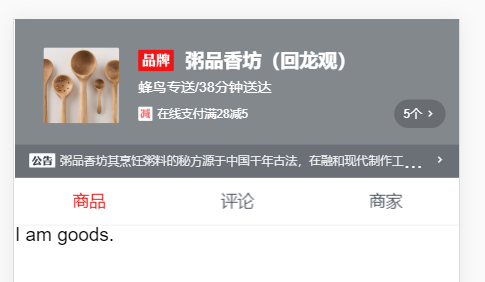
附一张手机截图:

二、公告+背景图
1)公告
// header.vue html代码
<template>
  <div class="header">
    <!--省略已有内容-->
    <div class="bulletin-wrapper"> <!--公告-->
      <span class="bulletin-title"></span><span class="bulletin-text">{{ seller.bulletin }}</span> <!--此处两个span没换行是为了去除多余的间隙-->
      <span class="icon-keyboard_arrow_right"></span> <!--右箭头-->
    </div>
  </div>
</template>
// header.vue css样式
.bulletin-wrapper
      position: relative
      height: 28px
      line-height: 28px
      padding: 0 22px 0 12px
      white-space: nowrap
      overflow: hidden
      text-overflow: ellipsis
      background-color: rgba(7, 17, 27, 0.2)
      .bulletin-title
        display: inline-block
        vertical-align: top
        margin-top: 7px
         22px
        height: 12px
        bg-image('bulletin')
        background-size: 22px 12px
        background-repeat: no-repeat
      .bulletin-text
        vertical-align: top
        margin: 0 4px
        font-size: 10px
        font-weight: 200
      .icon-keyboard_arrow_right
        position: absolute
        font-size: 10px
        right: 12px
        top: 8px
效果:
三、背景图
1)背景图
// header.vue html代码
<div class="header">
    <!--省略已有内容-->
    <div class="background">
      <img :src="seller.avatar" alt="" width="100%" height="100%">
    </div>
  </div>
// header.vue css 样式
.header
    position: relative
    color: #fff
    background-color: rgba(7, 17, 27, 0.5)
    // 省略已有内容
    .background
      position: absolute
      top: 0
      left: 0
       100%
      height: 100%
      z-index: -1
      filter: blur(10px) // 设置背景模糊
效果图:
