具体操作如下:
新建一个servlet,代码如下:标记一个WebServlet,
1 @WebServlet(urlPatterns = {"/checkCode"}) //验证码Servlet
绘制验证码图片的核心代码:
 1      int width = 100;
 2         int height = 50;
 3         //创建图片对象
 4         BufferedImage image = new BufferedImage(width, height, BufferedImage.TYPE_INT_RGB);
 5
 6         //美化图片
 7         Graphics g = image.getGraphics();
 8         //1:填充背景
 9         g.setColor(Color.pink);
10         g.fillRect(0, 0, width, height);
11
12         //画边框
13         g.setColor(Color.blue);
14         g.drawRect(0, 0, width - 1, height - 1);
15
16         //生成一个验证码字符串
17         String strCheckCode = "ABCDEFGHIJKLMNOPQRSTUVWXYZabcdefghijklmnopqrstuvwxyz0123456789";
18         Random random = new Random();
19         StrCheckCode = "";
20         for (int i = 1; i <= 4; i++) {
21             int index = random.nextInt(strCheckCode.length());
22             char ch = strCheckCode.charAt(index);
23             StrCheckCode += ch;//拼接验证码
24             g.drawString(ch + "", width / 5 * i, height / 2);
25         }
26
27         //画干扰线
28         for (int i = 0; i < 5; i++) {
29             int x1 = random.nextInt(width);
30             int x2 = random.nextInt(width);
31
32             int y1 = random.nextInt(height);
33             int y2 = random.nextInt(height);
34             g.drawLine(x1, x2, y1, y2);
35         }
36
37         //输出,显示出来
38         ImageIO.write(image, "jpg", resp.getOutputStream());
39     }
首先是new一个BufferedImage,然后给定长和宽,之后是指边框和背景色,接着使用随机数生成4个字符绘制在图片上,接着使用DrawLine绘随机制干扰线,
然后在前端页面引入图片,然后给图片绑定点击事件,点击后重新访问servlet即可:
1  //点击验证码图片,重新生成新验证
2         $(function () {
3             $("#imgCheckCode").click(function () {
4                 var img = document.getElementById("imgCheckCode");
5                 var date = new Date();
6                 img.src = "http://localhost:8080/blogs_war_exploded/checkCode?op=setCheckCode&a=" + date;
7             })
8         })
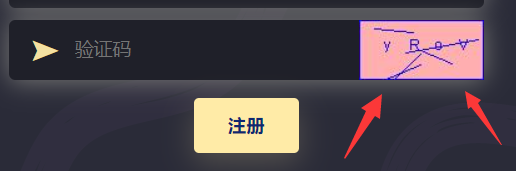
1 <div class="inputCheckCode"> 2 <div class="inputCheckCodeLeftIco">➤</div> 3 <div class="inputCheckCodeRightInput"> 4 <input type="text" name="checkCode" id="checkCode" placeholder="验证码" autocomplete="off"/> 5 </div> 6 <img src="http://localhost:8080/blogs_war_exploded/checkCode?op=setCheckCode" id="imgCheckCode"> 7 </div>
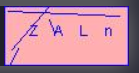
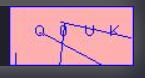
最后输出即可,效果如下: