在vue开发中,会涉及到很多接口的处理,当项目足够大时,就需要定义规范统一的接口,如何定义呢?
本文使用vue-cli生成的项目举例。
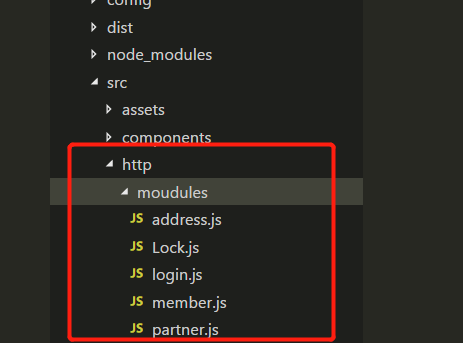
第一步.在src目录下新建一个文件夹http,在http目录下建文件夹moudules,后台提供的所有接口都在这里定义.
第二步.在moudules目录下划分模块新建js文件,比如:
a.会员中心模块: member.js
b.登录注册模块: login.js
c.合伙人模块: partner.js
目录大概是这个样子:
第三步,需要引入axios做相应的配置。
1.首先安装axios
npm install axios
2.在http目录下新建axios.js:
/* jshint esversion: 6 */

import axios from 'axios';
import Cookies from "js-cookie";
import config from './config';
import router from '@/router';
import { Toast} from 'vant';

export default function $axios(options) {
  return new Promise((resolve, reject) => {
    const instance = axios.create({
      baseURL: config.baseUrl,
      headers: config.headers,
      timeout: config.timeout,
      withCredentials: config.withCredentials,
    });

    // request 拦截器
    instance.interceptors.request.use(
      config => {
        //在发送之前做点什么
        let auth_token = Cookies.get('auth_token');
        if (auth_token) {
          config.headers.auth_token = auth_token;
        } else {
          let loginpage = Cookies.get('loginpage');
          if (loginpage) {
            router.push('/login');
          }
        }
        if (config.method === 'post') {}
        return config;
      },
      error => {
        // 判断请求超时
        if (error.code === 'ECONNABORTED' && error.message.indexOf('timeout') !== -1) {
          Toast("信号不好,请求超时")
        }
      }

    );

    // response 拦截器
    instance.interceptors.response.use(
      response => {
        //对响应数据做点什么
        let data;
        if (response.data == undefined) {
          data = JSON.parse(response.request.responseText);
        } else {
          data = response.data;
        }
        return data;
      },
      err => {
        if (err && err.response) {
          console.log(err)
        }// 返回接口返回的错误信息
        return Promise.reject(err);
      }
    );

    // 请求处理
    instance(options).then(res => {
      resolve(res);
      return false;
    }).catch(error => {
      reject(error);
    });
  });
}
3.在http目录下新建config.js:
export default {
  method: 'get',
  // 基础url前缀
  baseUrl: baseUrl,//请求的域名地址
  // 请求头信息
  headers: {
    'Content-Type': 'application/json;charset=UTF-8'
  },
  // 参数
  data: {},
  // 设置超时时间
  timeout: 10000,
  // 携带凭证
  withCredentials: false,
  // 返回数据类型
  responseType: 'json'
}
第四步,在http下面的js文件中引入api.js导出的函数,拿其中一个文件login.js说明:
1.api.js:
 /* jshint esversion: 6 */

import * as login from './moudules/login';
// 默认导出
export default {
    login,
}
2.login.js
import axios from '../axios'

/*
 * 系统登录模块
 */

// 登录
export const login = (data) => {
    return axios({
        url: '/app/api/v1/user/phonelogin',
        method: 'post',
        data
    });
};
第五步:将api挂载在 Vue 原型的 $api 对象上
1.在http文件下新建index.js文件:
import api from './api';

const install = Vue => {
    if (install.installed)
        return;
    install.installed = true;
    Object.defineProperties(Vue.prototype, {
        // 注意,此处挂载在 Vue 原型的 $api 对象上
        $api: {
            get() {
                return api
            }
        }
    });
};

export default install
2.在项目的main.js文件下导入api:
import api from './http';

Vue.use(api);
第六步步,在组件中使用接口,比如在登陆页面中使用login的接口:
        let loginInfo = {
          phone: this.field.phone,
          code: this.field.sms,
          cityname: this.field.city
        };
        this.$api.login.login(loginInfo).then(res => {
          if (res.ret == 0) {
            Cookies.set("auth_token", res.data.authToken);
              this.$toast.success({message:"登录成功",duration:2000});
            setTimeout(() => {
              this.loading = false;
              this.$router.go(-1);
            }, 2000);
          }
        })
最终http目录为:

以上方法定义接口虽然看起来麻烦点,但有却有其好处:
-
代码看起来规范,所有的接口都在一个文件夹定义,不用分散的各个组件,方便维护管理。
-
可以做到接口一次定义,多处使用。